Archive for ◊ 2013 ◊

01 Jun 2013 Lemon Ice Cream

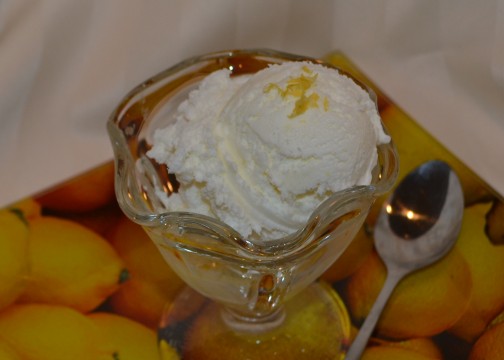
lemon ice cream closer

Bet you’ve never had Lemon Ice Cream!  Not lemon sorbet, or lemon sherbet, or lemon granita  or lemon frozen yogurt,  but lemon ice cream–creamy, rich, sweet, intense  lemon ice cream. Intrigued?  Tempted? I hope so, because I have a simple, oh-so-good recipe for you.  You do have an ice cream maker, right?  I use a “frozen bowl” ice cream maker, which seem to be everywhere for $40-$50 now, but sometimes you can get lucky.  This weekend my friend Sharon bought one at a garage sale for $5, and I saw one at  Savers for $12.99.

Homemade ice cream is very, very rich, and Lemon Ice Cream is no exception.  Serve small scoops (with an option for seconds, of course).  This recipe makes a quart of ice cream, richer and more filling than even the most premium commercial ice creams.  One quart of this ice cream will serve as many people as a half gallon of that store bought stuff.

I like to serve this ice cream on fruit pie, crisps and cobblers. My friend Sharon, whom I mentioned above, bought her ice cream maker after I fed her berry crisp with a scoop of this lemon ice cream.  This ice cream is also fantastic as a filling for an ice-cream sandwich.  To make a truly gourmet ice cream sandwich place a small scoop of Lemon Ice Cream between two ginger cookies, squish the sandwich a bit, square the filling up a bit, maybe roll the sides in a bit of chopped chocolate-milk, semi-sweet or white, then put the little bites of heaven in the freezer to firm up.   My pregnant daughter likes to eat  Lemon Ice Cream “as is” straight from a glass bowl with a long spoon.  She downed the sample above in one breath (at 9 o’clock in the morning one week before her due date!).

This recipe was first published in Gourmet magazine in 1999.  I’ve been making it since May 25, 2003.  Yes, I marked the date on my copy of the recipe, with this note, “Delicious and simple!”  “Simple” was written in caps and underlined twice!

Lemon Ice Cream

1 large lemon (zest plus 1/4 cup freshly squeezed lemon juice)

1 cup granulated sugar

1 cup cold milk (I usually only have 2% at home, so that’s what I use)

1 cup well chilled heavy cream


With a vegetable peeler or microplane remove the zest from the lemon, do NOT include any of that bitter white pith in with the zest.  Put the sugar and the lemon peel in a food processor or blender and whirl until the sugar is finely ground and the lemon zest has been incorporated into the sugar. Add in the milk and the cream (On occasion, I have used 2 cups half-and-half instead of the milk and cream mixture).  Blend just to combine.  Stir in 1/4 cup freshly squeezed lemon juice.  Process in ice cream maker for about 20 minutes.  Place soft ice cream in a freezer safe bowl, and set in freezer to harden up a bit (a few hours).  Ice Cream will keep at least a week, if not more, in the freezer but I doubt you will have to test the outer limits.

Thanks for stopping by my kitchen today!  Looks like the next few days are going to be scorchers.  Stay cool. Squeeze lemons. Make ice cream. By the way, I think the picture above is one of the best so far for this blog.  My webmaster, Ratty, fixed it up real nice, didn’t she?

06 Mar 2013 White Mint Dark Chocolate Layer Cake

chocmintcake

I know, I know, this is a horrible picture.  Don’t let that put you off though.  This is a delicious cake, one of my best!  The reason this picture is so bad, well, aside from me not being a talented photographer, is that everyone ate the cake!  This is the one piece  that was left, and it was left out all night.  It looks like it, too, doesn’t it? Poor cake.  I really should bake this cake again just to get a better picture of it.  Problem with that is, folks are hollering for the recipe! I served the cake at my Dining For Women meeting and had several requests for the recipe.  I told everyone it was on my website, but this morning  I was shocked to find I hadn’t posted it.  Ever. Oops. What have I been doing with my time?

So here is the recipe, finally!  I found the original  recipe on epicurious.com the year that my twins graduated from high school, in 2009, I believe.  I made it for their high school graduation.  See how good this cake is?  I know exactly when I first tasted it! (I was pretty impressed with myself!)

The only thing I changed was making two layers instead of three (I think three layer cakes are pretentious–and who has three matching layer cake pans anyway?).  Don’t change anything else!  Use peppermint extract, not mint.  AND, one more warning:  stick to the Lindt Mint Chocolate bar, or something very similar. My daughter made this cake one year with Ghirardelli Mint Squares (the ones with the liquid-y centers).  Not a good idea. She made the cake for my birthday cake.  The top layer kept sliding off the bottom layer.  Yes, more than once. The cook took it very hard.  I think there were tears.

There shouldn’t be tears served with this cake.

This cake can be dressed up a bit for Christmas.  Andes has Candy Cane mints now.  Those and a few candy canes or peppermints can adorn the sides/top of the cake or the cake platter. Hershey’s Candy Cane Kisses can be melted for the top of each layer, if you want, but they don’t taste nearly as good as the melted Lindt Mint chocolate bar…, and they don’t have the delightful thin crunch that comes from the melted Lindt bar.

Chocolate Mint Layer Cake

For Cake and Chocolate Mint Topping

1 ¾ c. flour
¾ c. unsweetened cocoa powder (use Hershey’s Special Dark)
1 ¼ tsp. baking soda
½ tsp. baking powder
¾ tsp. salt
2 c. sugar
¾ c. butter, at room temperature (1 ½ sticks)
3 eggs
4 tsp. vanilla
1 ½ c. buttermilk
1 large Lindt Mint Chocolate Bar, chopped

Preheat oven to 350 degrees. Butter and flour three 9-inch diameter cake pans. Line bottom of pans with parchment paper. Sift together flour, cocoa powder, baking soda, baking powder, and salt. In another bowl beat sugar and butter together until light and fluffy, at least 5 minutes. Add eggs, one at a time, beating well after each addition. Mix in vanilla. Beat for another 5 minutes. Add dry ingredients alternately with buttermilk in 3 additions each, beating just until blended. Divide batter equally between the three cake pans (a generous 2 cups of batter in each pan). Bake in preheated oven for about 25 minutes, or until cake springs back to touch. Remove cake and sprinkle chopped Lindt Mint Chocolate over tops of each layer. When chocolate melts, spread gently evenly across tops. Let cool in pans for 15 minutes then remove to racks to cool completely. Remove parchment paper.

For Creamy Minty Frosting

1 ½ 1-lb. boxes powdered sugar
½ c. butter, at room temperature
2 tsp. peppermint extract (not mint extract, peppermint extract)
¼ c. milk or cream, approximately
1 box Andes Mints, unwrapped and chopped

Combine powdered sugar, butter, extract, and milk/cream in a mixing bowl. Beat until light and fluffy, adding more milk or cream, 1 tsp. at a time, if needed to bring mixture to spreading consistency. Place approximately 1/5th of frosting on top of each layer cake. Carefully smooth frosting on top of mint chocolate covered cake layers. Place frosted layers on top of each other on a serving plate. Use remaining 2/5ths of frosting to carefully frost sides of cake. Sprinkle chopped mints on tops and sides of cake. Let sit for an hour or two before serving.

Thanks for stopping by my kitchen today!  If you like what you read, sign up.  You’ll get a three line email letting you know when I post another recipe.  I won’t use your email address for anything else, ever, I promise!


23 Feb 2013 Cold Brewed Iced Coffee (for the Yummiest Iced Lattes)

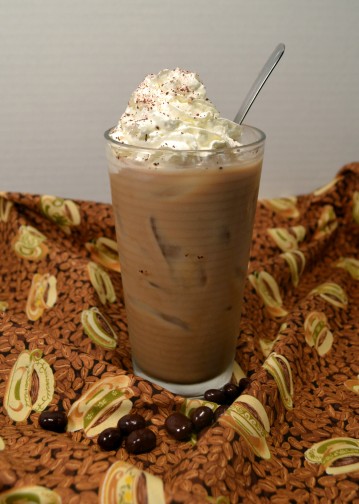
Iced Coffee with Whip

I like coffee.  I loooooove coffee.  Not that hot, black and bitter brewed coffee, but that expensive stuff brewed by the tablespoonful and mixed with steamed and foamed milk.  I have lived with an espresso machine since my ex-husband moved out.  It was a good switch. I am on my fourth one now (fourth espresso machine, not fourth ex-husband!).  Three had to be  retired (again, the three espresso machines not ex-husbands) and one  was fired for making terrible, horrible, no good, very bad lattes.  In addition to hot lattes, from spring through fall I really, really enjoy an Iced Latte in the afternoon, and, for Iced Lattes, with this recipe  no espresso machine is  required! Is there dancing in the aisles?

To make the Cold Brewed Iced Latte base, just get 12 oz of good quality coarse ground coffee beans, 7 cups of water, and a bowl that can be covered.  Are Toffee Nut Iced Coffee’s your little bit of heaven?  Not a problem. Vanilla Iced Coffee’s?  Easy peasy…

My friends and I are loading up my Minnie Winnie (small RV) and heading off to Palm Springs for the Camel & Ostrich Races and the Blessing of the Dates.  (Nooooo, I don’t know why we thought that would be a good idea!!! And no, I am not making this up, both are real events, held yearly, in Palm Springs and, from what I understand, in Arizona, too).  It’s become a tradition for us to load Iced Coffee Base (decaf)  into the Minnie Winnie when we head out.  Iced Lattes every afternoon while touring the US, what a nice way to live!  Don’t be jealous…raise your hand! You can come on the next trip!

Cold Brewed Iced Coffee Concentrate

  • 7 cups water (you could go gourmet and use bottled water…)
  • 12 oz. favorite rich coffee (coarse  or drip grind, decaf or regular)
  1. Pour the entire 12 oz of coffee into a bowl that can be covered (with a lid…or a plate)
  2. Pour the water over the coffee. Stir to make sure all grounds are saturated with water. Cover the bowl.
  3. Let the coffee and water sit, covered and undisturbed, for 24 hours.
  4. Now comes the messy part.  Strain the coffee.  I put a coffee filter in a mesh strainer, balance it on top of a pitcher, and pour cups of the mixture through the filter. The Iced Coffee base collects in the pitcher and  I throw the used coffee grinds away as I go.  You might need to use two coffee filters.  The decanting takes awhile, but it’s definitely worthwhile–messy but easy.
  5. Once all the coffee concentrate has been filtered, put a lid on the pitcher, and store it in the refrigerator for up to three weeks. (Handy Tip: write dates on the container with an erasable marker.  For example:  Made 2/13/13. Good until 3/6/13.  When the container is empty, wash the dates off!  I mark all my plastic containers with erasable markers now.  It’s so handy.)

Iced Latte

  • ¼ cup* of Cold Brewed Iced Coffee Concentrate (above)
  • ¾ cup of milk (If you want, you could experiment with the milk.  I use 1 or 2%, but I have heard of others using coconut milk, almond milk, chocolate milk, and of course soy milk. Some even like evaporated milk with a splash of sweetened condensed milk).
  • 4 or 5 ice cubes
  • Optional: sugar (white or raw), Splenda, Torano Syrup (Vanilla and Toffee Nut are favorites), Bailey’s Irish Creme, Kahlua, 1-3 Tablespoons chocolate syrup, Sprinkles (Trader Joe’s has a “Sugar, Chocolate, Coffee Bean Grinder” that’s fun), a chocolate covered espresso bean or mini chocolate chips…
  • whipped cream and a straw (I think these are musts, but some people are a bit more serious and go without!)
  1. Pour the concentrate into the glass.
  2. Add the milk and stir.
  3. Stir in any optional ingredients (sweetener or syrups)  Stir well.
  4. Plop  in some ice cubes. Stir again.
  5. Top with whipped cream, and sprinkles if you’d like (sprinkles, grated chocolate, a dusting of cocoa powder or cinnamon, or even a squirt of chocolate or caramel syrup), and, of course, a straw.

* ¼ cup of concentrate plus ¾ cup of milk seems to please most of my friends (A LOT!), but I do have one friend who doubles the coffee.  She has ½ cup concentrate and ¾ cup of milk. She’s German.  She likes strong coffee.

Thanks for stopping by my kitchen today!  You have in your hands one my favorite recipes. I hope you’ll be enjoying warm weather and iced lattes very soon!

P.S  If you’d like to get an email notifying you of the next recipe I post, please enter your email address in the box to the left. Don’t worry!  I won’t abuse your email address (I don’t know how to, for starters…) or use it for anything other than an occasional, short email notification of a new posted recipe.

11 Feb 2013 Crunchy Oat Clusters / Granola Bars

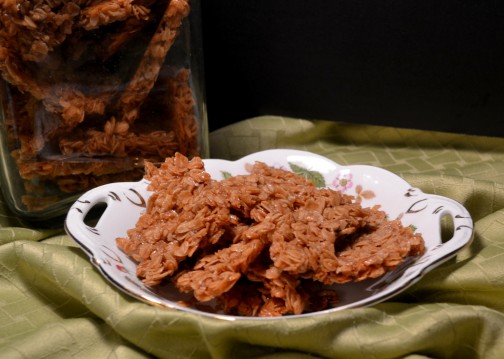
oat clusters

Sometimes, I don’t want to cook in the morning.  Sometimes I don’t even want to make toast.  I just want a lovely latte (I am always willing to make a latte) and  something on the side, while I casually drink my coffee and read the newspaper in my recliner. Sometimes that “something on the side” is a graham cracker, sometimes a cookie, sometimes  it’s something even more sinful. For a couple of years now, I’ve been thinking I should figure out a breakfast that works with my morning routine. You are probably thinking, fruit, eat fruit! No. Apples and oranges, pears and bananas do NOT go with coffee.  Dried fruit does, but that causes me to…ummm…make rude noises on a frequent basis, so dried fruit is out, too.  Last year I made a lot of granola.  I like granola.  I made some good ones, but eating granola  while balancing coffee and a newspaper is  inconvenient and messy.  I couldn’t get my granola to clump, and I needed clumps, big clumps, clumps like the size of a graham cracker.  Paring it down even more: I. want. crunchy. oat. clumps.  Now there’s a challenge!  Try running “Crunchy Oat Clumps” through a search engine and see what you get.  Not encouraging.

So! I have figured it out myself!  It took a couple of tries, and I pared down a lot of recipes, to get just want I wanted. And, tada! I have them now! Sweet, crunchy oat clumps, sort of like a Nature’s Valley Granola Bar.  My oats are tossed with a bit of butter, a bit of oil, some honey and some corn syrup, all necessary to get the large, crisp clumps and I added in some vanilla and a bit of cinnamon, too, so these oat clumps taste GOOD! They have none of those nasty additives, no preservatives and none of the excessive packaging that processed granola bars have. Score!

Crunchy Oat Clusters

  • 4 cups Old-fashioned oats
  • ½ cup light brown sugar
  • ½ teaspoon cinnamon
  • ¼ teaspoon Kosher salt
  • ¼ cup honey
  • ¼ cup corn syrup
  • ¼ cup butter
  • ¼ cup canola oil (or coconut oil, or vegetable oil)
  • 1 tablespoon vanilla extract
  1. In a large bowl combine oats, brown sugar, cinnamon and salt.  Stir to combine.
  2. In a small sauce pan combine honey, corn syrup, butter and oil.  Bring to a boil.  Reduce heat and simmer for 5 minutes.
  3. While sauce is simmering, line a baking tray with parchment paper.
  4. Remove sauce from heat and pour over the oat mixture.
  5. Pour oat mixture onto a parchment lined baking pan.
  6. With spatula or offset knife, spread oat mixture to an even thickness, and press down slightly.
  7. Place tray into preheated 300° oven and bake for 25 minutes.
  8. Open and turn off oven.  Let oats stay in oven for another hour or so, or until oats and oven are cool.
  9. Remove oats from oven and when completely cool break into pieces.
  10. Store in an airtight container.
  11. Eat whenever.  My son snacks on them after swim practice.  I like them in the morning, with a latte while I read the newspaper, in my recliner 🙂

In am sure these Crunchy Oat Clusters can be gussied up a bit.  You could add some coconut, chopped nuts, dried fruit…, make them yours!  You could probably also substitute real maple syrup for the honey, if you wanted.  You have to keep the corn syrup though (don’t worry too much, the corn syrup you buy at the store is not high fructose corn syrup). As for me, I like them just like this.  Simple, slightly sweet, very crunchy, and full of those good-for-you breakfast oats.

Thanks for stopping by my kitchen today and have a wonderful morning!