Archive for the Category ◊ Pizza and Tarts ◊

20 Oct 2010 Cupcake Tin Turkey Pies

I’ve posted this recipe before, on my Polly, Julie, and Julia Facebook page.  I think this is one of my Top Ten Posted Recipes 🙂

When asked what his favorite kind of pie is, my son always answers, “meat” and then gets those raised eyebrow are-you-kidding-me looks from Americans not familiar with Great British cooking. Meat pies are one of the delicious cornerstones of British cookery. That being said, this is a very American recipe from Epicurious.com (but it stays true to the spirit of a great British meat pie). This meat pie uses boxed pastry crusts (although you could make your own), ground turkey, grated apple, grated onion, and sage. The pies can be eaten hot, warm or cold. Whole trays of unbaked pies can be frozen to be baked later. Baked pies can be frozen to be reheated in the oven, oven or microwave . Cupcake Tin Turkey Pies can be a quick snack, breakfast, lunch or dinner, they are good for game day parties, buffets, and picnics, and they are tasty all the time. My grandson giggled his way through his first Cupcake Tin Turkey Pie and that meant he liked it a lot!

I have two dozen Cupcake Tin Turkey Pies in the freezer. At my house, one never can tell when a gaggle or bevy of college students will stop by.

Try these! They are so much better in taste, nutrition, lack of preservatives, and cost-per-serving than Hot Pockets and other similar packaged food products. Don’t eat those nasty things! Try these instead! They’ll become a staple at your house, too.  BTW…, how much would two dozen Hot Pockets cost?  Waaaay more than two dozen Cupcake Tin Turkey Pies, that I am sure of.

I have made a lamb version of these pies, but I didn’t likethem nearly as much.  If you want to try Cupcake Tin Lamb Pies, change the herbs and spices to 1/2 cup chopped fresh mint, 1 teaspoon allspice and 1/4 teaspoon cinnamon.

Cupcake Tin Turkey Pies

¾ pound ground turkey
1 medium (or ½ large) onion, peeled and grated
¼ cup applesauce or ½ grated, peeled apple
1 teaspoon kosher salt
1/2 teaspoon freshly ground black pepper
1 tablespoon chopped fresh sage (or ½ tsp dried)
1 tablespoon chopped fresh parsley (or 1 tsp dried…or omit)
1/2 cup bread crumbs
2 eggs, beaten
2 boxes pre-rolled, refrigerated pie dough (such as Pillsbury)or a double batch of your own pie crust

Preheat oven to 375°F. In a large bowl, combine all the ingredients but the dough and 1 tablespoon of the eggs; refrigerate mixture while you prepare the pastry. Unroll the dough and cut out twelve 4-inch circles with a biscuit cutter or the rim of a drinking glass. Line the bottoms and sides of the tins with the 4-inch rounds. Remove the bowl of filling from the refrigerator and divide evenly among the pastry filled muffin cups. Press the 2-inch rounds on top, pinching the edges together to seal. Poke a hole in the center of each pie. Brush tops with the reserved egg. Bake until the tops are browned and puffed slightly, 30 to 35 minutes. Loosen pies with thin metal spatula, place into a paper or foil cupcake/muffin liner. Let cool for 15 minutes before serving. Eat with hands. Serve warm…although my kids eat them hot, cold, warm and at room temperature. Can be frozen before baking-when ready to bake just follow directions above but bake for 40-45 minutes. Makes 18 cupcake sized turkey pies. Can make mini-muffin size for an appetizer buffet (but the mini pies have too much crust, and not enough filing,  for my taste.)

If these become a frequent item in your home, you might want to dedicate one cupcake pan to them, because a few batches do mess up the pans. I have two older pans for meat pies, and three pans for cupcakes. The pans stack and store easily, and you can buy a cupcake pan on sale for $3.99 sometimes.  OK, so I might have a few too many cupcake pans…

Thanks for stopping by my kitchen today.  See you again, soon! (Pssssst…! Vegan version to be posted shortly.  Yes, it’s true, veganized Cupcake Tin Turkey Pies!)

Print Friendly, PDF & Email
10 Sep 2010 Crockpot Pizza Sauce (and yummy extras)

I’ve finally found something that the crockpot (slow cooker for those of you offended by the term “crockpot”) excels in.  Excels in!  This is not just a recipe that can be cooked in the crockpot. It’s a recipe that should be cooked in a crockpot.  Yes, a recipe that tastes best cooked in the crockpot!  I found this recipe in “Not Your Mother’s Slow Cooker Cookbook” by Beth Hensperger and Julie Kaufmann (San Joseans!), on page 250.

I have made my fair share of pizza sauces and this is, by far, my favorite.  The flavor is so rich and consistent.  I’m in love!  What’s more, one batch of this recipe makes about 6 cups of pizza sauce.  Use one portion, freeze four! That’s my type of batch cooking.

Crockpot Pizza Sauce

2 12 oz. cans tomato paste
1 16 oz can tomato sauce
3 tablespoons olive oil
2-4 cloves garlic, crushed (to taste)
2 tablespoons dried oregano
1 tablespoon dried basil
1/4 cup minced fresh flat leafed parsley
1 tablespoon sugar
1/4 cup water
3 tablespoons grated Parmesan (or similar) cheese
salt and pepper, to taste

Place everything but the cheese, salt and pepper in the crock pot.  Cover and cook on low for at least 10 hours and no longer than 14 hours.  If at all possible, stir the sauce every few hours.  If you are sleeping, don’t worry about it.

Unplug crockpot.  Taste.  Add salt and pepper to taste.  Stir in cheese.  Let cool to room temperature.

I use just over 1 cup of sauce in my pizza.  Depending on the size of your pizza pan and your personal preference regarding the quantity of  sauce you might more or less than I do.

Sauce will keep, refrigerated, for at least four days.  Freeze for longer storage.

My Favorite Cheese Blend for Pizza

Like I said, I have made my share of pizza over the years.  I am finally getting good at it!  Last night’s pizza was fresh veggie…, sliced tomatoes, zucchini and basil, from my garden, and sliced fresh mushrooms and green onions.

Two of my three kids would holler, “Where’s the meat?”, but they are not home so I get to choose everything!

Whatever pizza I make, I always use this cheese blend.  I no longer have the cookbook I got it from, nor do I remember the name of the book, which is unfortunate now that I am going public with this blend.

2 parts shredded mozzarrella
1 part shredded smoked gouda
1 part shredded Italian Fontina
1 part freshly grated Parmigiana-Reggiano

Enjoy your creations! OH, you need a recipe for pizza dough, too?  Here you go… I hope you have a bread machine 🙂

Pizza Dough (for the bread machine)

1 1/3 cups water
1/4 cup olive oil
3 1/2 cups flour
1 tablespoon sugar
1 1/2 teaspoons salt
2 teaspoons yeast

Place all ingredients in bread machine.  Press “Quick Dough” or “Pizza Dough” cycle. Use immediately (as directed below), refrigerate overnight or freeze for up to three months.  Let frozen dough defrost overnight in refrigerator.  Let refrigerated dough rest for 20 minutes at room temperature before using.

Remove dough to a work surface sprinkled with flour or cornmeal. Divide into 2 parts (for large pizzas).  Roll or press dough into a circle about the size of your pizza pan.

Use dough immediately to make a pizza, or let rise 30 minutes or so for a thicker crust pizza.

When you have it all assembled, bake in preheated HOT oven (500 degrees) for 12-15 minutes.

Have fun assembling the perfect pizza!  Thanks for stopping by my pizzeria today. See you tomorrow!  Remember how much I like feedback.  I’d love to read your comments about this, or your experience making pizza at home.

Print Friendly, PDF & Email
02 Sep 2010 Fresh Tomato Tart

Fresh Tomato Tart

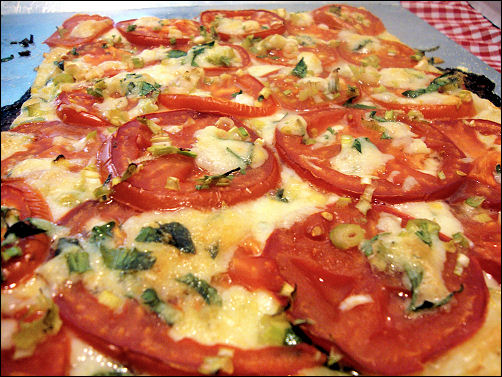
It’s been a long, cool summer here in California.  I’ve enjoyed it, loved it actually, but I did begin to wonder if we’d EVER “suffer” from our usual abundance of garden grown tomatoes.  Finally, the end of August, beginning of September 2010, we have an abundance of tomatoes.  My neighbors and Facebook friends have been asking for recipes to use up their tomatoes.  I have two good ones.  The Fresh Tomato Lasagna that I posted earlier this week, and this Fresh Tomato Tart which was a staple at our house last summer.  This year I’ve made it once, this afternoon, to welcome my daughter home for a quick 18-hour visit. I used 6 of my dry-farmed garden tomatoes.  I had better make another one, like I said, we finally have an abundance of organic, garden grown, dry-farmed tomatoes.  (I dry-farm my tomatoes every year.  The tomatoes are smaller, but oh so sweet and flavorful.  To dry-farm your own tomatoes, as soon as the fruit begins to set, stop watering.  YEP. No water. At all. Ever.) BTW…, I made this once without the feta cheese (not something I always have on hand) and it wasn’t nearly as good. My older daughter has substituted goat cheese for the feta, and she likes that.  But I hate (no, I loathe) goat cheese, so that doesn’t work for me. The inspiration for this recipe was from a 2009 Cooking Light magazine.  I used the cheese mixture from one of their recipes (can’t, for the life of me, remember which recipe), but then I changed everything else to get this…

Fresh Tomato Tart

1 sheet puff pastry, thawed 2 cups thinly sliced tomatoes (five or six medium tomatoes, discard the top and bottom slices) 1/3 cup thinly sliced green onions 1/2 cup thinly sliced basil leaves 1 Tablespoon thinly sliced fresh oregano (or pinch of dried) salt, pepper 1/2 cup shredded mozzarella 1/2 cup crumbled feta 1/4 cup grated Parmesan AND 1/4 cup grated Parmegiano-Reggiano (OR, 1/2 cup of just one cheese) Preheat oven to 375 degrees. Lightly coat an unrimmed cookie sheet with cornmeal, oil or spray (I prefer to use the cornmeal). Unroll puff pastry, thin out a bit by rolling, then prick all over with a fork. Place in hot oven for 10 minutes. Meanwhile, slice tomatoes and place on 2 layers of paper towel. Roll towels with tomatoes, and set aside for tomatoes to drain while you mix the cheeses, basil and oregano together in a bowl. Remove puffed pastry from oven. Sprinkle 2/3 of cheese/herb mixture over hot pastry. Place drained tomato slices on top of cheese. Sprinkle with salt, pepper, sliced green onion, and remaining cheese/herb mixture. Return to oven and cook for an additional 15-20 minutes, or until golden. Thanks for stopping by both my kitchen, and my garden, today.  It’s been a fun summer, but I am ready for fall.  If you make this, let me know how you like it!

Print Friendly, PDF & Email