Archive for the Category ◊ Fruits ◊

04 May 2019 Sweet Chili-Citrus Shrimp with Sugar Snap Peas

Not every published recipe works, and that’s a pet peeve of mine. Recently my Cookbook Club received the galley proofs for a soon-to-be-published cookbook. We cooked 19 recipes from the cookbook. Not one worked as written! Not one! Quantities didn’t fit into the stated pans, the oven temperatures were too low, cooking times were too short, methods were inconsistent, steps were missing, and some recipes simply didn’t work or were just plain weird… Jicama Fries anyone? Cauliflower with red wine?

I think the author had some good ideas, but I don’t think any recipe was tested outside of her kitchen or by anyone other than herself.  Badly written (or just plain wrong) recipes are a pet peeve of mine. I think some people end up thinking they are bad cooks just because they have had a couple of run-ins with bad recipes. Gr-r-r-r. It’s all about the recipe, folks (which was the name of my second “cookbook”, that I had passed out to my friends on my 50th birthday).

That all being said, this recipe, from the cookbook we reviewed, has become a favorite. It’s a sheet pan recipe! A ‘new trend’, which is really an old one rehashed, but whatev! After living six decades I have seen trends come, go, and come back again. Anyway, back to the recipe. I had to make some adjustments to methods and oven temperatures, and add in the rice component and now this recipe is one of the quickest, company-worthy, restaurant quality dinners I have on file. The picture above doesn’t do it justice. The shrimp are much more saucy and colorful. The picture below is a bit better, but I only had half the quantity of snap peas and I really should have removed the tails from the shrimp before cooking them. So, on with the recipe, because it’s a good one.

Note: I have been going back and forth about crediting this recipe to the cookbook author referenced above. After much thought I decided not to because I said so many negative (but truthful) things about her cookbook.

To make this you’ll need TWO large sheet pans, and some cooked rice. Either serve the dish in three different bowls, a bowl of rice, a bowl of peas, and a bowl of shrimp, OR layered in one 9×13 serving dish.

Sweet Chili-Lime Shrimp with Sugar Snap Peas

1/2 cup orange marmalade (heated slightly to make pour-able and mixable)

1/4 cup soy sauce

1/4 cup freshly squeezed lime juice (usually 2 limes)

2 teaspoons Thai Chili Garlic Paste (It’s red, and sold in jars in Asian section of most grocery stores)

1 teaspoon ground ginger

2 lbs shrimp, defrosted if necessary, with shells and tails removed (I like the frozen shrimp from Costco)

1 pound sugar snap peas

2 cups hot prepared rice

2 tablespoons olive oil

  1.  Preheat oven to 400 degrees F.
  2.  Combine marmalade, soy sauce, lime juice, chili-garlic paste and ground ginger.
  3.  Place the prepared shrimp into a large bowl or a large Ziploc bag. Pour marmalade mixture over shrimp and toss to coat.
  4. Pour the shrimp and all the marinade onto a sheet pan.
  5. Rinse and dry the sugar snap peas, and then toss with the olive oil.
  6. Pour the sugar snap peas onto another sheet pan.
  7. Place both sheet pans into hot 400 degree oven.
  8. Remove the snap peas after 5-7 minutes. Peas should be shiny and crisp.
  9. Let the shrimp cook for an additional minute or two. Remove from the oven when fully cooked, the shrimp should be totally opaque and curled into a “C” shape.
  10. Either serve the dish in three different bowls, a bowl of rice, a bowl of peas, and a bowl of shrimp, OR, as I do now, in one 9×13 serving dish with rice on the bottom, peas in the next layer, and the shrimp and sauce poured on top. The sauce eventually meets the rice and…, yum-m-m…, heaven!
  11. Serve and share 🙂

Thanks for stopping by my kitchen today!

Print Friendly, PDF & Email
04 May 2019 Apricot-Coconut Bars

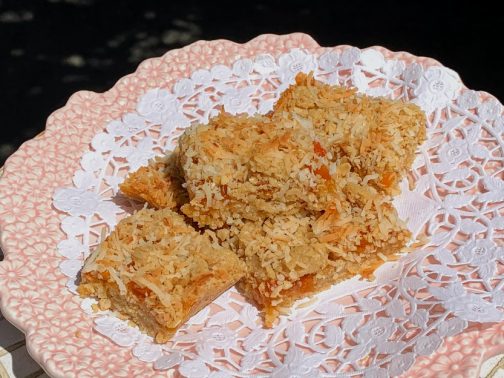
Feel like baking this weekend? Try these! They are delicious, one of my favorite bar/tray bake recipes. The bars are buttery, crisp, jammy, and coconut-y all at the same time. The dozen or so diced dried apricots sprinkled on top of the apricot jam boost the apricot flavor appreciably.

I’ve been making these bars for at least a decade. The original recipe was made with raspberry jam (and no diced apricots, obviously), but I think my apricot jam version with the addition of diced dried apricots takes the cake…, the bar…, the tray bake!

Apricot-Coconut Bars

1 ½ cups sweetened flaked coconut, divided use

1 ¼ cups all-purpose flour

¾ cup packed light brown sugar

½ teaspoon salt

¾ cup cold, unsalted butter, cut into small pieces

1 ½ cups old-fashioned oats

¾ cup apricot jam

10-12 dried apricots finely diced

  1. Prepare a 9×13 pan by lightly greasing bottom and sides or lining with parchment paper.
  2. Preheat oven to 375 degrees F.
  3. Toast the coconut in a dry frying pan until golden. Stir constantly and watch carefully OR spread onto a baking sheet and bake in a 375 degree oven for about 8 minutes. Set aside to cool.
  4. In the bowl of a food processor blend flour, brown sugar and salt. With motor running add butter pieces gradually then blend until a dough begins to form.
  5. Add 1 cup of toasted coconut and all of the oatmeal to dough in bowl, mix lightly but thoroughly, approx. 2-4 short bursts.
  6. Reserve ¾ cup of the dough and set aside.
  7. Press remaining dough into bottom of a prepared 9×13 inch baking pan.
  8. Sprinkle chopped dried apricots over dough.
  9. Spread jam evenly over dried apricots and the dough layer (It might help to heat jam briefly in the microwave to make it easier to spread).
  10. Crumble reserved ¾ cup of dough over jam.
  11. Sprinkle reserved ½ cup coconut over top of bars.
  12. Bake in middle of preheated 375 degree oven for 20-25 minutes.
  13. Cool in pan.
  14. Lift entire slab out of pan, transfer to cutting board and cut into bars of desired size and shape.
  15. Bars can be made 3 days in advance and stored in an airtight container at room temperature.

Thanks for stopping by my kitchen today!

Print Friendly, PDF & Email
18 Jan 2014 Russian Tea

Russian-Tea-1a

Are you old enough to remember the “Russian Tea” phase back in the 70’s?  I was a teenager then, a very young teenager, and our Moms and Grandmas were mixing up batches of Russian Tea like crazy and giving everyone little jars of the stuff.  I think the mix had instant tea, Tang (remember Tang? Astronauts drank it!), powdered lemonade, and some spices.  You opened up your gift jar, spooned some mix into a cup, added hot water, stirred it up and  you were drinking Russian Tea!  I liked it. It was a different hot drink.  I wasn’t into coffee yet, Hot Chocolate was too childish, English tea with milk was OK, but boring. Russian Tea was fun and different–and a bit exotic.

Fast forward to February 7th, 2014, Opening Ceremonies for The XXII Winter Olympics will be held in Sochi, Russia and I will be hosting a Russian Themed Winter Olympic Dinner.  What to have to drink after dinner? My daughter suggested Vodka shots off the tip of a sword.  Umm, no.  A citrus-y, sweet, slightly spicy version of Russian Tea is more up my alley — but not made of Tang, Country Time Lemonade and Nestea. So I hit the Internet.  First spoiler, the so-called “Russian Tea” of the 70’s isn’t Russian at all. It’s an American concoction! The only thing Russian about it is it’s name.  Shhhhhhhhhh! Don’t tell anyone!  Real Russian tea is “Russian Caravan” tea, because tea used to be imported to Russia from China, via a 16-18 month caravan, and it acquired a smokey flavor from all of the caravan campfires, according to Wikipedia.  So, I went to my local Russian grocery store, yes, we have one in San Jose, and I couldn’t find “Russian Caravan” tea anywhere (nor anyone to help me), but lots of Earl Grey.  I am not serving Earl Grey tea at my Russian Dinner.  Early Gray Tea is English and I don’t like it, it’s too smokey!

So now I am back to my original “Russian” Tea quest.  I found some recipes on the Internet, checked out their star ratings, and tried a few.  One was truly horrid; it involved extracting the juice from oranges and lemons, then boiling the  rinds in sugar and water then adding  the liquid to cold tea. I was skeptical, but the very attractive, very sincere lady on the YouTube video seemed nice, and she was raving over her tea! So I tried it.  She was not honest. Her tea was bitter and horrid.  Of COURSE it was.  Boiling all that pith then adding it to the tea? I should have known better. Why do people post bad recipes?

Eventually, I came up with this version for fresh Russian Tea.  I like it.  I really like it. I served it to five friends and two relatives, and they all said they liked it.  Then I served it to another relative, the daughter who suggested I serve vodka shots off the end of a sword, and she hated it.  I was SHOCKED.  I tied her down and make her try it again.  She STILL didn’t like it.  Harrumph.  She’s no longer my favorite child.  My son loved the tea.  He said, “That’s good.  That’s really, really good.”  He’s a good boy. He’s my favorite child now.

This “Russian” tea is in the same family as hot tea with lemon and honey, but with orange added, and some cinnamon, and a few cloves, it’s a bit more complex (there’s no honey in this tea though).  I’m going to serve it at my Russian themed Winter Olympic dinner, but I’ll brew a pot of Earl Grey, too… for the weirdos.

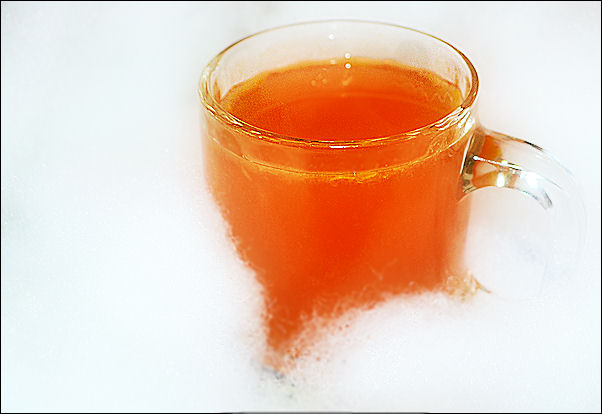
You all know I am not a photographer, right?  I thought I was being deliciously creative setting up a picture to look like hot, citrus-y, Russian tea in cold, stark, white snow.  Epic fail.  What I got looks like tea in bubbles, oh, not even that, it looks like tea in pillow stuffing, which it is.  Can you overlook that?  Can you just try this hot, citrus-y, slightly spiced, American-Russian tea?  I think you will be glad you did.  Just make the tea once, and put it in the refrigerator to reheat as needed. Ponyat’? Da?

I am really getting into the Olympic/Russian thing now. I made Pierogi for dinner last night, and I ordered a Pierogi press and a Pierogi cookbook written by a real babuska from Amazon.  I am trying to find a Russian outfit to wear. It seems I should go as a babushka.  I already have all the right clothes in my closet…and you know, Vodka shots from the end of a sword might not be too far fetched!

Russian Tea

  • 4 strong black tea bags
  • 1 quart (4 cups boiling water)
  • Zest of 1 1/2 oranges
  • Juice of 1 1/2 oranges (about 2/3 cup)
  • Zest of 1 large lemon
  • Juice of 1 large lemon (about 1/4 cup)
  • 6 cloves (0k to double for spicier drink)
  • 1 cinnamon stick (ok to use 2 for spicier drink)
  • 1 cup sugar (might be ok to reduce to 3/4 cup for a less sweet drink)
  • 2 cups cold water 
  1. Make 1 quart of tea by pouring 1 quart of boiling water over 4 teabags and seep for 5 minutes.  Remove tea bags from hot tea and set tea aside.
  2. Zest the oranges and lemon. Put the zest in a small saucepan.
  3. Add 1 cup sugar and 2 cups cold water to the zest in the small saucepan.
  4. Bring water, sugar, and zest to a boil and boil for 5 minutes.
  5. Juice the oranges and lemon. Pour the juice into the brewed tea.
  6. Strain the  boiled water, sugar, spices and zest mixture the add to tea and juice mixture.
  7. Stir well and serve or refrigerate mixture until ready to use. Reheat in the microwave or on the stove top.
  8. Enjoy the Olympics!

Thanks for stopping by my kitchen today.  BTW, I tried one more drink in my quest for my Olympic dinner, but I think that one qualifies as a dessert (and a gold medal)!  White Hot Chocolate.  Too, too, too decadent to post…I must keep my fans from sinning…I must…I must…OK, OK, I’ll post it soon!

Print Friendly, PDF & Email
31 Jul 2013 Blueberry Heaven


Do you ever go into a bakery?  Of COURSE you do!  Do you ever buy a pastry that looks delicious, but then are seriously disappointed in the taste…? And then, to top it off, are you overwhelmed by the amount of  fat you’ve just consumed for something that really wasn’t that all that great?  Me, too 🙁 Do you ever wish, on a weekend morning with your second cup of coffee, for that imagined deliciousness, without all greasy pastry and sugary icing?  Me, too 🙂 Pssssst…  Come here! No, come closer! I am going to tell you how to make a breakfast pastry as delicious as the one you are dreaming of…, and without the load upon load of grease and sugar!

Now. Seriously…, am I your best friend, or what?!

It’s so simple!  You need 2 slices of bread, a bit of cream cheese, and a handful of blueberries. It helps if you have a sandwich maker or a panini press, but if you don’t, use a frying pan and make this Blueberry Heaven just like you would a grilled cheese sandwich.

I found the original recipe here: http://www.fitfromconception.com/2012/06/blueberry-breakfast-grilled-cheese.html  No, I am not pregnant, roflmao.  Neither are any of my children.  I have no idea how I ended up at that website, but I am glad I did.

Blueberry Heaven

[a Stand-in for Fat and Sugar Laden Blueberry Pastries]

For each serving:

  • 2 slices of bread, any kind.  Make it whole wheat if that’s the way you roll.  I use Orrowheat Country Buttermilk Bread.  Cinnamon bread would probably be delicious, as would almost any kind of homemade bread (don’t use homemade rye bread or anything like that!).
  • Plain cream cheese, enough to spread on two slices of bread.
  • a sprinkling of sugar, less than 1/4 tsp, optional
  • a handful of fresh blueberries, about 24 (jam can be substituted)
  • Butter, optional, unless you are using a frying pan


  1. Preheat sandwich maker, panini press, or frying pan.
  2. Spread each slice of bread with cream cheese, no measurements here, just coat the slices of bread to your preference. (If you are using a frying pan, spread the other side of the bread with butter)
  3. Sprinkle a bit, and I do mean a bit, less than 1/4 tsp of sugar over the cream cheese, just to sweeten up the cream cheese a little bit. (I’ve made this without the sugar, and it’s just not the same.)
  4. Arrange blueberries on one slice of the cream cheese covered bread.  Use as many as you want, but I think 24 is about perfect.  I like to evenly space the blueberries on the bread so I get an equal number of  blueberries in every bite.
  5. Put the other slice of cream cheese covered bread onto of the blueberries, cream cheese to cream cheese.
  6. Put the sandwich in the press, latch close, and cook for 2 minutes. (If using a frying pan, put the sandwich, butter side down on the preheated frying pan.  When the first side is golden brown, flip, and cook the second side until it is golden brown too.)
  7. Remove sandwich from the press or the pan and let cool a bit, the filing will be mad hot right out of the press. Be careful.
  8. Enjoy! It’s a little slice of heaven, isn’t it?
  9. Repeat.  You’ll want to make one for someone else… 🙂

Thanks for stopping by my kitchen today! Aren’t you glad you don’t have to drive over to the Olde Time Bakery for a pastry that will only make you feel badly about yourself? Hooray!!

Print Friendly, PDF & Email