Archive for the Category ◊ Cakes & Cupcakes ◊

29 Sep 2016 Pumpkin-Chocolate Cake

w

This is the BEST cake to serve at this time of year (or any other time of the year, actually)!  It’s a good chocolate cake – a very, very good chocolate cake; it’s moist, and nicely chocolate-y, and made richer with some pumpkin puree added.  The cake doesn’t taste of pumpkin, it just tastes well-rounded and delicious and the frosting tastes like Fall! There is a touch of cinnamon in the frosting, then the ganache topping is smoothed over the top and dripped down the sides which sends this cake into the realm of ‘One of the Best Cakes EVER’! My daughter, Abby, has been making this cake since she was in high school.  Her friends would ask for it for their birthdays (even for Summer birthdays)!

It goes without saying that this cake takes a bit of time to make and decorate, but if you are thinking of making this cake then you are thinking of making it for a special occasion, right?  The time and effort are worth it and there’s nothing complex or confusing about making this cake, it’s pretty straightforward. And you won’t be serving up a box mix and a can of chemicals to your friends and family, either 🙂

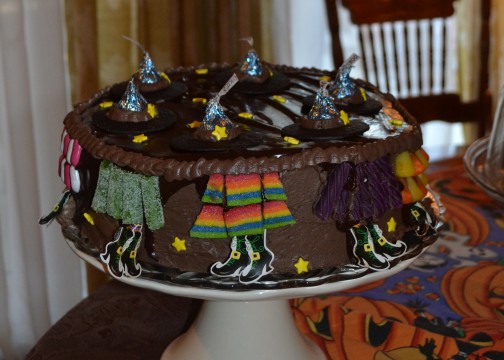
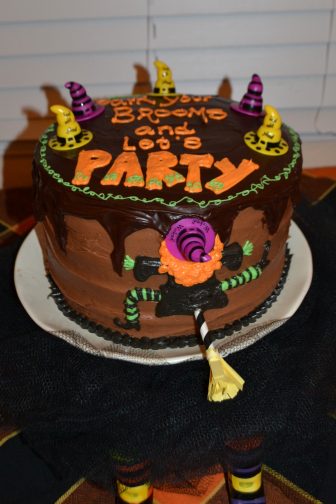
Now, your cake is going to look a bit different than the one above, since this cake was decorated for my witch themed Halloween party. Abby used candy, cupcake toppers, and Pinterest inspiration [to decorate the cake in the picture below] for my Halloween party last year.  Isn’t it cute?

Witches 2013 dessert abby's witch cake

The original recipe came from a Good Housekeeping magazine about, oh, 20 years ago?  I still see pictures from that recipe dancing around.  Don’t believe them!  For some reason in the picture the frosting under the ganache is orange.  I tried to do that and there is no way that I know of to turn a cocoa powder frosting bright orange.  I tried. Many times. It. Can’t.Be.Done. Sigh…

Not all recipes in magazines, cookbooks, newspapers and the Internet will work.  Mine will.  I only post recipes that I’ve tested and have been verified “Delicious!” by a multitude of family members and friends.  Many of my treasured recipes, like this Pumpkin-Chocolate Cake, I have made time and time again. You can do it, too! Make it once for Halloween, and I KNOW you’ll want to make it again for your Thanksgiving potlucks!

PUMPKIN-CHOCOLATE CAKE

For Cake

1 1/2 c. flour
2/3 c. unsweetened cocoa powder (Hershey’s Special Dark is good)
2 tsp. baking powder
1 tsp. baking soda
1/2 tsp. salt
1 (15 oz.) can pumpkin
1/2 c. buttermilk
2 tsp. vanilla
3/4 c. butter, softened
1 c. dark brown sugar
1 c. sugar
3 eggs plus one egg yolk
  • Preheat oven to 375 degrees.
  • Line the bottoms of 2 9-inch cake pans with parchment paper and lightly butter (or spray with Pam for Baking).
  • Sift flour, cocoa, baking powder, baking soda and salt together.
  • In another bowl stir together the pumpkin, buttermilk, and vanilla.
  • In the bowl of an electric mixer beat together the butter and the sugars until light and fluffy.
  • Beat in the eggs, one at a time, beating well after each addition, and then the egg yolk.
  • Reduce speed to low and beat in 1/3 flour mixture, and then 1/3 pumpkin mixture.
  • Repeat until all ingredients are used.
  • Pour batter into prepared pans.
  • Bake until cake passes the toothpick test, about 35 minutes.
  • Cool, frost and glaze as directed below.

For Frosting

6 oz. cream cheese, at room temperature
6 tablespoons butter (3/4 stick), softened
1 (16-oz.) box powdered sugar
3 T. cocoa powder
1/2 tsp. cinnamon
1 tsp. vanilla
2 – 3 T. cream (or milk)
  • Beat cream cheese and butter together until well blended.
  • Stir in powdered sugar, cinnamon, vanilla, and enough cream to make a stiff spreading consistency.
  • Spread 1 cup frosting between the two layers, and use the remaining frosting for the tops and sides.
  • Chill cake for a minimum of 30 minutes before glazing.

For Chocolate Glaze

4 oz. bittersweet chocolate, chopped
1 T. butter
3 T. corn syrup
1/2 c. heavy cream
  • Place chopped chocolate, butter, and corn syrup in a small bowl.
  • Heat heavy cream until boiling.
  • Pour hot cream over chocolate mixture in bowl.
  • Let sit for 3 minutes then blend with whisk until smooth.
  • Let glaze sit for  FOR AT LEAST 5 minutes to thicken slightly (it might be 15-20 minutes–better the glaze be on the thick side rather than the thin side)
  • Pour the glaze on top of the chilled and frosted cake. Smooth out glaze to edges, and then let drip down the sides.
  • Refrigerate to set glaze.
Print Friendly, PDF & Email
02 Mar 2014 Black Forest Torte (Black Forest Cake)

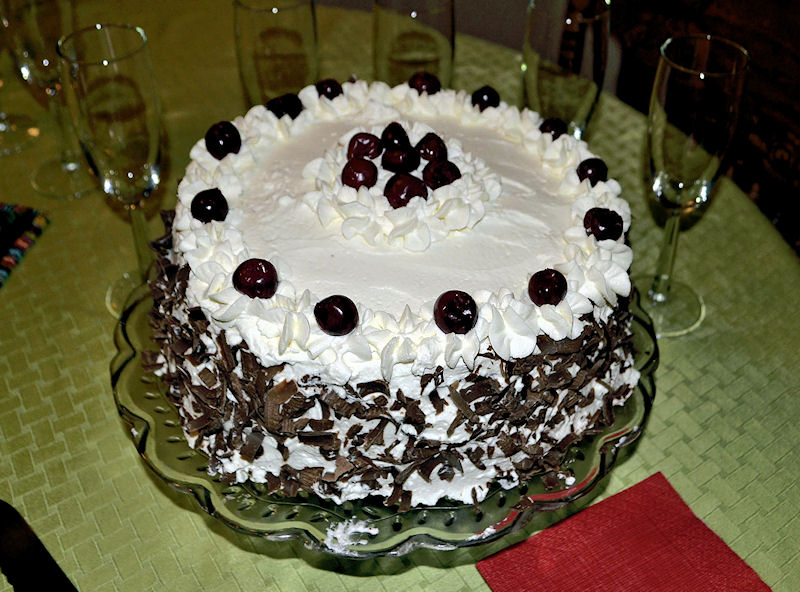
BookThief-torte

Once a year I host a book club meeting at my house.  My night was last night.  The book was “The Book Thief” so the theme was German food.  Thanks to input from the Internet, I decided to make a “Black Forest Torte” for dessert.  I found a recipe posted on Food.com by a “real German lady”, and decided to make it, with no advance practice session (I know, living on the edge!).

The cake was a delicious show-stopper.  Just look at that picture! I haven’t made too many show-stopper cakes before so I was quite thrilled with the way this one turned out.  PHEW! And I’d like to extend a big, grateful ‘danke’ to the “real German lady” 🙂

I made a few changes to the recipe, of course:  I used pitted sour cherries from a jar, rather than fresh cherries (they’re not in season right now), and I used butter, rather than shortening, in the cake batter. I also made two 9.5 inch cake layers instead of the three 9-inch layers specified in the original recipe (I really dislike 3 layer cakes).  I modified the mixing method for the cake. I used espresso powder, rather than cold brewed espresso, in the filling and adjusted the amount of Kirsch in the filling as well. I upped the whipped cream frosting by 50%.

Now, if you make this cake, you’ll need to start three days in advance and, please, DO make this cake!

  • Day 1: Drain the cherries and soak in Kirsh.
  • Day 2: Make the chocolate layer cakes, soak the cakes in the Kirsch drained from the (now boozy) cherries.  Make the filling and assemble the layers one on top of the other.  Refrigerate overnight.
  • Day 3: Make the chocolate curls and the whipped cream frosting. An hour or two before serving, decorate the cake with the whipped cream, reserved cherries, and chocolate curls. Serve!
  • Day 4: The leftovers are yummy! I called four friends over for tea, and they all accepted, enjoyed the cake, and took slices home for their husbands!  (So far, I have cut sixteen slices from this cake, and there is one slice left in the refrigerator for my 23 year old twins to fight over.

 Black Forest Torte

Cake

  • 1 2/3 cups all-purpose flour (8 oz)
  • 2/3 cup cocoa powder (I had Hershey’s on hand, so that’s what I used)
  • 1 1/2 teaspoons baking soda
  • 1 teaspoon salt
  • 1/2 cup shortening
  • 1 1/2 cups sugar
  • 2 eggs
  • 1 teaspoon vanilla
  • 1 1/2 cups buttermilk

Mocha Buttercream Filling

  • 1/2 cup kirsch
  • 1/2 cup butter
  • 3 cups powdered sugar
  • 1/8 teaspoon salt
  •  1 1/2 teaspoons instant  espresso powder
  • 2 jars of pitted sour cherries, drained (I got mine at Trader Joes-1 1/2 lbs each, most supermarkets have  1 lb. cans of cherries in the canned fruit section) OR 1 1/2 lbs fresh black cherries, pitted

Whipped Cream Frosting

  • 3 cups heavy whipping cream
  • 1 teaspoon vanilla
  • 2-3 tablespoons  kirsch
  • 2 tablespoons dry milk powder (optional, but helps with stability of whipped cream icing)
  • 1/3 cup powdered sugar

Chocolate Garnish

  • One large, 3.5-4 oz. dark chocolate bar, grated or curled

DIRECTIONS

  1.  Drain the cherries then soak them in 1/2 cup Kirsch overnight. Discard the cherry juice UNLESS you want to make a non-alcoholic cake.  If you want a non-alcoholic cake (like, if children will be eating it) use the cherry juice  from the cherries instead of the Kirsch and proceed as outlined below.
  2. Preheat the oven to 350°F
  3. Drain the cherries from the Kirsh.  RESERVE the liquid!  Most of the liquid will be poured over the hot cakes. Reserve 2 tablespoons of the liquid for the filling.
  4. Line the bottom of two 9 inch round cake pans with parchment. Spray the sides with “Pam for Baking”, or grease with a bit of butter or oil.
  5. Sift the dry cake ingredients together and set aside.
  6. With an electric mixer beat the shortening to soften, then add the sugar.  Beat for six minutes or until the shortening-sugar mixture is light and fluffy.
  7. Add the eggs, one at a time and mix well.  Stir in the vanilla.
  8. Add one-third of the dry ingredients to the sugar mixture and beat to combine. Add half of the buttermilk. Beat to combine. Add another one-third of the dry ingredients and beat to combine.  Add remaining buttermilk.  Beat to combine.  Finally, add the last of the dry ingredients and beat well. alternately with the buttermilk and mix well.
  9. Pour batter into the prepared cake pans.
  10. Bake in preheated 350 oven for approx. 25 minutes or until a cake springs back when touched.
  11. Remove the cakes from the oven.  Leave the cakes in the pans and immediately and slowly, pour some of the reserved Kirsch-cherry juice mixture over both cakes. Let the Kirsch soak in, then repeat until all but 2 tablespoons of the Kirsch-cherry liquid has been used. (The remaining 2 tablespoons liquid will be used in the filling)
  12. Let the cakes cool in their pans.
  13. Make the filling. With an electric mixer  beat the butter until light and creamy. Add the powdered sugar, salt, espresso powder, and 2 tablespoons Kirsch-Cherry juice and beat well for 3 or 4 minutes. If the filling is too thick add some extra Kirsch, cherry juice, or cream (add only an extra 1/2 tsp. at a time). The filling should be spreadable, but firm.
  14. Place the base layer on cake plate.  Spread filling over top, then cover with drained cherries (save some good, firm, pretty cherries to go on top of the cake as decoration). I took the time to place each cherry in concentric layers, which I think helped with the stability of the cake. Add the second cake on top of the filling and cherries on the first layer.  Push down a bit to secure a firm fit between the layers.
  15. Cover the cake  and let sit in refrigerator overnight for the flavors to meld.
  16. A few hours before serving place the whipping cream, powdered sugar, Kirsch, vanilla, and optional dry milk powder in the bowl of an electric mixer. Whip the cream until it forms stiff peaks.
  17. Spread the whipped cream frosting over all of the cake. Decorate the sides first, then the top.  If you want to be fancy, put some of the whipping cream in a Ziploc or a piping bag and pipe rosettes or swirls around top and bottom of cake.
  18. Pat the reserved cherries dry, and then place in a pretty design on top of the cake.
  19. Grate the chocolate bar or use a vegetable peeler to make chocolate curls. Gently, and decoratively  press handfuls of the grated chocolate onto the sides of the cake.
  20. Store cake in refrigerator until an hour or so before serving.  Serve and enjoy.  (You should get about 16 generous slices from this cake.)

Thanks for stopping by my kitchen today, and I hope there is a Special Occasion coming up soon so you can make this cake.  It’s a keeper!

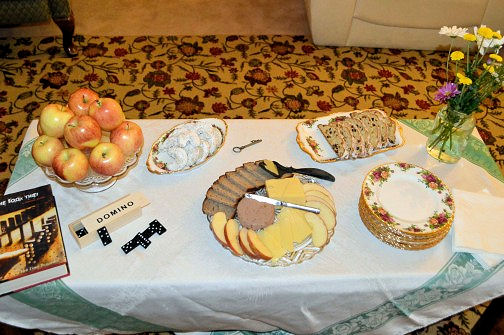
Just in case you are wondering, and in case you are reading this because you’ll also be hosting a book club meeting based upon “The Book Thief”, I also made Kipferls. Kipferls, which are significant in the book, were left by the window for people to take home (just like in the book).  I’ll posted that recipe, too, since they were soooooo good (but soooooo expensive to make, more about that later). My book club does snacks and dessert. For snacks I had a bowl of apples, German bread with cheese and liverwurst, and soft pretzels with a beer-mustard-cheese dip (no picture of the pretzels and dip) and Stollen! To drink, we had champagne, of course.  Those of you who read the book know why.

BookThief-snacks

Print Friendly, PDF & Email
06 Sep 2013 Pavlova

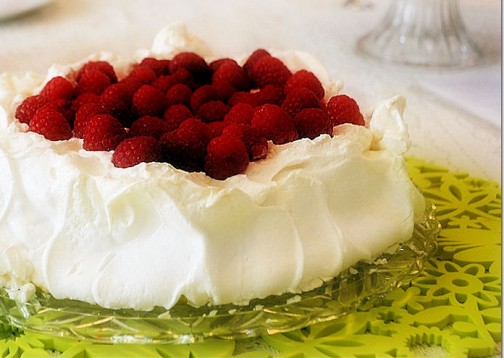
pavlova1

In England, Australia, New Zealand and my house Pavlova is  a very popular dessert.  I am not sure why it’s not only not popular in the US but it’s not even well known.  Pavlova is a  quick, light, inexpensive, impressive, and utterly delicious dessert.  Pavlova is usually served during summer months since fresh berries are an important component.

Legend has it that Pavlova was named after the Russian ballet dancer Anna Pavlova sometime in the 1920’s. But there the agreement ends. There is a huge and controversial issue around the country of origin of this dessert.  Both Australia and  New Zealand claim it.  Pavlova is a popular dish and important part of the national cuisine of both countries–as it is England (but England doesn’t claim to be a country of origin). Ok, ok! I can hear you all hollering but, what IS  “Pavlova”?

Pavlova is a meringue dessert with a crisp outer shell and a soft, light, fluffy center.  The meringue crust is  topped with lightly sweetened whipped cream and fresh berries–and kiwi– to serve.

I make two versions of this dessert.  Version #1, and the most traditional is below.  In Version #2, I mix a little lemon curd into the whipped cream, and I use blueberries instead of the more traditional raspberries and strawberries.  Trader Joe’s carries a very good and inexpensive lemon curd.  If you have a lemon tree, you can make your own lemon curd in the microwave with my recipe.

Pavlova doesn’t keep!  Don’t assemble the Pavlova until JUST before serving, and don’t expect to enjoy they leftovers (they’ll be soggy).  Make sure this is eaten all up all at once.  The good news is that the meringue base can be made ahead and stored for a few days in an airtight container before assembling and serving, which makes this a great showstopping dessert to make for guests.

High humidity might negatively affect this dessert. It’s best not to attempt to make this on a humid, wet, rainy day.

Pavlova

  •  4 extra-large egg whites, at room temperature
  • Pinch of salt (about 1/8 tsp)
  • 1 cup sugar
  • 2 teaspoons cornstarch
  • 1 teaspoon white wine vinegar
  • 1/2 teaspoon vanilla extract
  • Sweetened Whipped Cream, recipe follows
  • fresh raspberries, strawberries, kiwi or combination (see above for a blueberry version)
  1. Preheat oven to 200 degrees F.
  2. Place a sheet of parchment paper on a baking pan. Draw a 9-inch circle on the paper, using a 9-inch plate as a guide.  Turn the paper over so the drawn circle is on the reverse side of the paper. (This way you won’t get a pencil mark on the meringue.)
  3. Place the egg whites and salt in the bowl of an electric mixer fitted with a whisk attachment. (Be SURE the bowl and beaters are very, very, very clean–with not one bit of oil, butter or fat residue.)
  4. Beat the egg whites on high speed until firm, about 1 minute. With the mixer still on high, slowly add the sugar, in slow steady stream or 1 T. at a time and beat until it makes firm, shiny peaks, about 3 minutes. Remove the bowl from the mixer.
  5. Mix vanilla, cornstarch and vinegar together then fold that mixture lightly into the egg white mixture using a very clean rubber spatula (there should be no oil, fat, butter, residue on the spatula).
  6. Pile the meringue into the middle of the circle on the parchment paper and smooth it within the circle, making a rough disk. Then, make a crater or a bowl in the middle of the flat meringue pile. (So the meringue looks like a rimmed soup bowl or large saucer.  This “crater” will hold the whipped cream and fruit at serving time.
  7. Bake at 200 degrees for  1 1/2 hours. Turn off the oven, keep the door closed, and allow the meringue to cool completely in the oven, at least 1 hour, overnight is better. (The meringue will deflate if exposed to cold air before it’s cool).  Store in an airtight container until ready to serve. Do not refrigerate.
  8. Place meringue disk onto a serving plate and JUST BEFORE SERVING spread the top completely with sweetened whipped cream. Spoon the berries and the traditional Kiwi, if you can get it, carefully into the middle of the Pavlova, leaving a border of cream and meringue. Serve immediately.

Sweetened Whipped Cream:

1 cup cold heavy cream
2 tablespoons sugar
½ – 1 teaspoon vanilla

Whip the cream in the bowl of an electric mixer fitted with a whisk attachment (you can also use a hand mixer). When it starts to thicken, add the sugar and vanilla and continue to beat until firm. Don’t overbeat!  If using a Kitchen Aid, make 1 ½ or 2 cups cream, any less and the whisk won’t get it all up from the bottom.

You’ll love it!  Practice this once for the family, and then WOW your guests with it the next time!

Thanks for stopping by my kitchen today!

Print Friendly, PDF & Email
06 Mar 2013 White Mint Dark Chocolate Layer Cake

chocmintcake

I know, I know, this is a horrible picture.  Don’t let that put you off though.  This is a delicious cake, one of my best!  The reason this picture is so bad, well, aside from me not being a talented photographer, is that everyone ate the cake!  This is the one piece  that was left, and it was left out all night.  It looks like it, too, doesn’t it? Poor cake.  I really should bake this cake again just to get a better picture of it.  Problem with that is, folks are hollering for the recipe! I served the cake at my Dining For Women meeting and had several requests for the recipe.  I told everyone it was on my website, but this morning  I was shocked to find I hadn’t posted it.  Ever. Oops. What have I been doing with my time?

So here is the recipe, finally!  I found the original  recipe on epicurious.com the year that my twins graduated from high school, in 2009, I believe.  I made it for their high school graduation.  See how good this cake is?  I know exactly when I first tasted it! (I was pretty impressed with myself!)

The only thing I changed was making two layers instead of three (I think three layer cakes are pretentious–and who has three matching layer cake pans anyway?).  Don’t change anything else!  Use peppermint extract, not mint.  AND, one more warning:  stick to the Lindt Mint Chocolate bar, or something very similar. My daughter made this cake one year with Ghirardelli Mint Squares (the ones with the liquid-y centers).  Not a good idea. She made the cake for my birthday cake.  The top layer kept sliding off the bottom layer.  Yes, more than once. The cook took it very hard.  I think there were tears.

There shouldn’t be tears served with this cake.

This cake can be dressed up a bit for Christmas.  Andes has Candy Cane mints now.  Those and a few candy canes or peppermints can adorn the sides/top of the cake or the cake platter. Hershey’s Candy Cane Kisses can be melted for the top of each layer, if you want, but they don’t taste nearly as good as the melted Lindt Mint chocolate bar…, and they don’t have the delightful thin crunch that comes from the melted Lindt bar.

Chocolate Mint Layer Cake

For Cake and Chocolate Mint Topping

1 ¾ c. flour
¾ c. unsweetened cocoa powder (use Hershey’s Special Dark)
1 ¼ tsp. baking soda
½ tsp. baking powder
¾ tsp. salt
2 c. sugar
¾ c. butter, at room temperature (1 ½ sticks)
3 eggs
4 tsp. vanilla
1 ½ c. buttermilk
1 large Lindt Mint Chocolate Bar, chopped

Preheat oven to 350 degrees. Butter and flour three 9-inch diameter cake pans. Line bottom of pans with parchment paper. Sift together flour, cocoa powder, baking soda, baking powder, and salt. In another bowl beat sugar and butter together until light and fluffy, at least 5 minutes. Add eggs, one at a time, beating well after each addition. Mix in vanilla. Beat for another 5 minutes. Add dry ingredients alternately with buttermilk in 3 additions each, beating just until blended. Divide batter equally between the three cake pans (a generous 2 cups of batter in each pan). Bake in preheated oven for about 25 minutes, or until cake springs back to touch. Remove cake and sprinkle chopped Lindt Mint Chocolate over tops of each layer. When chocolate melts, spread gently evenly across tops. Let cool in pans for 15 minutes then remove to racks to cool completely. Remove parchment paper.

For Creamy Minty Frosting

1 ½ 1-lb. boxes powdered sugar
½ c. butter, at room temperature
2 tsp. peppermint extract (not mint extract, peppermint extract)
¼ c. milk or cream, approximately
1 box Andes Mints, unwrapped and chopped

Combine powdered sugar, butter, extract, and milk/cream in a mixing bowl. Beat until light and fluffy, adding more milk or cream, 1 tsp. at a time, if needed to bring mixture to spreading consistency. Place approximately 1/5th of frosting on top of each layer cake. Carefully smooth frosting on top of mint chocolate covered cake layers. Place frosted layers on top of each other on a serving plate. Use remaining 2/5ths of frosting to carefully frost sides of cake. Sprinkle chopped mints on tops and sides of cake. Let sit for an hour or two before serving.

Thanks for stopping by my kitchen today!  If you like what you read, sign up.  You’ll get a three line email letting you know when I post another recipe.  I won’t use your email address for anything else, ever, I promise!


Print Friendly, PDF & Email