Tag-Archive for ◊ BBQ ◊

11 Feb 2013 Gunpowder Polly’s Wild West Cowboy Steak

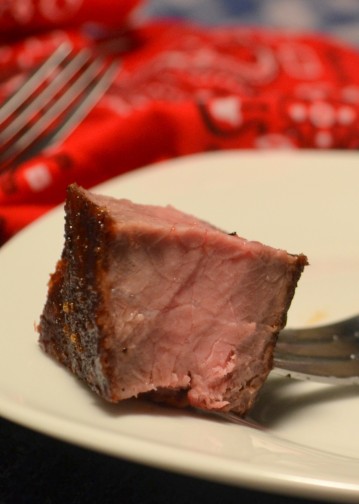
cowboy steak bite on fork 2

Last weekend I had a Wild West themed party at my house.  I suggested to my friends that they come dressed as cowgirls, and they did!  They moseyed on over to the Bar –the Trail Mix Bar– to fill their saddlebags with snacks and quenched their thirst at the watering hole.  I wanted the dinner to be Wild West themed, too, and steak immediately jumped to mind as the perfect main dish (I was later to find out that cowboys rarely ate steak, oops!).  Nevertheless, before steak enlightenment,  I set out to find out how to cook steak for twelve, quickly, accurately and indoors in February!  It was easier than I ever imagined, and more successful, too. After steak enlightenment, I was so excited about this easy, easy way to cook delicious steak that I decided to put it on my Wild West menu anyway.  I also served BBQ drumsticks, onion rings, cornbread with a delicious maple-orange butter, and roasted veggies.  OK, so the menu wasn’t exactly authentic, but it did have a Wild West feel to it 🙂 Also, in preparation for this Wild West dinner, I made place mats out of old blue jeans and bought red bandannas to use as napkins!

Now, for the steak.  Buy some really thick steaks.  I used rib-eyes, but any kind is fine as long as the steaks are thick…, over one-inch thick!  When you get the steaks home, dry age them.  This is a crucial step so buy the steaks early in the week.  Take the plastic wrap off the steaks, place them on a rack, and set them in the refrigerator, uncovered, for up to five days.  That’s right, put the steaks on a (baking) rack (with a tray underneath) in the refrigerator, uncovered, for a few days.  THIS, my friend, is the first half of the equation of a delicious steak.  The second half of the equation is the cooking method in the recipe below. This recipe includes the Cowboy Steak rub I used on my steaks, but you can use any favorite rub, it’s the dry-aging process and cooking process that are important.

For most cowboys,  even for the heartiest meat lovers, one-half of a thick rib steak is probably a good serving size.  I served my cowgirls one-third of a steak each. So with that in mind, your 4 thick steaks, with side dishes, will serve 4 football players, 8 men/boys, or 12 lightweights/small women/teenage girls.

Gunpowder Polly’s Wild West Cowboy Steaks  

(cooked in a modern indoor kitchen)

  • 2 teaspoons kosher salt
  • 1 teaspoon black pepper
  • 1 teaspoon Hungarian sweet paprika (regular or smoked paprika can be substituted)
  • 1 teaspoon garlic powder (can substitute onion powder, if you don’t have garlic powder)
  • 1 teaspoon favorite dried herb, many people like thyme, I prefer basil, some like oregano…put in what you like
  • 1 teaspoon ground cumin
  • ½ teaspoon smoked ancho chili powder (or any other chili powder)
  • 1 teaspoon finely ground coffee beans
  • 4 thick bone-in rib eye steaks ( 1 ¼” to 1 ½ thick; each steak weighing 12 to 16 ounces)
  1. Buy your steaks and dry age them in the refrigerator for up to five days.  Remove the steaks from the package.  Place them on a rack.  Place a tray under the rack to catch any possible drips.  Place the steaks, rack and tray in the refrigerator, uncovered, for up to 5 days.
  2. One or two hours before you want to start cooking, remove steaks from refrigerator and bring to room temperature.
  3. Mix  all rub ingredients –salt, pepper, paprika, garlic powder, dried green herb, cumin, chili powder, and ground coffee– in small bowl. Sprinkle approx ½ teaspoon of rub mixture over each side of the steaks, press and rub mixture into meat. Let steaks stand at room temperature 1 hour.
  4. Preheat the oven to 425°.
  5. Get out an oven safe frying pan large enough to fit all steaks (or use two frying pans), put 1T-3T olive oil in the bottom of the frying pan/s and heat (on the stove) until the oil is smoking (but don’t let the oil burn) and the pan is very, very hot.
  6. Keep heat under the pan on high, or medium high if there appears to be imminent danger of fire, and add the steaks to the hot pan.  Do not touch the steaks for the next five minutes.  Let steak cook on high for exactly five minutes.
  7. Turn the heat off.  Quickly turn the steaks over.  Place the still hot pan–with the steaks still in it–into a hot oven. Close the oven door and set the timer for five minutes.
  8. Remove the steaks and pan from the hot oven. Transfer the steaks to a cutting board, cover lightly with foil, and let sit for ten minutes before cutting or serving.
  9. Serve!  You’ll be amazed at how easy it was to cook the perfect medium rare steak.  Your guests will love, love, love the texture and  taste of the steak.  Look at THIS!

My daughter made these delightful cookies for dessert, so fun and tasty! Check her out at Party Girl Cookies or on Facebook 🙂

Here are a few more pictures from my Wild West party, yeeeeHAW!

Thanks for stopping by my Wild West kitchen today!  I hope this recipe becomes a staple in your kitchen, it definitely has in mine 🙂

04 Sep 2011 Sparkling Watermelon Lemonade

Last family BBQ of the season?  I wish I had posted this recipe as a season opener so that we could have had enjoyed this drink throughout the summer, but at least it is posted in time for the last BBQ of the summer. So toast the summer good-bye and pack away the white shoes with a glass of this sparkling Watermelon Lemonade.

This is  a summery, refreshing drink that’s lightly bubbly. No artificial colors, no artificial flavorings, no preservatives; just all natural ingredients! (…and it will use up all of that H-U-G-E watermelon you just bought!  My local grocery store had BIG ‘UNs for $2.49 yesterday.  How could I resist? Now, with this recipe for Watermelon Lemonade, none of that BIG ‘UN is going to waste!)

You could easily use this recipe and make a watermelon concentrate to freeze for future use.  Just mix the watermelon puree, the lemon juice, and the simple syrup, stir to blend. and then freeze (a quart Ziploc bag would work fine).  When ready to serve remove concentrate from freezer, defrost, add water and sparkling water, and stir until blended.

The kids are going to love this.  In fact, I think it will be their favorite. Go ahead and make some concentrate.  You know there is going to be a kid oriented event in the next few weeks.  Better to serve them good-for-you Watermelon Lemonade than a can of fizzy artificial flavorings and colorings.

This recipe has a long pedigree.  I found it here, http://traceysculinaryadventures.blogspot.com/2011/07/watermelon-lemonade.html (Tracey has posted a much better picture of the Watermelon Lemonade), where it was adapted from from Smitten Kitchen who adapted it from  Bubby’s.  I added the recipe for 8 servings  (why not make a pitcher  full?) and changed the ratio of bubbly water to straight water. You could make either version with all still water, or with all bubbly water.  Do what suits you. Make this recipe yours! Enjoy!  Here’s look to next summer, when we can have glass after glass after glass of this Sparkling Watermelon Lemonade.

Sparkling Watermelon Lemonade

For two glasses:

  • 1/4 cup freshly squeezed lemon juice (usually one lemon)
  • 1/2 cup fresh watermelon puree (Put cubes of seedless watermelon in blender and whirl until smooth.  Strain to remove seeds and pulp. )
  • 3-4 tablespoons simple syrup (recipe below, make first and let cool!)
  • 1/2 cup cold water
  • 1/4 cup sparkling water

Add all of the ingredients to a small pitcher and stir to combine.  Divide between two glasses and serve over ice.

For Eight Servings:

  • 1 cup freshly squeezed lemon juice (4-5 lemons)
  • 2 cups fresh, strained watermelon puree (about 1/2 a medium watermelon)
  • 1 cup simple syrup (recipe below, make first and let cool!)
  • 1  1/2 cups cold water
  • 1  1/2 cups sparkling water

Add all of the ingredients to a small pitcher and stir to combine.  Pour into ice filled glasses and serve.

Simple Syrup:

To make the simple syrup: Combine equal parts water and sugar in a small saucepan and bring to a simmer, stirring occasionally.  (1/4 cup of sugar and water for 2 servings, 1 cup of sugar and water for 8 servings). Continue simmering until the sugar has dissolved.  Turn off the heat and let the syrup cool to room temperature.  Leftover syrup can be stored in the refrigerator for up to one month.

Thanks for stopping by my kitchen today.  I hope I’ll be back cooking up a storm tomorrow.  Fingers crossed, I’ll see you then!

Polly


23 Jul 2011 Beef Skewers

Meat on a stick! Is there anything better?  When I was pregnant with my first child, my cravings were iced tea, tomato soup, and “tasty chunks of beef”!  Twenty-six year later, I still crave tasty chunks of beef!

This is a very easy recipe, resulting is some mighty fine, Asian accented, “tasty chunks of beef”.  Chill the meat for 30 minutes, marinate for 30 minutes, grill and eat.  For a special treat serve with corn-on-the-cob, grilled veggies or a salad and some Bloomin’ Onion Bread!

When I was a single full time working mother of three children I was a master of freezer food.  This was one of my favorites.  Homebaked Chicken Nuggets were another.  I would buy two flank steaks and some skewers.  I’d unroll the flank steaks and then freeze for 30 minutes to make it easier to slice. At the same time I would soak the skewers in cold water.  Then I’d probably sit down with my feet up, an iced coffee and a good book while the the meat chilled and the skewers soaked, LOL!  A sense of humor is a wonderful thing!  More than likely during that thirty minutes I’d finish putting the groceries away, wipe up a spill, ask a telemarketer to put me on the no-call list, solve a kid dispute, feed the dog, move the laundry over, eat lunch and load the dishwasher …  ANYWAY, after thirty minutes I’d slice the beef and thread it onto the skewers.  Then I would layer the skewers into a shoe box sided plastic container.  I’d put wax paper between the layers, and freeze the whole box.  One box would last two or three months and provide plenty of yummy and quick week night main dishes…easily expandable to however many people were home.  Just take out 3-5 skewers per person.  Mix up the marinade.  Marinate the desired number of skewers for 30 minutes, then grill or broil!

Oh, and I often omit the sesame seeds, as I don’t care for them 🙂

Beef Skewers

  • 1 flank steak, approx 1.5 lbs, (unrolled) and slightly frozen (for about 30 min or so)
  • 30 bamboo skewers (soaked in water for 30 minutes)

Marinade

  • ¼ cup soy sauce
  • ¼ cup sugar
  • 2 Tablespoons Sake (an opened bottle will keep 1 year in refrigerator)
  • 2 cloves garlic, smashed
  • 1 ½ teaspoons grated ginger (keep any leftover fresh ginger in baggie in freezer, when ready to use no need to defrost, just peel and grate!)
  • 2 tablespoons toasted sesame seeds (toast in dry frying pan until fragrant)
  • 3 green onions sliced

  1. Slice flank steak, across the grain, into thin strips.  Thread meat slices onto skewers, accordion style. It’s easy!  Child’s play!  (NOTE: Meat on sticks can be frozen at this point. When ready to use, just remove from freezer.  Let defrost for as long as it takes to make marinade.  Then continue with recipe.)
  2. Combine soy sauce, sugar, and sake; stir well to dissolve sugar.  Add in garlic, ginger, sesame seeds, and green onions.
  3. Pour over meat on sticks.  Marinate 30 minutes.
  4. Remove skewers from marinade.
  5. Grill over hot fire or broil for 2-3 minutes on each side.  Good hot, room temperature, and cold! I’ve served these as appetizers and as a main dish.

    Thanks for stopping by my kitchen today!  I hope I have given you an idea for this weekend’s BBQ and for busy school night meals, too!

    28 Jun 2011 Grilled Vegetable Platter

    I love veggies, as long as they are cooked.  If they are grilled, even better.  I started grilling veggies a few years back.  I just sliced and grilled.  Except for loosing a significant number of veggies through the grill, they worked out great.  I grilled carrots, zucchini, asparagus, onions and sweet potatoes.  Now I am working on fancier grilled veggies; a little marinade, a little glaze, grill marks…

    Last week I received an email, “Top Ten Recipes of June 2011”.   This email came from Taste of Home magazine.  I am not a huge fan of Taste of Home, too many of their recipes start out with a mix, but I am a sucker for Top Ten lists. So I opened the email.  The picture of the  Grilled Vegetable Platter looked good, the recipe had five stars out of five stars with twelve reviews, so I clicked away.  The recipe sounded good and looked simple enough, so I tested it…, winner, Winner, WINNER!

    Don’t feel like you have to stick to the veggie combo listed.  Grill what you have and what you like.  I left out all the bell peppers.  I. don’t. like. bell. peppers.  I didn’t add in any mushrooms because I just posted that fabulous recipe for Grilled PortobellosTaste of Home reviewers also reported adding green beans, snow peas, sweet potato rounds, and halved cherry tomatoes  into the mix.

    My change to the Taste of Home recipe is to make two marinade mixtures.  Use one to marinate the veggies in prior to grilling (and then discard that marinade with the Ziploc bag), and then use the second one to drizzle over the veggies after grilling, the second marinade is just slightly different from the first. I also substituted freshly minced garlic for the garlic powder in the first marinade.

    Now for my number one tip on grilled veggies… Grill the veggies first, before the meat or the fish.  Veggies are grill hogs, taking up an entire grill, and some of them take a surprisingly long time to grill, onions especially. The asparagus will cook most quickly, then the squash, then the carrots, and the onion will probably still be cooking when you start in on the meat.  Just remove each veggie when done and, when your veggie platter is mostly complete, drizzle with the second marinade, and place the whole platter in a warm oven.  Another reason for cooking the veggies first?  You can be in the middle of cooking them when  your guests arrive, and I haven’t met a guest yet who is not impressed by a grill covered in marinated mixed veggies, some with nice char marks!

    Grilled Vegetable Platter

    For the pre-grilling marinade

    • 1/4 cup olive oil
    • 2 Tablespoons honey
    • 1 Tablespoon Balsamic Vinegar
    • 1 teaspoon dried oregano
    • 1 clove garlic, minced or 1/2 teaspoon garlic powder

    For the post-grilling drizzle

    • 2 Tablespoon olive oil (this is the time to use your best tasting/most expensive olive oil)
    • 1 Tablespoon honey
    • 1/2 Tablespoon (which is equivalent to 1 1/2 teaspoons) Balsamic Vinegar
    • 1/8 teaspoon pepper
    • 1/4 teaspoon salt

    Veggie Mix (mix it up to suit what you have on hand, what you like to eat, and how many people you are serving…keeping in mind grilled veggies make great leftovers and are almost as good eaten at room temperature as they are when they are eaten fresh from the grill)

    • 1 pound fresh asparagus, trimmed
    • 3 small carrots, cut in half lengthwise
    • 3 small zucchini, cut in half lengthwise
    • 1 large sweet red, yellow, or green bell pepper, cut into 1-inch strips
    • 2 medium yellow summer squash, cut into 1/2-inch slices
    • 1 sweet potato (I prefer Garnet Yams), peeled and cut into slices
    • 1 medium red onion, cut into four wedges (I used a sweet Vidalia onion)
    • other possible add ins or substitutions: mushrooms, halved tomatoes, green beans, snow peas…
    1. Combine the olive oil, honey, Balsamic vinegar, oregano and minced garlic or garlic powder for the marinade. Pour into a large resealable plastic bag; add the vegetables. Seal bag and turn to coat; refrigerate for 1-1/2 hours.
    2. Combine the ingredients for the drizzle; cover and set aside.
    3. Place vegetables on a grilling grid (I don’t do this…I place the veggies directly on the grill, and loose a fair number of asparagus spears, skinny carrots and zucchini).  Grill, covered, over medium heat for 4-6 minutes (adjust for each veggie) on each side or until crisp-tender. Note: The onion wedges will probably fall apart.  That’s OK.  Just grill the slices (the slices that don’t fall through the grill, that is).  As soon as each slice is nicely brown and feels soft, transfer to platter and drizzle with some of the second marinade mixture.
    4. Transfer to a large serving platter. Drizzle with the second “marinade” mixture.
    5. Serve, or if desired, place in warm oven (250 degrees) to stay warm until needed

    So now you know what you will be grilling, what should you have for dessert?  S’mores (or S’mores Bars?), Frozen Bananas (always fun), or my personal favorites, Fresh Blueberry Pie or a Mixed Berry Pie?? Have some fun and search my recipes!

    Outdoor grilling rocks! Hope you are enjoying both cooking and dining outside.  Next up, grilled artichokes! Thanks for stopping by my kitchen again today.  I love it when you pop in!