Tag-Archive for ◊ breakfast ◊

31 Jul 2013 Blueberry Heaven


Do you ever go into a bakery?  Of COURSE you do!  Do you ever buy a pastry that looks delicious, but then are seriously disappointed in the taste…? And then, to top it off, are you overwhelmed by the amount of  fat you’ve just consumed for something that really wasn’t that all that great?  Me, too 🙁 Do you ever wish, on a weekend morning with your second cup of coffee, for that imagined deliciousness, without all greasy pastry and sugary icing?  Me, too 🙂 Pssssst…  Come here! No, come closer! I am going to tell you how to make a breakfast pastry as delicious as the one you are dreaming of…, and without the load upon load of grease and sugar!

Now. Seriously…, am I your best friend, or what?!

It’s so simple!  You need 2 slices of bread, a bit of cream cheese, and a handful of blueberries. It helps if you have a sandwich maker or a panini press, but if you don’t, use a frying pan and make this Blueberry Heaven just like you would a grilled cheese sandwich.

I found the original recipe here: http://www.fitfromconception.com/2012/06/blueberry-breakfast-grilled-cheese.html  No, I am not pregnant, roflmao.  Neither are any of my children.  I have no idea how I ended up at that website, but I am glad I did.

Blueberry Heaven

[a Stand-in for Fat and Sugar Laden Blueberry Pastries]

For each serving:

  • 2 slices of bread, any kind.  Make it whole wheat if that’s the way you roll.  I use Orrowheat Country Buttermilk Bread.  Cinnamon bread would probably be delicious, as would almost any kind of homemade bread (don’t use homemade rye bread or anything like that!).
  • Plain cream cheese, enough to spread on two slices of bread.
  • a sprinkling of sugar, less than 1/4 tsp, optional
  • a handful of fresh blueberries, about 24 (jam can be substituted)
  • Butter, optional, unless you are using a frying pan


  1. Preheat sandwich maker, panini press, or frying pan.
  2. Spread each slice of bread with cream cheese, no measurements here, just coat the slices of bread to your preference. (If you are using a frying pan, spread the other side of the bread with butter)
  3. Sprinkle a bit, and I do mean a bit, less than 1/4 tsp of sugar over the cream cheese, just to sweeten up the cream cheese a little bit. (I’ve made this without the sugar, and it’s just not the same.)
  4. Arrange blueberries on one slice of the cream cheese covered bread.  Use as many as you want, but I think 24 is about perfect.  I like to evenly space the blueberries on the bread so I get an equal number of  blueberries in every bite.
  5. Put the other slice of cream cheese covered bread onto of the blueberries, cream cheese to cream cheese.
  6. Put the sandwich in the press, latch close, and cook for 2 minutes. (If using a frying pan, put the sandwich, butter side down on the preheated frying pan.  When the first side is golden brown, flip, and cook the second side until it is golden brown too.)
  7. Remove sandwich from the press or the pan and let cool a bit, the filing will be mad hot right out of the press. Be careful.
  8. Enjoy! It’s a little slice of heaven, isn’t it?
  9. Repeat.  You’ll want to make one for someone else… 🙂

Thanks for stopping by my kitchen today! Aren’t you glad you don’t have to drive over to the Olde Time Bakery for a pastry that will only make you feel badly about yourself? Hooray!!

11 Feb 2013 Crunchy Oat Clusters / Granola Bars

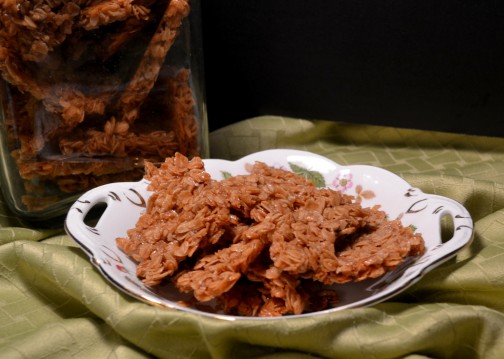
oat clusters

Sometimes, I don’t want to cook in the morning.  Sometimes I don’t even want to make toast.  I just want a lovely latte (I am always willing to make a latte) and  something on the side, while I casually drink my coffee and read the newspaper in my recliner. Sometimes that “something on the side” is a graham cracker, sometimes a cookie, sometimes  it’s something even more sinful. For a couple of years now, I’ve been thinking I should figure out a breakfast that works with my morning routine. You are probably thinking, fruit, eat fruit! No. Apples and oranges, pears and bananas do NOT go with coffee.  Dried fruit does, but that causes me to…ummm…make rude noises on a frequent basis, so dried fruit is out, too.  Last year I made a lot of granola.  I like granola.  I made some good ones, but eating granola  while balancing coffee and a newspaper is  inconvenient and messy.  I couldn’t get my granola to clump, and I needed clumps, big clumps, clumps like the size of a graham cracker.  Paring it down even more: I. want. crunchy. oat. clumps.  Now there’s a challenge!  Try running “Crunchy Oat Clumps” through a search engine and see what you get.  Not encouraging.

So! I have figured it out myself!  It took a couple of tries, and I pared down a lot of recipes, to get just want I wanted. And, tada! I have them now! Sweet, crunchy oat clumps, sort of like a Nature’s Valley Granola Bar.  My oats are tossed with a bit of butter, a bit of oil, some honey and some corn syrup, all necessary to get the large, crisp clumps and I added in some vanilla and a bit of cinnamon, too, so these oat clumps taste GOOD! They have none of those nasty additives, no preservatives and none of the excessive packaging that processed granola bars have. Score!

Crunchy Oat Clusters

  • 4 cups Old-fashioned oats
  • ½ cup light brown sugar
  • ½ teaspoon cinnamon
  • ¼ teaspoon Kosher salt
  • ¼ cup honey
  • ¼ cup corn syrup
  • ¼ cup butter
  • ¼ cup canola oil (or coconut oil, or vegetable oil)
  • 1 tablespoon vanilla extract
  1. In a large bowl combine oats, brown sugar, cinnamon and salt.  Stir to combine.
  2. In a small sauce pan combine honey, corn syrup, butter and oil.  Bring to a boil.  Reduce heat and simmer for 5 minutes.
  3. While sauce is simmering, line a baking tray with parchment paper.
  4. Remove sauce from heat and pour over the oat mixture.
  5. Pour oat mixture onto a parchment lined baking pan.
  6. With spatula or offset knife, spread oat mixture to an even thickness, and press down slightly.
  7. Place tray into preheated 300° oven and bake for 25 minutes.
  8. Open and turn off oven.  Let oats stay in oven for another hour or so, or until oats and oven are cool.
  9. Remove oats from oven and when completely cool break into pieces.
  10. Store in an airtight container.
  11. Eat whenever.  My son snacks on them after swim practice.  I like them in the morning, with a latte while I read the newspaper, in my recliner 🙂

In am sure these Crunchy Oat Clusters can be gussied up a bit.  You could add some coconut, chopped nuts, dried fruit…, make them yours!  You could probably also substitute real maple syrup for the honey, if you wanted.  You have to keep the corn syrup though (don’t worry too much, the corn syrup you buy at the store is not high fructose corn syrup). As for me, I like them just like this.  Simple, slightly sweet, very crunchy, and full of those good-for-you breakfast oats.

Thanks for stopping by my kitchen today and have a wonderful morning!