Tag-Archive for ◊ chocolate ◊

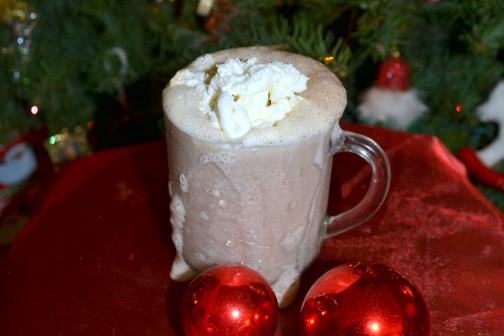
20 Dec 2014 Minty Malty Hot Chocolate

You HAVE to try this!  It’s delicious, and it’s mild and smooth and warm and comforting, and sooooo Christmassy!.  I don’t know about you, but I don’t like bitter hot chocolate (Starbucks!), and I don’t like hot chocolate that is so strong I can hardly finish it (Starbucks!), or so rich I feel sick after drinking it (Paris!).  This hot chocolate is perfect. Mild. Creamy. Totally Yummy. Totally Christmassy.  Serve it with a candy cane stirrer or crushed candy canes sprinkled on top of the whipped cream. I served it at my Christmas party and it was a big hit.

Make it to watch your favorite Christmas movie with, or to read your favorite Christmas book with, or to just sit under the Christmas tree and watch the lights.  Make it for after a long walk in the snow (or, in California, in the rain), or for the Christmas Carolers (there’s so few of them now). Or to celebrate having finished all your Christmas shopping. Or make it for Santa and leave it out with the cookies–with testers for the whole family, of course. Make it for Christmas morning, to open the presents with, or make it for Christmas night to end the day with.  Just make it.  You’ll love it.

There is a problem though, finding Chocolate Malted Milk Powder.  I had to order it from Amazon.  The first time I made it, I made it with Vanilla Malted Milk Powder though, which is easily found in any grocery store, then I added cocoa powder and sugar to taste. It was great! (I used 1/2 cup Vanilla Malted Powder…, and just kept adding equal amounts of cocoa powder and sugar until it tasted right.)

The original recipe starts with a gallon of milk, and leftovers do keep well in refrigerator and warm up well in the microwave, but if you want to make half a recipe, I have written the recipe with easy to half measurements. If you are making for a party, mix everything on top of stove, then pour into a crockpot to keep warm.

Trust me!  This is delicious.  Let me know how you like it.

Minty Malty Hot Chocolate

  • 1 gallon whole milk
  • 1 11 oz pkg (about 20-22) chocolate-covered cream filled mint patties (Mini York Peppermint Patties)
  • 1 ½ cups chocolate malted milk powder* (order from Amazon)
  • 1 tablespoon vanilla
  • Whipped cream, marshmallows, mini candy canes or crushed peppermints topping (optional)

Combine all ingredients in a pan on top of the stove, stir  until mint patties melt.  Stir occasionally, and watch like a hawk. Once milk gets hot enough to boil over, there’s no stopping it.  Just gently heat the milk and melt the mint  patties. (Can be made a few days in advance.) Beat to combine well.  Serve from pan, or place in crock pot to keep warm up.  (Can keep in crockpot for at least 2 hours.) Top with whipped cream, marshmallows, mini candy canes or some crushed up peppermints…, or serve “as is”.

*Or sub ½ cup vanilla malted milk powder and enough cocoa powder and chocolate to taste. I did this once, delicious, but don’t remember the quantities…, just a bit of this and a bit of that. Then a bit more of this, a bit more… Until it tastes delicious!

Thanks for stopping by my kitchen today,

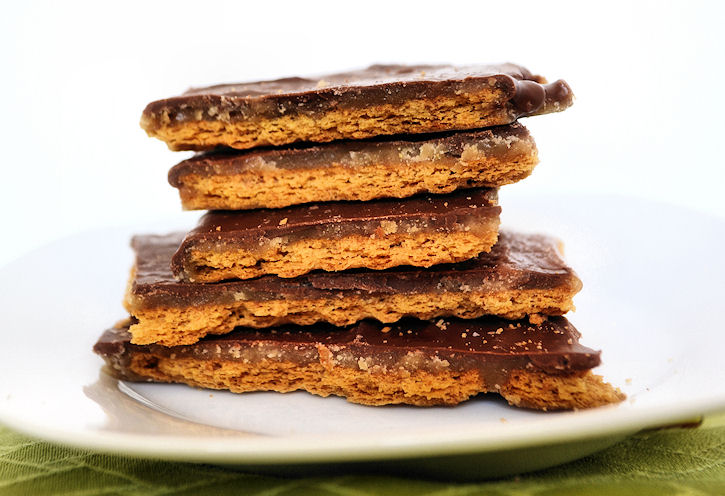
29 Mar 2014 Caramel and Chocolate Covered Graham Crackers

Graham-crackers-2

It’s been a terrible, horrible, no good, very bad few days around here. We are all fine, but there was a family brouhaha that just didn’t sit right. We were all out of sorts, and, truth be told,  a bit afraid of what the future will bring, too.  So what to do? Make the all time favorite family comfort food, of course!

This recipe is rustic and quik, and it’s done in 20 minutes.  So it’s great just to start on this and put some of that pent up adrenaline to good use. But then there’s the cooling off period. Once made, these bars have to  sit in the refrigerator to harden up a bit. Again, another good thing.  A cooling off period is needed after a big family brouhaha.  Then comes the peace and contentment, sitting down with a good cup of coffee, some rustic chocolate covered graham crackers and reflecting on what went right and what went wrong, and figuring out how to right the wrongs and ultimately, bringing peace back to the family.

In August of 2005 my friends Sharon and Margie, from Lake Arrowhead Retreats, gave me a recipe for Saltine Toffee Cookies which they had found on AllRecipes.com.  Truth be told, the recipe didn’t sound very good.  Saltine crackers, brown sugar, butter, and melted chocolate?  Just say no.  But they insisted I try it.  They insisted the recipe was good.  I trusted them, they make some great food, so I tried it. It WAS good. VERY good.  Then I came to find out this recipe is sort of an Internet sensation and I might have been the last person on the planet to know about it!

Years pass, and one fine weekend, I took a chocolate making class.  The instructor of the class talked about how her mother used to make a ganache and pour it over crumbled up graham crackers as a bedtime snack for her and her siblings (I know, I know, what a Mom! I never did that for MY kids…).  Then the gears started churning.  Chocolate covered graham crackers are one of my favorite things in the whole wide world, but I had never made them.  The chocolate covered graham crackers from Starbucks are the best, but they are a bit too rich with a bit too much chocolate. OH!  The light bulb popped!  Could I make chocolate covered graham crackers for my kids, too?  I could one-up that other Mom, as well!  I could make chocolate covered graham crackers and with caramel!  Never mind that she was using a fancy ganache and I was just melting giant chocolate bars, LOL! What if I use the Saltine Toffee Cookie recipe but substitute graham crackers for the saltine crackers.  What if???

So I did it.  Many times.  My son says these are the best things I make. The last tin I made, hidden in the refrigerator behind the lettuce, lasted only three days.

Turns out, I am not the first person to think of this!  Lots of people on the Internet have used graham crackers instead of saltines with this recipe. Again, why am I one of the last people on the planet to know about this?! 🙂 Anyway, here’s my recipe.  You can find lots of versions all over, but this is the one that works for me.  Keep these Caramel Chocolate Covered Graham Crackers refrigerated, when they are not being eaten…  If these cookies sit out too long at room temperature the graham cracker starts to soften and loose it’s crunch 🙁 My 2005 copy of this recipe (with saltines rather than graham crackers) specifies that the recipe makes 35 servings. ROFLMAO!!! That’s so funny 🙂

Caramel and Chocolate Covered Graham Crackers

  • approx. 2/3 a box of graham crackers (two wax covered packages out of a box of 3 packages)
  • 1 cup butter
  • 1 cup dark brown sugar
  • 1 large sized (4 or 5 oz) chocolate bar, chopped (I like a Symphony Bar or a Cadbury Bar, if you like dark chocolate, the Hershey’s Special Dark Bar is good)
  • ¾ cup chopped nuts (if you like nuts.  I have never added nuts) OR, if it’s December, crushed candy canes! (I loooove this option!)
  1. Preheat oven to 400 degrees.
  2. Line a rimmed cookie sheet with graham crackers.  Place the graham crackers as close together as possible. You will need most of 2 waxed covered packages. Set tray aside.
  3. In a medium saucepan, combine butter and sugar and stir constantly, over medium heat, until sugar is melted.
  4. Raise heat slightly, to bring mixture to a boil.  Boil vigorously for 3 minutes, without stirring–shaking the pan occasionally is OK (the original directions said to “stir constantly” but I have found this to make a grainy caramel layer).
  5. Immediately pour caramel over graham crackers.  Use an offset spatula to quickly spread the caramel evenly over the crackers.
  6. Place tray in hot oven and bake for 5 minutes.
  7. Remove tray from oven and sprinkled chopped chocolate evenly over top.  Let chocolate just sit on top of caramel for 5 minutes.
  8. Spread the now melted chocolate evenly over the caramel.  Sprinkle with nuts (if using).
  9. Let tray sit until chocolate has hardened.  This make take a few hours.  To speed things up, put the tray in the refrigerator for about 15-20 minutes.
  10. When chocolate is set, break bars into uneven pieces. Sneak a piece or two.  Serve or cover and hide in refrigerator until needed.

Thanks for stopping by my kitchen today!  If there is a brouhaha in your family, I hope it’s over quickly and sweetly!

02 Mar 2014 Black Forest Torte (Black Forest Cake)

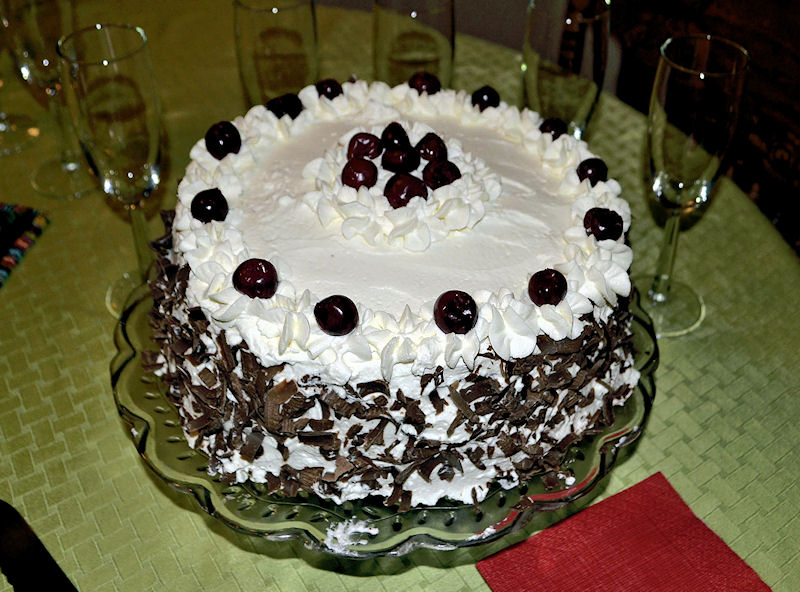
BookThief-torte

Once a year I host a book club meeting at my house.  My night was last night.  The book was “The Book Thief” so the theme was German food.  Thanks to input from the Internet, I decided to make a “Black Forest Torte” for dessert.  I found a recipe posted on Food.com by a “real German lady”, and decided to make it, with no advance practice session (I know, living on the edge!).

The cake was a delicious show-stopper.  Just look at that picture! I haven’t made too many show-stopper cakes before so I was quite thrilled with the way this one turned out.  PHEW! And I’d like to extend a big, grateful ‘danke’ to the “real German lady” 🙂

I made a few changes to the recipe, of course:  I used pitted sour cherries from a jar, rather than fresh cherries (they’re not in season right now), and I used butter, rather than shortening, in the cake batter. I also made two 9.5 inch cake layers instead of the three 9-inch layers specified in the original recipe (I really dislike 3 layer cakes).  I modified the mixing method for the cake. I used espresso powder, rather than cold brewed espresso, in the filling and adjusted the amount of Kirsch in the filling as well. I upped the whipped cream frosting by 50%.

Now, if you make this cake, you’ll need to start three days in advance and, please, DO make this cake!

  • Day 1: Drain the cherries and soak in Kirsh.
  • Day 2: Make the chocolate layer cakes, soak the cakes in the Kirsch drained from the (now boozy) cherries.  Make the filling and assemble the layers one on top of the other.  Refrigerate overnight.
  • Day 3: Make the chocolate curls and the whipped cream frosting. An hour or two before serving, decorate the cake with the whipped cream, reserved cherries, and chocolate curls. Serve!
  • Day 4: The leftovers are yummy! I called four friends over for tea, and they all accepted, enjoyed the cake, and took slices home for their husbands!  (So far, I have cut sixteen slices from this cake, and there is one slice left in the refrigerator for my 23 year old twins to fight over.

 Black Forest Torte

Cake

  • 1 2/3 cups all-purpose flour (8 oz)
  • 2/3 cup cocoa powder (I had Hershey’s on hand, so that’s what I used)
  • 1 1/2 teaspoons baking soda
  • 1 teaspoon salt
  • 1/2 cup shortening
  • 1 1/2 cups sugar
  • 2 eggs
  • 1 teaspoon vanilla
  • 1 1/2 cups buttermilk

Mocha Buttercream Filling

  • 1/2 cup kirsch
  • 1/2 cup butter
  • 3 cups powdered sugar
  • 1/8 teaspoon salt
  •  1 1/2 teaspoons instant  espresso powder
  • 2 jars of pitted sour cherries, drained (I got mine at Trader Joes-1 1/2 lbs each, most supermarkets have  1 lb. cans of cherries in the canned fruit section) OR 1 1/2 lbs fresh black cherries, pitted

Whipped Cream Frosting

  • 3 cups heavy whipping cream
  • 1 teaspoon vanilla
  • 2-3 tablespoons  kirsch
  • 2 tablespoons dry milk powder (optional, but helps with stability of whipped cream icing)
  • 1/3 cup powdered sugar

Chocolate Garnish

  • One large, 3.5-4 oz. dark chocolate bar, grated or curled

DIRECTIONS

  1.  Drain the cherries then soak them in 1/2 cup Kirsch overnight. Discard the cherry juice UNLESS you want to make a non-alcoholic cake.  If you want a non-alcoholic cake (like, if children will be eating it) use the cherry juice  from the cherries instead of the Kirsch and proceed as outlined below.
  2. Preheat the oven to 350°F
  3. Drain the cherries from the Kirsh.  RESERVE the liquid!  Most of the liquid will be poured over the hot cakes. Reserve 2 tablespoons of the liquid for the filling.
  4. Line the bottom of two 9 inch round cake pans with parchment. Spray the sides with “Pam for Baking”, or grease with a bit of butter or oil.
  5. Sift the dry cake ingredients together and set aside.
  6. With an electric mixer beat the shortening to soften, then add the sugar.  Beat for six minutes or until the shortening-sugar mixture is light and fluffy.
  7. Add the eggs, one at a time and mix well.  Stir in the vanilla.
  8. Add one-third of the dry ingredients to the sugar mixture and beat to combine. Add half of the buttermilk. Beat to combine. Add another one-third of the dry ingredients and beat to combine.  Add remaining buttermilk.  Beat to combine.  Finally, add the last of the dry ingredients and beat well. alternately with the buttermilk and mix well.
  9. Pour batter into the prepared cake pans.
  10. Bake in preheated 350 oven for approx. 25 minutes or until a cake springs back when touched.
  11. Remove the cakes from the oven.  Leave the cakes in the pans and immediately and slowly, pour some of the reserved Kirsch-cherry juice mixture over both cakes. Let the Kirsch soak in, then repeat until all but 2 tablespoons of the Kirsch-cherry liquid has been used. (The remaining 2 tablespoons liquid will be used in the filling)
  12. Let the cakes cool in their pans.
  13. Make the filling. With an electric mixer  beat the butter until light and creamy. Add the powdered sugar, salt, espresso powder, and 2 tablespoons Kirsch-Cherry juice and beat well for 3 or 4 minutes. If the filling is too thick add some extra Kirsch, cherry juice, or cream (add only an extra 1/2 tsp. at a time). The filling should be spreadable, but firm.
  14. Place the base layer on cake plate.  Spread filling over top, then cover with drained cherries (save some good, firm, pretty cherries to go on top of the cake as decoration). I took the time to place each cherry in concentric layers, which I think helped with the stability of the cake. Add the second cake on top of the filling and cherries on the first layer.  Push down a bit to secure a firm fit between the layers.
  15. Cover the cake  and let sit in refrigerator overnight for the flavors to meld.
  16. A few hours before serving place the whipping cream, powdered sugar, Kirsch, vanilla, and optional dry milk powder in the bowl of an electric mixer. Whip the cream until it forms stiff peaks.
  17. Spread the whipped cream frosting over all of the cake. Decorate the sides first, then the top.  If you want to be fancy, put some of the whipping cream in a Ziploc or a piping bag and pipe rosettes or swirls around top and bottom of cake.
  18. Pat the reserved cherries dry, and then place in a pretty design on top of the cake.
  19. Grate the chocolate bar or use a vegetable peeler to make chocolate curls. Gently, and decoratively  press handfuls of the grated chocolate onto the sides of the cake.
  20. Store cake in refrigerator until an hour or so before serving.  Serve and enjoy.  (You should get about 16 generous slices from this cake.)

Thanks for stopping by my kitchen today, and I hope there is a Special Occasion coming up soon so you can make this cake.  It’s a keeper!

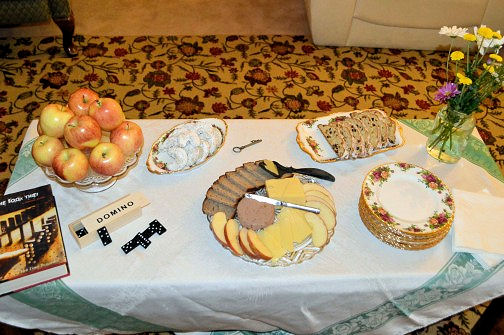
Just in case you are wondering, and in case you are reading this because you’ll also be hosting a book club meeting based upon “The Book Thief”, I also made Kipferls. Kipferls, which are significant in the book, were left by the window for people to take home (just like in the book).  I’ll posted that recipe, too, since they were soooooo good (but soooooo expensive to make, more about that later). My book club does snacks and dessert. For snacks I had a bowl of apples, German bread with cheese and liverwurst, and soft pretzels with a beer-mustard-cheese dip (no picture of the pretzels and dip) and Stollen! To drink, we had champagne, of course.  Those of you who read the book know why.

BookThief-snacks

21 Jul 2013 “Magic Shell” Topping for Ice Cream

magic shell with bottle[3] rattie

It’s summer.  It’s time for ice cream, and the easiest recipe ever posted on this site! Magic Shell!  You know the stuff, right?  You squeeze the chocolate-y liquid onto ice cream and it hardens up almost immediately.  Then you can use your spoon and shatter the thin chocolate all over the ice cream. Then you can stir the chocolate pieces  into your ice cream, and when you have a spoonful of the concoction the magic shell shatters again in your mouth.  It’s lovely.  It’s chocolate-y. It’s fun. It’s magic. It’s easy.

The recipe only calls for two ingredients.  And once you make it, you can keep it on the kitchen counter in a squeeze bottle for up to a month.

You need good chocolate, and coconut oil. Coconut oil?  Yep.  It’s not as hard to find as it used to be.  I even saw jars of coconut oil at Walmart, and Costco is selling huge bottles of it now.  It should be on the shelf of your grocery store, next to all the other oils.  If not there, and you don’t shop at either Walmart or Costco, try Trader Joe’s.

Magic Shell

  • 5  ½ oz. good quality chocolate, milk or dark, whatever is your personal preference (don’t use chocolate chips, use some good quality bar chocolate)
  • ½ cup coconut oil
  • Ice cream, for serving

Makes 1 cup

  1. Chop your chocolate and add it to a microwave-safe container along with coconut oil.
  2. Zap at 30-second intervals until chocolate melts into the coconut oil.  Stir well. At this point I like to pour my Magic Shell into a squeeze bottle, but this is not absolutely necessary.
  3. Pour mixture over ice cream, watch it harden, crack it open! Magic! Fun! Delicious!
  4. Because of the melting point of the coconut oil, the magic shell will stay liquid in a hot kitchen and solidify after sitting in a cold kitchen or the fridge. If your leftover shell hardens, just re-melt in the microwave. Stored at room temperature Magic Shell should keep for at least a month

Keep some of homemade “Magic Shell” and a carton of your favorite ice cream on-hand for quick, no cook, sort of special dessert.  Psssst…! Kids like to pour some rainbow sprinkles onto the chocolate sauce just before it hardens!

Thanks for stopping by my kitchen today.  See you again soon!