Tag-Archive for ◊ comfort food ◊

20 Mar 2017 B.O.B. Brownies

bob-brownies-bite

Google “Back of the Box” recipes and you’ll get lists such as 10 Best Back-of-the-box recipes from Epicurious, or Buzz Feed or The Daily Meal.  Never 20 best back-of-the-box recipes or 100 best back-of-the-box recipes.  Nope. Just 10. Because there are only about 10 really good back-of-the-box recipes 🙂

In my (albeit, limited) experience, it seems most back-of-the-box recipes sound good but in reality are quite plain and quite bland.  There are 10 good ones though!  Toll House Chocolate Chip Cookies, Philadelphia Cheesecake, Alber’s Cornbread, Rice Krispie Treats, Lipton Onion Dip jump to mind.  Pssst…! And now I have found another one! It’s on the back of the bag of Dutch Process cocoa powder that I purchased at Costco (brand name: Rodelle Organics).

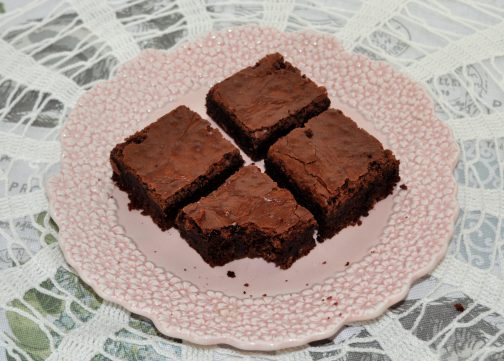
These brownies are delicious, and just my type of brownie.  Everyone seems to have their own preferred brownie type, right? This is mine.  Slightly crunchy top, oh-so-chocolately flavor, dense-but not fudge, light-but not cakey.  These are just right!  AND, they’re easy-to-make, and one batch fills a 9×13 pan!  The brownies slice well, too. What more could one want?

B.O.B.* Brownies

*Back of Bag (Rodelle Organic Dutch Process Baking Cocoa, sold at Costco)

  • 1 cup plus 2 T. butter
  • 2 ¼ cups sugar
  • 5 eggs (yes, 5. I was shocked, too)
  • 1 ½ tsp. vanilla
  • ¾ cup plus 1 T. flour
  • ¾ cup plus 1 T. Dutch Process cocoa powder (no substitutions)
  • 1 tsp. salt
  • ½ cup semisweet chocolate chips
  • ¾ cup chopped nuts (optional)
  1. Preheat oven to 350 degrees.
  2. Line 9×13 inch baking pan with parchment paper and spray lightly with cooking spray.
  3. Melt butter and sugar in a heavy saucepan on very low heat.
  4. Let the mixture slightly cool and transfer to a large bowl. Beat well.
  5. Add eggs, gradually, mixing well.
  6. Add vanilla extract.
  7. Sift dry ingredients together.
  8. Add dry ingredients to egg mixture, stirring gently and minimally.
  9. Stir in chips and nuts.
  10. Pour mixture into prepared pan and bake approximately 35 minutes. Do not overbake.
  11. Cool before cutting.
  12. Cut into squares and enjoy.
03 Mar 2017 Double Chocolate Marble Loaf

double-chocolate-marble-loaf

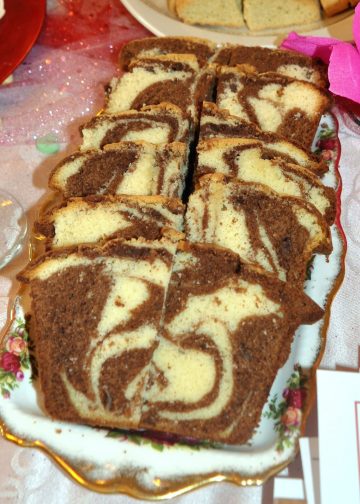
Weekend Cake!  Isn’t that a delightful subcategory of dessert? According to Dorrie Greenspan it’s a French concept. Weekend Cake is good for anything from breakfast through late night snacking.  Weekend Cake travels well, is long lasting and is best if left to sit a day before eating.

This recipe for Double Chocolate Marble Loaf, a “weekend cake” is from her cookbook, “Baking Chez Moi” . I’ve never been much for Marble Cake, often finding it to be dry and muddled.  Not this one! It’s truly delicious.  I’ve only made the orange chocolate-white chocolate version, but I am dying to make the mocha-cardamom version and the chocolate-mint version.

Double Chocolate Marble Loaf

  • 2 cups all-purpose flour (272 grams)
  • 1¼ teaspoons baking powder
  • 3/4 teaspoon fine sea salt
  • 1½ sticks (12 tablespoons or 6 ounces/170 grams) unsalted butter, at room temperature
  • 1 cup granulated sugar (200 grams)
  • 4 large eggs, at room temperature
  • 1½ teaspoons pure vanilla extract
  • 1/2 cup whole milk, at room temperature
  • 4 ounces best-quality white chocolate, melted and cooled (Lindt)
  • 1/4 teaspoon orange or peppermint oil (I used a bittersweet chocolate-orange chocolate bar, so no oil)
  • 4 ounces semisweet or bittersweet chocolate, melted and cooled
  1. Center a rack in the oven and preheat the oven to 325 degrees. Pull out an insulated baking sheet or stack two regular baking sheets one on top of the other. Line the (top) baking sheet with parchment paper or a silicone baking mat. Butter a 9-by-5-inch loaf pan, dust with flour and tap out the excess; set it on the baking sheet(s).
  2. Whisk the flour, baking powder and salt together in a small bowl.
  3. Working in the bowl of a stand mixer fitted with the paddle, or a large bowl with a hand mixer, beat butter on medium speed for 3 minutes, or until smooth. Add sugar and beat for another 2 to 3 minutes, scrape sides. Add the eggs, one at a time, and beat for a minute after each one goes in. The batter may curdle, but you needn’t worry.
  4. Reduce mixer speed to low and mix in the vanilla. Still on low speed, add the flour mixture in 3 additions and the milk in 2, beginning and ending with the dry ingredients and mixing only until each addition is incorporated.
  5. Scrape half of the batter into another bowl. Using a flexible spatula, gently stir the white chocolate into half of the batter. If you’re using the orange oil, stir it in as well. Stir the dark chocolate into the other half of the batter.
  6. Using a spoon or scoop, drop dollops of the light and dark batters randomly into the prepared pan — don’t think too much about the pattern — and then plunge a table knife deep into the batter and zigzag it across the pan. It’s best to move forward and not to backtrack. Don’t overdo it — 6 to 8 zigzags should suffice.
  7. Bake the cake for 80 to 90 minutes, or until a tester inserted deep into the center comes out clean. (My cake was done in 70 minutes, and I might have taken it out 5 minutes sooner.) Check the cake at the halfway mark, turn it around and, if it’s getting too brown, cover it loosely with a foil tent. Transfer the cake to a cooling rack and let it rest for 10 minutes, then unmold it, turn right side up on the rack and let come to room temperature.
  8. Storing: Wrapped well, the cake will keep at room temperature for up to 4 days. It can be wrapped airtight and frozen for up to 2 months; defrost it in its wrapper.

Spiced Mocha Variation: add 1 tsp. ground cardamom into the white chocolate portion and 2 ½ tsp. instant coffee or espresso mixed with 1 T. hot water to the dark chocolate portion. Omit the orange oil.

Mint Chocolate Variation: stir ¼ tsp. peppermint oil into the white chocolate portion and use only regular semi-sweet or bittersweet chocolate in the dark chocolate portion. Omit the orange oil.

24 Feb 2017 Italian Wedding Soup

italian-wedding-soup

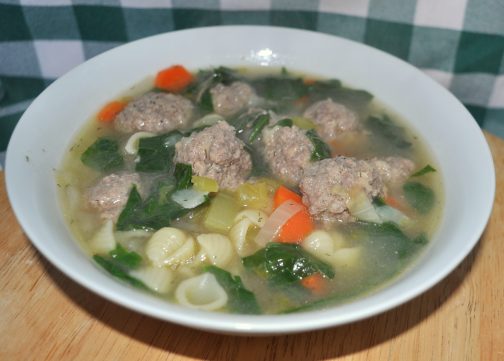
Italian Wedding Soup is easy to make, and is good as soon as it’s made (no need to sit overnight to intensify the flavors).  Not being Italian, I can’t claim this is just like my Nonna made. Nor can I claim to know the origin of the name, “Italian Wedding Soup”, but I did do a bit of Internet research.  Contrary to what some think, this soup is NOT served at Italian Weddings (although, because of it’s name, it is served at some Italian-American weddings in…Pennsylvania!).  Another theory is that the soup is a good “marriage” of ingredients, possibly green vegetables and meat. The most common story is the soup is easy enough for a new bride (or new groom) to make as one of their first home-cooked meals.  My non-Italian, non-traditional thought it that it’s great for a couple to make together.  One person could make the meatballs while the other makes the vegetable broth base.  Throw the vegetable broth and the meatballs together, simmer for a few minutes, and then sit down to enjoy a bowl or two of heart-warming Italian Wedding Soup.

This recipe is based upon one by Ina Garten, but I have changed Ina’s recipe somewhat.  The major change is I cook the meatballs in the broth, rather than bake them in the oven as Ina directs. I also make my meatballs out of ground beef instead of Ina’s ground chicken/ground chicken sausage combo.  I like a tastier meatball, and I think beef goes better with the Parmesan in the meatball than chicken does. I also added basil to the meatball. I don’t know why Ina forgot that!

I love soup. I can eat it for breakfast, lunch or dinner. One tip, every time I make a pot of soup, I freeze one or two individual servings.  It’s wonderful to have a ready-made, wholesome bowl of soup in the freezer for those days when you are rushing from points A to Z with no time to spare.  A bowl of soup in the freezer can keep you away from those fast food places. Honest.

Now go on, try it…Italian Wedding Soup!

Italian Wedding Soup

For the soup base

  • 2 Tablespoons olive oil
  • 1 cup chopped onion
  • 1 cup chopped celery
  • 1 1/2 cups sliced carrots
  • 2 teaspoons dill
  • 1/4 cup chopped fresh parsley (use more of the parsley in the meatballs)
  • 10-12 cups chicken broth (homemade is the best, of course)
  • 1/2 cup dry white wine
  • 1 cup small pasta (orzo, tubetini, small stars, mini shells..)
  • 1 batch of meatballs (recipe below)
  • 12 oz. baby spinach, stems removed and leaves coarsely chopped
  • salt and pepper, to taste
  • additional grated Parmesan, optional (for serving)

Heat the olive oil in a large, heavy bottomed soup pan.  Add the onion and saute until slightly caramelized, about 6 minutes.  Stir in chopped celery and saute for another 3 minutes. Stir in carrots, dill, parsley, chicken broth, and wine and bring to a boil. While soup is boiling, stir in pasta and meatballs.  Simmer for 8-10 minutes. Stir in chopped spinach and simmer for an additional 2 minutes.  Turn heat off. Taste broth.  Add salt and pepper as needed. Ladle soup into bowls and sprinkle with additional grated Parmesan, if desired.

For the Meatballs

  • 1 1/4 – 1 1/2 lbs lean ground beef (can substitute ground turkey or ground chicken, but the meatballs won’t taste as good!)
  • 2/3 cup fresh breadcrumbs (2 slices of bread, crusts removed, whirled in food processor OR, in a pinch, stir in bought bread crumbs or Panko)
  • 2 teaspoons dried basil, crushed
  • minced garlic, to taste (1 or 2 cloves, minced OR 1/2 teaspoon garlic OR onion powder)
  • 3 tablespoons chopped fresh parsley
  • 1/2 cup grated Parmesan
  • 3 Tablespoons milk
  • 1 egg
  • salt and pepper, to taste

Place ground beef, breadcrumbs, basil, garlic, parsley, cheese, and desired amount of salt and pepper in a bowl. Mix lightly with a fork (don’t use hands because the resulting meatballs will be too dense).  In another bowl, combine the milk with the egg and beat lightly.  Stir the egg/milk mixture into the meat mixture, again, using your fork. When all ingredients are evenly distributed, use a small scoop or a tablespoon to portion meat and form into about 40 meatballs. Roll the scooped meat gently in palm of your hand to form into a ball. Use meatballs as directed above.


20 Dec 2014 Minty Malty Hot Chocolate

You HAVE to try this!  It’s delicious, and it’s mild and smooth and warm and comforting, and sooooo Christmassy!.  I don’t know about you, but I don’t like bitter hot chocolate (Starbucks!), and I don’t like hot chocolate that is so strong I can hardly finish it (Starbucks!), or so rich I feel sick after drinking it (Paris!).  This hot chocolate is perfect. Mild. Creamy. Totally Yummy. Totally Christmassy.  Serve it with a candy cane stirrer or crushed candy canes sprinkled on top of the whipped cream. I served it at my Christmas party and it was a big hit.

Make it to watch your favorite Christmas movie with, or to read your favorite Christmas book with, or to just sit under the Christmas tree and watch the lights.  Make it for after a long walk in the snow (or, in California, in the rain), or for the Christmas Carolers (there’s so few of them now). Or to celebrate having finished all your Christmas shopping. Or make it for Santa and leave it out with the cookies–with testers for the whole family, of course. Make it for Christmas morning, to open the presents with, or make it for Christmas night to end the day with.  Just make it.  You’ll love it.

There is a problem though, finding Chocolate Malted Milk Powder.  I had to order it from Amazon.  The first time I made it, I made it with Vanilla Malted Milk Powder though, which is easily found in any grocery store, then I added cocoa powder and sugar to taste. It was great! (I used 1/2 cup Vanilla Malted Powder…, and just kept adding equal amounts of cocoa powder and sugar until it tasted right.)

The original recipe starts with a gallon of milk, and leftovers do keep well in refrigerator and warm up well in the microwave, but if you want to make half a recipe, I have written the recipe with easy to half measurements. If you are making for a party, mix everything on top of stove, then pour into a crockpot to keep warm.

Trust me!  This is delicious.  Let me know how you like it.

Minty Malty Hot Chocolate

  • 1 gallon whole milk
  • 1 11 oz pkg (about 20-22) chocolate-covered cream filled mint patties (Mini York Peppermint Patties)
  • 1 ½ cups chocolate malted milk powder* (order from Amazon)
  • 1 tablespoon vanilla
  • Whipped cream, marshmallows, mini candy canes or crushed peppermints topping (optional)

Combine all ingredients in a pan on top of the stove, stir  until mint patties melt.  Stir occasionally, and watch like a hawk. Once milk gets hot enough to boil over, there’s no stopping it.  Just gently heat the milk and melt the mint  patties. (Can be made a few days in advance.) Beat to combine well.  Serve from pan, or place in crock pot to keep warm up.  (Can keep in crockpot for at least 2 hours.) Top with whipped cream, marshmallows, mini candy canes or some crushed up peppermints…, or serve “as is”.

*Or sub ½ cup vanilla malted milk powder and enough cocoa powder and chocolate to taste. I did this once, delicious, but don’t remember the quantities…, just a bit of this and a bit of that. Then a bit more of this, a bit more… Until it tastes delicious!

Thanks for stopping by my kitchen today,