Tag-Archive for ◊ Halloween ◊

14 Sep 2012 Chocolate Peanut Butter Sandwich Cookies

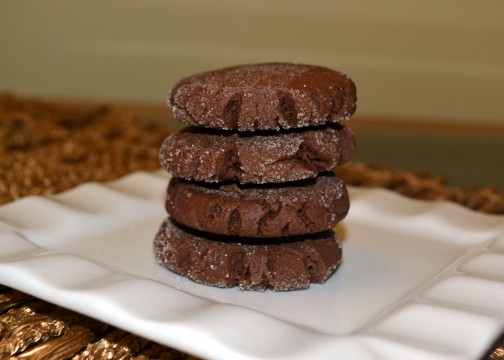
ChocPB cookies good Stack

I have been meaning to post this recipe forever, I just never had a good picture of the cookie.  The recipe only makes 32 cookies, and around here 32 cookies lasts approx 32 seconds.  My friend Josee made these for a Christmas Cookie Exchange two years ago (that’s how long I have wanted to post this recipe). I gave a dozen of these to a friend, Becky,  for a “Craft it Forward” exchange and I promised the recipe to her ONE year ago. (Bad Polly, bad, bad, bad, bad.)  But finally, I  made a batch that didn’t get scarfed immediately.  I made them for my Yoga Group, and they are too polite to eat a half dozen each at one sitting (but it could have been that I had them so busy bagging stuff for an upcoming fundraiser and they didn’t have any hands free to eat cookies!)  They did sing praises for the cookies they did eat though and encouraged me to post the recipe ASAP.

Now getting back to the first time I encountered this cookie.  It was my favorite cookie that year, maybe my favorite cookie in all the years of our exchange (of which there have only been three).  Oddly enough, I made my cookie that year from same cookie magazine Josee used, and I never even considered making these!  Even now, if I just looked at the recipe, I would not be inclined to make it. This is one cookie that tastes much, much better than it’s list of ingredients.  It tastes much, much better than it looks, too and, no matter how good the picture looks above  (do you like it?  I got a new camera!), it still doesn’t do the cookie justice.  Take a bite!  There’s a layer of peanut butter inside!  As one of my friends said, who shall remain nameless, “So how did you get the peanut butter IN there?”

So here it is, at long last, the recipe for Chocolate Peanut Butter Sandwich Cookies (originally published as “Peanut Butter Munchies” in the Better Homes and Gardens “100 Best Cookies”, 2009).

One more note,  I often loose track of how many balls I have, so now I line up a chocolate ball with a peanut butter ball before I start rolling.  One time I ran out of peanut butter balls! I have no idea how that happened.  So I just cracked open another bottle of wine and made another half batch of the peanut butter batter, and all was fine. Hic.  (Just kidding.  I don’t drink.  Ever.  Really!! No, REALLY, I don’t!!!)

Chocolate Peanut Butter Sandwich Cookies

For Chocolate Cookie

  • 1 ½ cups all-purpose flour
  • ½ cup unsweetened cocoa powder
  • ½ teaspoon baking soda
  • ½ cup butter (one stick, 4 oz), softened
  • ¼ cup peanut butter (I always use creamy)
  • ½ cup granulated sugar
  • ½ cup packed brown sugar (I use light brown sugar)
  • 1 egg
  • 1 tablespoon of milk or cream
  • 1 teaspoon vanilla

For Peanut Butter Filling

  • ½ cup peanut butter
  • 3/4 cup powdered sugar

For Sparkle

  • 2 tablespoon granulated sugar
  1. Preheat oven to 350 degrees F.
  2. In a bowl, combine flour, cocoa powder, and baking soda and set aside.
  3. In a large bowl of an electric mixer combine butter and peanut butter.  Beat for a minute or so. Add in both sugars and beat for another minute or so.  Beat in egg and milk.
  4. Slowly add the flour-cocoa powder mixture to the butter-peanut butter mixture and beat just until combined.  Roll ball into a snake shape and refrigerate for a short while (to make it easier to handle) while you mix up the peanut butter filling.
  5. Beat peanut butter and powdered sugar together until well combined.  Roll dough into 32 equal balls.
  6. Divide cookie dough into 32 equal portions.
  7. For each cookie, flatten a piece of chocolate dough and top with a peanut butter filling ball.  Wrap Chocolate cookie dough around the peanut butter filling, making a ball in the process.  Place balls on a cookie sheet, about 1 inch apart.
  8. Rub a bit of leftover dough or a very slight bit of butter onto the bottom of a glass.  Dip glass in sugar.  Press cookies flat with sugar coated glass. (redip glass in sugar before pressing down on each ball).
  9. Bake cookies in preheated 350 degree oven for 8-10 minutes, until the sides are just slightly cracked.  Cool on cookie sheet for a minute or so and then transfer to a wire rack to cool.

Becky, I hope you are reading this…, I’m sorry that I took so long.  Josee, thanks for introducing me to this excellent cookie! Everyone else, ENJOY!  This is one great cookie!

Thanks for stopping by my kitchen today, come back again soon!  Now that I am learning how to master an SLR camera, I will probably be posting more frequently 🙂  I have a terrific parchment wrapped salmon recipe and a long time favorite gazpacho recipe just waiting in the wings!

14 Jun 2011 Chocolate-Peanut Butter Popcorn

My friends tell me I have more than my share of cooking gadgets.  I don’t disagree with them.  But I don’t have everything.  For example, I don’t have one of those quick freeze Popsicle makers, and until today I didn’t have a popcorn machine. The Popsicle maker is on my “Wish List”, but the popcorn machine has been on my kitchen counter churning out popcorn for the last few hours.

I needed a popcorn machine today.  My daughter Abby is manager of our neighborhood pool this Summer and tonight is the first Kid Movie Night.  The pool’s popcorn machine is broken, and she can’t have her first movie night without popcorn, now can she?  So we went out and got a popcorn machine.  It wasn’t expensive.  It was on super-duper clearance at Target.  I KNEW that lucky penny I found on the driveway this morning was going to mean something!

My daughter, being sensible and well organized (like her mother), thought she should practice with the popcorn machine before taking it down to the pool and expecting it to perform perfectly.  So she practiced, and managed to churn out a lot of popcorn.  The machine worked like a charm!  But there was about twenty-four cups of practice popcorn on our counter.  I ate a cup.  My grandson ate about four pieces, and then spilled a cup.  My son refused a cup. Only twenty-two cups to go!

I thought about making Caramel Corn with the popcorn.  I have a terrific Caramel Corn recipe posted, and while my Caramel Corn is one of my favorite foods on the planet, it is a bit of a bother to make.  Time was running out, so I turned to foodgawker, searched on Popcorn, and found this recipe for Chocolate Peanut Butter Popcorn.  On closer inspection I found the recipe had been posted by one of my favorite bloggers, Brown Eyed Baker.  The recipe had to be good!  I just knew it!  It was my lucky day.  That was one powerful penny.

This recipe is the same recipe as for Muddy Buddies, but using popcorn instead of Rice Chex.  It’s a cinch to pull together, and it’s good for you:  popcorn, whole grain; peanut butter, plant based protein; chocolate, dairy!  And it’s melt-in-your mouth delicious.  Seriously addictive. I am pretty sure you have all the ingredients in your cabinet, too.

And it’s Summer.  Don’t we all need a movie night?  How about movie night with one of the best popcorn snacks EVAH?!

Umm….there’s just one more thing.  This popcorn doesn’t keep well; it starts to get soft after a few hours.  So eat fast!

Chocolate Peanut Butter Popcorn

9 cups plain popped popcorn (top of stove, air popped, popcorn machine, microwaved…)
1 cup semisweet chocolate chips (or milk chocolate, or half bittersweet and half milk, or whatever chopped chocolate you have on hand)
½ cup creamy peanut butter
¼ cup butter
1 teaspoon vanilla
1½ cups powdered sugar

  1. Place the popped popcorn in a very large bowl.
  2. In a microwave  melt the chocolate chips, peanut butter and butter for about 1 minute.  Stir well. Chocolate and peanut butter should be melted and very smooth. Stir in the vanilla.
  3. Pour the chocolate mixture over the popcorn. Using a large spoon or spatula, stir until all of the popcorn is evenly coated with the chocolate/peanut butter mixture.
  4. Sprinkle the powdered sugar over the chocolate-covered popcorn and stir until evenly coated.
  5. Spread the mixture onto a baking sheet and place in the refrigerator for about 30 minutes or until the chocolate is set.
  6. Serve! Leftovers don’t keep well.  Eat everything as soon as it’s made!

Thank you for stopping by my kitchen today.  If you like what you see, please consider subscribing to my blog.  If you subscribe you will get a quick e-mail to alert you each time I post a new recipe (which I try to do a few times a week).  Great seeing you!

Polly

13 Feb 2011 French Hot Chocolate

Just in time for Valentine’s Day: French Hot Chocolate!

This is soooo good, made with real cream and real chocolate–bearing no resemblance at all to that powdery mix in a paper packet. The serving ritual makes this really special. Pass a bowl of the chocolate cream mixture, then pass a pot of steaming hot milk (I like to put the milk in a teapot).  Let each person scoop a desired amount of the chocolate cream into their cup.  Pass the hot milk so the person can fill the cup up the rest of the way.  Make sure everyone has a spoon.  Stirring the hot chocolate is the fun part.  So is the sipping to taste.  Then maybe adding a bit more chocolate cream.  Then stirring some more and sipping some more.  Ahhhh.   So civilized.  So social.  So calming.  So special.

I was going with ¼ chocolate cream to ¾ hot milk, when one of my taste testers announced that half chocolate cream and half milk was just about right!  Serve this in small cups. This is rich. To cut the fat, I put non-fat milk in the teapot 🙂

I found this recipe at MakeAndTakes.

The chocolate cream mixture can be kept for a few days in the refrigerator, but you need to put the cream in a sieve, and then cover with plastic. This is, truly, the best hot chocolate you’ll ever make.

French Hot Chocolate

To make the chocolate cream:

1 cup chopped chocolate (your choice–milk, semisweet, bittersweet, or combination. You can also use chocolate chips!)
1 cup corn syrup
1/4 cup water
2 cups cold whipping cream

To serve:

2 quarts (8 cups) hot milk (go ahead and use non-fat or low-fat, it will make you feel better!)

To make chocolate cream: Heat chopped chocolate, corn syrup, and water in a small saucepan, stirring until chocolate has melted.  Set mixture aside to cool. Beat the cream in a large mixing bowl until peaks form.  Slowly add the chocolate sauce to the whipped cream in a steady stream while beating.  After all the sauce has been added to the cream, beat for a few more seconds until the cream is thick.  Place in chocolate cream refrigerator until ready to use.  To keep chocolate cream for longer than an hour or two, place the chocolate cream in a sieve over a slightly larger bowl and cover with plastic warp.

To serve: Heat the desired quantity of milk (2 qts if using the whole batch of chocolate cream, and serving 10-12 people) until steaming (I heat the milk in the MW).  Pour hot milk into serving pitcher (I use a teapot).  Pass the chocolate cream, and spoon a bit of the into the bottom of cup or mug.  Add enough hot milk to fill cup.  Stir to combine.

One batch makes enough to serve 10-12 people (depending on size of cups or mugs).

Thanks for stopping by my kitchen today! Take the time to make an occasion of serving this hot chocolate.  You’ll be glad you did!

03 Feb 2011 Caramel Corn

Ooooh, Caramel Corn!   Isn’t it lovely?  You know I am not talking about that stale, pale, powdery stuff out of a bright and cheerful tin.  No, no, no, no, no!  I am talking about real Caramel Corn, the homemade variety.  Caramel Corn made with love.  Lots of love.  Lots and lots of love.  Truthfully, Caramel Corn is a bit of a  bother to make.  It’s going to take a commitment.  It’s going to take some time.  And it is going to make a mess in your kitchen.  It’s kinda sorta along the same lines as giving birth  (Forgive me for this analogy). At first bite – that first crisp, sweet crunch – the pain of bringing it forth will be forgotten.

Here’s my recipe.  I think I first got it from Taste of Home about, oh, maybe, five years ago.  Over the years, after reading every other Caramel Corn recipe, and testing out and then incorporating the best tips, I have improved upon their recipe.  It’s still a mess to make, but, using this recipe has a guaranteed outcome.  I know this recipe works.

There are a lot of occasions coming up where Caramel Corn would be very welcome.  What’s happening back East right now?  Snow Days!  How about a Movie Night?  I just had friends over to watch a few of this years “Best Picture” Academy Awards nominees.  Then, in a few weeks it will be the Academy Awards themselves.  Let’s not forget abut Super Bowl Sunday: the best reason on the planet for the best snack layout of the year!  Touchdown! And, Valentine’s Day. Just pop Caramel Corn in those heart motif bags and you’re all set. Your Valentine will melt in your arms…

Need some more reasons to make Caramel Corn?  (Tough crowd today…) Caramel Corn can be made ahead, way ahead, like a week or more.  Once made, Caramel Corn is no more bother.  Just pour it in a bowl on put it on the table.  No refrigeration.  No reheating.  No slicing. No spreading.  No dip.  No utensils. Leftovers, highly unlikely, but if there are any, will keep for up to two weeks. The real reason to make Caramel Corn though?  The taste.  That sweet, crisp crunch.

Caramel Corn

  • 1 cup unpopped popping corn (divided use)
  • ¼ cup vegetable, canola, or corn oil (divided use)
  • 1 cup butter (no substitutions, no margarine)
  • 2 cups light brown sugar
  • ½ cup corn syrup
  • 1 ½ teaspoons Kosher salt
  • ½ teaspoon baking soda

Directions

  1. Preheat oven to 200 degrees.  Set out two large, rimmed baking sheets and one clean, large brown grocery bag.
  2. First, make the popcorn.  You’ll have to do this in two batches.  Get out your biggest pan (I use my stock pot) with the tightest fitting lid (if the lid is glass, you’ll have it made in the shade).
  3. Note:  I make my popcorn the old-fashioned way, on the stove, in some hot oil, as the directions below reflect.  I am guessing you could also make the popcorn in an air popper or in the microwave.  If you choose to go down that path, skip the popping directions below, use your own method, and have about 16 cups of popped popcorn warming in the oven when you start on the caramel part of this recipe.
  4. Heat 2 tablespoons of oil in the bottom of the pan.  When oil is hot, stir in ½ cup unpopped popcorn kernels.  Put the lid on and SHAKE the pan like crazy. After 2-3 minutes, the popcorn will begin to pop.  Keep shaking the pan!  When you can see (if you have a glass lid) or hear the corn has stopped popping for 2 seconds or more, remove pan from heat.
  5. Pour the popcorn onto a baking sheet and place in warm oven.
  6. Make the second batch of popcorn.  Wipe out the hot pan and repeat the steps above with the remaining 2 tablespoons oil and ½ cup unpopped popcorn kernels. The popcorn will cook faster this time around because your stock pot should already be hot.
  7. Put the second batch of popcorn onto the second baking sheet and place in warm oven.
  8. In a medium saucepan over medium heat, melt the butter.
  9. Stir brown sugar, corn syrup, and salt into the melted butter and bring to a boil, stirring constantly.  Now, STOP STIRRING.  Let mixture boil, undisturbed, for four minutes.
  10. Remove warm popcorn from oven.
  11. Pour ½ of hot syrup over each tray of popcorn.  Stir to combine.
  12. You can skip this step if you want, but I find it helpful.  Pour the partially coated popcorn into a clean brown paper grocery bag.  Fold over the top to seal, then vigorously shake the bag to evenly coat with the caramel syrup.
  13. Pour the popcorn back onto two baking sheets.
  14. Place popcorn in preheated oven for 15 minutes.  Remove from oven and stir to evenly coat caramel over all kernels.  Return pans to oven, switching pan locations.  Repeat three more times, so the popcorn bakes for 45 minutes total.
  15. Remove pans from oven and let cool.
  16. Serve, or store in air tight container until ready to serve.

Thank you for stopping by my kitchen today!  I hope you like the Caramel Corn. Want to serve it with Maple Bacon popcorn?  Stop by again, I have that recipe in my line up. Enjoy!