Tag-Archive for ◊ Mother’s Day ◊

06 Sep 2013 Pavlova

pavlova1

In England, Australia, New Zealand and my house Pavlova is  a very popular dessert.  I am not sure why it’s not only not popular in the US but it’s not even well known.  Pavlova is a  quick, light, inexpensive, impressive, and utterly delicious dessert.  Pavlova is usually served during summer months since fresh berries are an important component.

Legend has it that Pavlova was named after the Russian ballet dancer Anna Pavlova sometime in the 1920’s. But there the agreement ends. There is a huge and controversial issue around the country of origin of this dessert.  Both Australia and  New Zealand claim it.  Pavlova is a popular dish and important part of the national cuisine of both countries–as it is England (but England doesn’t claim to be a country of origin). Ok, ok! I can hear you all hollering but, what IS  “Pavlova”?

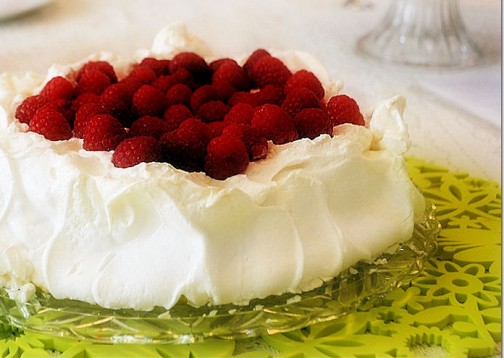
Pavlova is a meringue dessert with a crisp outer shell and a soft, light, fluffy center.  The meringue crust is  topped with lightly sweetened whipped cream and fresh berries–and kiwi– to serve.

I make two versions of this dessert.  Version #1, and the most traditional is below.  In Version #2, I mix a little lemon curd into the whipped cream, and I use blueberries instead of the more traditional raspberries and strawberries.  Trader Joe’s carries a very good and inexpensive lemon curd.  If you have a lemon tree, you can make your own lemon curd in the microwave with my recipe.

Pavlova doesn’t keep!  Don’t assemble the Pavlova until JUST before serving, and don’t expect to enjoy they leftovers (they’ll be soggy).  Make sure this is eaten all up all at once.  The good news is that the meringue base can be made ahead and stored for a few days in an airtight container before assembling and serving, which makes this a great showstopping dessert to make for guests.

High humidity might negatively affect this dessert. It’s best not to attempt to make this on a humid, wet, rainy day.

Pavlova

  •  4 extra-large egg whites, at room temperature
  • Pinch of salt (about 1/8 tsp)
  • 1 cup sugar
  • 2 teaspoons cornstarch
  • 1 teaspoon white wine vinegar
  • 1/2 teaspoon vanilla extract
  • Sweetened Whipped Cream, recipe follows
  • fresh raspberries, strawberries, kiwi or combination (see above for a blueberry version)
  1. Preheat oven to 200 degrees F.
  2. Place a sheet of parchment paper on a baking pan. Draw a 9-inch circle on the paper, using a 9-inch plate as a guide.  Turn the paper over so the drawn circle is on the reverse side of the paper. (This way you won’t get a pencil mark on the meringue.)
  3. Place the egg whites and salt in the bowl of an electric mixer fitted with a whisk attachment. (Be SURE the bowl and beaters are very, very, very clean–with not one bit of oil, butter or fat residue.)
  4. Beat the egg whites on high speed until firm, about 1 minute. With the mixer still on high, slowly add the sugar, in slow steady stream or 1 T. at a time and beat until it makes firm, shiny peaks, about 3 minutes. Remove the bowl from the mixer.
  5. Mix vanilla, cornstarch and vinegar together then fold that mixture lightly into the egg white mixture using a very clean rubber spatula (there should be no oil, fat, butter, residue on the spatula).
  6. Pile the meringue into the middle of the circle on the parchment paper and smooth it within the circle, making a rough disk. Then, make a crater or a bowl in the middle of the flat meringue pile. (So the meringue looks like a rimmed soup bowl or large saucer.  This “crater” will hold the whipped cream and fruit at serving time.
  7. Bake at 200 degrees for  1 1/2 hours. Turn off the oven, keep the door closed, and allow the meringue to cool completely in the oven, at least 1 hour, overnight is better. (The meringue will deflate if exposed to cold air before it’s cool).  Store in an airtight container until ready to serve. Do not refrigerate.
  8. Place meringue disk onto a serving plate and JUST BEFORE SERVING spread the top completely with sweetened whipped cream. Spoon the berries and the traditional Kiwi, if you can get it, carefully into the middle of the Pavlova, leaving a border of cream and meringue. Serve immediately.

Sweetened Whipped Cream:

1 cup cold heavy cream
2 tablespoons sugar
½ – 1 teaspoon vanilla

Whip the cream in the bowl of an electric mixer fitted with a whisk attachment (you can also use a hand mixer). When it starts to thicken, add the sugar and vanilla and continue to beat until firm. Don’t overbeat!  If using a Kitchen Aid, make 1 ½ or 2 cups cream, any less and the whisk won’t get it all up from the bottom.

You’ll love it!  Practice this once for the family, and then WOW your guests with it the next time!

Thanks for stopping by my kitchen today!

31 Jul 2013 Blueberry Heaven


Do you ever go into a bakery?  Of COURSE you do!  Do you ever buy a pastry that looks delicious, but then are seriously disappointed in the taste…? And then, to top it off, are you overwhelmed by the amount of  fat you’ve just consumed for something that really wasn’t that all that great?  Me, too 🙁 Do you ever wish, on a weekend morning with your second cup of coffee, for that imagined deliciousness, without all greasy pastry and sugary icing?  Me, too 🙂 Pssssst…  Come here! No, come closer! I am going to tell you how to make a breakfast pastry as delicious as the one you are dreaming of…, and without the load upon load of grease and sugar!

Now. Seriously…, am I your best friend, or what?!

It’s so simple!  You need 2 slices of bread, a bit of cream cheese, and a handful of blueberries. It helps if you have a sandwich maker or a panini press, but if you don’t, use a frying pan and make this Blueberry Heaven just like you would a grilled cheese sandwich.

I found the original recipe here: http://www.fitfromconception.com/2012/06/blueberry-breakfast-grilled-cheese.html  No, I am not pregnant, roflmao.  Neither are any of my children.  I have no idea how I ended up at that website, but I am glad I did.

Blueberry Heaven

[a Stand-in for Fat and Sugar Laden Blueberry Pastries]

For each serving:

  • 2 slices of bread, any kind.  Make it whole wheat if that’s the way you roll.  I use Orrowheat Country Buttermilk Bread.  Cinnamon bread would probably be delicious, as would almost any kind of homemade bread (don’t use homemade rye bread or anything like that!).
  • Plain cream cheese, enough to spread on two slices of bread.
  • a sprinkling of sugar, less than 1/4 tsp, optional
  • a handful of fresh blueberries, about 24 (jam can be substituted)
  • Butter, optional, unless you are using a frying pan


  1. Preheat sandwich maker, panini press, or frying pan.
  2. Spread each slice of bread with cream cheese, no measurements here, just coat the slices of bread to your preference. (If you are using a frying pan, spread the other side of the bread with butter)
  3. Sprinkle a bit, and I do mean a bit, less than 1/4 tsp of sugar over the cream cheese, just to sweeten up the cream cheese a little bit. (I’ve made this without the sugar, and it’s just not the same.)
  4. Arrange blueberries on one slice of the cream cheese covered bread.  Use as many as you want, but I think 24 is about perfect.  I like to evenly space the blueberries on the bread so I get an equal number of  blueberries in every bite.
  5. Put the other slice of cream cheese covered bread onto of the blueberries, cream cheese to cream cheese.
  6. Put the sandwich in the press, latch close, and cook for 2 minutes. (If using a frying pan, put the sandwich, butter side down on the preheated frying pan.  When the first side is golden brown, flip, and cook the second side until it is golden brown too.)
  7. Remove sandwich from the press or the pan and let cool a bit, the filing will be mad hot right out of the press. Be careful.
  8. Enjoy! It’s a little slice of heaven, isn’t it?
  9. Repeat.  You’ll want to make one for someone else… 🙂

Thanks for stopping by my kitchen today! Aren’t you glad you don’t have to drive over to the Olde Time Bakery for a pastry that will only make you feel badly about yourself? Hooray!!

24 Jun 2013 Crab and Brie Macaroni and Cheese

Crab and brie mac n cheese

Whooooa Nelly!  Crab and Brie Macaroni and Cheese?  Over-the-top decadence in a comfort food?  YEP! And the decadence makes the comfort food even more comforting–like ‘died and gone to heaven’ comforting!  Yet another winning recipe from Better Homes and Gardens Special Interest Publication “Best Loved Reader Recipes; 125 Winners from 1930 to Today”. (My last post was a recipe for “Peach Iced Tea” inspired by a recipe from this magazine)

If someone is having a hard time, and that sweet “I am going to drop off a casserole” American tradition seems appropriate, THIS is the casserole to take.  I took it to my 120-miles away daughter who is bravely attempting a semester long college Physics course in a six-week summer session, working the 4 PM-midnight shift at Target, and sweltering in the hot central valley heat. I am not saying this Macaroni and Cheese is miraculous or anything, but she did  score 15 points over the class average on her first mid-term. Not dropping off a casserole to a friend-in-need anytime soon?  I’ll bet you’ll be going to a potluck then. Take this!  Want to eat it at home, like we did?  We had it with mixed roasted veggies, but a leafy green salad would be nice too, and a corn muffin.

This casserole is not cheap, but if you shop at Costco for your pound of brie and pound of crab (the only two expensive ingredients), it won’t break the bank and you’ll have made a casserole big enough feed a small army.

Truth be told, I was a bit afraid of this recipe at first, wondering if the Brie would be too strong, and wondering if I would be able to taste the crab over the brie.  Both worries proved needless.  Everything melds together nicely.  Comfortingly nice.  I’ll say it again, because it’s true, ‘died and gone to heaven’ nice!

I changed the recipe just just a bit; one, to conform to the quantities of crab and brie sold at Costco (no leftover bits and no need to buy two big cartons of anything) and two, to make the recipe a bit easier by  substituting panko instead of homemade bread crumbs. I also re-wrote the recipe a bit, making roux is not hard, just follow my instructions: brown the flour and butter (and don’t skimp on the butter), remove the pan from the heat, then vigorously stir in hot milk until sauce is smooth.

Enjoy your comfort food decadance.

Crab and Brie Macaroni and Cheese

  • 1 lb. dried macaroni (small shells or elbows)
  • 1 medium onion, chopped
  • 5 tablespoons butter (maybe a bit more)
  • 3 cups milk (I used 2%)
  • 1/3 cup all-purpose flour
  • 1 teaspoon salt
  • 1/2 teaspoon black pepper
  • 13-16 oz. Brie, cubed
  • 16 oz. refrigerated container crabmeat, drained and flaked
  • 1/2 cup Panko or favorite breadcrumbs
  1. Cook macaroni in salted water according to package directions.  (Choose the shortest cooking time since pasta will continue to cook when baked.) Drain and set aside.
  2. Preheat oven to 350 degrees. Grease a 9-in by 13-in casserole dish.
  3. In a large skillet over medium-high heat, saute onion in butter until tender and golden, about 15 minutes.  (Do not skimp on the butter.  You’ll need the full quantity of  butter to make the roux in the step 5.)
  4. Heat 3 cups of milk in microwave until hot (3-5 minutes).
  5. Meanwhile, over medium heat, stir flour into onion and butter mixture.  Stir constantly for 3 minutes (to cook flour and to incorporate butter into the flour).  If mixture is too lumpy or dry, add an additional tablespoon of butter.
  6. Remove hot pan with onion and roux from heat.  Pour in 1 cup of hot milk.  Stir well, and keep stirring-vigorously if needed-until mixture is smooth and lump free.  Add another cup of hot milk, stir and mix again.  When mixture is smooth and lump free, repeat with last cup of milk.
  7. Return pan to medium heat. Add cubed brie to sauce in pan.  Stir constantly until brie is melted and incorporated.  Remove pan from heat when brie has melted and the sauce is smooth once again.
  8. Fold drained crab into cheese sauce then stir in cooked and well-drained macaroni.
  9. Season with salt and pepper.
  10. Pour crab-brie-macaroni mixture into a well buttered 9-in x 13-in casserole dish.
  11. Sprinkle bread crumbs over top of macaroni and cheese.
  12. Bake in preheated 350 degree oven for 30 minutes or until mixture is heated through and bread crumbs have browned.  If breadcrumbs don’t brown, turn on the broiler and broil casserole for a few minutes.
  13. Remove casserole from oven. Let cool 5 – 10 minutes, then serve. In a bowl, while curled up on the couch with a good book or good movie, or on a plate with roasted veggies or a salad, and maybe a small corn muffin. Enjoy.  Feel better. Ace the Physics test!

Leftovers can be reheated in microwave or frozen for a future treat.

Thank you for stopping by my kitchen again today,  I love having you drop by!  Let’s see what else I can make from this magazine. It’s supposed to be on the shelves until July 15, 2013, so if you see it, you might want to pick up a copy.

08 Jun 2013 Peach Iced Tea

2 Peach Iced Tea Vert

I made a Peach Iced Tea! I am so excited that I have to share the recipe with you, even as I work to make it more natural (off to the farmer’s market tomorrow for my first try). I didn’t want you all to have to wait until I got the natural version perfected as this version works fine!  I know there are hot days and summer parties in your near future–graduations, Father’s Day, showers, birthday parties, July 4th celebrations, and BBQ’s, so I know you need this recipe now!

This tea, as is, is not too sweet, and definitely has a pronounced peach flavor; it’s like Snapple Peach Iced Tea, only better!  Make the big-batch peach base to keep in the freezer and you’ll be able to whip up a quart of Peach Iced Tea for yourself and a good book! Or make a gallon or two  for a  summer party in a flash.  I, for one, would love to go to a summer party where there’s something to drink other than bottles of beer, soda and water 🙂 (BTW, I have a recipe posted for Blueberry Lemonade, too, which is also very good!).

The peach part of the tea was inspired by a recipe I found in a “Better Homes and Gardens Special Interest Publication” entitled , “Best Loved Reader Recipes; 125 Winners from 1930 to Today”.  The recipe in the magazine was for a “Sparkling Peach Punch”, where the base below is mixed with ginger ale or sparkling water.  I tried both versions. The ginger ale version was very sweet, the sparkling water version was given a thumbs up by my daughters, but the iced tea version created by yours truly was the star of the show.

Notes:

#1 Make the base and freeze it in three 1-quart batches or six 2-cup batches.  Each 1-quart peach base will mix with 2 quarts of strong tea to make 12 cups/3 quarts of  Peach Iced Tea, add ice and you have a party!  Each 2-cup peach base mixed with 6 cups of strong tea will make 8 cups/2 quarts of Peach Iced Tea, add ice and a friend and you have a cool and tasty summer drink with which you and  your friend can enjoy a little down time.

#2 Make the tea twice as strong as you would for regular hot tea!  I prefer English or Irish tea bags such as Barry’s Irish Gold, or Yorkshire Gold or PG tips.  Trader Joe’s Irish Breakfast tea is also very good (but, oddly, the English Breakfast tea isn’t very good at all). I use 3 or 4 tea bags to each quart of boiling water.  If I had to use Lipton or Red Rose Tea, I’d use at least six tea bags to a quart of boiling water.  I haven’t experimented with green tea, as I am not a big fan, but I am sure green tea could substitute for the black tea, and of course, decaf tea could be used too, if that is your preference.

#3 I don’t know why there is gelatin in the base, that’s one of the things I am going to experiment with and try to remove, but, I think it probably does add to the overall peachiness of the drink. Yes, yes, yes, one of the first things I will experiment with is using fresh peaches in place of the canned peaches…but until that happens, make this version, it’s yummy!

Peach Iced Tea

For the Peach Base:

  • 3 cups water
  • 1 1/2 cups sugar
  • 13-ounce package peach-flavored gelatin
  • 1 29-ounce can peach slices in light syrup
  • 4 11 ounce cans peach nectar (find them on the shelves of the grocery store next to the bottled juices)
  • 1/2 cup lemon juice
  1. Combine water, sugar, and gelatin in a saucepan. Bring to a boil, stir to dissolve the gelatin then remove from heat and allow to cool.
  2. Place undrained peach slices in blender, and blend until smooth.
  3. In a 1 gallon capacity bowl, pan or pitcher combine gelatin mixture, pureed peaches, peach nectar, and lemon juice. Stir to combine.
  4. Divide peach mixture into three 1-quart batches or six 2-cup batches.  Use now (see steps below), or freeze until needed.  According to the original recipe, the base can be frozen for up to 3 months.

To Brew the Tea and Combine With the Peach Flavor:

  • Desired quantity of peach base (remove from freezer an hour or two before needing)
  • Tea bags (Make the tea twice as strong as you would for regular hot tea, see note #2 above)
  • Boiling water (You will need to make 2X the amount of water for the quantity of base you are using, see note #1 above)
  1. Pour the required amount of boiling water over the tea bags and let steep for 3-5 minutes.  Don’t let the tea steep for more than 5 minutes or it will start to get bitter.
  2. Fill a pitcher half full of  ice.  Pour the hot brewed tea over the ice. Discard the tea bags.
  3. Stir the peach base into the iced tea.
  4. Pour into glass and enjoy! ahhhhhhhh

It’s mercilessly HOT here, and I hate hot, but a glass of Peach Iced Tea, a day off, and a good book does make the summer somewhat enjoyable(!)

Thanks for stopping by my kitchen today!  I am going to try some more recipes from this magazine–Calypso Shrimp Skewers, Coconut Salmon Curry, Macaroni and Brie with Crab, Green Beans with Basil and Mint, so stay tuned!

BTW, if you have the magazine, I’ve already tried the “Bagel, Lox and Egg Strata” recipe… The picture looked great.  The make-ahead casserole wasn’t bad, but neither was it great, and I see no reason to make it again.