Tag-Archive for ◊ Picnic ◊

20 Mar 2017 B.O.B. Brownies

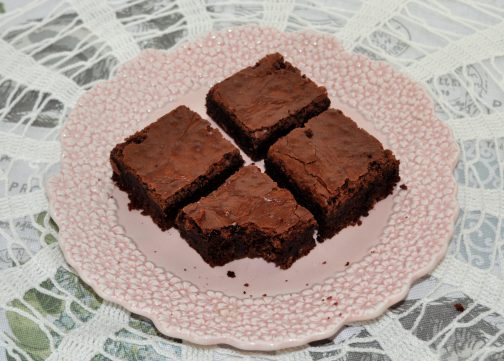
bob-brownies-bite

Google “Back of the Box” recipes and you’ll get lists such as 10 Best Back-of-the-box recipes from Epicurious, or Buzz Feed or The Daily Meal.  Never 20 best back-of-the-box recipes or 100 best back-of-the-box recipes.  Nope. Just 10. Because there are only about 10 really good back-of-the-box recipes 🙂

In my (albeit, limited) experience, it seems most back-of-the-box recipes sound good but in reality are quite plain and quite bland.  There are 10 good ones though!  Toll House Chocolate Chip Cookies, Philadelphia Cheesecake, Alber’s Cornbread, Rice Krispie Treats, Lipton Onion Dip jump to mind.  Pssst…! And now I have found another one! It’s on the back of the bag of Dutch Process cocoa powder that I purchased at Costco (brand name: Rodelle Organics).

These brownies are delicious, and just my type of brownie.  Everyone seems to have their own preferred brownie type, right? This is mine.  Slightly crunchy top, oh-so-chocolately flavor, dense-but not fudge, light-but not cakey.  These are just right!  AND, they’re easy-to-make, and one batch fills a 9×13 pan!  The brownies slice well, too. What more could one want?

B.O.B.* Brownies

*Back of Bag (Rodelle Organic Dutch Process Baking Cocoa, sold at Costco)

  • 1 cup plus 2 T. butter
  • 2 ¼ cups sugar
  • 5 eggs (yes, 5. I was shocked, too)
  • 1 ½ tsp. vanilla
  • ¾ cup plus 1 T. flour
  • ¾ cup plus 1 T. Dutch Process cocoa powder (no substitutions)
  • 1 tsp. salt
  • ½ cup semisweet chocolate chips
  • ¾ cup chopped nuts (optional)
  1. Preheat oven to 350 degrees.
  2. Line 9×13 inch baking pan with parchment paper and spray lightly with cooking spray.
  3. Melt butter and sugar in a heavy saucepan on very low heat.
  4. Let the mixture slightly cool and transfer to a large bowl. Beat well.
  5. Add eggs, gradually, mixing well.
  6. Add vanilla extract.
  7. Sift dry ingredients together.
  8. Add dry ingredients to egg mixture, stirring gently and minimally.
  9. Stir in chips and nuts.
  10. Pour mixture into prepared pan and bake approximately 35 minutes. Do not overbake.
  11. Cool before cutting.
  12. Cut into squares and enjoy.
03 Mar 2017 Double Chocolate Marble Loaf

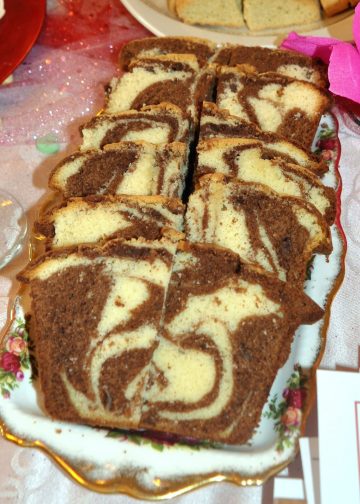
double-chocolate-marble-loaf

Weekend Cake!  Isn’t that a delightful subcategory of dessert? According to Dorrie Greenspan it’s a French concept. Weekend Cake is good for anything from breakfast through late night snacking.  Weekend Cake travels well, is long lasting and is best if left to sit a day before eating.

This recipe for Double Chocolate Marble Loaf, a “weekend cake” is from her cookbook, “Baking Chez Moi” . I’ve never been much for Marble Cake, often finding it to be dry and muddled.  Not this one! It’s truly delicious.  I’ve only made the orange chocolate-white chocolate version, but I am dying to make the mocha-cardamom version and the chocolate-mint version.

Double Chocolate Marble Loaf

  • 2 cups all-purpose flour (272 grams)
  • 1¼ teaspoons baking powder
  • 3/4 teaspoon fine sea salt
  • 1½ sticks (12 tablespoons or 6 ounces/170 grams) unsalted butter, at room temperature
  • 1 cup granulated sugar (200 grams)
  • 4 large eggs, at room temperature
  • 1½ teaspoons pure vanilla extract
  • 1/2 cup whole milk, at room temperature
  • 4 ounces best-quality white chocolate, melted and cooled (Lindt)
  • 1/4 teaspoon orange or peppermint oil (I used a bittersweet chocolate-orange chocolate bar, so no oil)
  • 4 ounces semisweet or bittersweet chocolate, melted and cooled
  1. Center a rack in the oven and preheat the oven to 325 degrees. Pull out an insulated baking sheet or stack two regular baking sheets one on top of the other. Line the (top) baking sheet with parchment paper or a silicone baking mat. Butter a 9-by-5-inch loaf pan, dust with flour and tap out the excess; set it on the baking sheet(s).
  2. Whisk the flour, baking powder and salt together in a small bowl.
  3. Working in the bowl of a stand mixer fitted with the paddle, or a large bowl with a hand mixer, beat butter on medium speed for 3 minutes, or until smooth. Add sugar and beat for another 2 to 3 minutes, scrape sides. Add the eggs, one at a time, and beat for a minute after each one goes in. The batter may curdle, but you needn’t worry.
  4. Reduce mixer speed to low and mix in the vanilla. Still on low speed, add the flour mixture in 3 additions and the milk in 2, beginning and ending with the dry ingredients and mixing only until each addition is incorporated.
  5. Scrape half of the batter into another bowl. Using a flexible spatula, gently stir the white chocolate into half of the batter. If you’re using the orange oil, stir it in as well. Stir the dark chocolate into the other half of the batter.
  6. Using a spoon or scoop, drop dollops of the light and dark batters randomly into the prepared pan — don’t think too much about the pattern — and then plunge a table knife deep into the batter and zigzag it across the pan. It’s best to move forward and not to backtrack. Don’t overdo it — 6 to 8 zigzags should suffice.
  7. Bake the cake for 80 to 90 minutes, or until a tester inserted deep into the center comes out clean. (My cake was done in 70 minutes, and I might have taken it out 5 minutes sooner.) Check the cake at the halfway mark, turn it around and, if it’s getting too brown, cover it loosely with a foil tent. Transfer the cake to a cooling rack and let it rest for 10 minutes, then unmold it, turn right side up on the rack and let come to room temperature.
  8. Storing: Wrapped well, the cake will keep at room temperature for up to 4 days. It can be wrapped airtight and frozen for up to 2 months; defrost it in its wrapper.

Spiced Mocha Variation: add 1 tsp. ground cardamom into the white chocolate portion and 2 ½ tsp. instant coffee or espresso mixed with 1 T. hot water to the dark chocolate portion. Omit the orange oil.

Mint Chocolate Variation: stir ¼ tsp. peppermint oil into the white chocolate portion and use only regular semi-sweet or bittersweet chocolate in the dark chocolate portion. Omit the orange oil.

16 Feb 2017 Polly’s BBQ Sauce

bbq-sauce

I’ve been glued to MSNBC since January 21. It hasn’t been good for me. I need a break. It’s time for me to post more recipes!

I’m starting with this BBQ sauce because I bought some country ribs on sale this morning, and oven BBQ’d ribs for dinner sound like a great idea on this rainy February day.

Homemade BBQ sauce is easy to make and it tastes so much better that the squeeze bottle of chemicals with a 2 year shelf life! Use it on anything. Chicken, Ribs, Burgers, Steak…

The original recipe for this BBQ sauce was from a newspaper column in the San Jose Mercury News in 2013, I modified it just a bit (bourbon!) and four years later it’s still my go-to BBQ sauce. You can dress this recipe up to suit yourself.  You’ll probably want more hot sauce, maybe some liquid smoke…you might even want to use beer or red wine in place of some of the coffee–but make the original first, then decide how you want to make it yours.

If it’s a rainy day where you are, and you are lucky enough to get country ribs on sale too, soak the ribs in BBQ sauce, and place the ribs in a large shallow pan. Cover with BBQ sauce. Cover the pan with foil. Bake at 400 degrees for approx. 1 1/2 hours.

My BBQ Sauce

  • 1 1/2 cups strong brewed coffee
  • 1/4 cup bourbon (or additional coffee)
  • 2 cups ketchup (yessss, I use ketchup…)
  • 1/4 cup favorite mustard
  • 1/4 cup brown sugar (or honey)
  • 2 Tablespoons Worcestershire sauce
  • 2 Tablespoons cider or balsamic vinegar or freshly squeezed lemon juice
  • 1/2 teaspoon hot sauce

Combine all ingredients in a saucepan.  Bring to a boil over medium heat.  Lower heat.  Simmer for about 20 minutes, stirring occasionally.  Use immediately or refrigerate for up to a week.  Makes 4 cups BBQ sauce.

29 Mar 2014 Caramel and Chocolate Covered Graham Crackers

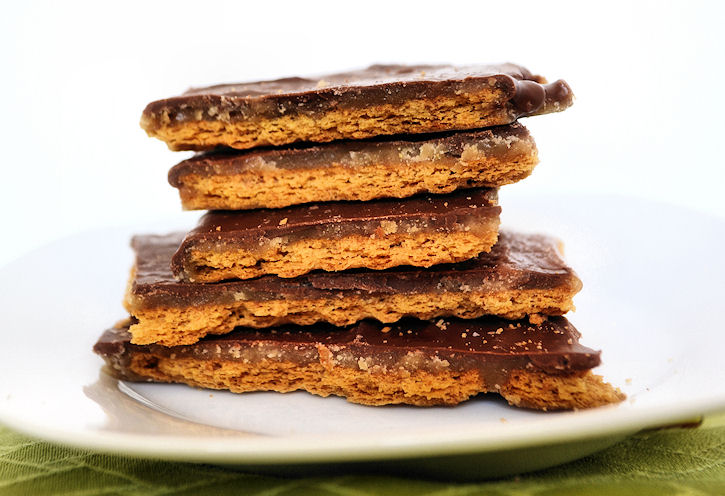
Graham-crackers-2

It’s been a terrible, horrible, no good, very bad few days around here. We are all fine, but there was a family brouhaha that just didn’t sit right. We were all out of sorts, and, truth be told,  a bit afraid of what the future will bring, too.  So what to do? Make the all time favorite family comfort food, of course!

This recipe is rustic and quik, and it’s done in 20 minutes.  So it’s great just to start on this and put some of that pent up adrenaline to good use. But then there’s the cooling off period. Once made, these bars have to  sit in the refrigerator to harden up a bit. Again, another good thing.  A cooling off period is needed after a big family brouhaha.  Then comes the peace and contentment, sitting down with a good cup of coffee, some rustic chocolate covered graham crackers and reflecting on what went right and what went wrong, and figuring out how to right the wrongs and ultimately, bringing peace back to the family.

In August of 2005 my friends Sharon and Margie, from Lake Arrowhead Retreats, gave me a recipe for Saltine Toffee Cookies which they had found on AllRecipes.com.  Truth be told, the recipe didn’t sound very good.  Saltine crackers, brown sugar, butter, and melted chocolate?  Just say no.  But they insisted I try it.  They insisted the recipe was good.  I trusted them, they make some great food, so I tried it. It WAS good. VERY good.  Then I came to find out this recipe is sort of an Internet sensation and I might have been the last person on the planet to know about it!

Years pass, and one fine weekend, I took a chocolate making class.  The instructor of the class talked about how her mother used to make a ganache and pour it over crumbled up graham crackers as a bedtime snack for her and her siblings (I know, I know, what a Mom! I never did that for MY kids…).  Then the gears started churning.  Chocolate covered graham crackers are one of my favorite things in the whole wide world, but I had never made them.  The chocolate covered graham crackers from Starbucks are the best, but they are a bit too rich with a bit too much chocolate. OH!  The light bulb popped!  Could I make chocolate covered graham crackers for my kids, too?  I could one-up that other Mom, as well!  I could make chocolate covered graham crackers and with caramel!  Never mind that she was using a fancy ganache and I was just melting giant chocolate bars, LOL! What if I use the Saltine Toffee Cookie recipe but substitute graham crackers for the saltine crackers.  What if???

So I did it.  Many times.  My son says these are the best things I make. The last tin I made, hidden in the refrigerator behind the lettuce, lasted only three days.

Turns out, I am not the first person to think of this!  Lots of people on the Internet have used graham crackers instead of saltines with this recipe. Again, why am I one of the last people on the planet to know about this?! 🙂 Anyway, here’s my recipe.  You can find lots of versions all over, but this is the one that works for me.  Keep these Caramel Chocolate Covered Graham Crackers refrigerated, when they are not being eaten…  If these cookies sit out too long at room temperature the graham cracker starts to soften and loose it’s crunch 🙁 My 2005 copy of this recipe (with saltines rather than graham crackers) specifies that the recipe makes 35 servings. ROFLMAO!!! That’s so funny 🙂

Caramel and Chocolate Covered Graham Crackers

  • approx. 2/3 a box of graham crackers (two wax covered packages out of a box of 3 packages)
  • 1 cup butter
  • 1 cup dark brown sugar
  • 1 large sized (4 or 5 oz) chocolate bar, chopped (I like a Symphony Bar or a Cadbury Bar, if you like dark chocolate, the Hershey’s Special Dark Bar is good)
  • ¾ cup chopped nuts (if you like nuts.  I have never added nuts) OR, if it’s December, crushed candy canes! (I loooove this option!)
  1. Preheat oven to 400 degrees.
  2. Line a rimmed cookie sheet with graham crackers.  Place the graham crackers as close together as possible. You will need most of 2 waxed covered packages. Set tray aside.
  3. In a medium saucepan, combine butter and sugar and stir constantly, over medium heat, until sugar is melted.
  4. Raise heat slightly, to bring mixture to a boil.  Boil vigorously for 3 minutes, without stirring–shaking the pan occasionally is OK (the original directions said to “stir constantly” but I have found this to make a grainy caramel layer).
  5. Immediately pour caramel over graham crackers.  Use an offset spatula to quickly spread the caramel evenly over the crackers.
  6. Place tray in hot oven and bake for 5 minutes.
  7. Remove tray from oven and sprinkled chopped chocolate evenly over top.  Let chocolate just sit on top of caramel for 5 minutes.
  8. Spread the now melted chocolate evenly over the caramel.  Sprinkle with nuts (if using).
  9. Let tray sit until chocolate has hardened.  This make take a few hours.  To speed things up, put the tray in the refrigerator for about 15-20 minutes.
  10. When chocolate is set, break bars into uneven pieces. Sneak a piece or two.  Serve or cover and hide in refrigerator until needed.

Thanks for stopping by my kitchen today!  If there is a brouhaha in your family, I hope it’s over quickly and sweetly!