Tag-Archive for ◊ Picnic ◊

08 Mar 2014 Kipferls (Vanilla Hazelnut Butter Cookies)

kipferl2

I had never, ever heard of Kipferls before.  Then, in two weeks they came into my life twice!  First, my friend Priscilla made some in the Culinary School Pastry Arts program she is enrolled in. I didn’t try one because I don’t like nuts.  I dislike nuts so much that the name of the cookie didn’t even register.  Then I read “The Book Thief” and Kipferls are important in one chapter.  Since I was hosting book club this month and since the author had contributed his mother’s recipe for Kipferls to “The Book Club Cookbook” that my friend Kayte  gave me for my birthday last year, I decided to make the cookie. I had to do a Google image search to see what they looked like! Then came the hunt for Hazelnut Flour.  It’s out there. I found it at Sprouts.  I was shocked by the price.  I told the cashier that there must have been a mistake.  She said she doubted it.  I asked her to call for a manager for a price check.  YEP.  She was right.  There was no mistake.  It’s $16.95 for a 14 oz. packet of Hazelnut Flour (aka Hazelnut Meal). After creating such a fuss, and with my book club in less than seven hours, I bought the dangblasted expensive and pitifully small bag of Hazelnut Flour. BTW, you don’t have to buy this flour to make these cookies.

How to avoid using expensive Hazelnut Flour:

1. Make your own.  Preheat oven to 350°F. Place 6 ounces (1 1/4 cups) of shelled hazelnuts on a baking sheet in a single layer. Bake 8–10 minutes, stirring occasionally until the hazelnuts are fragrant and brown. Remove the nuts from the  oven and let cool slightly. While still warm, though, fold the nuts inside a clean kitchen towel and rub vigorously to remove their skins. Place skinned nuts in a food processor fitted with the stainless-steel blade, and process until they are finely ground.

2. Substitute Almond Flour or Almond Meal for the Hazelnut Flour.  Almond Meal is about one-third the price of Hazelnut flour.  My German friend Karin said she always makes her Kipferls with Almond Meal, but her German relatives grind their own nuts.

To continue with my saga…Upon returning home with my $16.95 package of Hazelnut Flour, I got out the recipe and got started.  No! Two vanilla beans?  TWO?  For 36 cookies?  It is now clear to me that I am making World’s Most Expensive Cookie and I am thinking these better be good.  (They were, thank goodness. So good I might have to make them again, and again, and again…)

This recipe is based upon Markus Zusak’s recipe for Kipferls as published in The Book Club Cookbook.  I made some changes to the method and to the ingredients.  Mr. Zusak’s mother mixed her dough by hand, I tried it for a bit, then resorted to my electric mixer.  I split the use of the vanilla beans, putting one in the cookie and one in the powdered sugar, Mr. Zusak put both in the powdered sugar. I had to quadruple the amount of powdered sugar to cover all the cookies, and I covered the cookies with the powdered sugar while the cookies were still warm* so get a crackly, almost melted sugar coating on the cookies. (*Let the cookies cool a little, to firm up a bit.  If you toss hot cookies in powdered sugar, the cookie will break.)

Kipferls

Crisp German Vanilla Hazelnut Butter Cookies

For the cookies

  • 1 ¾ cups all-purpose flour
  • 1 ¼ cups Hazelnut Flour or Hazelnut Meal or alternative (see above)
  • 2/3 cup granulated sugar
  • 14 tablespoons (1 ¾ sticks) butter, at room temperature
  • 1 whole vanilla bean, split in half, and insides scraped off with a knife.  Discard the outside of the vanilla bean

For the vanilla sugar

  • 1 1/3 cup powdered sugar
  • 1 whole vanilla bean, cut crosswise into 1-inch pieces (different preparation than above)
  1. Make the vanilla sugar first.  Place the powdered sugar with the chopped up vanilla bean in the bowl of a food processor fitted with a metal blade.  Process until the vanilla bean has been incorporated into the powdered sugar, several 10 second bursts.  Place a fine meshed sifter over a small bowl and sift the powdered sugar to remove the unblended pieces of vanilla bean.  Pour vanilla sugar into a large Ziploc bag. Set aside.
  2. Preheat oven to 350°F. Spray two baking sheets lightly with cooking spray or line with parchment paper.
  3. Combine all purpose flour, hazelnut flour/meal, and granulated sugar in a large bowl. Cut butter into 1/2-inch pieces and add to flour mixture. Scrape the inside out of the split vanilla bean and add to bowl.  With an electric mixer, mix dough for 3-4 minutes or until a soft dough is formed.
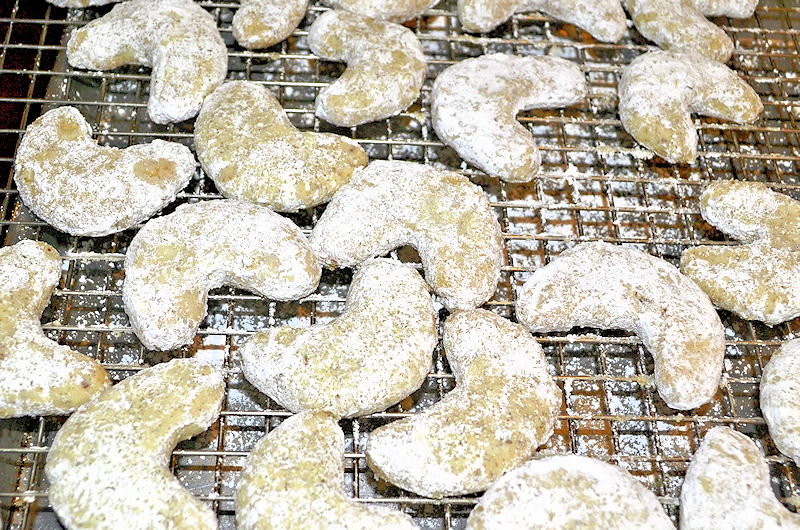
  4. Pinch off small pieces of dough (1 T; 1/2 oz; 15 grams) and mold gently between your palms to form 3-inch ropes, thicker in the middle and tapered at the ends.   This took a bit of doing to master.  I rolled the dough to the length of my three middle fingers.  I rolled the dough a bit more firmly with my ring and index finger so the ends of the dough would be thinner. Fashion each piece of rolled dough into a crescent shape and place onto the prepared trays, see picture above.
  5. Bake in preheated 350º oven for 15-20 minutes or just until the cookies are beginning to turn brown.  Mr. Kusak says that once the Kipferls are brown, they are over cooked.
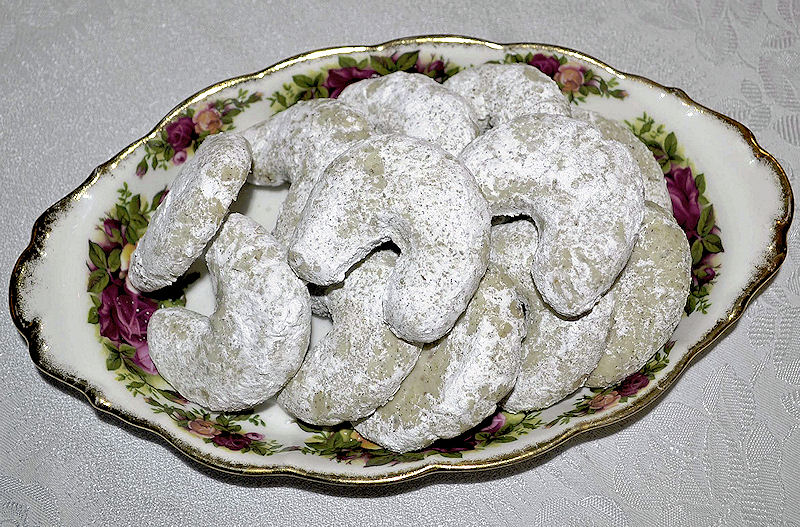
  6. Remove cookies from oven.  Cool just slightly and then toss into the Ziploc bag with the vanilla sugar–tossing the cookies while they are still hot creates a slightly melted-on, and truly special coating.  Toss  cookies in vanilla sugar.
  7. Remove cookie to a cooling tray and repeat with remaining cookies and vanilla sugar.  If you have vanilla sugar left over, you can re-coat the cookies.
  8. Let cool completely before eating. The cookies will crisp up as they cool.

 Yield: About 3 ½ dozen cookies

Kipferls1

I hope you enjoy the World’s Most Expensive Cookie!  They ARE good and worth the cost and the effort. Thanks for stopping by my kitchen today!

PS…I am making another batch of these cookies to take to a Tahoe retreat this weekend.  One bag of that dangblasted expensive Hazelnut Flour does make three batches of these cookies…AND, Costco sells vanilla beans now.  Note my friend Sally’s point, put the vanilla beans in the powdered sugar as soon as you get them.  Once you are ready to make the cookies, remove the beans and use as outlined above.  The benefit is that some of the essence of the vanilla beans will have soaked into the sugar…yummmmm.

24 Jul 2013 Triple Threat Chicken

Triple Threat Chicken on BBQ w smoke

What is Triple Threat Chicken?  Chicken breasts that have been 1) marinated, 2) grilled and 3) glazed!  Delicious!  I have been making this chicken for about five years now, and it has always been well received.  I served it last week at the Grand Opening of my Little Free Library(more about that later*), and one of my friends said, “If you post the recipe for this chicken, I’ll be tempted to start grilling again”.  Here it is!  Fire up the grill.

One of the advantages of this recipe is that you probably have all the ingredients for the marinade and the glaze on hand.  Well, all the ingredients except one, do you have Raspberry Vinegar on hand?  If you don’t,  substitute Red Wine Vinegar, but if you buy Red Raspberry Vinegar on your next trip to the grocery store, you will have some on hand for the next year or two (vinegar doesn’t go off)!

The disadvantage of this recipe is that you have to make two sauces, one for the marinade and one for the grilling, so it’s a few extra minutes measuring and pouring in the kitchen.  Just make both sauces at the same time, because some ingredients are in both sauces.

I use boneless, skinless chicken breasts, but boneless, skinless thighs can  be used just as easily if you prefer darker meat (any chicken parts can be used in this recipe, the boneless, skinless ones are just easier to grill).  I cut-up the chicken breasts, and cook the same pieces at the same time to ensure even cooking.  Don’t even think of cooking a whole breast, it’s too difficult, because the breast varies so much in thickness.

This is how I cut up the chicken breast:

First, I cut the tenderloin off; then I cut off the lower triangle of the breast; when I have just the thickest part of the breast left, I cut that in half.  I get four pieces of chicken from one breast.  The tenderloins and the triangle pieces are thin and cook the most quickly.  The thick pieces from the top of the breast take much longer to cook so put them on the grill first and the tenderloins on last.

Now here’s the most important tip for grilling the chicken:  half cook the marinated chicken on the grill, then take it off the grill and dunk into a pan with the glaze, then return the chicken to the grill to finish off.  This enables the chicken to cook before the glaze burns!  Novices will use a brush and brush the glaze on the half cooked chicken.  Silly novices.  Brushing does not get enough glaze on the chicken, and a lot of the glaze drips onto the coals, which causes flare ups, which causes hot hands and more burned spots than necessary.

But before grilling, you have to marinate, and that part is easy.  The chicken needs to sit in the marinade for 2-4 hours, so start early in the afternoon.  Remember to start your coals approx 40 minutes before you want to start grilling.  Grilling the thickest parts of the chicken might take 20 minutes, the thinner tenderloins might take only 5 minutes.  All of these times are approximate, and all depend on how hot your fire is.  Use common sense.  Don’t freak out.  The chicken would cook at different times in a pan on the stove, too.  Just keep  your eye on each piece of chicken, judging it as an individual, and you’ll be fine.  The picture above was taken on the tiny balcony of my daughter’s apartment, the first time she made this chicken, and only the third time she had ever BBQ’d. Doesn’t it look great?

Don’t forget to have s’mores for dessert, you don’t want to waste all those lovely coals!  For sides, we like to grill sliced zucchini and tomatoes fresh from the garden, but corn-on-the-cob, potato or pasta salad, baked beans, and garlic bread are also classic accompaniments.  Leftovers are great on a green salad the next day, or diced in a quesadilla or burrito, or added to stir-fried veggies and served over rice.

Polly’s Triple Threat Chicken

Desired number of boneless, skinless, chicken breasts each cut into 3 pieces (see note above).  One recipe of marinade will do for 6-8 breasts.  For more chicken, just double the marinade.  You’ll have enough glaze for a double batch.

For the Marinade
· ½ cup soy sauce
· ¼ cup vegetable oil
· ¼ cup red wine vinegar or raspberry vinegar (I keep a bottle of raspberry vinegar on hand just for this recipe)
· 1 teaspoon dried oregano
· 1 teaspoon dried basil
· ½ teaspoon black pepper
· ½ teaspoon dried parsley (or 1 tablespoon finely minced fresh parsley)
· 1 crushed and chopped garlic clove (or ½ teaspoon garlic powder)

For the Glaze
· ¾ cup ketchup
· ¾ cup honey
· ½ cup soy sauce
· 3 crushed and chopped garlic cloves
· a few drops of Tabasco (I live in fear of hot and spicy food, so I only use about ¼-½ teaspoonful)

  1. Place your chicken chunks into a large Ziploc bag or marinating tray.  In a small measuring cup or bowl, combine all ingredients for marinade.  Pour the marinade over the chicken.  Refrigerate, and marinate chicken for 2 to 4 hours.  Remove from refrigerator one hour before grilling so the chicken can be at room temperature before putting on grill.
  2. While chicken is marinating, prepare the glaze.  Combine all ingredients and place in a bowl or container (the container should be big enough to hold chunks of half cooked chicken and be able to withstand the heat of half cooked chicken.  I use a large flat Tupperware container), stir well to combine.
  3. Drain the room temperature chicken from the marinade.  Grill.  Pick out similar size pieces of chicken and put them next to each other on the grill.  Put the thickest pieces on first, then the tenderloins, then those thin triangular pieces.  Turn as needed.  When the pieces are one-half to two-thirds cooked, remove from grill and dunk completely into the prepared glaze, turning to get a good coat.  Return the chicken pieces to the grill for an additional 2-3 minutes on each side.  The glaze will caramelize and look completely yummy.  Allow the chicken to get grill marks, but remove from heat before charring!!
  4. Remove chicken to a serving platter, and dig in!

NEWS FLASH! Look what was in the San Jose Mercury News today, August 1, 2013. The cutie patootie is my 2 month old grandson, awwwwww.

Jett recipe in newspaper


08 Jun 2013 Peach Iced Tea

2 Peach Iced Tea Vert

I made a Peach Iced Tea! I am so excited that I have to share the recipe with you, even as I work to make it more natural (off to the farmer’s market tomorrow for my first try). I didn’t want you all to have to wait until I got the natural version perfected as this version works fine!  I know there are hot days and summer parties in your near future–graduations, Father’s Day, showers, birthday parties, July 4th celebrations, and BBQ’s, so I know you need this recipe now!

This tea, as is, is not too sweet, and definitely has a pronounced peach flavor; it’s like Snapple Peach Iced Tea, only better!  Make the big-batch peach base to keep in the freezer and you’ll be able to whip up a quart of Peach Iced Tea for yourself and a good book! Or make a gallon or two  for a  summer party in a flash.  I, for one, would love to go to a summer party where there’s something to drink other than bottles of beer, soda and water 🙂 (BTW, I have a recipe posted for Blueberry Lemonade, too, which is also very good!).

The peach part of the tea was inspired by a recipe I found in a “Better Homes and Gardens Special Interest Publication” entitled , “Best Loved Reader Recipes; 125 Winners from 1930 to Today”.  The recipe in the magazine was for a “Sparkling Peach Punch”, where the base below is mixed with ginger ale or sparkling water.  I tried both versions. The ginger ale version was very sweet, the sparkling water version was given a thumbs up by my daughters, but the iced tea version created by yours truly was the star of the show.

Notes:

#1 Make the base and freeze it in three 1-quart batches or six 2-cup batches.  Each 1-quart peach base will mix with 2 quarts of strong tea to make 12 cups/3 quarts of  Peach Iced Tea, add ice and you have a party!  Each 2-cup peach base mixed with 6 cups of strong tea will make 8 cups/2 quarts of Peach Iced Tea, add ice and a friend and you have a cool and tasty summer drink with which you and  your friend can enjoy a little down time.

#2 Make the tea twice as strong as you would for regular hot tea!  I prefer English or Irish tea bags such as Barry’s Irish Gold, or Yorkshire Gold or PG tips.  Trader Joe’s Irish Breakfast tea is also very good (but, oddly, the English Breakfast tea isn’t very good at all). I use 3 or 4 tea bags to each quart of boiling water.  If I had to use Lipton or Red Rose Tea, I’d use at least six tea bags to a quart of boiling water.  I haven’t experimented with green tea, as I am not a big fan, but I am sure green tea could substitute for the black tea, and of course, decaf tea could be used too, if that is your preference.

#3 I don’t know why there is gelatin in the base, that’s one of the things I am going to experiment with and try to remove, but, I think it probably does add to the overall peachiness of the drink. Yes, yes, yes, one of the first things I will experiment with is using fresh peaches in place of the canned peaches…but until that happens, make this version, it’s yummy!

Peach Iced Tea

For the Peach Base:

  • 3 cups water
  • 1 1/2 cups sugar
  • 13-ounce package peach-flavored gelatin
  • 1 29-ounce can peach slices in light syrup
  • 4 11 ounce cans peach nectar (find them on the shelves of the grocery store next to the bottled juices)
  • 1/2 cup lemon juice
  1. Combine water, sugar, and gelatin in a saucepan. Bring to a boil, stir to dissolve the gelatin then remove from heat and allow to cool.
  2. Place undrained peach slices in blender, and blend until smooth.
  3. In a 1 gallon capacity bowl, pan or pitcher combine gelatin mixture, pureed peaches, peach nectar, and lemon juice. Stir to combine.
  4. Divide peach mixture into three 1-quart batches or six 2-cup batches.  Use now (see steps below), or freeze until needed.  According to the original recipe, the base can be frozen for up to 3 months.

To Brew the Tea and Combine With the Peach Flavor:

  • Desired quantity of peach base (remove from freezer an hour or two before needing)
  • Tea bags (Make the tea twice as strong as you would for regular hot tea, see note #2 above)
  • Boiling water (You will need to make 2X the amount of water for the quantity of base you are using, see note #1 above)
  1. Pour the required amount of boiling water over the tea bags and let steep for 3-5 minutes.  Don’t let the tea steep for more than 5 minutes or it will start to get bitter.
  2. Fill a pitcher half full of  ice.  Pour the hot brewed tea over the ice. Discard the tea bags.
  3. Stir the peach base into the iced tea.
  4. Pour into glass and enjoy! ahhhhhhhh

It’s mercilessly HOT here, and I hate hot, but a glass of Peach Iced Tea, a day off, and a good book does make the summer somewhat enjoyable(!)

Thanks for stopping by my kitchen today!  I am going to try some more recipes from this magazine–Calypso Shrimp Skewers, Coconut Salmon Curry, Macaroni and Brie with Crab, Green Beans with Basil and Mint, so stay tuned!

BTW, if you have the magazine, I’ve already tried the “Bagel, Lox and Egg Strata” recipe… The picture looked great.  The make-ahead casserole wasn’t bad, but neither was it great, and I see no reason to make it again.

23 Feb 2013 Cold Brewed Iced Coffee (for the Yummiest Iced Lattes)

Iced Coffee with Whip

I like coffee.  I loooooove coffee.  Not that hot, black and bitter brewed coffee, but that expensive stuff brewed by the tablespoonful and mixed with steamed and foamed milk.  I have lived with an espresso machine since my ex-husband moved out.  It was a good switch. I am on my fourth one now (fourth espresso machine, not fourth ex-husband!).  Three had to be  retired (again, the three espresso machines not ex-husbands) and one  was fired for making terrible, horrible, no good, very bad lattes.  In addition to hot lattes, from spring through fall I really, really enjoy an Iced Latte in the afternoon, and, for Iced Lattes, with this recipe  no espresso machine is  required! Is there dancing in the aisles?

To make the Cold Brewed Iced Latte base, just get 12 oz of good quality coarse ground coffee beans, 7 cups of water, and a bowl that can be covered.  Are Toffee Nut Iced Coffee’s your little bit of heaven?  Not a problem. Vanilla Iced Coffee’s?  Easy peasy…

My friends and I are loading up my Minnie Winnie (small RV) and heading off to Palm Springs for the Camel & Ostrich Races and the Blessing of the Dates.  (Nooooo, I don’t know why we thought that would be a good idea!!! And no, I am not making this up, both are real events, held yearly, in Palm Springs and, from what I understand, in Arizona, too).  It’s become a tradition for us to load Iced Coffee Base (decaf)  into the Minnie Winnie when we head out.  Iced Lattes every afternoon while touring the US, what a nice way to live!  Don’t be jealous…raise your hand! You can come on the next trip!

Cold Brewed Iced Coffee Concentrate

  • 7 cups water (you could go gourmet and use bottled water…)
  • 12 oz. favorite rich coffee (coarse  or drip grind, decaf or regular)
  1. Pour the entire 12 oz of coffee into a bowl that can be covered (with a lid…or a plate)
  2. Pour the water over the coffee. Stir to make sure all grounds are saturated with water. Cover the bowl.
  3. Let the coffee and water sit, covered and undisturbed, for 24 hours.
  4. Now comes the messy part.  Strain the coffee.  I put a coffee filter in a mesh strainer, balance it on top of a pitcher, and pour cups of the mixture through the filter. The Iced Coffee base collects in the pitcher and  I throw the used coffee grinds away as I go.  You might need to use two coffee filters.  The decanting takes awhile, but it’s definitely worthwhile–messy but easy.
  5. Once all the coffee concentrate has been filtered, put a lid on the pitcher, and store it in the refrigerator for up to three weeks. (Handy Tip: write dates on the container with an erasable marker.  For example:  Made 2/13/13. Good until 3/6/13.  When the container is empty, wash the dates off!  I mark all my plastic containers with erasable markers now.  It’s so handy.)

Iced Latte

  • ¼ cup* of Cold Brewed Iced Coffee Concentrate (above)
  • ¾ cup of milk (If you want, you could experiment with the milk.  I use 1 or 2%, but I have heard of others using coconut milk, almond milk, chocolate milk, and of course soy milk. Some even like evaporated milk with a splash of sweetened condensed milk).
  • 4 or 5 ice cubes
  • Optional: sugar (white or raw), Splenda, Torano Syrup (Vanilla and Toffee Nut are favorites), Bailey’s Irish Creme, Kahlua, 1-3 Tablespoons chocolate syrup, Sprinkles (Trader Joe’s has a “Sugar, Chocolate, Coffee Bean Grinder” that’s fun), a chocolate covered espresso bean or mini chocolate chips…
  • whipped cream and a straw (I think these are musts, but some people are a bit more serious and go without!)
  1. Pour the concentrate into the glass.
  2. Add the milk and stir.
  3. Stir in any optional ingredients (sweetener or syrups)  Stir well.
  4. Plop  in some ice cubes. Stir again.
  5. Top with whipped cream, and sprinkles if you’d like (sprinkles, grated chocolate, a dusting of cocoa powder or cinnamon, or even a squirt of chocolate or caramel syrup), and, of course, a straw.

* ¼ cup of concentrate plus ¾ cup of milk seems to please most of my friends (A LOT!), but I do have one friend who doubles the coffee.  She has ½ cup concentrate and ¾ cup of milk. She’s German.  She likes strong coffee.

Thanks for stopping by my kitchen today!  You have in your hands one my favorite recipes. I hope you’ll be enjoying warm weather and iced lattes very soon!

P.S  If you’d like to get an email notifying you of the next recipe I post, please enter your email address in the box to the left. Don’t worry!  I won’t abuse your email address (I don’t know how to, for starters…) or use it for anything other than an occasional, short email notification of a new posted recipe.