Tag-Archive for ◊ quick and easy ◊

29 Mar 2014 Caramel and Chocolate Covered Graham Crackers

Graham-crackers-2

It’s been a terrible, horrible, no good, very bad few days around here. We are all fine, but there was a family brouhaha that just didn’t sit right. We were all out of sorts, and, truth be told,  a bit afraid of what the future will bring, too.  So what to do? Make the all time favorite family comfort food, of course!

This recipe is rustic and quik, and it’s done in 20 minutes.  So it’s great just to start on this and put some of that pent up adrenaline to good use. But then there’s the cooling off period. Once made, these bars have to  sit in the refrigerator to harden up a bit. Again, another good thing.  A cooling off period is needed after a big family brouhaha.  Then comes the peace and contentment, sitting down with a good cup of coffee, some rustic chocolate covered graham crackers and reflecting on what went right and what went wrong, and figuring out how to right the wrongs and ultimately, bringing peace back to the family.

In August of 2005 my friends Sharon and Margie, from Lake Arrowhead Retreats, gave me a recipe for Saltine Toffee Cookies which they had found on AllRecipes.com.  Truth be told, the recipe didn’t sound very good.  Saltine crackers, brown sugar, butter, and melted chocolate?  Just say no.  But they insisted I try it.  They insisted the recipe was good.  I trusted them, they make some great food, so I tried it. It WAS good. VERY good.  Then I came to find out this recipe is sort of an Internet sensation and I might have been the last person on the planet to know about it!

Years pass, and one fine weekend, I took a chocolate making class.  The instructor of the class talked about how her mother used to make a ganache and pour it over crumbled up graham crackers as a bedtime snack for her and her siblings (I know, I know, what a Mom! I never did that for MY kids…).  Then the gears started churning.  Chocolate covered graham crackers are one of my favorite things in the whole wide world, but I had never made them.  The chocolate covered graham crackers from Starbucks are the best, but they are a bit too rich with a bit too much chocolate. OH!  The light bulb popped!  Could I make chocolate covered graham crackers for my kids, too?  I could one-up that other Mom, as well!  I could make chocolate covered graham crackers and with caramel!  Never mind that she was using a fancy ganache and I was just melting giant chocolate bars, LOL! What if I use the Saltine Toffee Cookie recipe but substitute graham crackers for the saltine crackers.  What if???

So I did it.  Many times.  My son says these are the best things I make. The last tin I made, hidden in the refrigerator behind the lettuce, lasted only three days.

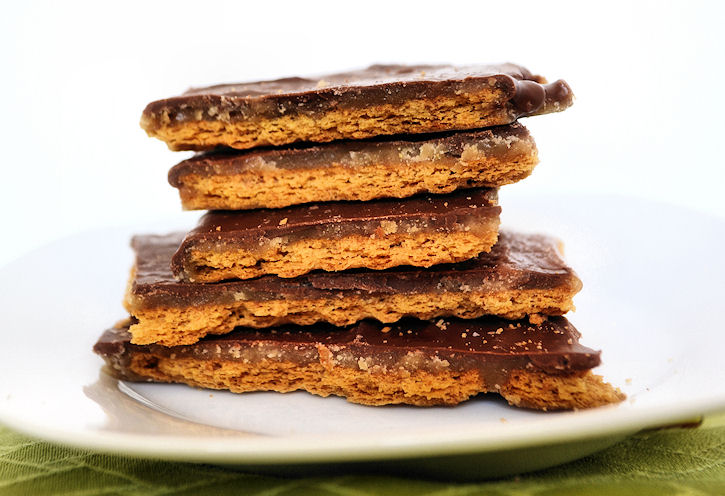
Turns out, I am not the first person to think of this!  Lots of people on the Internet have used graham crackers instead of saltines with this recipe. Again, why am I one of the last people on the planet to know about this?! 🙂 Anyway, here’s my recipe.  You can find lots of versions all over, but this is the one that works for me.  Keep these Caramel Chocolate Covered Graham Crackers refrigerated, when they are not being eaten…  If these cookies sit out too long at room temperature the graham cracker starts to soften and loose it’s crunch 🙁 My 2005 copy of this recipe (with saltines rather than graham crackers) specifies that the recipe makes 35 servings. ROFLMAO!!! That’s so funny 🙂

Caramel and Chocolate Covered Graham Crackers

  • approx. 2/3 a box of graham crackers (two wax covered packages out of a box of 3 packages)
  • 1 cup butter
  • 1 cup dark brown sugar
  • 1 large sized (4 or 5 oz) chocolate bar, chopped (I like a Symphony Bar or a Cadbury Bar, if you like dark chocolate, the Hershey’s Special Dark Bar is good)
  • ¾ cup chopped nuts (if you like nuts.  I have never added nuts) OR, if it’s December, crushed candy canes! (I loooove this option!)
  1. Preheat oven to 400 degrees.
  2. Line a rimmed cookie sheet with graham crackers.  Place the graham crackers as close together as possible. You will need most of 2 waxed covered packages. Set tray aside.
  3. In a medium saucepan, combine butter and sugar and stir constantly, over medium heat, until sugar is melted.
  4. Raise heat slightly, to bring mixture to a boil.  Boil vigorously for 3 minutes, without stirring–shaking the pan occasionally is OK (the original directions said to “stir constantly” but I have found this to make a grainy caramel layer).
  5. Immediately pour caramel over graham crackers.  Use an offset spatula to quickly spread the caramel evenly over the crackers.
  6. Place tray in hot oven and bake for 5 minutes.
  7. Remove tray from oven and sprinkled chopped chocolate evenly over top.  Let chocolate just sit on top of caramel for 5 minutes.
  8. Spread the now melted chocolate evenly over the caramel.  Sprinkle with nuts (if using).
  9. Let tray sit until chocolate has hardened.  This make take a few hours.  To speed things up, put the tray in the refrigerator for about 15-20 minutes.
  10. When chocolate is set, break bars into uneven pieces. Sneak a piece or two.  Serve or cover and hide in refrigerator until needed.

Thanks for stopping by my kitchen today!  If there is a brouhaha in your family, I hope it’s over quickly and sweetly!

18 Jan 2014 Russian Tea

Russian-Tea-1a

Are you old enough to remember the “Russian Tea” phase back in the 70’s?  I was a teenager then, a very young teenager, and our Moms and Grandmas were mixing up batches of Russian Tea like crazy and giving everyone little jars of the stuff.  I think the mix had instant tea, Tang (remember Tang? Astronauts drank it!), powdered lemonade, and some spices.  You opened up your gift jar, spooned some mix into a cup, added hot water, stirred it up and  you were drinking Russian Tea!  I liked it. It was a different hot drink.  I wasn’t into coffee yet, Hot Chocolate was too childish, English tea with milk was OK, but boring. Russian Tea was fun and different–and a bit exotic.

Fast forward to February 7th, 2014, Opening Ceremonies for The XXII Winter Olympics will be held in Sochi, Russia and I will be hosting a Russian Themed Winter Olympic Dinner.  What to have to drink after dinner? My daughter suggested Vodka shots off the tip of a sword.  Umm, no.  A citrus-y, sweet, slightly spicy version of Russian Tea is more up my alley — but not made of Tang, Country Time Lemonade and Nestea. So I hit the Internet.  First spoiler, the so-called “Russian Tea” of the 70’s isn’t Russian at all. It’s an American concoction! The only thing Russian about it is it’s name.  Shhhhhhhhhh! Don’t tell anyone!  Real Russian tea is “Russian Caravan” tea, because tea used to be imported to Russia from China, via a 16-18 month caravan, and it acquired a smokey flavor from all of the caravan campfires, according to Wikipedia.  So, I went to my local Russian grocery store, yes, we have one in San Jose, and I couldn’t find “Russian Caravan” tea anywhere (nor anyone to help me), but lots of Earl Grey.  I am not serving Earl Grey tea at my Russian Dinner.  Early Gray Tea is English and I don’t like it, it’s too smokey!

So now I am back to my original “Russian” Tea quest.  I found some recipes on the Internet, checked out their star ratings, and tried a few.  One was truly horrid; it involved extracting the juice from oranges and lemons, then boiling the  rinds in sugar and water then adding  the liquid to cold tea. I was skeptical, but the very attractive, very sincere lady on the YouTube video seemed nice, and she was raving over her tea! So I tried it.  She was not honest. Her tea was bitter and horrid.  Of COURSE it was.  Boiling all that pith then adding it to the tea? I should have known better. Why do people post bad recipes?

Eventually, I came up with this version for fresh Russian Tea.  I like it.  I really like it. I served it to five friends and two relatives, and they all said they liked it.  Then I served it to another relative, the daughter who suggested I serve vodka shots off the end of a sword, and she hated it.  I was SHOCKED.  I tied her down and make her try it again.  She STILL didn’t like it.  Harrumph.  She’s no longer my favorite child.  My son loved the tea.  He said, “That’s good.  That’s really, really good.”  He’s a good boy. He’s my favorite child now.

This “Russian” tea is in the same family as hot tea with lemon and honey, but with orange added, and some cinnamon, and a few cloves, it’s a bit more complex (there’s no honey in this tea though).  I’m going to serve it at my Russian themed Winter Olympic dinner, but I’ll brew a pot of Earl Grey, too… for the weirdos.

You all know I am not a photographer, right?  I thought I was being deliciously creative setting up a picture to look like hot, citrus-y, Russian tea in cold, stark, white snow.  Epic fail.  What I got looks like tea in bubbles, oh, not even that, it looks like tea in pillow stuffing, which it is.  Can you overlook that?  Can you just try this hot, citrus-y, slightly spiced, American-Russian tea?  I think you will be glad you did.  Just make the tea once, and put it in the refrigerator to reheat as needed. Ponyat’? Da?

I am really getting into the Olympic/Russian thing now. I made Pierogi for dinner last night, and I ordered a Pierogi press and a Pierogi cookbook written by a real babuska from Amazon.  I am trying to find a Russian outfit to wear. It seems I should go as a babushka.  I already have all the right clothes in my closet…and you know, Vodka shots from the end of a sword might not be too far fetched!

Russian Tea

  • 4 strong black tea bags
  • 1 quart (4 cups boiling water)
  • Zest of 1 1/2 oranges
  • Juice of 1 1/2 oranges (about 2/3 cup)
  • Zest of 1 large lemon
  • Juice of 1 large lemon (about 1/4 cup)
  • 6 cloves (0k to double for spicier drink)
  • 1 cinnamon stick (ok to use 2 for spicier drink)
  • 1 cup sugar (might be ok to reduce to 3/4 cup for a less sweet drink)
  • 2 cups cold water 
  1. Make 1 quart of tea by pouring 1 quart of boiling water over 4 teabags and seep for 5 minutes.  Remove tea bags from hot tea and set tea aside.
  2. Zest the oranges and lemon. Put the zest in a small saucepan.
  3. Add 1 cup sugar and 2 cups cold water to the zest in the small saucepan.
  4. Bring water, sugar, and zest to a boil and boil for 5 minutes.
  5. Juice the oranges and lemon. Pour the juice into the brewed tea.
  6. Strain the  boiled water, sugar, spices and zest mixture the add to tea and juice mixture.
  7. Stir well and serve or refrigerate mixture until ready to use. Reheat in the microwave or on the stove top.
  8. Enjoy the Olympics!

Thanks for stopping by my kitchen today.  BTW, I tried one more drink in my quest for my Olympic dinner, but I think that one qualifies as a dessert (and a gold medal)!  White Hot Chocolate.  Too, too, too decadent to post…I must keep my fans from sinning…I must…I must…OK, OK, I’ll post it soon!

06 Oct 2013 Espresso Rice Krispie Treats

espresso RKT bright1

As most of you know, I can’t be left in a room with a Rice Krispie Treat, or as my #1 grandson calls them, “Rice Christmas Treats”. Unfortunately, now he can’t be left alone in a room with a Rice Krispie Treat either, but it’s a problem that seems to run in the family.  His mother,  aunt and uncle can’t be left in a room with a RKT either (probably bad parenting).  We’re a Rice Krispie Treat crazed family which is odd, considering we don’t eat cereal (well, Abby eats cereal, but it’s a secret!).  I hate all boxed cereal.  Yes, I know that is a strong word, but I do.  I don’t think I have had a bowl of cereal in 40 years or more.  Yucky stuff, but stir in some processed marshmallows and a bit of butter and everything is magically transformed!

So! Now, I’ve finally found a GOOD recipe for an Espresso Rice Krispie Treats! I’ve tried some others over the years, including one epic fail using butterscotch pudding, but this one is a winner.  Where did I find it?  In the October 2013 edition of Cooking Light!  Are you shocked?  Me, too! This issue has NINE recipes for Rice Krispie Treats!  I am not inclined to make any of the other recipes, one of which is…, wait for it…, drum roll…, Maple Bacon!! Really? Really!?!  A  Maple Bacon Rice Krispie Treat?  (In Cooking Light?!) Ummm, no. But, if you do make them, you have GOT to let me know how they turned out, OK?  Are they supposed to be a breakfast food?!

Here, on In the Kitchen with Polly, I have four more recipes for Rice Krispie Treats: Salted Brown Butter Rice Krispie Treats (the all time favorite, the classic recipe made even better); Coconut Rice Krispie Treats and Chocolate-Chocolate Cherry Rice Krispie treats (which are both deeeeelicious–I don’t know which one I like better!) and Milky Way Rice Krispie Treats (which have a great taste but come in 4th place because they suffer a teeny-tiny bit in texture and are a bit, and just a bit, dense/hard… Not as ooey-gooey as the other four recipes).

This recipe calls for “toffee bits” which are Heath Bar Bits. Normally, I don’t like Heath Bar Bits because they taste a bit old and stale, but in this recipe they  complement and enhance the espresso powder perfectly (truth be told, I  made these the first time because I had half a bag of Heath Bar Bits in the refrigerator and didn’t know what to do with them).  Since then though, I’ve made these Espresso Rice Krispie Treats several times, always to rave reviews, except by #1 grandson, age: not-yet-five, who doesn’t like the coffee flavor (YET).  SCORE! More for ME! But it does mean that I have to make two batches of RKTs when I make these… 🙂

Espresso Rice Krispie Treats

  • 2-3 tablespoons butter
  • 10 oz. miniature marshmallows (check your package, you might have a 16 oz package of marshmallows and in that case, make 1 ½ times this recipe, which fits nicely in a 9″ x 13″ pan)
  • 1 tablespoon espresso powder (can be found in most grocery stores now, next to the instant coffee, gourmet stores carry it too, but at double the price)
  • 1 cup toffee bits (Heath Bar bits, the ones without the chocolate)
  • 6 cups crispy rice cereal (Rice Krispies, or one of the generic brands–which I usually use because they are so much cheaper and they work out fine)
  1. Melt the butter in a saucepan or large skillet over medium high heat.
  2. Stir in the espresso power.  Stir to blend.
  3. Lower the heat. Stir in the marshmallows. Continue cooking and stirring until the marshmallows are melted and the espresso powder has been evenly dispersed. Turn off the heat.
  4. Stir in the 6 cups of Rice Krispies and the toffee bits.  This is the only (slightly) difficult and messy part of the recipe.  Keep stirring until marshmallow mixture has been evenly distributed through the cereal.
  5. Transfer the mixture to an 11″ x 7″ pan (if you don’t have one, don’t worry, use the nearest size pan you have…or use a 9″ x 13″ pan.  In the larger pan, the squares will just be a bit thinner)
  6. Press the mixture evenly into the pan, you have to press down slightly to get the right consistency in your finished Treats.  The mixture will be sticky, and a bit hot, so use the wrapper from the butter to press the mixture down, or butter your fingertips and press down, some people wet their fingertips to do this, but I am always afraid I’ll make the top layer soggy.
  7. Let Rice Krispie Treats set and cool on counter before slicing and serving. Cut into any size or shape bars that you prefer.

That’s it!  Now you have a truly grown-up flavored Rice Krispie Treat!

Thanks for stopping by my kitchen today!

22 Aug 2013 Salmon in Parchment

salmon

Every once in awhile you run across a recipe that changes everything!  This is one of those recipes.  Cooking salmon in the microwave, with veggies.  How simple is that? How convenient is that? This main dish is simple, delicious  and healthy.  You’ll need a salmon fillet, a cup of fresh julienne veggies, a large piece of parchment paper, a little liquid, and a microwave. Chop and prep, five minutes in the microwave, then BOOM, a tasty, spot on healthy dinner of salmon and veggies!

I can’t get enough of this!  As much as I love, love, love the combination of veggies below, I often have to switch up the veggies and change the sauce to accommodate what I have on hand. The method always works, it’s always good and it never heats up the kitchen.  PLUS, dinner can be ready in ten minutes flat!

Fully Customizable Microwave Salmon & Veggies in Parchment

Recipe by Polly Ferguson, based on a recipe by Alton Brown

  • 1 (8-ounce) salmon fillet, pin bones removed
  • 1/3 cup julienne fennel bulb
  • 1/3 cup julienne leeks, white part only
  • 1/3 cup julienne carrots
  • 1/3 cup julienne snow peas
  • ½ teaspoon Kosher salt
  • 1/8 teaspoon freshly ground black pepper
  • 1/8 teaspoon ground coriander (this could be customized too—curry powder, cumin, or any other powdered spice you are partial to and that would complement the veggies and the salmon could be used)
  • Herbs: 6 basil leaves, chopped finely (or any mixture of herbs from your garden, or spices from your cabinet, that appeals to you—parsley, cilantro, dill, mint, rosemary, green onion, chives, fresh ginger, tarragon, lemon pepper, garlic, chili powder, curry powder, herbs de province, paprika, etc…)
  • Other Stuff: 1 tsp. grated lemon or orange peel, diced pineapple, jalapeño, (maybe even some brown sugar or a drizzle of maple syrup, or a sprinkling of ground coffee or mustard…, pesto or marmalade…)
  • Liquid: 1 tablespoon dry vermouth, OR orange juice, OR white wine… (just don’t use lemon juice, major Yuck!) I’d really like to experiment with soy sauce or teriyaki sauce, rice wine, melted butter (!), dry sherry, coconut milk, Asian Fish Sauce or beer 🙂
  1. Take a rather large piece of parchment paper and fold it in half  like a book. Lay fennel, leeks, carrots, and snow peas on parchment in the center of the paper and on one side of the fold.
  2. Mix together salt, pepper, and ground coriander (or whatever spice mix appeals to you). Sprinkle vegetables with 1/2 of the spice mixture.
  3. Lay salmon on top of vegetables and sprinkle with the remaining spice mixture.
  4. Top salmon with choice of herbs, sprinklings, and 1 tablespoon of desired liquid (wine, vermouth, orange juice, teriyaki sauce…)
  5. Fold empty side of parchment over fish and starting at top, fold up both edges of parchment, overlapping folds as you move along. Once you reach the bottom tip, twist several times to secure tightly.
  6. Place on microwave safe plate and cook for 5 minutes, on high in microwave (or until fish reaches 131 degrees if you have an instant read thermometer and wish to use it–I don’t). Let the package sit for 2 minutes.
  7. Open parchment carefully and serve for a complete meal. Serve from the parchment package, if you’d like. If I am feeling fancy I take the skin off the salmon fillet, place the veggies on the plate, and put the salmon on top and sprinkle with a garnish of  green onion, parsley or snipped basil.

Thanks for stopping by my kitchen today! :)