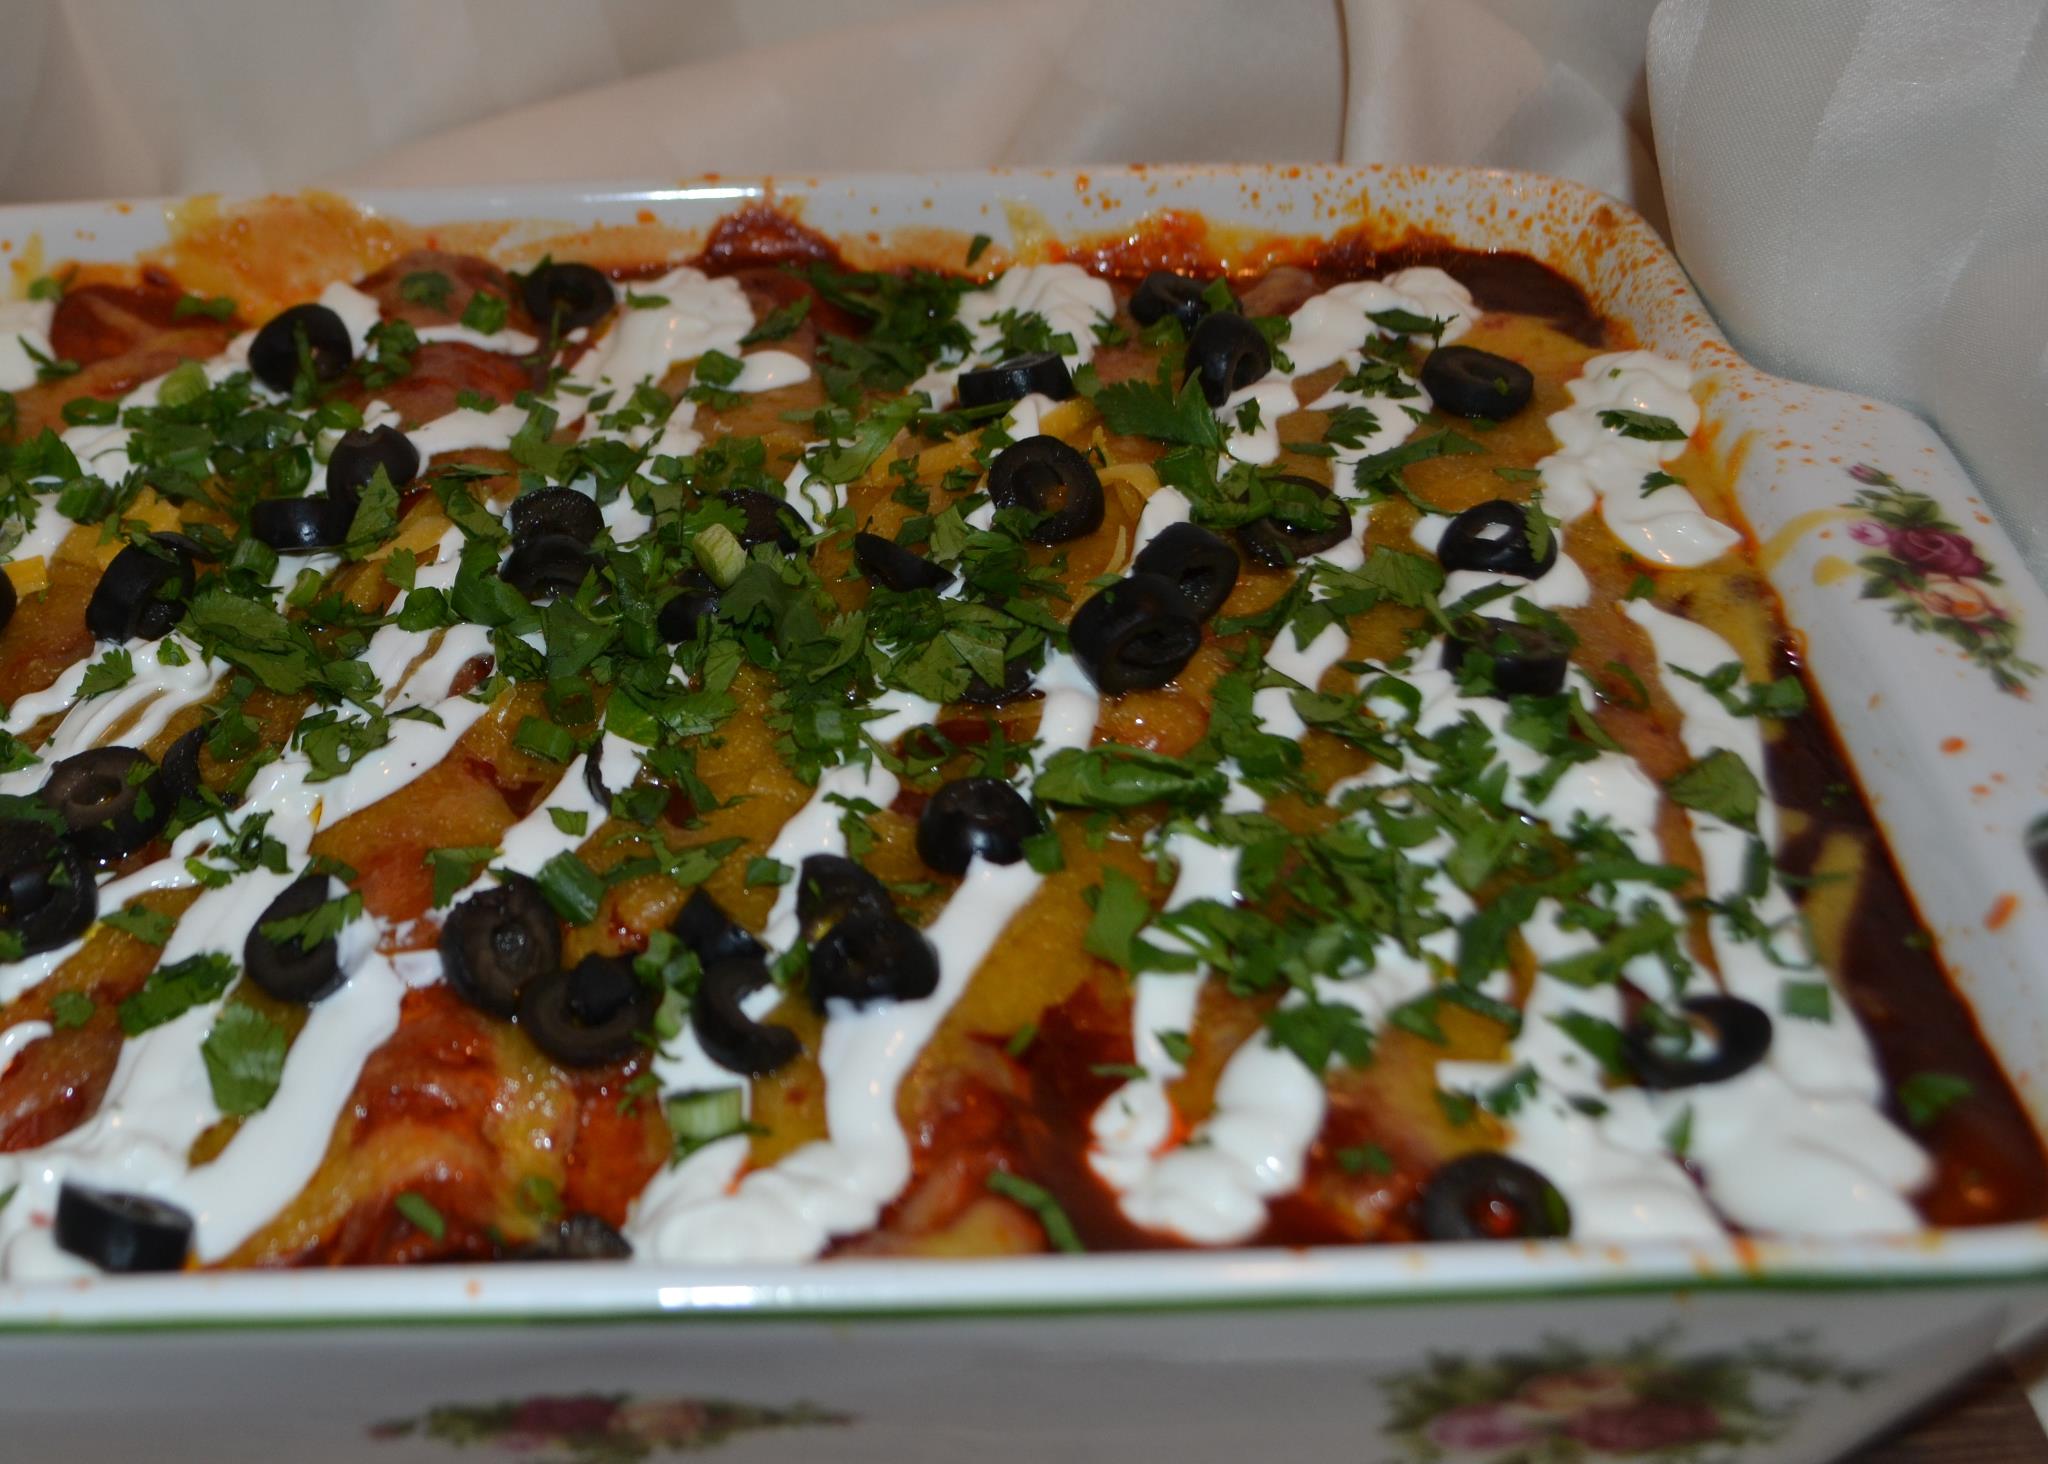
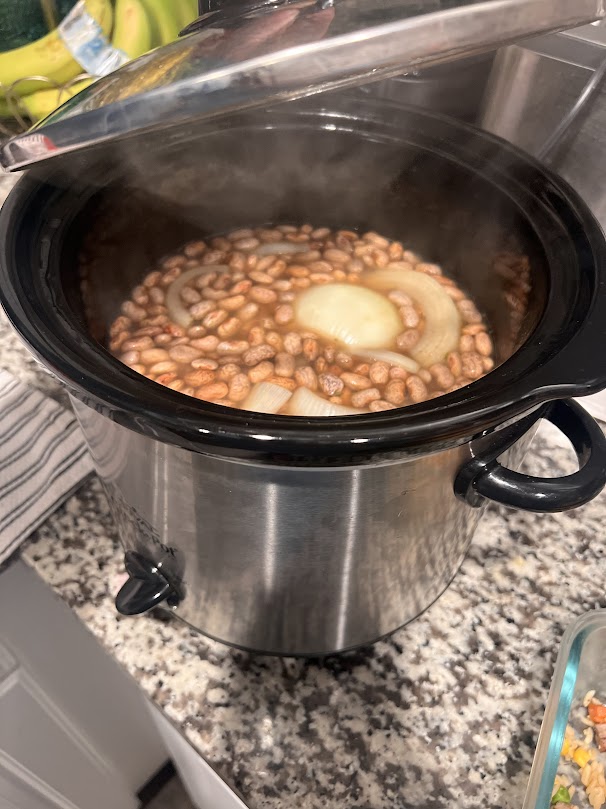
Tag-Archive for ◊ Cinco de Mayo ◊

17 Oct 2010 Cheddar Cheese Crackers

Look what I made for my grandson’s “Pups and Trucks” birthday party,  dog bone crackers!  Aren’t they adorable?  I think the two year olds, and their parents, are really going to enjoy them.  I used a small cookie cutter to cut the bone shape out of a cheddar cheese flavored cracker dough.  Look how I’m going to serve them!  Don’t shudder, it’s a brand new dog bowl!  I bought it at the dollar store and I washed it well before putting the crackers in it!

The crackers taste great.  It’s sort of like the Goldfish crackers, not nearly as crisp, but much more flavorful (and no icky preservatives).  I’d never made crackers before, but now I know they are easier than cookies, and taste so much better than store bought boxed stuff,  I will be making them a lot more.  Think of all the possibilities: the bone cookie cutter would also make good Halloween treats (and the dough is slightly orange making it PERFECT!), for Thanksgiving  I could make leaf or acorn shapes, Christmas options are too numerous to list, Valentine’s Day hearts, Easter eggs and bunnies, Mother’s Day flowers…

I found the recipe at Yum Food & Fun for Kids magazine, October 2010 by Laura Flowers. THANKS Laura!

Cheddar Cheese Crackers

1 1/3 cup unbleached all purpose flour
1 teaspoon salt
½ teaspoon paprika
½ teaspoon onion powder
6 tablespoon unsalted butter, diced
8 ounce package shredded cheddar cheese
2 egg yolks
2 tablespoons water

Line cookie sheets with parchment paper (DO this, the crackers bake so much better on parchment paper). Clear a space in your freezer to accommodate the cookie sheet.  You will need to freeze the crackers for 15 minutes before baking.

In a food processor pulse together the flour, salt, paprika and onion powder. Add the butter and process until combined. Add the grated cheddar cheese and pulse until combined. Process in the egg yolk and water until the mixture forms a ball.

Remove the dough and knead in your hands for a few turns. Divide in half and roll one part between two pieces of wax paper to 3/8 inch thick. Peel off the wax paper and cut with cookie cutters (or just cut into a square or rectangular cracker shape of choice). Place the crackers on the parchment lined cookie sheets.

Freeze the crackers on the cookie sheets for 15 minutes. Meanwhile, preheat the oven to 325º.

Transfer the cookie sheets to the oven and bake for 20 minutes.

Cool crackers on cooling racks. Store in an airtight container.

I was able to get 70 1.5 inch dog bone crackers from this dough.

Happy Birthday Zadeykins!

25 Sep 2010 Baked Chicken Taquitos

Yes!  You can bake taquitos!  Who knew?  My kids loved taquitos when they were growing up.  They were always happy when there was a box of them in the freezer. I wish I knew then what I know now.  I could have made batches of these and had them in the freezer for them to reheat.  I could have been my own Costco!  I could have served them real food, and it could have been baked, rather than fried.  Oh well.  I can make these now and my daughter is heading back to her college apartment with two dozen of them (frozen), and the knowledge of how to make them for herself.  Hey, I AM my own Costco!

I was afraid this would be a bit spicy for my tender palate.  Not at all.  In fact, if you want a bit of a kick you should probably add in a few chopped chilies.  We made most of these with corn tortillas, but tried a few with flour, too.  We didn’t like the flour ones nearly as much. BTW, I’ve found a really good brand of corn tortillas, they don’t crack when folded (even when taken right out of the refrigerator).  They are  “La Tortilla Factory Hand Made Style Corn Tortillas”.  Here in San Jose they are at both Lucky and Safeway. I found this recipe at Our Best Bites.

Promise me you won’t skip the sprinkling of Kosher salt before baking.

Baked Chicken Taquitos

4 oz cream cheese
1/4  cup Salsa Verde (green salsa)
1 tablespoon fresh lime juice
1/2 teaspoon cumin
1 teaspoon chili powder
2 teaspoons minced garlic
3 tablespoons chopped fresh cilantro
2 tablespoons sliced green onions
3 cups shredded cooked chicken
1  cup grated pepperjack cheese

16-20 small corn tortillas
kosher salt
cooking spray (Pam) or oil placed in an oil mister

Heat oven to 425°. Line a baking sheet with foil and lightly coat with cooking spray.

Heat cream cheese in the microwave for about 20-30 seconds so it’s soft and easy to stir (but not melted).

Stir salsa verde, lime juice, cumin, chili powder, garlic, cilantro, green onions, chicken and grated cheese into softened cream cheese and combine well. You can easily prepare  this mixture ahead of time and store covered in the refrigerator until ready to use.
Working with a few tortillas at a time, place between damp paper towels and heat in microwave (20-30 seconds) until soft enough to roll without cracking (not necessary if you are using La Tortilla Factory Hand Made Style Corn Tortillas!)

Place 2 tablespoons of chicken mixture on the lower third of a tortilla, keeping it about 1/2 inch from the edges. Roll tortilla as tightly as possible.  Secure with a toothpick if desired, but it’s probably not necessary (Now would be the time to freeze, if you want to save and bake at a later time). Place rolls seam side down on the prepared baking sheet. The rolls should not touch each other.

Spray taquitos lightly with cooking spray or oil in a mister.  Sprinkle tops lightly with kosher salt. Don’t you dare skip this!

Place taquitos  in preheated oven and bake for 15-20 minutes, or until crisp and the ends start to get golden brown.

Serve hot, with dips that suit you–guacamole, sour cream, salsa…

Thanks for stopping by my kitchen today, I hope you enjoy this recipe!

31 Aug 2010 Green Rice (Arroz Verde)

I first posted this recipe on my Facebook “Polly, Julie and Julia” page in 2009.  Since then I have had a lot of feedback:  we have a winner! Green Rice has become a welcome addition to  many dinner plates.  Finally, a new rice side-dish; one that both looks good on the plate and is deliciously, delicately flavored. Odd, that you cook the rice in pureed spinach, cilantro and milk, but it works!  Don’t let the name-or the method-scare you off.  BTW,  the rice is not green-green, it’s more herby-green.  It’s pretty!

I found this recipe in “The Best 150 American Recipes“, by Fran McCullough and Molly Stevens, the book that spurred this food blogging urge.  The authors of the book  used some interesting turns of phrase to describe this rice dish (and other rice dishes of Mexico) the book said, “…like unexpected treasures at a rummage sale”.  This recipe certainly is an unexpected treasure…I don’t know about the rummage sale part though.

One note of caution, my rice, although very tasty, was a bit crunchy. Next time I will add a bit more liquid (2T – 1/4 cup). Check your rice about halfway through, to see if yours needs a bit more liquid, too. Other than that, you can probably fit this into your dinner plans in the next day or two. It will make the whole meal shine a bit more brightly “(…like an unexpected treasure at a rummage sale”!).

Green Rice

1 cup tightly packed spinach leaves (about 1.5 oz)
1/2 cup cilantro leaves (about .5 oz)
1 1/4 cup chicken broth (homemade is best)
1 1/4 cup milk
1 tsp. salt
3 T. butter
1 T. olive oil
1 1/2 cups long-grain rice
1/4 cup minced onion
1 minced garlic clove

Place spinach, cilantro and broth in a blender and puree. Add milk and salt to spinach mixture and blend until combined. Set aside. In a medium saucepan over medium heat, heat butter and olive oil. When butter has melted, add rice. Saute rice, stirring frequently, until rice just begins to brown, 3-4 minutes. Add onion and saute for 1 minute more, then add in garlic and stir. To rice in pan pour mixture from blender, turn heat up, and bring to boil. Cover pan, reduce heat, and cook for 25 minutes. (You might want to check, about halfway through, to see if rice needs a bit more liquid. If it does, add 2 – 4 T of additional warm broth, water, or milk.) After 25 minutes, turn off heat, stir rice, re-cover pan and let sit for another 10 minutes. Serve hot.

Recipe states the rice is best just after it’s made but can be made up to 2 days ahead and reheated in the microwave.

Thanks for stopping by my kitchen today.  Hope it was worth your while!

13 Jun 2010 South Texas Flour Tortillas
 |  Category: Breads  | Tags: ,  | Leave a Comment

I saw this post at Om-Nom-Nomnivore, laughed out loud, and took up the challenge. Thirty minutes later I am sitting here with soft and warm flour tortillas bathed in melted butter. YUM! There’s only 2 teaspoons vegetable oil in the whole batch of one dozen tortillas, so I’m not feeling too badly about the melted butter on top…

I need some practice, no doubt about it. I have no idea how to roll a 2 oz. ball of dough into an even 6 inch circle, but what the heck. These tasted good. They were easy. They’d be great for the kids or company to make while you pulled together the meat, fish, beans, veggies, guacamole, salsa…, whatever, to wrap in the tortilla for taco night or burrito night.

I read these keep for 5 days wrapped in plastic in the refrigerator. Not sure mine will last that long. Think I will try some cinnamon and sugar on top of this melted butter now-(always been a favorite of mine) and maybe when Abby comes home she’ll spread a bit of peanut butter on hers…, and we do have a lot of leftover BBQ chicken in the refrigerator.

I think I’ll show my 19 year olds how to make these, college students do run out of money from time to time. It would be good for them to know how to make these, just in case.

I’m just going to copy the post from the Om-Nom-Nomnivore site…, maybe it will inspire you to crank out your first batch, too!

South Texas Flour Tortillas

2 1/4 cups all purpose flour (NOT bread flour)
2 tsp baking powder
1 tsp salt
2 tsp vegetable oil
3/4 cup hot milk

1. Light up the stove or griddle. Get a large non-stick surface hot and ready to go. I like these to cook fast, so fire that baby on up. Set out a heavy plate (that will hold heat) and a spatula to handle the hot bread.

2. Put a smidgen over 3/4 cup of milk into the micro and set on high for 60 seconds and leave it. We’ll cover why it’s just over 3/4 cup shortly…

3. Measure out all of the dry ingredients into the mixer of your Kitchen Aid or a large bowl that you can mix in by hand.

4. Add in 2 tsp of vegetable oil. Yes, vegetable oil. No, I don’t mean butter. It works, trust me. Now mix those items together just a bit.

5. Slowly mix the hot milk in until the dough ball comes away cleanly. You may need to add a little more or less and you may need to adjust with additional flour.

6. Mix the dough for 3-4 minutes then turn out on a floured surface and knead once or twice to shape it some. (Note: To this point you should have taken no more than 5 minutes tops! Yes, the clock is running, come’on! Didn’t you read the post title?)

7. Divide the dough into 12 equal balls, if you are measuring with scales each ball will be somewhere around 2 oz in size.

8. Here’s the fun part! You may want some help with the first couple of times. Roll each ball into a 6″ circle on a lightly floured surface and cook them on the skillet/griddle. Each one will take about 30 seconds per side to cook so you can put one on and roll out a second tortilla. Once the second one is ready you can flip the first one and place the second one on the surface. By the time the third one is ready the first will come off and the second will be ready to flip. Lather, rinse, repeat until done.

9. Be standing at the door, when your SO walks in, with one of these lathered up in butter and waiting for him/her. Don’t ever send him/her to the store again for something that’s so easy for you to whip out. Seriously, that’s just mean 🙂