I am fortunate to live in an area with some remaining cherry orchards. For a few weeks each year these orchards are open for U-Pick cherries. Seeing as how we are in the midst of a pandemic (80 days of Shelter-In-Place and counting), and U-Pick Cherries being a relatively safe outdoor activity (with masks in place), we’ve been twice in two weeks. That’s a lot of cherries!
Caution #1: U-Pick cherries are not cheap, they might even be a bit more than you’d pay in the grocery store, but they’re good, and fresh, and last a surprisingly long time.
Caution #2: If you go cherry picking, you will undoubtedly come home with more cherries than you would if you bought a bag of cherries at the grocery store or famer’s market. So bookmark a few of our very favorite cherry recipes: Fresh Cherry Salsa, Cherry-Limeaid, and Fresh Cherry Pie.
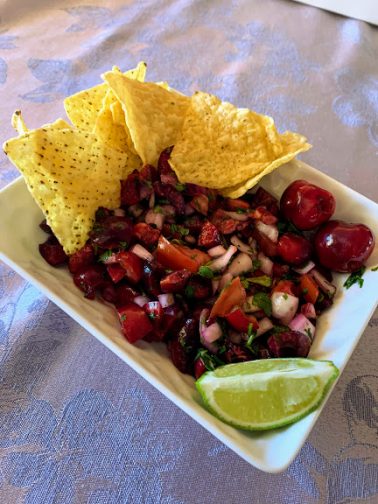
First up, Fresh Cherry Salsa. It’s surprisingly good. I ate it with tortilla chips, layered on top of grilled tri-tip, and the last was layered on top of chicken in a chicken taco. So, so good!
Fresh Cherry Salsa
- 3 cups (575 grams/1 ¼ lbs) fresh cherries, pitted and coarsely chopped
- 2 ½ cups tomatoes, chopped (453 grams/1 lb./2 large)
- ½ cup very finely chopped red onion (OK to sub sliced green onion, if preferred)
- 1-2 jalapeños, seeded and minced (adjust to taste)
- 1 bunch fresh cilantro, chopped (about ½ cup)
- ¼ cup fresh lime juice (2 limes)
- Salt to taste
Chop everything up, combine with the fresh lemon juice and salt. Adjust the lime, salt and jalapeños to taste. Pour into a pretty bowl and serve with tortilla chips or on ladled on top of grilled meat, or layered in a taco.
One of these might make your cherry-picking life easier. I’ve had this one for years, there might be better models out there now.