Tag-Archive for ◊ coffee ◊

05 Feb 2021 New York Style Coffee Coffeecake

I love New York style coffeecake. For years I have had in mind the perfect New York style coffeecake, and I have tried many recipes in order to produce that coffeecake. What I have in mind is a 1:1 ratio of cake to topping, a coffeecake that is delicious at room temperature, one that stays moist and delicious for a few days, and one that had to be baked in a 9×13 pan. I might finally have achieved my goal, melding hints and bits and pieces of several recipes into this one. The topping in this recipe is based on one in “Cake, I Love You” by Jill O’Connor. The coffee coffeecake portion is only minimally changed from “One Tin Bakes” by Edd Kimber.

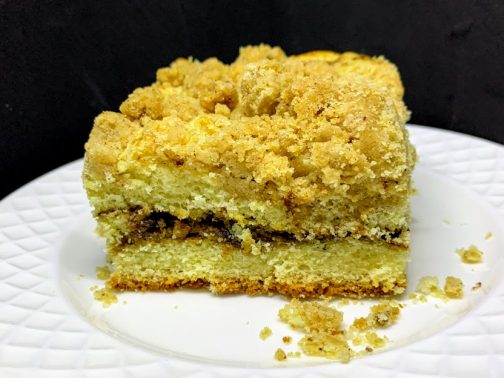
YES! This New York Style COFFEE Coffeecake has a coffee swirl running through it and a nice thick layer of New York style coffeecake crumbs on top! Coffeecake just doesn’t get any better.

For New York Style Crumble Topping

320 grams (2 ½ cups) AP flour

½ tsp. baking powder

¼ cup brown sugar

¼ cup white sugar

1 tsp. Kosher salt

1 tsp. cinnamon

1 cup unsalted butter

For the Coffee Ripple

100g (1/3 cup) brown sugar

4 tsp. instant espresso powder

1 ½ tsp. cinnamon

For the Sour Cream Coffeecake

175 grams (6 oz) unsalted butter, at room temperature

300 grams (1 ½ cups) sugar

315 grams (2 ½ cups) AP flour

1 tablespoon baking powder

1 teaspoon salt

2 teaspoons vanilla

3 eggs

180 ml (3/4 cup) sour cream

  1. Preheat oven to 350 F.
  2. Line 9×11 pan with parchment paper.
  3. First, make the New York Style Crumb Topping first. Mix the flour, sugars, baking powder, salt, and cinnamon together in a bowl, and set aside for a minute.
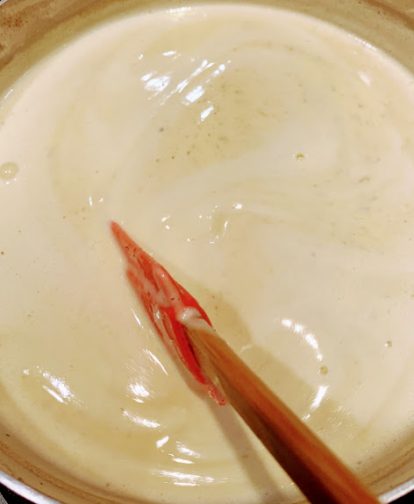
  4. Next, brown the butter. Melt the butter in a pan over medium heat.  The butter will melt, sizzle a bit, then foam. As it foams, brown specks will form. You want those.  Don’t let the brown specks burn though. 
  5. When butter is nicely browned and smelling a bit like nuts, remove from heat and pour over dry ingredients.
  6. Using a fork, combine the butter and the dry ingredients, until the mixture clumps together. You want clumps! If you don’t have some big clumps, squeeze dough together until you get some.
  7. Pop the crumble topping into the freezer (you can do this the night before, if you’d like).
  8. Next, combine all the ingredients for the coffee ripple and set aside.
  9. Now make the cake.  Beat butter and sugar together until light and fluffy, 4-5 minutes with a stand mixer.
  10. Combine all the dry ingredients in one bowl and stir to combine. Set aside.
  11. Combine all the wet ingredients into another bowl and mix well. Set aside.
  12. Add 1/3 of flour mixture to butter sugar mixture and mix well. Add 1/3 of wet mixture and mix well. Repeat two more times to use up all the flour and the wet ingredients.
  13. Spoon ½ (or a bit more) of cake batter into prepared 9×13 pan.
  14. Sprinkle Coffee Ripple mixture over the batter.
  15. Spoon remaining cake batter over Ripple mixture. Cake mixture should completely cover the coffee mixture.
  16. Take the New York Style Crumb topping out of the freezer and sprinkle all over the cake mixture.  The cake should be completely covered by the topping.
  17. Bake for 50 minutes in a preheated 350 F oven.  Check that the middle of the cake is completely done before removing from oven.
  18. Let cake cool at least 20 minutes before removing from pan.
  19. Serve cake warm or at room temperature. Leftover cake will keep 2-3 on counter in a closed container.

Thanks for stopping by my kitchen today.

20 Nov 2019 Homemade Eggnog for Eggnog Lattes
Cooking up cream, milk, sugar, egg yolks, cinnamon, nutmeg, and vanilla into delicious homemade eggnog. Store eggnog in the refrigerator, and add a splash to your lattes and coffees for mugs of holiday pleasure.

Years ago I had my first Eggnog Latte at Starbucks. I fell in love and Eggnog Lattes quickly became my favorite seasonal treat. They are rich, creamy, slightly spiced, and slightly sweet, (and caffeinated!), a warm sip of heaven in a cup.

Having a home espresso machine, I tried to recreate Eggnog Lattes at home. In that quest, I went through many, many varieties of commercial eggnogs.  I found that every carton of eggnog is different, some more intense than others, some sweeter than others, some spicier than others,  some too weak, most were too strong, and some, no most, truly horrible and artificial tasting.

Then, in 2016 this homemade eggnog entered my world and the angels sang…

Eggnog for Lattes

  • 2 cups milk
  • ½ teaspoon cinnamon
  • ½ teaspoon nutmeg
  • 1 teaspoon vanilla
  • 6 egg yolks
  • ½ cup sugar
  • 1 cup cream
  • 1/3 cup rum or bourbon, optional (I never add)
  1. Place milk, cinnamon, nutmeg and vanilla in a small saucepan and heat over medium heat. Heat just until bubbles appear around the edge of the pan. Do not bring milk to a full boil.
  2. While milk and spices are heating, beat 6 egg yolks and sugar with an electric mixer. Beat until mixture is pale and creamy.
  3. Remove hot milk from the stove. With beaters on low (to avoid splashback) slowly pour the hot milk into the egg and sugar mixture.
  4. After all the milk mixture has been incorporated, pour the mixture back into the saucepan and return to stove.
  5. Over medium heat, bring mixture to a boil, stirring constantly, until slightly thickened, about 160 degrees.
  6. Remove from heat and stir in cream and optional rum or bourbon.
  7. Refrigerate until chilled.

To make an Eggnog Latte: I use half this eggnog mixture and half milk in my lattes. For company, I might top with a bit of whipped cream and a light dusting of nutmeg.

To make an Eggnog Coffee: stir this eggnog mixture, as is, into a cup of strong, hot black coffee.

Eggnog for my Dad: a small glass of chilled eggnog, straight up, with an extra shot of bourbon. Repeat.

Added bonuses: No added preservatives or chemicals, no wasteful packaging!

18 Sep 2019 Cafe Mocha Pinwheels

I love cookies! These are fun, a bit different, striking, and feature grown-up flavors of mocha and espresso. I found the original recipe in the Taste of Home publication, ‘Fall Baking 2019’. After my first try, following the recipe perfectly, I changed the recipe a bit. I added more flour to one portion of dough (after the dough is divided) to make both doughs even (why didn’t TOH do the same?). Also, as the mocha flavor was strong in the original recipe and the espresso was loosing out, which I found to be unacceptable, I upped the espresso! The resulting cookie is crisp, pretty, and full flavored.

Making the pinwheels is the tricky part, so let me help with that a bit. One, don’t stress. Two, on a large piece of parchment paper, roll the first dough out to a rectangle of only the approximate size. Don’t be a slave to the ruler, it doesn’t matter that much! Three, using another piece of parchment paper, roll the second dough into approx the same size as the first rectangle of dough. Four, put one dough on top of the other dough and remove the top piece of parchment paper. Five, now trim and patch and press to fit! If you have extra dark dough, put it where there’s some extra pale dough, and vice-a-versa. Keep working at it until all the dough is used and more-or-less on top of one another. Five, gently roll over the two doughs with a rolling pin to make the doughs stick together and to remove any lumps or air pockets. Six, roll up tightly and slice as per the directions below. You’ll have beautiful pinwheel cookies!

Café Mocha Pinwheels

  • 1 cup butter, softened
  • 2 cups sugar
  • 2 large eggs, room temperature
  • 2 teaspoons vanilla extract
  • 3 cups all-purpose flour (375 grams)
  • 2 teaspoons baking powder
  • 1 tablespoon instant espresso powder
  • 1/2 cup cocoa powder (Hershey’s is fine) (50 grams)
  • Additional 50 grams flour (about 1/3 cup)
  • Additional 1 tablespoon instant espresso powder
  1. In a large bowl, cream butter and sugar until light and fluffy.
  2. Beat in eggs and vanilla.
  3. In another bowl, whisk flour, baking powder and espresso powder to combine. Gradually beat flour mixture into creamed mixture.
  4. Divide dough in half. Beat cocoa into half of dough. Beat additional flour and additional espresso powder into other half of the dough.
  5. Divide each color into 2 portions.
  6. Refrigerate until firm enough to roll out, about 1 hour.
  7. Roll each portion into a 9×7-in. rectangle, approx. (Roll on parchment paper to make the whole job a lot easier.)
  8. Place a chocolate rectangle on top of the coffee rectangle. Fussy cut and finagle to shape dough into rectangles of matching size and shape.
  9. Roll up tightly jelly-roll style, starting with a long side, and using parchment paper to help with the rolling. Mold the dough into a smooth roll. Securely wrap dough in plastic wrap; repeat with remaining dough. Freeze 1 hour or until firm.
  10. Preheat oven to 350°. Unwrap and cut dough crosswise into 1/4-in. slices. Place 2″ apart on ungreased baking sheets. Bake 10-12 minutes or until edges are light brown. Cool on pans 2 minutes. Remove to wire racks to cool. 
  11. Makes 4 dozen large cookies

Freeze option: Place wrapped logs in an airtight container; return to freezer. To use, unwrap frozen logs and cut into slices. If necessary, let dough stand 15 minutes at room temperature before cutting. Bake as directed.

From Taste of Home, ‘Fall Baking, 2019’ (but has been posted elsewhere on the internet since 2016).

11 Jul 2017 Chocolate Cake, Mocha Filling & Coffee-with-Cream Frosting
mocha-cake2-768x512
My daughter got married recently. I made the cake.  Three layer cakes (some of them double recipes), all with different fillings and frostings.  One cake was red velvet cake with cheesecake filling and a white chocolate Swiss buttercream frosting–because my grandson likes red velvet cake and the groom likes cheesecake.  Another cake was a wedding white cake with a tangy lemon filling and a lemon kissed Italian meringue frosting–because that’s what the bride wanted. The middle layer was a rich chocolate cake, with a mocha filling and a coffee-with-cream frosting–because that’s my favorite and I was making the cake, and I was the M-O-B, so I got to insist upon it!

I hope to get all the recipes for all the cakes posted, but let me start with this one, my current favorite special occasion cake: 3 layers of cake, 2 layers of mocha filling, and then all that is en robed in a coffee-with-cream frosting.  The recipe for the cake is an Ina Garten recipe from 2007 which was featured in Food and Wine magazine as “Double Chocolate Layer Cake” where I found it.  There is a frosting recipe included with Ina’s recipe, but I use a Ruth Cousineau recipe that ran in Gourmet Magazine in December of 2008 for “Coffee and Mocha Buttercreams”, which is a cooked meringue recipe, which is a whole lot of bother but tastes so much better than an American Buttercream, and makes two amazing variations. Using both variations, with this super rich chocolate cake (buttermilk and hot coffee in the batter) makes this cake a standout.

The cake is huge.  Cut thin slices (which is fine because the slices hold together very well). I had 10 people over for dinner last weekend, everyone had a decent sized piece of cake, and 5 people took a piece home, and I still and one-quarter of the cake leftover!  The picture above is from that one-quarter cake, and had been sitting in the refrigerator for three days before I decided to take a picture of it. Please note, my baked goods are better than my pictures!

Rich Chocolate Cake

  • 1 ¾ cups (8 oz/219g) all purpose flour
  • 2 cups sugar
  • ¾ cup unsweetened cocoa powder (I use Hershey’s, it’s all that’s needed)
  • 2 teaspoons baking soda
  • 1 teaspoon baking powder
  • 1 teaspoon kosher salt
  • 1 cup buttermilk
  • ½ cup vegetable oil
  • 2 eggs
  • 1 teaspoon vanilla extract
  • 1 cup freshly brewed, strong, hot coffee
  1. Make the coffee! Bring buttermilk and eggs to room temperature.
  2. Preheat oven to 350° F.
  3. Prepare 2 or 3 nine inch pans. (NOTE: original recipe called for two pans, I prefer three pans. It’s up to you.) Spray the pans with Pam for Baking, or spread with softened butter, or line with parchment paper. I line with parchment paper and then either lightly spray or lightly butter the parchment paper.
  4. Mix the flour, sugar, cocoa powder, baking soda, baking powder, and salt together and set aside.
  5. Mix buttermilk, oil, eggs and vanilla in another bowl.
  6. With an electric mixer, add the buttermilk mixture into the flour mixture, mixing just until all ingredients are blended.
  7. Slowly beat in the hot coffee, beating until all ingredients are fully incorporated.
  8. You will have about 6 cups of batter. Pour an equal amount of batter into each of the prepared pans.
  9. Bake the cakes at 350° F for 25 minutes for 3 layers (35 minutes for 2 layers), but don’t rely on time alone, check the cakes for before taking them out of the oven. The tops of the cakes should spring back when lightly pressed with a finger and the cake should be slightly pulling away from the sides of the pan.
  10. Remove from oven and let cakes cool in pans for about 30 minutes then invert onto cooling racks to cool completely.

Coffee-with-Cream and Mocha Buttercreams

  • 2 cups sugar, divided
  • ¾ cup water
  • 6 large egg whites at room temperature 30 minutes
  • 2 tablespoons plus 1 teaspoon instant-espresso powder
  • 1 tablespoon pure vanilla extract
  • ½ teaspoon cream of tartar
  • ¼ teaspoon salt
  • 6 sticks (1 ½ pounds) unsalted butter, cut into tablespoon sized pieces and softened
  • 6 ounces fine-quality 60%-cacao bittersweet chocolate, melted and cooled to lukewarm

Special Equipment needed: a candy thermometer; a stand mixer fitted with whisk attachment

  1. Bring 1 ¾ cups sugar and water to a boil in a 3-quart heavy saucepan over medium heat, stirring until sugar has dissolved, then wash down any sugar crystals from side of pan with a pastry brush dipped in cold water. Boil, without stirring, until it registers 220° to 225° F, 15 to 20 minutes.
  2. At this point, while continuing to boil syrup, beat whites with espresso powder, vanilla, cream of tartar, and salt in mixer at medium speed until they just hold soft peaks. Add remaining ¼ cup sugar, 1 tablespoon at a time, beating, and beat until whites just hold stiff peaks.
  3. When syrup reaches soft-ball stage (238 to 242°F), immediately pour syrup in a slow stream down side of bowl into whites (avoid beaters) while beating at high speed. Beat until completely cool, 25 to 30 minutes. With mixer at medium speed, add butter 1 tablespoon at a time, beating well after each addition (see cooks’ note, below) and until buttercream is smooth. (Mixture may look curdled before all butter is added but will come together at end.)
  4. Transfer 2 cups buttercream to a small bowl and stir in chocolate. If buttercream is too soft to spread, chill, stirring occasionally.

Notes:

  • If buttercream looks soupy after some butter is added, meringue is too warm: Chill bottom of bowl in an ice bath for a few seconds before continuing to beat in remaining butter.
  • Buttercreams can be made 1 week ahead and chilled or 1 month ahead and frozen. Bring to room temperature (do not use a microwave), about 2 hours, and beat with an electric mixer until spreadable.

Thank you for stopping by my kitchen today. I hope you make this cake and get rave reviews.  I know you will.  This cake is delicious!