Tag-Archive for ◊ quick and easy ◊

02 Oct 2019 Fresh Corn Soup
Fresh Corn Soup with Roasted Poblano Chilies, Queso Fresco, and fried corn tortilla strips.

This is such a plain and simple recipe, it’s hard to believe such a good tasting soup comes out of it!

The ingredient list for this soup is so ordinary that it’s hard to imagine how exceptional the soup tastes.  Been there, thought that. I was wrong. This soup is beyond the sum of its parts. Fresh Corn Soup is divine, and creamy and rich, but it’s not a hearty soup so it needs something else to go with it to make a full meal. Soup-and-sandwich anyone or, even better, a soup-and-enchilada combo?

I like to have this Fresh Corn Soup when the seasons are just beginning to change , just when cooler temperatures heighten the desire for soup and when the end-of-the-season corn-on-the-cob is still available. The original recipe said this soup can be made with frozen corn, so score one for simplicity! I always make things hard on myself though. I strip the corn kernels off six ears of fresh corn and then proceed with the recipe.

The toppings make this soup exceptional. Top each bowl of Fresh Corn Soup with a few corn tortillas cut into strips and fried in a little oil until crisp, a few crumbles of Queso Fresco, and a tablespoon or so of charred, peeled and diced poblano chilis.

This soup can be made vegetarian by substituting vegetable broth for the chicken broth, or by not using broth at all and using milk as the liquid ingredient.

Fresh Corn Soup

4 cups fresh corn kernels (from about 6 ears of corn) or 4 cups frozen corn kernels, defrosted.

1 cup water

4 tablespoons butter

2 cups chicken broth, vegetable broth, or milk

2 cups of milk

½ teaspoon table salt or 1 teaspoon Kosher salt

  1. Mix corn with water and place in blender, process until the water and corn combine into a smooth paste.
  2. Melt the butter in a large saucepan. Add corn puree and sauté for 5 minutes.
  3. Pour chicken broth (or veggie broth) plus milk into pan with corn mixture and bring to a boil.
  4. Reduce heat to medium and gently simmer soup for 15 minutes.
  5. Turn off heat and cool slightly.
  6. Don’t skip this step! I did once and it was not nice. Pour the soup into a fine mesh strainer. Retain the liquid and discard the solids.
  7. When ready to serve, gently reheat and serve with all three of the toppings below.

Makes about 6 cups of soup. Leftover soup freezes well.

Garnishes

2 Poblano Chilies

3 corn tortillas

Queso Fresco

  1. Char the poblano chilies over an open burner. When completely charred and black, place in a brown paper bag to cool. When cool enough to handle, rub the burned skin off with a paper towel, cut away the stem, seeds and membrane and then finely chop the remaining flesh.
  2. Cut the three corn tortillas into thin strips. Heat a thin layer of vegetable oil in a small fraying pan. When hot add some of the strips and fry until light brown. Repeat with remaining tortilla strip.
  3. Open the package of Queso Fresco and crumble the cheese.
  4. Add ½-1 tablespoon of diced chilies into bottom of the bowl along with approx. 1 tablespoon crumbled Queso Fresco.
  5. Ladle hot soup over the chilies and cheese.
  6. Top with crispy fried corn tortillas
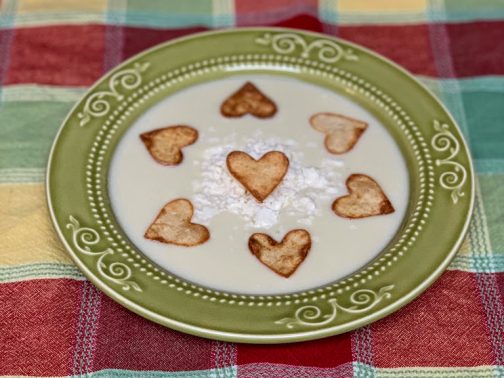
Fresh Corn Soup made with white corn, topped with fancy corn tortilla shapes and Queso Fresco. Made and photographed by my daughter, Abby.

Thanks for stopping by my kitchen today.

04 May 2019 Sweet Chili-Citrus Shrimp with Sugar Snap Peas

Not every published recipe works, and that’s a pet peeve of mine. Recently my Cookbook Club received the galley proofs for a soon-to-be-published cookbook. We cooked 19 recipes from the cookbook. Not one worked as written! Not one! Quantities didn’t fit into the stated pans, the oven temperatures were too low, cooking times were too short, methods were inconsistent, steps were missing, and some recipes simply didn’t work or were just plain weird… Jicama Fries anyone? Cauliflower with red wine?

I think the author had some good ideas, but I don’t think any recipe was tested outside of her kitchen or by anyone other than herself.  Badly written (or just plain wrong) recipes are a pet peeve of mine. I think some people end up thinking they are bad cooks just because they have had a couple of run-ins with bad recipes. Gr-r-r-r. It’s all about the recipe, folks (which was the name of my second “cookbook”, that I had passed out to my friends on my 50th birthday).

That all being said, this recipe, from the cookbook we reviewed, has become a favorite. It’s a sheet pan recipe! A ‘new trend’, which is really an old one rehashed, but whatev! After living six decades I have seen trends come, go, and come back again. Anyway, back to the recipe. I had to make some adjustments to methods and oven temperatures, and add in the rice component and now this recipe is one of the quickest, company-worthy, restaurant quality dinners I have on file. The picture above doesn’t do it justice. The shrimp are much more saucy and colorful. The picture below is a bit better, but I only had half the quantity of snap peas and I really should have removed the tails from the shrimp before cooking them. So, on with the recipe, because it’s a good one.

Note: I have been going back and forth about crediting this recipe to the cookbook author referenced above. After much thought I decided not to because I said so many negative (but truthful) things about her cookbook.

To make this you’ll need TWO large sheet pans, and some cooked rice. Either serve the dish in three different bowls, a bowl of rice, a bowl of peas, and a bowl of shrimp, OR layered in one 9×13 serving dish.

Sweet Chili-Lime Shrimp with Sugar Snap Peas

1/2 cup orange marmalade (heated slightly to make pour-able and mixable)

1/4 cup soy sauce

1/4 cup freshly squeezed lime juice (usually 2 limes)

2 teaspoons Thai Chili Garlic Paste (It’s red, and sold in jars in Asian section of most grocery stores)

1 teaspoon ground ginger

2 lbs shrimp, defrosted if necessary, with shells and tails removed (I like the frozen shrimp from Costco)

1 pound sugar snap peas

2 cups hot prepared rice

2 tablespoons olive oil

  1.  Preheat oven to 400 degrees F.
  2.  Combine marmalade, soy sauce, lime juice, chili-garlic paste and ground ginger.
  3.  Place the prepared shrimp into a large bowl or a large Ziploc bag. Pour marmalade mixture over shrimp and toss to coat.
  4. Pour the shrimp and all the marinade onto a sheet pan.
  5. Rinse and dry the sugar snap peas, and then toss with the olive oil.
  6. Pour the sugar snap peas onto another sheet pan.
  7. Place both sheet pans into hot 400 degree oven.
  8. Remove the snap peas after 5-7 minutes. Peas should be shiny and crisp.
  9. Let the shrimp cook for an additional minute or two. Remove from the oven when fully cooked, the shrimp should be totally opaque and curled into a “C” shape.
  10. Either serve the dish in three different bowls, a bowl of rice, a bowl of peas, and a bowl of shrimp, OR, as I do now, in one 9×13 serving dish with rice on the bottom, peas in the next layer, and the shrimp and sauce poured on top. The sauce eventually meets the rice and…, yum-m-m…, heaven!
  11. Serve and share 🙂

Thanks for stopping by my kitchen today!

24 Mar 2017 Chocolate Peanut Butter Chip Cookies
 

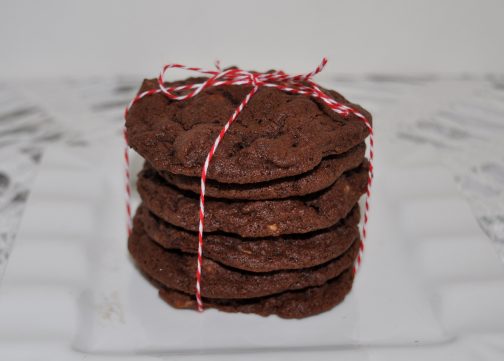
chocolate-peanut-butter-chip-cookies

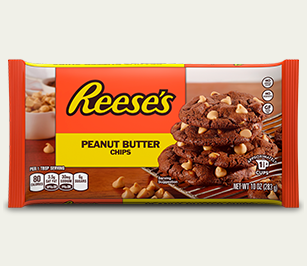
This recipe is from the back of the bag of Reese’s Peanut Butter Chips (see picture below).  The cookie is fabulous.  It’s like a peanut butter cup in cookie form.

My daughter made these cookies for a “Back of the Box” themed Cookbook Club meeting.  She loves peanut butter.  She saw the chips.  She read the recipe on the back of the bag.  She made the cookies. Everyone swooned. End of story.

Well, not quite the end of the story because now I’m posting the recipe, as is, lifted right off the back of the Reese’s Peanut Butter Chip bag. You’ve just read the recipe and my swooning review. You are going to go out to get a bag of Reese’s Peanut Butter Chips. You are going to make the cookie. You and yours will swoon. You’ll go down as one of the best cookie bakers EVER!

End of story.

Chocolate Peanut Butter Chip Cookies

  • 3/4 cup cocoa powder (natural baking powder-like Hershey’s, NOT Dutch processed cocoa powder)
  • 1 teaspoon baking soda
  • 1 10 oz. pkg REESE’S Peanut Butter Chips – divided use
  • 1 1/4 cups butter (2-1/2 sticks), at room temperature
  • 2 eggs
  • 2 cups sugar
  • 2 teaspoons vanilla extract
  • 2 cups all-purpose flour
  • 1/2 teaspoon salt


  1.  Preheat oven to 350°F.
  2. Stir together flour, cocoa, baking soda and salt; set aside.
  3. Beat butter and sugar in large bowl with mixer until fluffy, 3-5 minutes.
  4. Add eggs and vanilla; beat well.
  5. Gradually add flour mixture, beating well.
  6.  Stir in most of the  peanut butter chips. Hold out some peanut butter chips to decorate the tops of the cookies before baking.
  7. Drop by rounded teaspoons onto ungreased, preferably parchment lined, unrimmed cookie sheet. If desired, press 2, 3, or 4 peanut butter chips onto the top of each cookie.
  8. Bake 8 to 9 minutes. (Do not over bake; cookies will be soft. They will puff while baking and flatten while cooling.)
  9. Cool slightly; remove from cookie sheet to wire rack. Cool completely.
  10. Makes about 4 dozen cookies, but depends on the size of your cookie.

Thanks for stopping by my kitchen today!

reese-s-peanut-butter-chips

20 Mar 2017 B.O.B. Brownies
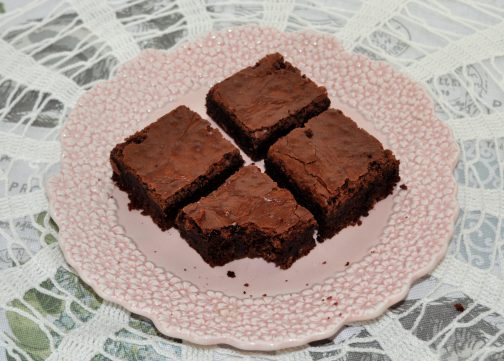
bob-brownies-bite

Google “Back of the Box” recipes and you’ll get lists such as 10 Best Back-of-the-box recipes from Epicurious, or Buzz Feed or The Daily Meal.  Never 20 best back-of-the-box recipes or 100 best back-of-the-box recipes.  Nope. Just 10. Because there are only about 10 really good back-of-the-box recipes 🙂

In my (albeit, limited) experience, it seems most back-of-the-box recipes sound good but in reality are quite plain and quite bland.  There are 10 good ones though!  Toll House Chocolate Chip Cookies, Philadelphia Cheesecake, Alber’s Cornbread, Rice Krispie Treats, Lipton Onion Dip jump to mind.  Pssst…! And now I have found another one! It’s on the back of the bag of Dutch Process cocoa powder that I purchased at Costco (brand name: Rodelle Organics).

These brownies are delicious, and just my type of brownie.  Everyone seems to have their own preferred brownie type, right? This is mine.  Slightly crunchy top, oh-so-chocolately flavor, dense-but not fudge, light-but not cakey.  These are just right!  AND, they’re easy-to-make, and one batch fills a 9×13 pan!  The brownies slice well, too. What more could one want?

B.O.B.* Brownies

*Back of Bag (Rodelle Organic Dutch Process Baking Cocoa, sold at Costco)

  • 1 cup plus 2 T. butter
  • 2 ¼ cups sugar
  • 5 eggs (yes, 5. I was shocked, too)
  • 1 ½ tsp. vanilla
  • ¾ cup plus 1 T. flour
  • ¾ cup plus 1 T. Dutch Process cocoa powder (no substitutions)
  • 1 tsp. salt
  • ½ cup semisweet chocolate chips
  • ¾ cup chopped nuts (optional)
  1. Preheat oven to 350 degrees.
  2. Line 9×13 inch baking pan with parchment paper and spray lightly with cooking spray.
  3. Melt butter and sugar in a heavy saucepan on very low heat.
  4. Let the mixture slightly cool and transfer to a large bowl. Beat well.
  5. Add eggs, gradually, mixing well.
  6. Add vanilla extract.
  7. Sift dry ingredients together.
  8. Add dry ingredients to egg mixture, stirring gently and minimally.
  9. Stir in chips and nuts.
  10. Pour mixture into prepared pan and bake approximately 35 minutes. Do not overbake.
  11. Cool before cutting.
  12. Cut into squares and enjoy.