Tag-Archive for ◊ recipe index ◊

05 Feb 2021 New York Style Coffee Coffeecake

I love New York style coffeecake. For years I have had in mind the perfect New York style coffeecake, and I have tried many recipes in order to produce that coffeecake. What I have in mind is a 1:1 ratio of cake to topping, a coffeecake that is delicious at room temperature, one that stays moist and delicious for a few days, and one that had to be baked in a 9×13 pan. I might finally have achieved my goal, melding hints and bits and pieces of several recipes into this one. The topping in this recipe is based on one in “Cake, I Love You” by Jill O’Connor. The coffee coffeecake portion is only minimally changed from “One Tin Bakes” by Edd Kimber.

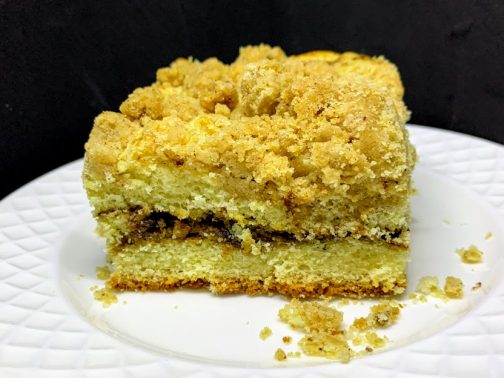
YES! This New York Style COFFEE Coffeecake has a coffee swirl running through it and a nice thick layer of New York style coffeecake crumbs on top! Coffeecake just doesn’t get any better.

For New York Style Crumble Topping

320 grams (2 ½ cups) AP flour

½ tsp. baking powder

¼ cup brown sugar

¼ cup white sugar

1 tsp. Kosher salt

1 tsp. cinnamon

1 cup unsalted butter

For the Coffee Ripple

100g (1/3 cup) brown sugar

4 tsp. instant espresso powder

1 ½ tsp. cinnamon

For the Sour Cream Coffeecake

175 grams (6 oz) unsalted butter, at room temperature

300 grams (1 ½ cups) sugar

315 grams (2 ½ cups) AP flour

1 tablespoon baking powder

1 teaspoon salt

2 teaspoons vanilla

3 eggs

180 ml (3/4 cup) sour cream

  1. Preheat oven to 350 F.
  2. Line 9×11 pan with parchment paper.
  3. First, make the New York Style Crumb Topping first. Mix the flour, sugars, baking powder, salt, and cinnamon together in a bowl, and set aside for a minute.
  4. Next, brown the butter. Melt the butter in a pan over medium heat.  The butter will melt, sizzle a bit, then foam. As it foams, brown specks will form. You want those.  Don’t let the brown specks burn though. 
  5. When butter is nicely browned and smelling a bit like nuts, remove from heat and pour over dry ingredients.
  6. Using a fork, combine the butter and the dry ingredients, until the mixture clumps together. You want clumps! If you don’t have some big clumps, squeeze dough together until you get some.
  7. Pop the crumble topping into the freezer (you can do this the night before, if you’d like).
  8. Next, combine all the ingredients for the coffee ripple and set aside.
  9. Now make the cake.  Beat butter and sugar together until light and fluffy, 4-5 minutes with a stand mixer.
  10. Combine all the dry ingredients in one bowl and stir to combine. Set aside.
  11. Combine all the wet ingredients into another bowl and mix well. Set aside.
  12. Add 1/3 of flour mixture to butter sugar mixture and mix well. Add 1/3 of wet mixture and mix well. Repeat two more times to use up all the flour and the wet ingredients.
  13. Spoon ½ (or a bit more) of cake batter into prepared 9×13 pan.
  14. Sprinkle Coffee Ripple mixture over the batter.
  15. Spoon remaining cake batter over Ripple mixture. Cake mixture should completely cover the coffee mixture.
  16. Take the New York Style Crumb topping out of the freezer and sprinkle all over the cake mixture.  The cake should be completely covered by the topping.
  17. Bake for 50 minutes in a preheated 350 F oven.  Check that the middle of the cake is completely done before removing from oven.
  18. Let cake cool at least 20 minutes before removing from pan.
  19. Serve cake warm or at room temperature. Leftover cake will keep 2-3 on counter in a closed container.

Thanks for stopping by my kitchen today.

30 Jan 2021 Absurdly Addictive Asparagus
Absurdly Addictive Asparagus

I belong to a cookbook club. We meet every month to feed each other some spectacular food and then to share the recipe for the food. Sometimes the meeting/recipes follow a theme like “Your Mom’s Best Recipe” or “Picnic Food”. Sometimes the meeting/recipes are from a particular cookbook, a particular chef, a particular location or focus on a particular ingredient. Usually I have it covered. This month though, I didn’t. Our meetings are on Sunday at 3, I was searching recipes at 8 PM on Saturday. Nothing was speaking to me. Desperation was setting in, but then desperation-inspiration hit and I googled Best Recipes of All Time. Five entries down I saw 10 Best Recipes of All Time at Food 52. I clicked on it. Then I clicked on the recipe in the #9 spot. Originally uploaded to Food52 by community member kaykay in 2010, this recipe has racked up an impressive amount of attention with upwards of 12,000 favorites and 300 comments. Pretty good creds, so I made it. Then I made it again. It was delicious. Don’t know why it’s only #9. Here’s the recipe; I only made a few minor changes, but if you want the original recipe, the link is above.

Absurdly Addictive Asparagus

SERVES 4

  • 4 ounces pancetta, cut into 3/8 inch to 1/4 inch dice
  • 1 tablespoon butter
  • 1 pound asparagus, woody ends trimmed and sliced into 2 inch pieces on the bias
  • 1 leek, thinly sliced crosswise (white and pale green parts only)
  • 2 cloves garlic, minced
  • Zest of one lemon
  • 1-2 teaspoons orange zest
  • 2 tablespoons toasted pine nuts, optional
  • 1 tablespoon Italian parsley, chopped (more to taste)
  • Salt and freshly ground pepper to taste
  1. In a large non-stick pan, sauté pancetta, stirring frequently, over medium heat, until crisp and lightly golden.
  2. Add 1 tablespoon of butter to pan. Add leek and sauté for a few minutes, or until halfway cooked.
  3. Add asparagus pieces and sauté until asparagus is tender crisp, about 3-4 minutes.
  4. Add garlic, lemon and orange zest, toasted pine nuts and parsley and sauté for about 1 minute, until fragrant.
  5. Season to taste with freshly ground pepper and salt and serve immediately.

I hope you enjoy it! Thanks for stopping by my kitchen today!

29 Nov 2020 Polly’s Mac n’ Cheese
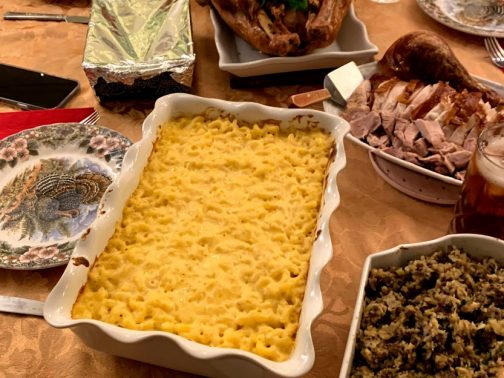
Thanksgiving Dinner with Mac n’ Cheese
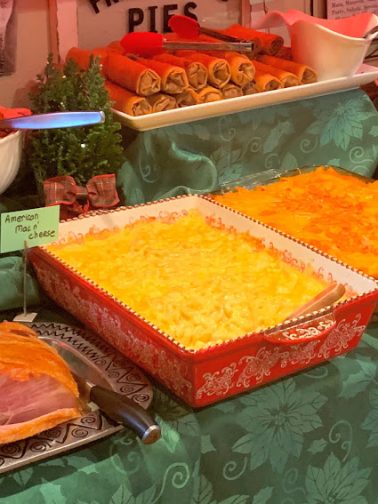
Christmas Party buffet with Mac n’ Cheese

Polly’s Mac n’ Cheese (YEP, I’m claiming it)

I’ve been promising to post this recipe forever, but I have held off because it’s impossible (for me anyway) to get a good picture of Mac n’ Cheese. The issue is partly Mac n’ Cheese’s fault, right? It’s just not photogenic; it’s flat, it’s monotone (just white noodles and melted cheese), and it has NO pops of color anywhere! Garnish Mac n’ Cheese? That would just look silly. So here it is, my recipe for Mac n’ Cheese, without a good picture 🙂

It’s taken a long time to perfect this recipe and there is nothing crazy about it. It’s a traditional macaroni and cheese; no fancy cheeses. No veggies, no lobster, no bacon, no truffle oil, no breadcrumbs and definitely no Flamin’ Hot Cheetos! Just elbow noodles, cheddar cheese, and a roux.

That being said, I do have ONE secret ingredient, I use some chicken broth in the sauce to add more umami, if you will, to the dish.  I use homemade chicken broth/stock/bone broth, not the processed, canned or boxed stuff. 

If you must use a commercial broth, deepen the flavor first.  Pour the broth into a pan, add some bone-in chicken (anything: a thigh, a drumstick or two, leftover carcass of a rotisserie chicken…). Then toss in a bay leaf or two, some chopped onion (with the skin), and perhaps some chopped carrot or celery (whatever you have languishing in the veggie drawer). Let the to-be-enhanced broth simmer while prepping the rest of the ingredients. Drain solids from broth and discard. Use broth as directed below.

One other tip, I wouldn’t use that pre-shredded cheese. I haven’t tasted any pre-shredded cheese that has the required sharpness, and I don’t know how all those additives used to prevent the cheese from clumping will affect the final dish.

Just for the record, Mac n’ Cheese is a side dish, never a main.

INGREDIENTS

  • 2-3 cups homemade or enriched Chicken broth, heated
  • 2-3 cups whole milk, heated
  • NOTE: you need 5 cups total of liquid–use 50/50 chicken broth/milk or 60/40 or 25/75, whatever suits you or whatever fits what you have on hand.
  • 4 Tablespoons butter
  • 1/3 cup flour
  • ¼-½ teaspoon powdered mustard (not so much for taste, but to help with emulsion)
  • 1 lb sharp cheddar cheese grated, approx. 4 cups (Ok to sub a bit of mozzarella, up to 1 cup, for some of the sharp cheddar. Also, if you have odd bits and pieces of various cheeses leftover, use them but remember that the flavor of the dish will change–and kids will object)
  • Salt and pepper, to taste (chicken broth varies in saltiness, so taste the cheese sauce and add salt and pepper as needed.)
  • 1 lb elbow macaroni (cooked in generously salted water, for the shortest time mentioned on the package, rinse with cold water, and drain.)

DIRECTIONS

  1. Preheat oven to 350 degrees.
  2. Combine milk and chicken broth in a large container and microwave until hot.
  3. In a large skillet, melt butter and stir in the flour.
  4. Stirring constantly, cook the flour-butter mixture over medium heat for 3 minutes, taking care not to brown the roux.
  5. Turn off the heat under the roux.
  6. Slowly add about 1 cup of the chicken broth-milk mixture into the roux. Whisk and stir constantly until all liquid is absorbed and mixture looks homogenous and there are no lumps in the sacue. Repeat until all milk-broth mixture has been incorporated into the butter-flour mixture.
  7. Return mixture to heat and simmer gently for 3 minutes, stirring occasionally.
  8. Taste.  Add salt, pepper  to taste along with a small quantity of powdered mustard.
  9. Gradually add cheese a handful at a time. Stir until completely melted, then add another handful and repeat process until all cheese has been incorporated.
  10. Stir cooked elbow macaroni into cheese sauce.
  11. Pour into greased 9×13 casserole dish.
  12.  Bake in preheated 350 oven for 30 minutes. Do not overbake or cheese sauce will begin to separate.
  13.  Cool for 10 minutes or so before serving.

NOTES from experience: To make ahead, make cheese sauce and boil noodles, but store separately. Bring to room temperature. Combine. Bake as above.

I have made premade cheese sauce and frozen it , then defrosted it overnight in the refrigerator.  I do reheat the cheese sauce and whip with immersion blender before combining with boiled noodles.

OK to sprinkle extra cheese on top if you like that look.

Enjoy!

28 Aug 2020 Blueberry Upside-Down Coffee Cake

Just a reminder, there’s no coffee in coffee cake. Coffee cake is cake to be eaten with a perfect cup of coffee.  And that, my friends, is what a weekend quarantine breakfast is all about.  Throw in a good book or a good companion and you’re in heaven.

I’ve been making this cake for decades, except that I had forgotten all about it for the past five or six years. Somehow this recipe went missing from one of my 13 recipe binders.  I didn’t even notice. Then my daughter Hannah brought this coffee cake over as a first day of on-line school snack during the 2020 pandemic. I asked her for the recipe. To which she responded, with a disbelieving eye roll, “Mommmm, it’s YOUR recipe”.  Ooops.

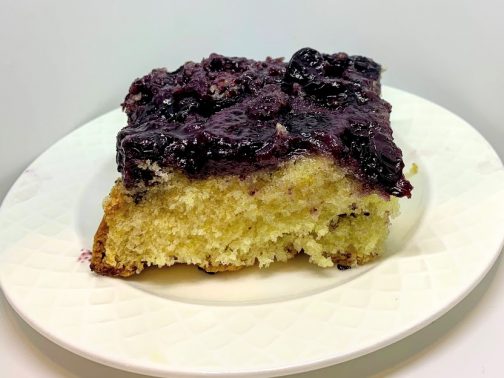
So here it is, the replacement for the missing recipe, the best blueberry coffee cake on the planet, Blueberry Upside-Down Coffee Cake.

Hint #1: If there’s no need for a fancy display, then there’s no need to actually turn the whole cake upside down. Just carve out a slice and turn upside down onto your plate.  You can add whipped cream, or not, depending on your breakfast/brunch rules. 

Hint #2: Don’t skimp on the lemon zest. The lemon zest (and butter) is what makes this cake sing!

I like this cake much better than any cake cooked with blueberries mixed into the batter. Cooked blueberries mess with the texture of any cake. In this cake, the blueberries shine as a layer, and the buttery cake also shines as a layer. You get to enjoy both the cake and the blueberries without one interfering with the other. Win-win! Oh, and it’s supposed to be served warm, win-win-win!

Blueberry Upside-Down Coffee Cake

For the Blueberry Layer

  • ¼ cup butter
  • 2/3 cup brown sugar (light or dark)
  • 3-4 cups fresh blueberries (18-24 oz)
  • 1 ½ tsp grated lemon zest
  1. Get out your best 9×13 inch pan.
  2. In a small saucepan, melt butter.
  3. Stir in brown sugar and boil gently for 3 full minutes, stirring occasionally.
  4. Pour the mixture into the bottom of the 9×13 pan, spreading carefully to make an even layer.
  5. Pour fresh blueberries on top of butter/brown sugar mixture.
  6. Sprinkle lemon zest evenly over the blueberry layer.

For the Cake

  • ¾ cup butter
  • 1 ½ cups sugar
  • 2 eggs
  • 2 teaspoons vanilla
  • 2 ½ cups all-purpose flour (310 grams)
  • 2 ¼ teaspoons baking powder
  • ¼ teaspoon salt
  • ¾ cup milk
  • 1 ½ teaspoons grated lemon zest
  1. Preheat oven to 350 degrees.
  2. With an electric mixer beat together butter and sugar. Continue to beat until light and fluffy, approx. 3-5 minutes.
  3. Gradually add eggs, one at a time, beating well after each addition.
  4. Stir in vanilla.
  5. Combine flour, baking powder and salt in a small bowl.
  6. Add 1/3rd of dry ingredients to the butter-sugar mixture and beat well.
  • Add half of the milk and beat until all of the milk has been incorporated,
  • Add another 1/3 of dry ingredients to the butter-sugar mixture and beat well.
  • Add remaining milk and beat until all of the milk has been incorporated.
  • Add remaining flour mixture and beat well.
  • Stir in lemon zest
  • Pour batter over blueberries in 9×13 pan. Smooth with a spatula.
  • Place pan in a 350-degree oven for 45-50 minutes.  The top will be well browned. Use a toothpick to check that cake in the middle of the pan has been cooked.
  • Remove cake from the oven. If inverting, let cool for 3 minutes. Run a knife along all sides to loosen the cake from the pan. Invert onto a large rectangular platter or cutting board. 
  • Serve warm, with or without optional whipped cream or pouring custard.