It's all about the recipe. Really, it is! I have amassed quite a collection of recipes from my favorite cookbooks and food magazines, and now, because of all the foodie blogs out there, I am adding more every day! I test every recipe I post. Some I've been cooking for years, decades even, others I have cooked just once or twice. I don't post mediocre recipes. I don't post good recipes. I post GREAT recipes, recipes that I LOVE. When I find a recipe like that, I can't wait to share it! And the only thing better than sharing a recipe is hearing that someone else tried it and is as excited about it as I am :) Please, try something! Then let me know if you love it as much as I do! Or even why you don't... Either way, I'd love to hear from you!
Cooking up cream, milk, sugar, egg yolks, cinnamon, nutmeg, and vanilla into delicious homemade eggnog. Store eggnog in the refrigerator, and add a splash to your lattes and coffees for mugs of holiday pleasure.
Years ago I had my first Eggnog Latte at Starbucks. I fell in love and Eggnog Lattes quickly became my favorite seasonal treat. They are rich, creamy, slightly spiced, and slightly sweet, (and caffeinated!), a warm sip of heaven in a cup.
Having a home espresso machine, I tried to recreate Eggnog Lattes at home. In that quest, I went through many, many varieties of commercial eggnogs. I found that every carton of eggnog is different, some more intense than others, some sweeter than others, some spicier than others, some too weak, most were too strong, and some, no most, truly horrible and artificial tasting.
Then, in 2016 this homemade eggnog entered my world and the angels sang…
Eggnog for Lattes
2 cups milk
½ teaspoon cinnamon
½ teaspoon nutmeg
1 teaspoon vanilla
6 egg yolks
½ cup sugar
1 cup cream
1/3 cup rum or bourbon, optional (I never add)
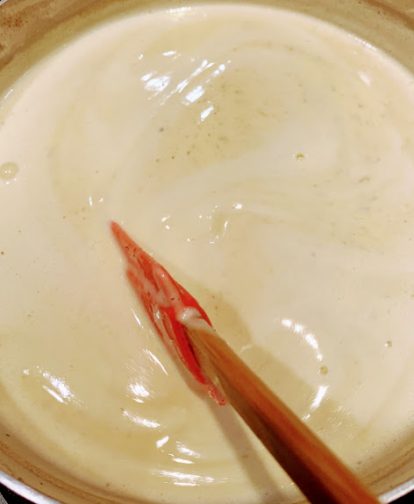
Place milk, cinnamon, nutmeg and vanilla in a small saucepan and heat over medium heat. Heat just until bubbles appear around the edge of the pan. Do not bring milk to a full boil.
While milk and spices are heating, beat 6 egg yolks and sugar with an electric mixer. Beat until mixture is pale and creamy.
Remove hot milk from the stove. With beaters on low (to avoid splashback) slowly pour the hot milk into the egg and sugar mixture.
After all the milk mixture has been incorporated, pour the mixture back into the saucepan and return to stove.
Over medium heat, bring mixture to a boil, stirring constantly, until slightly thickened, about 160 degrees.
Remove from heat and stir in cream and optional rum or bourbon.
Refrigerate until chilled.
To make an Eggnog Latte: I use half this eggnog mixture and half milk in my lattes. For company, I might top with a bit of whipped cream and a light dusting of nutmeg.
To make an Eggnog Coffee: stir this eggnog mixture, as is, into a cup of strong, hot black coffee.
Eggnog for my Dad: a small glass of chilled eggnog, straight up, with an extra shot of bourbon. Repeat.
Added bonuses: No added preservatives or chemicals, no wasteful packaging!
Fresh Corn Soup with Roasted Poblano Chilies, Queso Fresco, and fried corn tortilla strips.
This is such a plain and simple recipe, it’s hard to believe such a good tasting soup comes out of it!
The ingredient list for this soup is so ordinary that it’s hard to imagine how exceptional the soup tastes. Been there, thought that. I was wrong. This soup is beyond the sum of its parts. Fresh Corn Soup is divine, and creamy and rich, but it’s not a hearty soup so it needs something else to go with it to make a full meal. Soup-and-sandwich anyone or, even better, a soup-and-enchilada combo?
I like to have this Fresh Corn Soup when the seasons are just beginning
to change , just when cooler temperatures heighten the desire for soup and when
the end-of-the-season corn-on-the-cob is still available. The original recipe
said this soup can be made with frozen corn, so score one for simplicity! I always
make things hard on myself though. I strip the corn kernels off six ears of
fresh corn and then proceed with the recipe.
The toppings make this soup exceptional. Top each bowl of Fresh Corn
Soup with a few corn tortillas cut into strips and fried in a little oil until
crisp, a few crumbles of Queso Fresco, and a tablespoon or so of charred,
peeled and diced poblano chilis.
This soup can be made vegetarian by substituting vegetable broth for
the chicken broth, or by not using broth at all and using milk as the liquid
ingredient.
Fresh Corn Soup
4 cups fresh corn kernels (from about 6 ears of corn) or 4 cups frozen
corn kernels, defrosted.
1 cup water
4 tablespoons butter
2 cups chicken broth, vegetable broth, or milk
2 cups of milk
½ teaspoon table salt or 1 teaspoon Kosher salt
Mix corn with
water and place in blender, process until the water and corn combine into a
smooth paste.
Melt the butter
in a large saucepan. Add corn puree and sauté for 5 minutes.
Pour chicken
broth (or veggie broth) plus milk into pan with corn mixture and bring to a
boil.
Reduce heat to
medium and gently simmer soup for 15 minutes.
Turn off heat and
cool slightly.
Don’t skip this
step! I did once and it was not nice. Pour the soup into a fine mesh strainer.
Retain the liquid and discard the solids.
When ready to
serve, gently reheat and serve with all three of the toppings below.
Makes about 6 cups of soup. Leftover soup freezes
well.
Garnishes
2 Poblano Chilies
3 corn tortillas
Queso Fresco
Char the poblano
chilies over an open burner. When completely charred and black, place in a
brown paper bag to cool. When cool enough to handle, rub the burned skin off
with a paper towel, cut away the stem, seeds and membrane and then finely chop
the remaining flesh.
Cut the three corn
tortillas into thin strips. Heat a thin layer of vegetable oil in a small
fraying pan. When hot add some of the strips and fry until light brown. Repeat
with remaining tortilla strip.
Open the package
of Queso Fresco and crumble the cheese.
Add ½-1
tablespoon of diced chilies into bottom of the bowl along with approx. 1 tablespoon
crumbled Queso Fresco.
Ladle hot soup
over the chilies and cheese.
Top with crispy
fried corn tortillas
Fresh Corn Soup made with white corn, topped with fancy corn tortilla shapes and Queso Fresco. Made and photographed by my daughter, Abby.
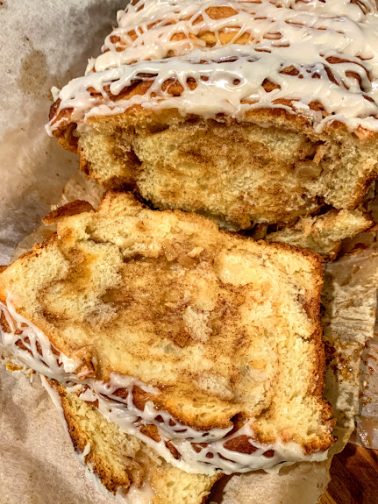
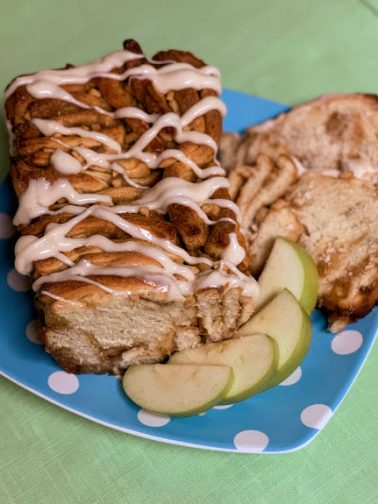
Bread baking is my Everest, meaning I haven’t conquered it yet. I’m not even at base camp so the bread recipes that appeal to me are easy and pretty much foolproof. Here’s one of them! The recipe is easy… I see you shaking your head. Is it because you’ve already noticed the 22 steps? Granted, that seems like a lot, but there are 22 because I broke each step down into tiny increments. You can do this! You can have a loaf of Sweet Apple Bread ready to eat in about two hours! For a fancy, fruit-filled, yeasted bread, that’s a pretty quick turnaround time! The two hours is not all hands-on work either, that time includes two periods of rest for the dough to rise AND the baking time! The resulting product is delicious and impressive. Around here the aroma of this bread baking reliably gets sleepyheads out of bed and ready to face the day with a smile on their faces!
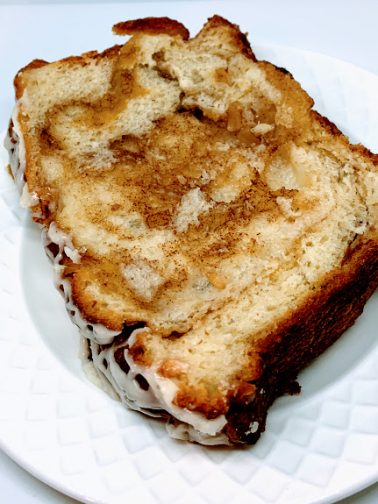
The bread is not burned! Darned filter! I bake better than the I take pictures.
I didn’t create this recipe; I am not nearly that smart. I found it in Better Homes and Garden, Fall Baking at the same time as my daughter, who found it online. Then I googled it, and the recipe is all over the Internet, so I don’t know who or where it first came from first, but it’s a good one, a keeper, and almost infallible. I did have it fail once, though. I didn’t measure the apples. I wanted more apples and more apples, so I probably ended up with double the apples and one soggy, flat, never-did-bake loaf, so don’t do that! Measure the apples! I have made this bread with both cinnamon and Apple Pie Spice and I prefer it with Apple Pie Spice. If you can’t find it at your local grocery store, order it from Penzey’s Spices.
My daughter’s first loaf of Sweet and Cinnamon-y Apple Bread
While looking for this recipe on line, my daughter came across an almost identical recipe made with pumpkin. Unbeknownst to each other, we both made it, on the same afternoon, and we both thought it needed some upgrading, so we’ll work on that. Look for an enhanced pumpkin bread soon but until then, make this one! It’s a winner!
Sweet and Cinnamon-y Apple Loaf
For the dough:
3/4 cup milk
1 package (2 ½ teaspoons)
active dry yeast
1 egg, lightly beaten
1/4 cup butter, melted
2 tablespoons sugar
(divided use)
1/2 teaspoon salt
3 cups (375 grams)
all-purpose flour
For the filling:
1/4 cup melted or very, very soft butter
1 tsp. sugar
1-1/2 cups peeled and finely chopped Granny Smith apple (usually one very large apple)
3/4 cup (75 grams) packed brown sugar
2 teaspoons Apple Pie Spice or Cinnamon
For the icing:
2 ounces cream cheese, softened (optional)
1 cup powdered sugar
1/2 teaspoon vanilla
1 to 2 tablespoons milk
In the microwave, heat milk until just until lukewarm, approx. 105°F to 115°F, about 30-60 seconds, depending on the wattage of your microwave.
Combine warm milk, yeast, and ½ tsp of sugar in small bowl. Stir until yeast is dissolved. Let stand 5 minutes.
In bowl of electric mixer combine egg, 1/4 cup melted butter, the rest of the granulated sugar, and salt. Beat for 30 seconds.
Add yeast mixture to egg/butter mixture. Beat with mixer on medium until combined.
Add half the flour to mixture in bowl. Beat on low 30 seconds, scraping bowl as needed, then beat for 3 minutes on medium.
Stir in remaining flour. Beat for another 2 minutes or so.
Shape dough into ball (dough will not be smooth).
Place dough in greased bowl; turn once to completely grease surface of dough.
Note: To make ahead: prepare as directed up to this step. Do
not let dough rise. Cover bowl and refrigerate for up to 24 hours.
Cover
the dough with greased plastic wrap and let rise in warm place until nearly
double in size 45 to 60 minutes (longer if dough has been refrigerated).
Grease 9×5-inch loaf pan, or line with
parchment paper.
Note: Here comes the tricky part but it just sounds as if it’s tricky. Don’t stress it at all. The measurements are just approximate. Even the number of slices in the stacks are approximate. Eyeball everything! Have fun with it! Do. Not. Stress! This is a free-form bread. You can’t make a mistake. Go for it!
Turn dough out onto lightly floured surface.
Roll dough into 20×12-inch rectangle (approximately, jagged edges are no
problem).
Brush dough with 1/4
cup melted or very soft butter then sprinkle with 1 tsp. white sugar.
In a small bowl, combine
chopped apples, brown sugar, and apple pie spice or cinnamon. Sprinkle this
mixture equidistantly over the dough.
Cut the dough rectangle
in half lengthwise to make two 20×6-inch strips (approximately)
Cut each strip vertically
into five 6×4-inch strips.
Carefully make 2
stacks of 5 strips each. Cut each stack lengthwise into three 4×2-inch pieces.
Now lift the stacks,
and loosely stagger stacks in pan, cut sides up. You’ll have to push and pull to
make all stacks fit. This is not a problem.
Lightly push down on dough to fill corners and level the top of the loaf.
Cover loaf with
greased plastic wrap and let rise in warm place until nearly double in size (40
to 45 minutes).
Preheat oven to 350°F.
Bake loaf for about 45 minutes or until golden brown and an instant-read
thermometer inserted near center registers 200°F.
Cool in pan 10
minutes.
In a medium mixer bowl
combine ingredients for icing: room temperature cream cheese, powdered sugar,
and vanilla. Beat on medium speed until smooth. Beat in enough milk to make a
glaze of drizzling consistency. (NOTE: I usually make the icing without the
cream cheese)
Remove loaf from pan
and drizzle with icing. Cool at least 20 minutes more before eating (but bread
will keep well for a few days).
Thanks for stopping by my kitchen today! Happy baking!
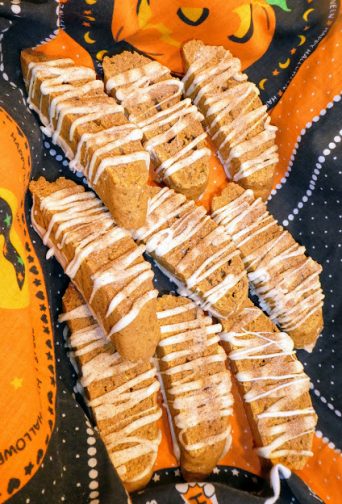
It’s that time of year. Let the fall baking commence! I’ve started with these: Pumpkin Spice Latte Biscotti, my entry for my cookbook club’s ‘Pumpkin Dessert Showstopper Challenge’ last year (sometimes we act like we are contestants on the mythical ‘Great American Baking Show’!).
These biscotti have a subtle pumpkin spice taste, are crunchy around the edges, and somewhat soft and cake-y on the inside. I really should put the word biscotti in quotes since these are not traditional: they are not teeth shattering-ly crunchy, they don’t contain nuts or almond extract, and with the two non-traditional drizzles with a shower of cinnamon-sugar, they are also showstoppingly pretty 🙂
You won’t find this recipe anywhere else on the web. I started with another recipe (regretfully, I don’t remember where I found the original recipe), upped and re-mixed the spices and added the three toppings.
NOTE: When I made these biscotti last year, Caramel Chips (not to be confused with Caramel Bits) were available everywhere. This year I couldn’t find them anywhere (have they been discontinued?) so I substituted Butterscotch Chips for the Caramel Chips.
If you like my version of ‘biscotti’, check out my recipe for Gingerbread Biscotti, also on this website 🙂
Pumpkin Spice Biscotti
3 1/4 cups All-Purpose Flour (400 grams)
1 1/2 tsp. Baking Powder
1 Tablespoon Instant Espresso Powder
1/2 tsp. Salt
1 Tablespoon Cinnamon
2 tsp. Ginger
1 tsp. Nutmeg
1/2 cup Unsalted Butter, room temperature
1 cup Sugar
2 large Eggs
1 1/2 tsp. Vanilla Extract
3/4 cup Pumpkin Puree
To decorate
white chocolate and caramel chips, not combined, melted separately (it’s okay to sub Butterscotch Chips for the Caramel Chips, see the NOTE above)
Cinnamon-Sugar mixture
Preheat oven to 300° F. and line a large baking sheet with parchment paper. Set aside.
In a medium bowl, combine the flour, baking powder, salt, and spices. Whisk well to combine. Set aside.
In a large bowl of a stand mixer fitted with a paddle attachment, cream the butter and sugar together until light and fluffy.
Add eggs, one at a time, beating well after each addition. Add vanilla and pumpkin and beat to combine.
Add dry ingredients and mix until well combined. Batter will be slack, and a bit worrisome because it’s so hard to work with, but it will be fine (it might be easier to refrigerate dough for a few hours to make it easier to handle, but this is not necessary).
On the prepared baking sheet, spoon dough into two logs about 2″ wide by 12+” long (they will spread). Using moistened hands, shape and smooth the dough.
Bake in preheated oven for 40-60 minutes, or until firm and hollow sounding when tapped. Remove from oven and allow to rest on the pan for at least 10 minutes and up to a few hours
Remove logs to a cutting board and using a serrated knife at an angle, cut into 1-inch slices. Return slices to rack over a baking sheet, with cut side down, and bake 15-30+ minutes, or until biscotti loses it’s cake-y feel.
Remove from oven and allow to cool completely.
Melt chocolate. Coat one side of biscotti with either caramel chips or white chocolate. Let dry.
Turn biscotti over and drizzle with the chocolate (caramel or white) not used in previous step
Before the drizzled chocolate hardens, sprinkle with cinnamon-sugar mixture.
After chocolate hardens shake off excess cinnamon sugar
Store airtight. Freezes well.
Thanks for stopping by my kitchen today. Be sure to stop by again for the Gingerbread Biscotti recipe after devouring these!