Archive for the Category ◊ Holidays & Events ◊

23 Dec 2019 Christmas Present Cookies
There’s a surprise in the middle!
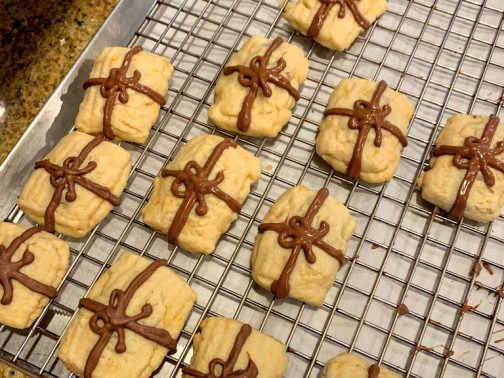
Chocolate-Orange Christmas Present Cookies

Most of my cookie recipes are from recipes I’ve collected over the years. Some I modify to suit my taste, to improve on method, or to add another component. This recipe I made up all by myself in the 1990s. It’s a basic spritz cookie recipe, with the addition of orange zest and orange extract and then for some reason (maybe the cookie press was malfunctioning?) I made long ribbon strips, laid down chocolate squares on top of the cookie dough, then piped another strip on top, and made chocolate filled Christmas presents.

The orange-chocolate flavor is one that I associate with Christmas. Being a British transplant, there was always a bit of England in my Christmas stocking, one of them being a Terry’s chocolate-orange.

Christmas Presents (Cookies)

  • 1 ½ cups butter
  • 1 cup of sugar
  • 3 ½ cups Flour
  • 1 tsp baking powder
  • 1 egg
  • Zest of 2-3 Oranges (I like my cookies with a lot of orange flavor)
  • ½ tsp Vanilla
  • 1 ½ tsp Orange Extract
  • 3 3.5oz Hershey bars (milk or Special Dark) DIVIDED USE
  1. Preheat oven to 375 degrees.
  2. Sift flour and baking powder together. Set aside.
  3. In the bowl of an electric mixer, cream butter and sugar together, 3-5 minutes.
  4. When the butter-sugar mixture is light and fluffy, add the egg, vanilla, orange extract, and the orange zest.
  5. With the mixer on low, gradually add in the flour and beat until just combined.
  6. Choose Method 1 or Method 2 to make the presents
  7. Method 1: Using a cookie press (No refrigeration needed) Using a cookie press fitted with a ribbon plate. Spritz one long ribbon. Break the chocolate bars into squares and place along the ribbon, with about ½ inch between each piece of chocolate. Spritz another ribbon on top of the first ribbon and chocolate. Cut between the chocolate pieces, and push slightly on each end to seal the present. Place the presents on a cookie tray lined with parchment paper, about one inch apart.
  8. Method 2: Using a rolling pin (refrigeration necessary) Separate dough into two equal size disks, and wrap in plastic wrap. Refrigerate the dough for 2 hours or until firm enough to roll. Roll Dough out into a square. It is ok if dough is thin because you will add another layer of dough on top. Break up the chocolate pieces, and place them all around the dough in a grid, all pieces about ½ inch apart. Roll out the second disk of dough to the same size as the first.  Then place second dough square on top of the first dough square, and gently press dough around the chocolate pieces (so that you can see where you need to cut). Using a ravioli cutter, pizza cutter, knife, or cookie cutter, cut cookies around each piece of chocolate. Gently press all sizes of the cookies to seal. Place presents on a parchment-lined baking sheet, about one inch apart.
  9. Bake cookies for 9-11 minutes. You don’t want cookies to brown, but you want all the dough to cook. Cookie bottoms should be a very light golden brown. (Everyone rolls or pipes different thicknesses of dough, which necessitate different cooking times. Use your judgement here. You might need to add a minute or two to the cooking times)
  10. Once cookies come out of the oven, move cookies to a cooling rack to cool completely.
  11. Melt leftover chocolate using your favorite method (I like to microwave chocolate in a bowl in 30 seconds increments until melted), then place melted chocolate into a quart size zip lock bag, and cut a small hole at the tip of the bag.
  12. Pipe the melted chocolate onto each cookie to look like a ribbon and bow (this might take some practice. Just sample the ugly ones and put the pretty ones on the cookie plate). Chill cookies in refrigerator until chocolate hardens.
  13. Then, serve and enjoy!!

Print Friendly, PDF & Email
21 Dec 2019 Candy Cane Sparkle Cookies
Candy Cane Sparkle Cookies, YUM!

Every Christmas has to include the three big Christmas flavors: Egg Nog, Gingerbread, and Candy Cane. Here is a sugar cookie made with crushed candy canes. The cookie is delicious! The candy cane flavor is not overpowering, it’s just right. The cookie is slightly chewy from the crushed candy canes, and yes, the cookie sparkles from the sugar.

Candy Cane Sparkle Cookies

  • 3/4 cup sugar
  • 1/2 cup butter, softened
  • 1 egg
  • 1/2 teaspoon vanilla extract
  • 1/4 teaspoon mint extract
  • 1 2/3 cup all purpose flour
  • 1 teaspoon cream of tartar
  • 1/2 teaspoon baking soda
  • 1/2 teaspoon salt
  • 1/2 cup crushed candy canes or peppermint candies (about 7 full sized candy canes or a 6 oz box of mini candy canes), divided use
  1. Preheat oven to 350 degrees. Line cookie trays with parchment paper.
  2. Crush candy canes (I place in a Ziploc bag and whack with a rolling pin, effective, but not very environmentally friendly. I have to find a better way)
  3. Combine sugar and butter in bowl of electric mixer and mix well, for 3-5 minutes or until light and fluffy.
  4. Add egg, vanilla and mint extracts to butter and sugar mixture. Mix well to combine.
  5. In a different bowl whisk together flour, cream of tartar, baking soda and salt.
  6. Slowly add flour mixture to butter-sugar mixture, combine well, on low speed of the electric mixer.
  7. Slowly add 1/4 cup crushed candy canes to cookie mixture. Stir only until combined.
  8. In another bowl combine 1/4 cup sugar and remaining 1/4 cup crushed candy canes.
  9. Shape dough into 3/4 inch balls (I use a small cookie scoop) and roll in the sugar-candy cane mixture.
  10. Place balls on parchment-lined cookie sheet, about 2 inches apart. Press down lightly on each cookie to flatten slightly. Sprinkle each cookie with a few of the remaining, larger pieces of the crushed candy canes.
  11. Bake cookies for 8-10 minutes at 350 degrees. Cookies should look cooked but not browned when removing them from oven.
  12. Let cookies cool for a minute or two on cookie sheet, then move to a wire rack to cool completely.

Makes approximately 3 dozen cookies.

Print Friendly, PDF & Email
20 Nov 2019 Homemade Eggnog for Eggnog Lattes
Cooking up cream, milk, sugar, egg yolks, cinnamon, nutmeg, and vanilla into delicious homemade eggnog. Store eggnog in the refrigerator, and add a splash to your lattes and coffees for mugs of holiday pleasure.

Years ago I had my first Eggnog Latte at Starbucks. I fell in love and Eggnog Lattes quickly became my favorite seasonal treat. They are rich, creamy, slightly spiced, and slightly sweet, (and caffeinated!), a warm sip of heaven in a cup.

Having a home espresso machine, I tried to recreate Eggnog Lattes at home. In that quest, I went through many, many varieties of commercial eggnogs.  I found that every carton of eggnog is different, some more intense than others, some sweeter than others, some spicier than others,  some too weak, most were too strong, and some, no most, truly horrible and artificial tasting.

Then, in 2016 this homemade eggnog entered my world and the angels sang…

Eggnog for Lattes

  • 2 cups milk
  • ½ teaspoon cinnamon
  • ½ teaspoon nutmeg
  • 1 teaspoon vanilla
  • 6 egg yolks
  • ½ cup sugar
  • 1 cup cream
  • 1/3 cup rum or bourbon, optional (I never add)
  1. Place milk, cinnamon, nutmeg and vanilla in a small saucepan and heat over medium heat. Heat just until bubbles appear around the edge of the pan. Do not bring milk to a full boil.
  2. While milk and spices are heating, beat 6 egg yolks and sugar with an electric mixer. Beat until mixture is pale and creamy.
  3. Remove hot milk from the stove. With beaters on low (to avoid splashback) slowly pour the hot milk into the egg and sugar mixture.
  4. After all the milk mixture has been incorporated, pour the mixture back into the saucepan and return to stove.
  5. Over medium heat, bring mixture to a boil, stirring constantly, until slightly thickened, about 160 degrees.
  6. Remove from heat and stir in cream and optional rum or bourbon.
  7. Refrigerate until chilled.

To make an Eggnog Latte: I use half this eggnog mixture and half milk in my lattes. For company, I might top with a bit of whipped cream and a light dusting of nutmeg.

To make an Eggnog Coffee: stir this eggnog mixture, as is, into a cup of strong, hot black coffee.

Eggnog for my Dad: a small glass of chilled eggnog, straight up, with an extra shot of bourbon. Repeat.

Added bonuses: No added preservatives or chemicals, no wasteful packaging!

Print Friendly, PDF & Email
08 Sep 2019 Pumpkin Spice Biscotti
Pumpkin Spice Biscotti

It’s that time of year. Let the fall baking commence! I’ve started with these: Pumpkin Spice Latte Biscotti, my entry for my cookbook club’s ‘Pumpkin Dessert Showstopper Challenge’ last year (sometimes we act like we are contestants on the mythical ‘Great American Baking Show’!).

These biscotti have a subtle pumpkin spice taste, are crunchy around the edges, and somewhat soft and cake-y on the inside. I really should put the word biscotti in quotes since these are not traditional: they are not teeth shattering-ly crunchy, they don’t contain nuts or almond extract, and with the two non-traditional drizzles with a shower of cinnamon-sugar, they are also showstoppingly pretty 🙂

You won’t find this recipe anywhere else on the web. I started with another recipe (regretfully, I don’t remember where I found the original recipe), upped and re-mixed the spices and added the three toppings.

NOTE: When I made these biscotti last year, Caramel Chips (not to be confused with Caramel Bits) were available everywhere. This year I couldn’t find them anywhere (have they been discontinued?) so I substituted Butterscotch Chips for the Caramel Chips.

If you like my version of ‘biscotti’, check out my recipe for Gingerbread Biscotti, also on this website 🙂

Pumpkin Spice Biscotti

  • 3 1/4 cups All-Purpose Flour (400 grams)
  • 1 1/2 tsp. Baking Powder
  • 1 Tablespoon Instant Espresso Powder
  • 1/2 tsp. Salt
  • 1 Tablespoon Cinnamon
  • 2 tsp. Ginger
  • 1 tsp. Nutmeg
  • 1/2 cup Unsalted Butter, room temperature
  • 1 cup Sugar
  • 2 large Eggs
  • 1 1/2 tsp. Vanilla Extract
  • 3/4 cup Pumpkin Puree

To decorate

  • white chocolate and caramel chips, not combined, melted separately (it’s okay to sub Butterscotch Chips for the Caramel Chips, see the NOTE above)
  • Cinnamon-Sugar mixture
  1. Preheat oven to 300° F. and line a large baking sheet with parchment paper. Set aside.
  2. In a medium bowl, combine the flour, baking powder, salt, and spices. Whisk well to combine. Set aside.
  3. In a large bowl of a stand mixer fitted with a paddle attachment, cream the butter and sugar together until light and fluffy.
  4. Add eggs, one at a time, beating well after each addition. Add vanilla and pumpkin and beat to combine.
  5. Add dry ingredients and mix until well combined. Batter will be slack, and a bit worrisome because it’s so hard to work with, but it will be fine (it might be easier to refrigerate dough for a few hours to make it easier to handle, but this is not necessary).
  6. On the prepared baking sheet, spoon dough into two logs about 2″ wide by 12+” long (they will spread). Using moistened hands, shape and smooth the dough.
  7. Bake in preheated oven for 40-60 minutes, or until firm and hollow sounding when tapped. Remove from oven and allow to rest on the pan for at least 10 minutes and up to a few hours
  8. Remove logs to a cutting board and using a serrated knife at an angle, cut into 1-inch slices. Return slices to rack over a baking sheet, with cut side down, and bake 15-30+ minutes, or until biscotti loses it’s cake-y feel.
  9. Remove from oven and allow to cool completely.
  10. Melt chocolate. Coat one side of biscotti with either caramel chips or white chocolate. Let dry.
  11. Turn biscotti over and drizzle with the chocolate (caramel or white) not used in previous step
  12. Before the drizzled chocolate hardens, sprinkle with cinnamon-sugar mixture.
  13. After chocolate hardens shake off excess cinnamon sugar
  14. Store airtight. Freezes well.

Thanks for stopping by my kitchen today. Be sure to stop by again for the Gingerbread Biscotti recipe after devouring these!

Print Friendly, PDF & Email