Tag-Archive for ◊ Valentine’s Day ◊

15 Aug 2019 Triple Chocolate Mousse Torte

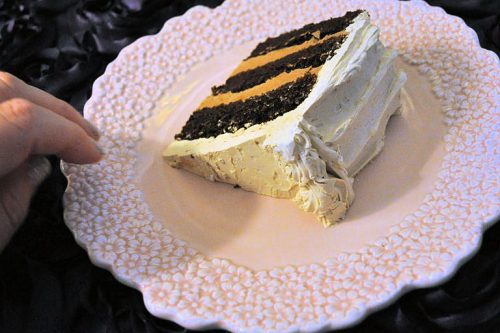
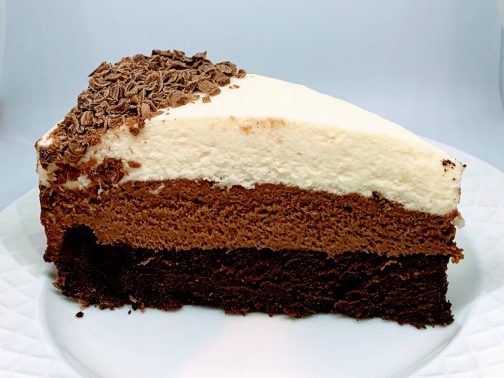
This is the cake I wanted for my birthday this year and it’s what a friend requested for her birthday a few months ago. It’s a fabulous trifecta of chocolate: semi sweet chocolate in a brownie-like cake on the bottom, a smooth and rich milk chocolate mousse for the middle layer, and a creamy white chocolate mousse for the top layer.  After that description, I’m guessing you’ll want it for your birthday, too! The torte not only tastes fantastic, it looks impressive, it slices well and it holds it’s shape after being cut. Magnifique!

The torte is a bit of effort to make, but each step, each layer, is easy and is relatively quick to accomplish.  Make the bottom layer before going to bed, let it cool on the counter while you sleep.  The next day, make the middle layer, refrigerate it, and wash the dishes. Then make the top layer and refrigerate the cake until serving time. Cake will keep 24 hours in refrigerator, but I always serve it on the day I make the second and third layers.

And look, here’s a link to a how-to video about making the torte!

The original recipe is from Cooks Illustrated. I think it was a cover recipe for one of their magazines. You can access the recipe online at Cooksillustrated.com, but it will cost you (and I hate that about Cooks Illustrated recipes).

So, after watching the video you’ll know this is not a difficult recipe. Just follow the directions. Melt the chocolate slowly. Fold the whipped cream into the chocolate mixtures. Use an electric mixer when specified and hand whisk or a spatula when specified.  If you can read, you can make this cake. “It’s all about the recipe” is my tag line, and I truly believe it!

I use Lindt chocolate bars in each layer. You’ll need two of the large bars for the bottom layer (around 70% cacao), two large milk chocolate bars for the middle layer, and two white chocolate bars for the top layer. Throw in an extra bar of your favorite type to grate on top. That’s about $20 worth of chocolate. In a pinch, you could use chocolate chips, which would be cheaper but wouldn’t taste quite as good and you’d have a harder time melting the chocolate (chocolate chips are not made to melt).

You’ll need a 9-inch springform pan, with sides at least 3 inches high to make this torte. If you’re in town, you can borrow mine. You could also order one off of Amazon, the Fat Daddio’s brand is my favorite. TJ Maxx/HomeGoods has started carrying Fat Daddio’s pans, usually at half the price Amazon sells them for, but it’s hit-or-miss at TJMaxx, isn’t it? Sur la Table and other specialty cooking stores will definitely carry 9-inch springform pans, usually at the same price as Amazon.

Triple Chocolate Mousse Torte

THE BOTTOM LAYER

  •  6 tablespoons (3 oz) unsalted butter, cut into 6 pieces (plus extra for greasing pan)
  •  7 ounces semi sweet or bittersweet chocolate, finely chopped (I prefer semi-sweet).
  •  ¾ teaspoon instant espresso powder
  •  1½ teaspoons vanilla extract
  •  4 eggs (separated)
  • Pinch salt
  •  1/3 cup light brown sugar
  1. Preheat oven to 325 degrees F. Butter the bottom and sides of a 9-inch springform pan with sides at least 3 inches high and set aside.
  2. Melt the butter, chocolate and espresso powder in a large heatproof bowl set over a bowl of really hot water, stirring occasionally until smooth. Remove from heat and cool for 5 minutes.
  3. Whisk in the vanilla and egg yolks into the chocolate mixture and set aside.
  4. With a stand mixer fitted with the whisk attachment, beat the egg whites and salt at medium speed until frothy, about 30 seconds. Add half of the brown sugar and beat until combined, about 15 seconds. Add the remaining brown sugar and beat at high speed until soft peaks form when the whisk is lifted, about 1 minute longer, scraping down the sides halfway through.
  5. With a hand-held whisk, whisk one-third of the beaten egg whites into the chocolate mixture. Using a rubber spatula, fold in the remaining egg whites until no white streaks remain.
  6. Carefully transfer the batter to the prepared springform pan, gently smoothing the top with an offset spatula.
  7. Bake until the cake has risen, is firm around the edges, and the center has just set but is still soft (the center of cake will spring back after pressing gently with your finger), 13 to 18 minutes.
  8. Transfer the pan to a wire rack to cool completely, about 1 hour. (The cake will collapse as it cools).
  9. Do not remove the cake from the pan!

THE MIDDLE LAYER:

  •  2 tablespoons cocoa powder (preferably Dutch-processed, Hershey’s is fine).
  •  5 tablespoons hot water
  •  7 ounces milk chocolate, finely chopped
  •  1½ cups cold heavy cream
  •  1 tablespoon granulated sugar
  •  1/8 teaspoon table salt
  1. Whisk together the cocoa powder and hot water in a small bowl and set aside.
  2. Melt the chocolate in a bowl set over another bowl filled with very, very hot water, stirring occasionally until smooth. Remove from heat and cool for 5 minutes.
  3. Whisk the cocoa powder mixture into the melted chocolate until smooth.
  4. With an electric mixer whisk the cream, granulated sugar and salt on medium speed until the mixture begins to thicken, about 30 seconds. Increase the speed to high and whip until soft peaks form.
  5. With a handheld wire whisk, stir one-third of the whipped cream into the chocolate mixture to lighten. Using a rubber spatula, fold in the remaining whipped cream until no white streaks remain.
  6. Spoon the mousse into the springform pan over the cooled cake and gently tap the pan on counter 3 times to remove any large air bubbles; smooth the top with an offset spatula. Refrigerate for at least 15 minutes while preparing the top layer.

THE TOP LAYER

  •  ¾ teaspoon powdered gelatin
  •  1 tablespoon water
  •  6 ounces white chocolate, finely chopped
  •  1½ cups cold heavy cream (divided use)
  • Additional grated chocolate (milk or dark) or cocoa powder for decoration, optional
  1. In a small bowl, sprinkle the gelatin over the water; let stand for at least 5 minutes.
  2. Place the white chocolate in a medium bowl.
  3. Bring ½ cup of the heavy cream to a simmer in a small saucepan over medium-high heat or in the microwave.
  4. Stir the gelatin mixture, into the hot cream, whisking until fully dissolved.
  5. Pour the cream-gelatin mixture over the white chocolate and whisk until the chocolate is melted and the mixture is completely smooth (I usually sit the bowl of chocolate over another bowl of boiling water to help it melt).
  6. Cool mixture to room temperature, stirring occasionally, 5 to 8 minutes. The mixture will thicken slightly.
  7. With an electric mixer whisk the remaining 1 cup heavy cream at medium speed until it begins to thicken, about 30 seconds. Increase the speed to high and whip until soft peaks form when the whisk is lifted.
  8. Whisk one-third of the whipped cream, with a hand held whisk, into the white chocolate mixture to lighten. Using a rubber spatula, fold the remaining whipped cream into the white chocolate mixture until no white streaks remain.
  9. Spoon the white chocolate mousse into the pan over the middle layer. Smooth the top with an offset spatula.
  10. Return the cake to the refrigerator and chill until set, at least 2½ hours.
  11. Garnish the top of cake with grated chocolate or dust with cocoa powder, if desired.
  12. Run a thin knife between the cake and side of the springform pan, then remove the side of pan. Place torte on serving plate.
  13. Cut into slices and share (for clean slices, dip a sharp knife into hot water and wipe dry between cuts).

NOTES: The cake can be made up to 1 day in advance and refrigerated.

11 Jul 2017 Chocolate Cake, Mocha Filling & Coffee-with-Cream Frosting
mocha-cake2-768x512
My daughter got married recently. I made the cake.  Three layer cakes (some of them double recipes), all with different fillings and frostings.  One cake was red velvet cake with cheesecake filling and a white chocolate Swiss buttercream frosting–because my grandson likes red velvet cake and the groom likes cheesecake.  Another cake was a wedding white cake with a tangy lemon filling and a lemon kissed Italian meringue frosting–because that’s what the bride wanted. The middle layer was a rich chocolate cake, with a mocha filling and a coffee-with-cream frosting–because that’s my favorite and I was making the cake, and I was the M-O-B, so I got to insist upon it!

I hope to get all the recipes for all the cakes posted, but let me start with this one, my current favorite special occasion cake: 3 layers of cake, 2 layers of mocha filling, and then all that is en robed in a coffee-with-cream frosting.  The recipe for the cake is an Ina Garten recipe from 2007 which was featured in Food and Wine magazine as “Double Chocolate Layer Cake” where I found it.  There is a frosting recipe included with Ina’s recipe, but I use a Ruth Cousineau recipe that ran in Gourmet Magazine in December of 2008 for “Coffee and Mocha Buttercreams”, which is a cooked meringue recipe, which is a whole lot of bother but tastes so much better than an American Buttercream, and makes two amazing variations. Using both variations, with this super rich chocolate cake (buttermilk and hot coffee in the batter) makes this cake a standout.

The cake is huge.  Cut thin slices (which is fine because the slices hold together very well). I had 10 people over for dinner last weekend, everyone had a decent sized piece of cake, and 5 people took a piece home, and I still and one-quarter of the cake leftover!  The picture above is from that one-quarter cake, and had been sitting in the refrigerator for three days before I decided to take a picture of it. Please note, my baked goods are better than my pictures!

Rich Chocolate Cake

  • 1 ¾ cups (8 oz/219g) all purpose flour
  • 2 cups sugar
  • ¾ cup unsweetened cocoa powder (I use Hershey’s, it’s all that’s needed)
  • 2 teaspoons baking soda
  • 1 teaspoon baking powder
  • 1 teaspoon kosher salt
  • 1 cup buttermilk
  • ½ cup vegetable oil
  • 2 eggs
  • 1 teaspoon vanilla extract
  • 1 cup freshly brewed, strong, hot coffee
  1. Make the coffee! Bring buttermilk and eggs to room temperature.
  2. Preheat oven to 350° F.
  3. Prepare 2 or 3 nine inch pans. (NOTE: original recipe called for two pans, I prefer three pans. It’s up to you.) Spray the pans with Pam for Baking, or spread with softened butter, or line with parchment paper. I line with parchment paper and then either lightly spray or lightly butter the parchment paper.
  4. Mix the flour, sugar, cocoa powder, baking soda, baking powder, and salt together and set aside.
  5. Mix buttermilk, oil, eggs and vanilla in another bowl.
  6. With an electric mixer, add the buttermilk mixture into the flour mixture, mixing just until all ingredients are blended.
  7. Slowly beat in the hot coffee, beating until all ingredients are fully incorporated.
  8. You will have about 6 cups of batter. Pour an equal amount of batter into each of the prepared pans.
  9. Bake the cakes at 350° F for 25 minutes for 3 layers (35 minutes for 2 layers), but don’t rely on time alone, check the cakes for before taking them out of the oven. The tops of the cakes should spring back when lightly pressed with a finger and the cake should be slightly pulling away from the sides of the pan.
  10. Remove from oven and let cakes cool in pans for about 30 minutes then invert onto cooling racks to cool completely.

Coffee-with-Cream and Mocha Buttercreams

  • 2 cups sugar, divided
  • ¾ cup water
  • 6 large egg whites at room temperature 30 minutes
  • 2 tablespoons plus 1 teaspoon instant-espresso powder
  • 1 tablespoon pure vanilla extract
  • ½ teaspoon cream of tartar
  • ¼ teaspoon salt
  • 6 sticks (1 ½ pounds) unsalted butter, cut into tablespoon sized pieces and softened
  • 6 ounces fine-quality 60%-cacao bittersweet chocolate, melted and cooled to lukewarm

Special Equipment needed: a candy thermometer; a stand mixer fitted with whisk attachment

  1. Bring 1 ¾ cups sugar and water to a boil in a 3-quart heavy saucepan over medium heat, stirring until sugar has dissolved, then wash down any sugar crystals from side of pan with a pastry brush dipped in cold water. Boil, without stirring, until it registers 220° to 225° F, 15 to 20 minutes.
  2. At this point, while continuing to boil syrup, beat whites with espresso powder, vanilla, cream of tartar, and salt in mixer at medium speed until they just hold soft peaks. Add remaining ¼ cup sugar, 1 tablespoon at a time, beating, and beat until whites just hold stiff peaks.
  3. When syrup reaches soft-ball stage (238 to 242°F), immediately pour syrup in a slow stream down side of bowl into whites (avoid beaters) while beating at high speed. Beat until completely cool, 25 to 30 minutes. With mixer at medium speed, add butter 1 tablespoon at a time, beating well after each addition (see cooks’ note, below) and until buttercream is smooth. (Mixture may look curdled before all butter is added but will come together at end.)
  4. Transfer 2 cups buttercream to a small bowl and stir in chocolate. If buttercream is too soft to spread, chill, stirring occasionally.

Notes:

  • If buttercream looks soupy after some butter is added, meringue is too warm: Chill bottom of bowl in an ice bath for a few seconds before continuing to beat in remaining butter.
  • Buttercreams can be made 1 week ahead and chilled or 1 month ahead and frozen. Bring to room temperature (do not use a microwave), about 2 hours, and beat with an electric mixer until spreadable.

Thank you for stopping by my kitchen today. I hope you make this cake and get rave reviews.  I know you will.  This cake is delicious!

20 Jul 2014 Toasted Coconut Waffles
coconut-waffle01 They taste like a tropical vacation!  I liked them with butter and apricot jam.  My kids were hollering for pineapple, mango, and some toasted nuts but I gave them what I had on hand, maple syrup and whipped cream (poor, poor deprived children). I cut this recipe out of a Bon Appetit magazine in December, 2013 but didn’t make them until July 2014. I’m glad I don’t clear my refrigerator of assorted clippings and notes and pictures all that often, and I am glad I saved this recipe for seven months! The note above the recipe states the recipe is from Elmwood Cafe in Berkeley.  I wonder what they serve them with… You’ll need some coconut oil for this recipe.  I don’t think it affects the taste much, but I think it adds to the delightful crunch.  I did make one change to the recipe, I reduced the amount of toasted coconut. Only ¾ cup of toasted coconut is incorporated into the batter, but the recipe stated to toast 1 ½ cups, using the extra ¾  to sprinkle on top of the cooked waffles, that’s way too much coconut for sprinkling, an extra ¼ cup will do you. I toasted the coconut and mixed up the dry ingredients before I went to bed, which made Sunday morning a bit easier.  I just had to stir in the eggs, milk, and coconut oil and heat up the waffle iron. The batter made 7 large, round waffles (which leaves some for us to throw in the toaster tomorrow morning). Word of advice, if you like waffles, and want to enjoy them on a regular basis, get two waffle irons.  The horrible thing about waffles is that it’s hard to get everyone a hot waffle at the same time.  Two waffles irons solves this problem–unless you have a really large family and need three waffle irons… It goes without saying that you have to like coconut (and the Hawaiian mojo) to like these waffles. But who doesn’t like coconut…, or Hawaii!? Toasted Coconut Waffles, take me awayyyyy. . . .

BTW, my notoriously picky 5 year old grandson, who at last count eats only 27 different foods (he has some sort of selective eating disorder), ate half a waffle and told me it was GOOD.  Hooray! I might be making these on a regular basis now, especially since scrambled eggs, a long time favorite, has slipped off of his list.  I just might have this recipe committed to memory by next month 🙂

Toasted Coconut Waffles

  • 1 cup shredded coconut (original recipe specified unsweetened, but I didn’t have any, so used sweetened coconut)
  • 1 ½ cups all-purpose flour
  • ½ cup cornstarch (yes, my eyes popped, too.  Not a misprint.  On-half a cup of cornstarch!)
  • 1 teaspoon kosher salt
  • 1 teaspoon baking powder
  • ½ teaspoon baking soda
  • 2 large eggs
  • 1 cup buttermilk (or soured milk)
  • 1 cup whole milk (I had whole milk on hand, so I used it, but I am sure 2% would be fine, too)
  • 2/3 cup coconut oil, melted
  • ½ cup sugar (use 2 tablespoons less if you are using sweetened shredded coconut)
  1. The original recipe said to preheat oven to 400°F, toast coconut on a rimmed baking sheet until golden brown, 2 minutes. then let cool. I find it easier to toast the coconut in a dry frying pan over medium heat.  Just keep stirring and then watch closely.  Once the coconut is a nice golden brown remove it from the pan and let cool on a plate.
  2. Whisk flour, cornstarch, salt, baking powder, and baking soda in a large bowl (I did this the night before, covered, and left on counter).
  3. Whisk eggs, buttermilk, milk, oil, and sugar in a medium bowl. Whisk buttermilk mixture into dry ingredients (do not over mix). Mix in ¾ cup coconut; set aside remaining ¼ cup coconut for sprinkling on waffles.
  4. Heat a waffle iron until very hot.
  5. Ladle approx 2/3 cup of batter onto hot waffle iron, close lid, and cook waffles until golden brown (each waffle iron is different, but usually 4-6 minutes).
  6. Serve topped with your choice of toppings: butter, syrup, apricot/pineapple jam, diced fresh bananas/mango/pineapple, toasted pecans, whipped cream and reserved coconut.

Thanks for stopping by my kitchen today.  I hope you I’ll be offering up some recipes on a more regular basis now. I am home from an extended European vacation and pretty much convinced that what I make at home is better than anything anywhere else 🙂

29 Mar 2014 Caramel and Chocolate Covered Graham Crackers

Graham-crackers-2

It’s been a terrible, horrible, no good, very bad few days around here. We are all fine, but there was a family brouhaha that just didn’t sit right. We were all out of sorts, and, truth be told,  a bit afraid of what the future will bring, too.  So what to do? Make the all time favorite family comfort food, of course!

This recipe is rustic and quik, and it’s done in 20 minutes.  So it’s great just to start on this and put some of that pent up adrenaline to good use. But then there’s the cooling off period. Once made, these bars have to  sit in the refrigerator to harden up a bit. Again, another good thing.  A cooling off period is needed after a big family brouhaha.  Then comes the peace and contentment, sitting down with a good cup of coffee, some rustic chocolate covered graham crackers and reflecting on what went right and what went wrong, and figuring out how to right the wrongs and ultimately, bringing peace back to the family.

In August of 2005 my friends Sharon and Margie, from Lake Arrowhead Retreats, gave me a recipe for Saltine Toffee Cookies which they had found on AllRecipes.com.  Truth be told, the recipe didn’t sound very good.  Saltine crackers, brown sugar, butter, and melted chocolate?  Just say no.  But they insisted I try it.  They insisted the recipe was good.  I trusted them, they make some great food, so I tried it. It WAS good. VERY good.  Then I came to find out this recipe is sort of an Internet sensation and I might have been the last person on the planet to know about it!

Years pass, and one fine weekend, I took a chocolate making class.  The instructor of the class talked about how her mother used to make a ganache and pour it over crumbled up graham crackers as a bedtime snack for her and her siblings (I know, I know, what a Mom! I never did that for MY kids…).  Then the gears started churning.  Chocolate covered graham crackers are one of my favorite things in the whole wide world, but I had never made them.  The chocolate covered graham crackers from Starbucks are the best, but they are a bit too rich with a bit too much chocolate. OH!  The light bulb popped!  Could I make chocolate covered graham crackers for my kids, too?  I could one-up that other Mom, as well!  I could make chocolate covered graham crackers and with caramel!  Never mind that she was using a fancy ganache and I was just melting giant chocolate bars, LOL! What if I use the Saltine Toffee Cookie recipe but substitute graham crackers for the saltine crackers.  What if???

So I did it.  Many times.  My son says these are the best things I make. The last tin I made, hidden in the refrigerator behind the lettuce, lasted only three days.

Turns out, I am not the first person to think of this!  Lots of people on the Internet have used graham crackers instead of saltines with this recipe. Again, why am I one of the last people on the planet to know about this?! 🙂 Anyway, here’s my recipe.  You can find lots of versions all over, but this is the one that works for me.  Keep these Caramel Chocolate Covered Graham Crackers refrigerated, when they are not being eaten…  If these cookies sit out too long at room temperature the graham cracker starts to soften and loose it’s crunch 🙁 My 2005 copy of this recipe (with saltines rather than graham crackers) specifies that the recipe makes 35 servings. ROFLMAO!!! That’s so funny 🙂

Caramel and Chocolate Covered Graham Crackers

  • approx. 2/3 a box of graham crackers (two wax covered packages out of a box of 3 packages)
  • 1 cup butter
  • 1 cup dark brown sugar
  • 1 large sized (4 or 5 oz) chocolate bar, chopped (I like a Symphony Bar or a Cadbury Bar, if you like dark chocolate, the Hershey’s Special Dark Bar is good)
  • ¾ cup chopped nuts (if you like nuts.  I have never added nuts) OR, if it’s December, crushed candy canes! (I loooove this option!)
  1. Preheat oven to 400 degrees.
  2. Line a rimmed cookie sheet with graham crackers.  Place the graham crackers as close together as possible. You will need most of 2 waxed covered packages. Set tray aside.
  3. In a medium saucepan, combine butter and sugar and stir constantly, over medium heat, until sugar is melted.
  4. Raise heat slightly, to bring mixture to a boil.  Boil vigorously for 3 minutes, without stirring–shaking the pan occasionally is OK (the original directions said to “stir constantly” but I have found this to make a grainy caramel layer).
  5. Immediately pour caramel over graham crackers.  Use an offset spatula to quickly spread the caramel evenly over the crackers.
  6. Place tray in hot oven and bake for 5 minutes.
  7. Remove tray from oven and sprinkled chopped chocolate evenly over top.  Let chocolate just sit on top of caramel for 5 minutes.
  8. Spread the now melted chocolate evenly over the caramel.  Sprinkle with nuts (if using).
  9. Let tray sit until chocolate has hardened.  This make take a few hours.  To speed things up, put the tray in the refrigerator for about 15-20 minutes.
  10. When chocolate is set, break bars into uneven pieces. Sneak a piece or two.  Serve or cover and hide in refrigerator until needed.

Thanks for stopping by my kitchen today!  If there is a brouhaha in your family, I hope it’s over quickly and sweetly!