Tag-Archive for ◊ cream cheese ◊

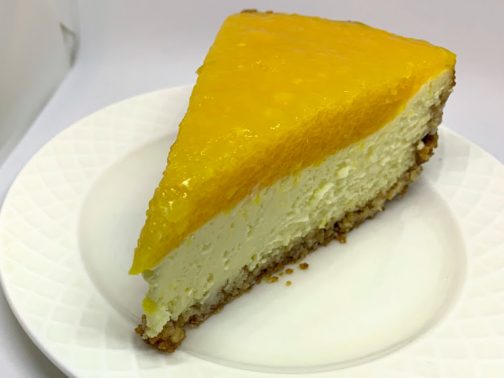
29 Aug 2019 Coconut Mango Cheesecake

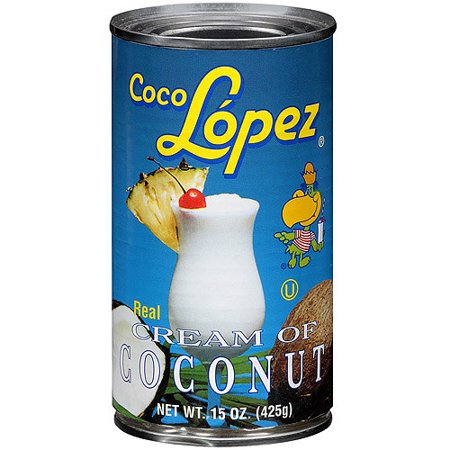
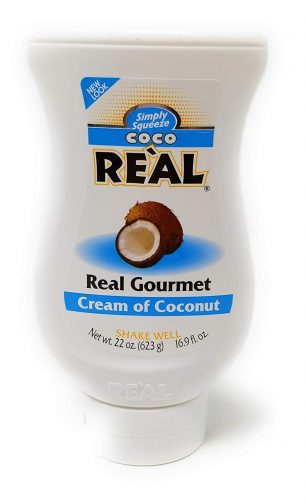
This is one of my favorite cheesecakes! It’s showy and special and tastes wonderful 🙂 The method for this cheesecake is different from my usual method, but it works like a dream, and I’ve never had this cheesecake crack. The only tricky part is getting the right ‘Cream of Coconut’. Try to find the Coco Lopez brand, or any other brand used for making mixed drinks such as the Pina Colada. Don’t use canned coconut milk or even the new canned coconut cream [this is getting so confusing!], you need Cream of Coconut. It’s sweet and thick. Here are pictures of the two brands I have used successfully.
Hope you can make this for a special occasion in your life. It’s a winner!

Coconut-Mango Cheesecake

Coconut Crust:

  • 2 cups sweetened flaked coconut
  • 8 whole graham crackers, broken
  • 1/4 cup sugar
  • 1/4 cup (1/2 stick) unsalted butter, diced

Cheesecake:

  • 32-ounces Philadelphia-brand cream cheese (do not use reduced-fat, fat-free, or whipped) The cream cheese MUST be at room temperature. Do not proceed with cold cream cheese!
  • 2/3 cup sugar
  • 1 15-ounce can (sweetened) cream of coconut (such as Coco López, look for it in the alcohol mixers section. Do NOT USE COCONUT MILK!)
  • 1 teaspoon coconut extract
  • 1/8 teaspoon salt
  • 5 large eggs

Glaze:

  • ¼ cup  water
  • 1 pkg unflavored gelatin
  • 2 ½-3 cups mango puree (from 2 16 oz packages frozen mango chunks)
  • 1/2 cup sugar, or to taste
  • ½ teaspoon vanilla

For crust:

  1. Preheat oven to 350°F.
  2. Blend all ingredients in processor until finely ground and sticking together, 1 to 2 minutes.
  3.  Press crumb mixture onto bottom and 2 1/2 inches up sides of 10-inch-diameter spring form pan with 2 3/4- to 3-inch-high sides.
  4. Bake crust until golden, 14 to 15 minutes.
  5. Cool crust on rack.
  6. Increase oven temperature to 425°F.

For filling:

  1. Blend cream cheese and sugar in bowl of electric mixer. Stir in cream of coconut, coconut extract and salt. Add eggs 1 at a time. Mix to blend.
  2.  Pour filling into crust. Bake cheesecake 10 minutes at 425°F .
  3. Reduce oven temperature to 250°F. Bake until center is softly set, about 1 hour 35 minutes longer.
  4. Turn off oven, keeping the oven door closed. Cool cake in oven 1 hour.
  5. Refrigerate cake, uncovered, at least 12 hours or overnight.

For glaze:

  1. Place water in small cup or bowl.  Sprinkle gelatin over water. Let stand until gelatin softens, about 10 minutes.
  2. Meanwhile, pour mango puree and sugar into small saucepan. Taste that flavor is correct. Add more mango puree or more sugar if needed.
  3. Stir mixture over low heat until sugar dissolves, bubbles form at edge of pan, and mixture is hot.
  4. Add gelatin mixture and stir 1 minute to dissolve. Stir in vanilla.
  5. Cool mango mixture until lukewarm, stirring occasionally.
  6. Pour glaze into center of cheesecake. Rotate and tilt the pan until glaze is spread evenly over top.
  7. Chill cheesecake to set glaze, approximately 3 hours.

Notes: DO AHEAD! This recipe can be made 1 day ahead. Cover and keep chilled.

29 Sep 2016 Pumpkin-Chocolate Cake
w

This is the BEST cake to serve at this time of year (or any other time of the year, actually)!  It’s a good chocolate cake – a very, very good chocolate cake; it’s moist, and nicely chocolate-y, and made richer with some pumpkin puree added.  The cake doesn’t taste of pumpkin, it just tastes well-rounded and delicious and the frosting tastes like Fall! There is a touch of cinnamon in the frosting, then the ganache topping is smoothed over the top and dripped down the sides which sends this cake into the realm of ‘One of the Best Cakes EVER’! My daughter, Abby, has been making this cake since she was in high school.  Her friends would ask for it for their birthdays (even for Summer birthdays)!

It goes without saying that this cake takes a bit of time to make and decorate, but if you are thinking of making this cake then you are thinking of making it for a special occasion, right?  The time and effort are worth it and there’s nothing complex or confusing about making this cake, it’s pretty straightforward. And you won’t be serving up a box mix and a can of chemicals to your friends and family, either 🙂

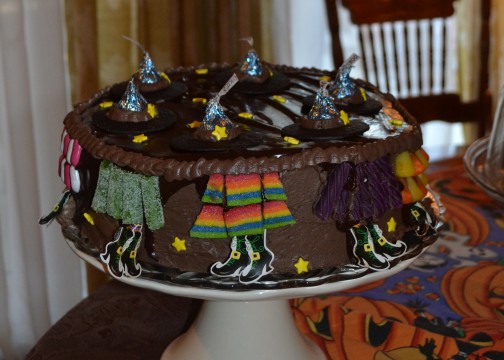
Now, your cake is going to look a bit different than the one above, since this cake was decorated for my witch themed Halloween party. Abby used candy, cupcake toppers, and Pinterest inspiration [to decorate the cake in the picture below] for my Halloween party last year.  Isn’t it cute?

Witches 2013 dessert abby's witch cake

The original recipe came from a Good Housekeeping magazine about, oh, 20 years ago?  I still see pictures from that recipe dancing around.  Don’t believe them!  For some reason in the picture the frosting under the ganache is orange.  I tried to do that and there is no way that I know of to turn a cocoa powder frosting bright orange.  I tried. Many times. It. Can’t.Be.Done. Sigh…

Not all recipes in magazines, cookbooks, newspapers and the Internet will work.  Mine will.  I only post recipes that I’ve tested and have been verified “Delicious!” by a multitude of family members and friends.  Many of my treasured recipes, like this Pumpkin-Chocolate Cake, I have made time and time again. You can do it, too! Make it once for Halloween, and I KNOW you’ll want to make it again for your Thanksgiving potlucks!

PUMPKIN-CHOCOLATE CAKE

For Cake

1 1/2 c. flour
2/3 c. unsweetened cocoa powder (Hershey’s Special Dark is good)
2 tsp. baking powder
1 tsp. baking soda
1/2 tsp. salt
1 (15 oz.) can pumpkin
1/2 c. buttermilk
2 tsp. vanilla
3/4 c. butter, softened
1 c. dark brown sugar
1 c. sugar
3 eggs plus one egg yolk
  • Preheat oven to 375 degrees.
  • Line the bottoms of 2 9-inch cake pans with parchment paper and lightly butter (or spray with Pam for Baking).
  • Sift flour, cocoa, baking powder, baking soda and salt together.
  • In another bowl stir together the pumpkin, buttermilk, and vanilla.
  • In the bowl of an electric mixer beat together the butter and the sugars until light and fluffy.
  • Beat in the eggs, one at a time, beating well after each addition, and then the egg yolk.
  • Reduce speed to low and beat in 1/3 flour mixture, and then 1/3 pumpkin mixture.
  • Repeat until all ingredients are used.
  • Pour batter into prepared pans.
  • Bake until cake passes the toothpick test, about 35 minutes.
  • Cool, frost and glaze as directed below.

For Frosting

6 oz. cream cheese, at room temperature
6 tablespoons butter (3/4 stick), softened
1 (16-oz.) box powdered sugar
3 T. cocoa powder
1/2 tsp. cinnamon
1 tsp. vanilla
2 – 3 T. cream (or milk)
  • Beat cream cheese and butter together until well blended.
  • Stir in powdered sugar, cinnamon, vanilla, and enough cream to make a stiff spreading consistency.
  • Spread 1 cup frosting between the two layers, and use the remaining frosting for the tops and sides.
  • Chill cake for a minimum of 30 minutes before glazing.

For Chocolate Glaze

4 oz. bittersweet chocolate, chopped
1 T. butter
3 T. corn syrup
1/2 c. heavy cream
  • Place chopped chocolate, butter, and corn syrup in a small bowl.
  • Heat heavy cream until boiling.
  • Pour hot cream over chocolate mixture in bowl.
  • Let sit for 3 minutes then blend with whisk until smooth.
  • Let glaze sit for  FOR AT LEAST 5 minutes to thicken slightly (it might be 15-20 minutes–better the glaze be on the thick side rather than the thin side)
  • Pour the glaze on top of the chilled and frosted cake. Smooth out glaze to edges, and then let drip down the sides.
  • Refrigerate to set glaze.
31 Jul 2013 Blueberry Heaven
 

Do you ever go into a bakery?  Of COURSE you do!  Do you ever buy a pastry that looks delicious, but then are seriously disappointed in the taste…? And then, to top it off, are you overwhelmed by the amount of  fat you’ve just consumed for something that really wasn’t that all that great?  Me, too 🙁 Do you ever wish, on a weekend morning with your second cup of coffee, for that imagined deliciousness, without all greasy pastry and sugary icing?  Me, too 🙂 Pssssst…  Come here! No, come closer! I am going to tell you how to make a breakfast pastry as delicious as the one you are dreaming of…, and without the load upon load of grease and sugar!

Now. Seriously…, am I your best friend, or what?!

It’s so simple!  You need 2 slices of bread, a bit of cream cheese, and a handful of blueberries. It helps if you have a sandwich maker or a panini press, but if you don’t, use a frying pan and make this Blueberry Heaven just like you would a grilled cheese sandwich.

I found the original recipe here: http://www.fitfromconception.com/2012/06/blueberry-breakfast-grilled-cheese.html  No, I am not pregnant, roflmao.  Neither are any of my children.  I have no idea how I ended up at that website, but I am glad I did.

Blueberry Heaven

[a Stand-in for Fat and Sugar Laden Blueberry Pastries]

For each serving:

  • 2 slices of bread, any kind.  Make it whole wheat if that’s the way you roll.  I use Orrowheat Country Buttermilk Bread.  Cinnamon bread would probably be delicious, as would almost any kind of homemade bread (don’t use homemade rye bread or anything like that!).
  • Plain cream cheese, enough to spread on two slices of bread.
  • a sprinkling of sugar, less than 1/4 tsp, optional
  • a handful of fresh blueberries, about 24 (jam can be substituted)
  • Butter, optional, unless you are using a frying pan


  1. Preheat sandwich maker, panini press, or frying pan.
  2. Spread each slice of bread with cream cheese, no measurements here, just coat the slices of bread to your preference. (If you are using a frying pan, spread the other side of the bread with butter)
  3. Sprinkle a bit, and I do mean a bit, less than 1/4 tsp of sugar over the cream cheese, just to sweeten up the cream cheese a little bit. (I’ve made this without the sugar, and it’s just not the same.)
  4. Arrange blueberries on one slice of the cream cheese covered bread.  Use as many as you want, but I think 24 is about perfect.  I like to evenly space the blueberries on the bread so I get an equal number of  blueberries in every bite.
  5. Put the other slice of cream cheese covered bread onto of the blueberries, cream cheese to cream cheese.
  6. Put the sandwich in the press, latch close, and cook for 2 minutes. (If using a frying pan, put the sandwich, butter side down on the preheated frying pan.  When the first side is golden brown, flip, and cook the second side until it is golden brown too.)
  7. Remove sandwich from the press or the pan and let cool a bit, the filing will be mad hot right out of the press. Be careful.
  8. Enjoy! It’s a little slice of heaven, isn’t it?
  9. Repeat.  You’ll want to make one for someone else… 🙂

Thanks for stopping by my kitchen today! Aren’t you glad you don’t have to drive over to the Olde Time Bakery for a pastry that will only make you feel badly about yourself? Hooray!!

18 Mar 2012 Salmon Spinach Breakfast Roll
I’m pretty sure this recipe will make my Top Ten list for 2012.  It’s certainly the best recipe I’ve come across so far this year–and the one that has gotten me back into the business of blogging, which was no small feat. This is a delicious make ahead special occasion breakfast/brunch dish.  Keep it in mind for Easter, Mother’s Day, Father’s Day, Graduations, as well as anytime you have overnight or early morning guests.

My friend Karin made this at our Cookbook Club’s Snow Holiday.  I ate it the morning she made it, and had it again for the following three mornings! Loved it.

Karin learned to make  this from her cousin in Germany who had made it for an Aunt’s milestone birthday celebration. The original recipe is full of German words, quantities stated in grams, and a few ingredients mentioned in the directions but not in the ingredient list, but we’ve fixed that for you. Truthfully, both Karin and I wouldn’t have made this if we hadn’t eaten it before reading the recipe.  Cream cheese and eggs never appealed to me, and neither did the thought of eating cold omlette. Just overlook those things!  Be smarter than we would have been. This recipe is a winner. Don’t hesitate to make it. Remember to plan ahead;  make, assemble and roll this the night before your special occasion.

Since I ate this for four days, I know it stays fresh and delicious for at least that long, but I probably wouldn’t push it  much longer than that.

I know this is thinking a bit far ahead, but wouldn’t the green spinach, the “red” salmon, and the make-ahead-ability make this perfect for Christmas morning?   Salmon Spinach Breakfast Roll

  •  approx. 1/3 cup grated Parmesan cheese
  • 4 oz. fresh baby spinach, roughly chopped
  • 3 green onions, sliced (can substitute some finely diced and sauteed onion or shallots)
  • 6 whole eggs
  • salt and pepper to taste
  • 2 oz shredded swiss or gruyere cheese (about 1/2 cup)
  • 8 oz. cream cheese with herbs, divided use, at room temperature (don’t even be tempted to try to make this with cold cream cheese)
  • 8 oz. thinly sliced lox-style salmon
  • Bagels, toast, or mixed greens, to serve
  • a few teaspoons of capers, optional, for garnish
  1. Preheat oven to 375 degrees F. (200 degrees C.)
  2. Line a jelly roll pan with parchment paper and lightly spray with Pam or spread with butter.
  3. Sprinkle grated Parmesan cheese onto the parchment paper.
  4. Beat 4 oz of the softened cream cheese and then beat in the eggs. Stir in the chopped spinach, sliced green onions,  the Swiss or Gruyere cheese, and salt and pepper to taste.  Stir well. (It will probably look like you have used  too much spinach, but it’s OK. The spinach will reduce significantly when cooked.)
  5. Pour egg mixture carefully over the Parmesan cheese onto the parchment lined jelly roll pan. Bake  at  375 degrees F.  for 10 min.
  6. Remove cooked eggs from oven. Let cool in pan.
  7. When cool, flip omlette over and onto a long piece of plastic wrap.  Remove parchment paper.
  8.  Spread remaining softened cream cheese on top of eggs.  Lay thinly sliced smoked salmon over the cream cheese, covering the entire omlette.
  9. Roll egg-cheese-salmon omlette tightly in plastic wrap–you can roll from either end, making a bigger spiral serving fewer people or a small spiral serving more people with lighter appetites– and place in refrigerator overnight (at least 8  hours).
  10. Remove roll from refrigerator about an hour before serving (just to remove the chill). Slice, arrange on platter (sprinkle with capers, if desired) and serve. (The first day we put this on lightly toasted bagel halves, the following days on slices of sourdough toast. Can we also served on a bed of greens as a light salad.)

THANKS for stopping by my kitchen today.  Aren’t you glad there was a new recipe posted?  Me, too! I hope there’s another one tomorrow…or the next day.