Archive for the Category ◊ Pies & Tarts ◊

27 May 2020 Fresh Cherry Pie

INGREDIENTS

  • 1 double crust pie dough

Cherry Filling:

  • 2 red plums
  • 2 pounds (6 cups) sweet cherries, pitted and halved
  • ½ -1 cup sugar, to taste (½ cup sugar usually results in a slightly tart pie)
  • ¼ teaspoon salt
  • 1 tablespoon freshly squeezed lemon juice
  • 2 tablespoons bourbon
  • 2 ½ tablespoons cornstarch
  • ¼ teaspoon ground cinnamon
  • 2 tablespoons unsalted butter, cut into ¼ inch cubes
  • 1 large egg + 1 teaspoon water (for egg wash)
  • Approx. 1 teaspoon sugar

INSTRUCTIONS

  1. Roll out a generous ½ of pie crust dough and place in bottom of 9-inch pie pan. Wrap pie pan containing bottom pastry with plastic wrap in place in refrigerator.
  2. Roll out remaining pastry for top crust. Place flat onto a baking sheet, cover with plastic, and place in refrigerator. Meanwhile, prepare cherry filling.
  3. Pit the cherries, and cut them in half.
  4. Cut plums in half and remove the pit.
  5. Place plum halves and 1 cup of cherries to food processor and process for 1 minute or until smooth.
  6. Strain the plum-cherry mixture through a fine-mesh strainer over a large bowl. Press down and extract as much liquid as possible, discard the solids and retain the juice in the bowl.
  7. Add the remaining 5 cups of pitted and halved cherries, sugar, salt, lemon juice, bourbon cinnamon and corn starch into bowl containing the puree. Stir to combine. Let mixture stand for 15 minutes to meld flavors.
  8. Remove bottom crust from refrigerator. Pour cherry mixture into to dough-lined pie plate. Scatter 1/4? butter cubes evenly over filling.
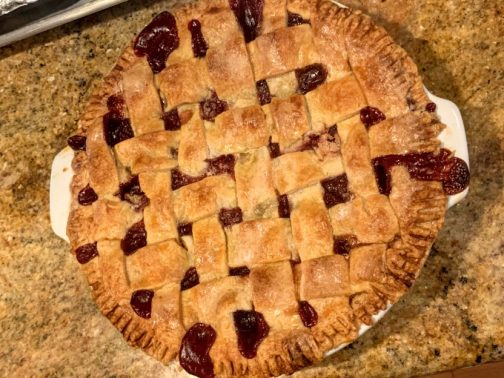
  9. Remove the top pie crust from the refrigerator and place on top of pie.  Using thumb and forefinger, flute edges or use the tines of a fork to seal the two pie crusts together.
  10. In a small bowl, lightly beat egg and 1 teaspoon water together. Using a pastry brush, brush egg all over the top pie crust.  Sprinkle a small amount of sugar over the egg wash. Use a sharp knife to make 4-8 evenly spaced vents in top of pie.
  11. Freeze prepared pie for 20 minutes.
  12. Preheat oven to 400 degrees. Place a foil lined baking sheet in oven to preheat.
  13. Remove pie from freezer and transfer to pre-heated baking sheet. Bake for 30 minutes at 400 degrees. Then reduce temperature to 350-degrees and continue to bake for another 30-40 minutes or until the juices bubble around the edges and crust is deeply golden brown.
  14. Allow pie to cool on wire rack for 4 hours before serving. Serve with a side of ice cream or sweetened whipped cream, if desired.

Enjoy!

Print Friendly, PDF & Email
29 Aug 2019 Coconut Mango Cheesecake

This is one of my favorite cheesecakes! It’s showy and special and tastes wonderful 🙂 The method for this cheesecake is different from my usual method, but it works like a dream, and I’ve never had this cheesecake crack. The only tricky part is getting the right ‘Cream of Coconut’. Try to find the Coco Lopez brand, or any other brand used for making mixed drinks such as the Pina Colada. Don’t use canned coconut milk or even the new canned coconut cream [this is getting so confusing!], you need Cream of Coconut. It’s sweet and thick. Here are pictures of the two brands I have used successfully.

Hope you can make this for a special occasion in your life. It’s a winner!

Coconut-Mango Cheesecake

Coconut Crust:

  • 2 cups sweetened flaked coconut
  • 8 whole graham crackers, broken
  • 1/4 cup sugar
  • 1/4 cup (1/2 stick) unsalted butter, diced

Cheesecake:

  • 32-ounces Philadelphia-brand cream cheese (do not use reduced-fat, fat-free, or whipped) The cream cheese MUST be at room temperature. Do not proceed with cold cream cheese!
  • 2/3 cup sugar
  • 1 15-ounce can (sweetened) cream of coconut (such as Coco López, look for it in the alcohol mixers section. Do NOT USE COCONUT MILK!)
  • 1 teaspoon coconut extract
  • 1/8 teaspoon salt
  • 5 large eggs

Glaze:

  • ¼ cup  water
  • 1 pkg unflavored gelatin
  • 2 ½-3 cups mango puree (from 2 16 oz packages frozen mango chunks)
  • 1/2 cup sugar, or to taste
  • ½ teaspoon vanilla

For crust:

  1. Preheat oven to 350°F.
  2. Blend all ingredients in processor until finely ground and sticking together, 1 to 2 minutes.
  3.  Press crumb mixture onto bottom and 2 1/2 inches up sides of 10-inch-diameter spring form pan with 2 3/4- to 3-inch-high sides.
  4. Bake crust until golden, 14 to 15 minutes.
  5. Cool crust on rack.
  6. Increase oven temperature to 425°F.

For filling:

  1. Blend cream cheese and sugar in bowl of electric mixer. Stir in cream of coconut, coconut extract and salt. Add eggs 1 at a time. Mix to blend.
  2.  Pour filling into crust. Bake cheesecake 10 minutes at 425°F .
  3. Reduce oven temperature to 250°F. Bake until center is softly set, about 1 hour 35 minutes longer.
  4. Turn off oven, keeping the oven door closed. Cool cake in oven 1 hour.
  5. Refrigerate cake, uncovered, at least 12 hours or overnight.

For glaze:

  1. Place water in small cup or bowl.  Sprinkle gelatin over water. Let stand until gelatin softens, about 10 minutes.
  2. Meanwhile, pour mango puree and sugar into small saucepan. Taste that flavor is correct. Add more mango puree or more sugar if needed.
  3. Stir mixture over low heat until sugar dissolves, bubbles form at edge of pan, and mixture is hot.
  4. Add gelatin mixture and stir 1 minute to dissolve. Stir in vanilla.
  5. Cool mango mixture until lukewarm, stirring occasionally.
  6. Pour glaze into center of cheesecake. Rotate and tilt the pan until glaze is spread evenly over top.
  7. Chill cheesecake to set glaze, approximately 3 hours.

Notes: DO AHEAD! This recipe can be made 1 day ahead. Cover and keep chilled.

Print Friendly, PDF & Email
06 Sep 2013 Pavlova
pavlova1

In England, Australia, New Zealand and my house Pavlova is  a very popular dessert.  I am not sure why it’s not only not popular in the US but it’s not even well known.  Pavlova is a  quick, light, inexpensive, impressive, and utterly delicious dessert.  Pavlova is usually served during summer months since fresh berries are an important component.

Legend has it that Pavlova was named after the Russian ballet dancer Anna Pavlova sometime in the 1920’s. But there the agreement ends. There is a huge and controversial issue around the country of origin of this dessert.  Both Australia and  New Zealand claim it.  Pavlova is a popular dish and important part of the national cuisine of both countries–as it is England (but England doesn’t claim to be a country of origin). Ok, ok! I can hear you all hollering but, what IS  “Pavlova”?

Pavlova is a meringue dessert with a crisp outer shell and a soft, light, fluffy center.  The meringue crust is  topped with lightly sweetened whipped cream and fresh berries–and kiwi– to serve.

I make two versions of this dessert.  Version #1, and the most traditional is below.  In Version #2, I mix a little lemon curd into the whipped cream, and I use blueberries instead of the more traditional raspberries and strawberries.  Trader Joe’s carries a very good and inexpensive lemon curd.  If you have a lemon tree, you can make your own lemon curd in the microwave with my recipe.

Pavlova doesn’t keep!  Don’t assemble the Pavlova until JUST before serving, and don’t expect to enjoy they leftovers (they’ll be soggy).  Make sure this is eaten all up all at once.  The good news is that the meringue base can be made ahead and stored for a few days in an airtight container before assembling and serving, which makes this a great showstopping dessert to make for guests.

High humidity might negatively affect this dessert. It’s best not to attempt to make this on a humid, wet, rainy day.

Pavlova

  •  4 extra-large egg whites, at room temperature
  • Pinch of salt (about 1/8 tsp)
  • 1 cup sugar
  • 2 teaspoons cornstarch
  • 1 teaspoon white wine vinegar
  • 1/2 teaspoon vanilla extract
  • Sweetened Whipped Cream, recipe follows
  • fresh raspberries, strawberries, kiwi or combination (see above for a blueberry version)
  1. Preheat oven to 200 degrees F.
  2. Place a sheet of parchment paper on a baking pan. Draw a 9-inch circle on the paper, using a 9-inch plate as a guide.  Turn the paper over so the drawn circle is on the reverse side of the paper. (This way you won’t get a pencil mark on the meringue.)
  3. Place the egg whites and salt in the bowl of an electric mixer fitted with a whisk attachment. (Be SURE the bowl and beaters are very, very, very clean–with not one bit of oil, butter or fat residue.)
  4. Beat the egg whites on high speed until firm, about 1 minute. With the mixer still on high, slowly add the sugar, in slow steady stream or 1 T. at a time and beat until it makes firm, shiny peaks, about 3 minutes. Remove the bowl from the mixer.
  5. Mix vanilla, cornstarch and vinegar together then fold that mixture lightly into the egg white mixture using a very clean rubber spatula (there should be no oil, fat, butter, residue on the spatula).
  6. Pile the meringue into the middle of the circle on the parchment paper and smooth it within the circle, making a rough disk. Then, make a crater or a bowl in the middle of the flat meringue pile. (So the meringue looks like a rimmed soup bowl or large saucer.  This “crater” will hold the whipped cream and fruit at serving time.
  7. Bake at 200 degrees for  1 1/2 hours. Turn off the oven, keep the door closed, and allow the meringue to cool completely in the oven, at least 1 hour, overnight is better. (The meringue will deflate if exposed to cold air before it’s cool).  Store in an airtight container until ready to serve. Do not refrigerate.
  8. Place meringue disk onto a serving plate and JUST BEFORE SERVING spread the top completely with sweetened whipped cream. Spoon the berries and the traditional Kiwi, if you can get it, carefully into the middle of the Pavlova, leaving a border of cream and meringue. Serve immediately.

Sweetened Whipped Cream:

1 cup cold heavy cream
2 tablespoons sugar
½ – 1 teaspoon vanilla

Whip the cream in the bowl of an electric mixer fitted with a whisk attachment (you can also use a hand mixer). When it starts to thicken, add the sugar and vanilla and continue to beat until firm. Don’t overbeat!  If using a Kitchen Aid, make 1 ½ or 2 cups cream, any less and the whisk won’t get it all up from the bottom.

You’ll love it!  Practice this once for the family, and then WOW your guests with it the next time!

Thanks for stopping by my kitchen today!

Print Friendly, PDF & Email
31 Jul 2013 Blueberry Heaven
 

Do you ever go into a bakery?  Of COURSE you do!  Do you ever buy a pastry that looks delicious, but then are seriously disappointed in the taste…? And then, to top it off, are you overwhelmed by the amount of  fat you’ve just consumed for something that really wasn’t that all that great?  Me, too 🙁 Do you ever wish, on a weekend morning with your second cup of coffee, for that imagined deliciousness, without all greasy pastry and sugary icing?  Me, too 🙂 Pssssst…  Come here! No, come closer! I am going to tell you how to make a breakfast pastry as delicious as the one you are dreaming of…, and without the load upon load of grease and sugar!

Now. Seriously…, am I your best friend, or what?!

It’s so simple!  You need 2 slices of bread, a bit of cream cheese, and a handful of blueberries. It helps if you have a sandwich maker or a panini press, but if you don’t, use a frying pan and make this Blueberry Heaven just like you would a grilled cheese sandwich.

I found the original recipe here: http://www.fitfromconception.com/2012/06/blueberry-breakfast-grilled-cheese.html  No, I am not pregnant, roflmao.  Neither are any of my children.  I have no idea how I ended up at that website, but I am glad I did.

Blueberry Heaven

[a Stand-in for Fat and Sugar Laden Blueberry Pastries]

For each serving:

  • 2 slices of bread, any kind.  Make it whole wheat if that’s the way you roll.  I use Orrowheat Country Buttermilk Bread.  Cinnamon bread would probably be delicious, as would almost any kind of homemade bread (don’t use homemade rye bread or anything like that!).
  • Plain cream cheese, enough to spread on two slices of bread.
  • a sprinkling of sugar, less than 1/4 tsp, optional
  • a handful of fresh blueberries, about 24 (jam can be substituted)
  • Butter, optional, unless you are using a frying pan


  1. Preheat sandwich maker, panini press, or frying pan.
  2. Spread each slice of bread with cream cheese, no measurements here, just coat the slices of bread to your preference. (If you are using a frying pan, spread the other side of the bread with butter)
  3. Sprinkle a bit, and I do mean a bit, less than 1/4 tsp of sugar over the cream cheese, just to sweeten up the cream cheese a little bit. (I’ve made this without the sugar, and it’s just not the same.)
  4. Arrange blueberries on one slice of the cream cheese covered bread.  Use as many as you want, but I think 24 is about perfect.  I like to evenly space the blueberries on the bread so I get an equal number of  blueberries in every bite.
  5. Put the other slice of cream cheese covered bread onto of the blueberries, cream cheese to cream cheese.
  6. Put the sandwich in the press, latch close, and cook for 2 minutes. (If using a frying pan, put the sandwich, butter side down on the preheated frying pan.  When the first side is golden brown, flip, and cook the second side until it is golden brown too.)
  7. Remove sandwich from the press or the pan and let cool a bit, the filing will be mad hot right out of the press. Be careful.
  8. Enjoy! It’s a little slice of heaven, isn’t it?
  9. Repeat.  You’ll want to make one for someone else… 🙂

Thanks for stopping by my kitchen today! Aren’t you glad you don’t have to drive over to the Olde Time Bakery for a pastry that will only make you feel badly about yourself? Hooray!!

Print Friendly, PDF & Email