Tag-Archive for ◊ lemon ◊

18 Jan 2014 Russian Tea

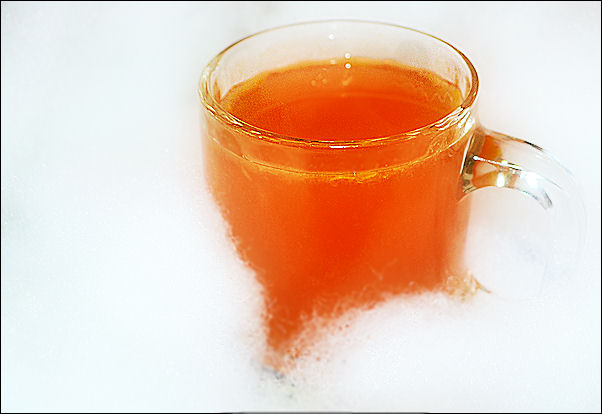
Russian-Tea-1a

Are you old enough to remember the “Russian Tea” phase back in the 70’s?  I was a teenager then, a very young teenager, and our Moms and Grandmas were mixing up batches of Russian Tea like crazy and giving everyone little jars of the stuff.  I think the mix had instant tea, Tang (remember Tang? Astronauts drank it!), powdered lemonade, and some spices.  You opened up your gift jar, spooned some mix into a cup, added hot water, stirred it up and  you were drinking Russian Tea!  I liked it. It was a different hot drink.  I wasn’t into coffee yet, Hot Chocolate was too childish, English tea with milk was OK, but boring. Russian Tea was fun and different–and a bit exotic.

Fast forward to February 7th, 2014, Opening Ceremonies for The XXII Winter Olympics will be held in Sochi, Russia and I will be hosting a Russian Themed Winter Olympic Dinner.  What to have to drink after dinner? My daughter suggested Vodka shots off the tip of a sword.  Umm, no.  A citrus-y, sweet, slightly spicy version of Russian Tea is more up my alley — but not made of Tang, Country Time Lemonade and Nestea. So I hit the Internet.  First spoiler, the so-called “Russian Tea” of the 70’s isn’t Russian at all. It’s an American concoction! The only thing Russian about it is it’s name.  Shhhhhhhhhh! Don’t tell anyone!  Real Russian tea is “Russian Caravan” tea, because tea used to be imported to Russia from China, via a 16-18 month caravan, and it acquired a smokey flavor from all of the caravan campfires, according to Wikipedia.  So, I went to my local Russian grocery store, yes, we have one in San Jose, and I couldn’t find “Russian Caravan” tea anywhere (nor anyone to help me), but lots of Earl Grey.  I am not serving Earl Grey tea at my Russian Dinner.  Early Gray Tea is English and I don’t like it, it’s too smokey!

So now I am back to my original “Russian” Tea quest.  I found some recipes on the Internet, checked out their star ratings, and tried a few.  One was truly horrid; it involved extracting the juice from oranges and lemons, then boiling the  rinds in sugar and water then adding  the liquid to cold tea. I was skeptical, but the very attractive, very sincere lady on the YouTube video seemed nice, and she was raving over her tea! So I tried it.  She was not honest. Her tea was bitter and horrid.  Of COURSE it was.  Boiling all that pith then adding it to the tea? I should have known better. Why do people post bad recipes?

Eventually, I came up with this version for fresh Russian Tea.  I like it.  I really like it. I served it to five friends and two relatives, and they all said they liked it.  Then I served it to another relative, the daughter who suggested I serve vodka shots off the end of a sword, and she hated it.  I was SHOCKED.  I tied her down and make her try it again.  She STILL didn’t like it.  Harrumph.  She’s no longer my favorite child.  My son loved the tea.  He said, “That’s good.  That’s really, really good.”  He’s a good boy. He’s my favorite child now.

This “Russian” tea is in the same family as hot tea with lemon and honey, but with orange added, and some cinnamon, and a few cloves, it’s a bit more complex (there’s no honey in this tea though).  I’m going to serve it at my Russian themed Winter Olympic dinner, but I’ll brew a pot of Earl Grey, too… for the weirdos.

You all know I am not a photographer, right?  I thought I was being deliciously creative setting up a picture to look like hot, citrus-y, Russian tea in cold, stark, white snow.  Epic fail.  What I got looks like tea in bubbles, oh, not even that, it looks like tea in pillow stuffing, which it is.  Can you overlook that?  Can you just try this hot, citrus-y, slightly spiced, American-Russian tea?  I think you will be glad you did.  Just make the tea once, and put it in the refrigerator to reheat as needed. Ponyat’? Da?

I am really getting into the Olympic/Russian thing now. I made Pierogi for dinner last night, and I ordered a Pierogi press and a Pierogi cookbook written by a real babuska from Amazon.  I am trying to find a Russian outfit to wear. It seems I should go as a babushka.  I already have all the right clothes in my closet…and you know, Vodka shots from the end of a sword might not be too far fetched!

Russian Tea

  • 4 strong black tea bags
  • 1 quart (4 cups boiling water)
  • Zest of 1 1/2 oranges
  • Juice of 1 1/2 oranges (about 2/3 cup)
  • Zest of 1 large lemon
  • Juice of 1 large lemon (about 1/4 cup)
  • 6 cloves (0k to double for spicier drink)
  • 1 cinnamon stick (ok to use 2 for spicier drink)
  • 1 cup sugar (might be ok to reduce to 3/4 cup for a less sweet drink)
  • 2 cups cold water 
  1. Make 1 quart of tea by pouring 1 quart of boiling water over 4 teabags and seep for 5 minutes.  Remove tea bags from hot tea and set tea aside.
  2. Zest the oranges and lemon. Put the zest in a small saucepan.
  3. Add 1 cup sugar and 2 cups cold water to the zest in the small saucepan.
  4. Bring water, sugar, and zest to a boil and boil for 5 minutes.
  5. Juice the oranges and lemon. Pour the juice into the brewed tea.
  6. Strain the  boiled water, sugar, spices and zest mixture the add to tea and juice mixture.
  7. Stir well and serve or refrigerate mixture until ready to use. Reheat in the microwave or on the stove top.
  8. Enjoy the Olympics!

Thanks for stopping by my kitchen today.  BTW, I tried one more drink in my quest for my Olympic dinner, but I think that one qualifies as a dessert (and a gold medal)!  White Hot Chocolate.  Too, too, too decadent to post…I must keep my fans from sinning…I must…I must…OK, OK, I’ll post it soon!

06 Sep 2013 Pavlova

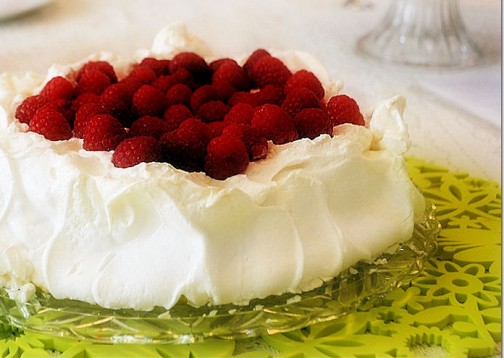
pavlova1

In England, Australia, New Zealand and my house Pavlova is  a very popular dessert.  I am not sure why it’s not only not popular in the US but it’s not even well known.  Pavlova is a  quick, light, inexpensive, impressive, and utterly delicious dessert.  Pavlova is usually served during summer months since fresh berries are an important component.

Legend has it that Pavlova was named after the Russian ballet dancer Anna Pavlova sometime in the 1920’s. But there the agreement ends. There is a huge and controversial issue around the country of origin of this dessert.  Both Australia and  New Zealand claim it.  Pavlova is a popular dish and important part of the national cuisine of both countries–as it is England (but England doesn’t claim to be a country of origin). Ok, ok! I can hear you all hollering but, what IS  “Pavlova”?

Pavlova is a meringue dessert with a crisp outer shell and a soft, light, fluffy center.  The meringue crust is  topped with lightly sweetened whipped cream and fresh berries–and kiwi– to serve.

I make two versions of this dessert.  Version #1, and the most traditional is below.  In Version #2, I mix a little lemon curd into the whipped cream, and I use blueberries instead of the more traditional raspberries and strawberries.  Trader Joe’s carries a very good and inexpensive lemon curd.  If you have a lemon tree, you can make your own lemon curd in the microwave with my recipe.

Pavlova doesn’t keep!  Don’t assemble the Pavlova until JUST before serving, and don’t expect to enjoy they leftovers (they’ll be soggy).  Make sure this is eaten all up all at once.  The good news is that the meringue base can be made ahead and stored for a few days in an airtight container before assembling and serving, which makes this a great showstopping dessert to make for guests.

High humidity might negatively affect this dessert. It’s best not to attempt to make this on a humid, wet, rainy day.

Pavlova

  •  4 extra-large egg whites, at room temperature
  • Pinch of salt (about 1/8 tsp)
  • 1 cup sugar
  • 2 teaspoons cornstarch
  • 1 teaspoon white wine vinegar
  • 1/2 teaspoon vanilla extract
  • Sweetened Whipped Cream, recipe follows
  • fresh raspberries, strawberries, kiwi or combination (see above for a blueberry version)
  1. Preheat oven to 200 degrees F.
  2. Place a sheet of parchment paper on a baking pan. Draw a 9-inch circle on the paper, using a 9-inch plate as a guide.  Turn the paper over so the drawn circle is on the reverse side of the paper. (This way you won’t get a pencil mark on the meringue.)
  3. Place the egg whites and salt in the bowl of an electric mixer fitted with a whisk attachment. (Be SURE the bowl and beaters are very, very, very clean–with not one bit of oil, butter or fat residue.)
  4. Beat the egg whites on high speed until firm, about 1 minute. With the mixer still on high, slowly add the sugar, in slow steady stream or 1 T. at a time and beat until it makes firm, shiny peaks, about 3 minutes. Remove the bowl from the mixer.
  5. Mix vanilla, cornstarch and vinegar together then fold that mixture lightly into the egg white mixture using a very clean rubber spatula (there should be no oil, fat, butter, residue on the spatula).
  6. Pile the meringue into the middle of the circle on the parchment paper and smooth it within the circle, making a rough disk. Then, make a crater or a bowl in the middle of the flat meringue pile. (So the meringue looks like a rimmed soup bowl or large saucer.  This “crater” will hold the whipped cream and fruit at serving time.
  7. Bake at 200 degrees for  1 1/2 hours. Turn off the oven, keep the door closed, and allow the meringue to cool completely in the oven, at least 1 hour, overnight is better. (The meringue will deflate if exposed to cold air before it’s cool).  Store in an airtight container until ready to serve. Do not refrigerate.
  8. Place meringue disk onto a serving plate and JUST BEFORE SERVING spread the top completely with sweetened whipped cream. Spoon the berries and the traditional Kiwi, if you can get it, carefully into the middle of the Pavlova, leaving a border of cream and meringue. Serve immediately.

Sweetened Whipped Cream:

1 cup cold heavy cream
2 tablespoons sugar
½ – 1 teaspoon vanilla

Whip the cream in the bowl of an electric mixer fitted with a whisk attachment (you can also use a hand mixer). When it starts to thicken, add the sugar and vanilla and continue to beat until firm. Don’t overbeat!  If using a Kitchen Aid, make 1 ½ or 2 cups cream, any less and the whisk won’t get it all up from the bottom.

You’ll love it!  Practice this once for the family, and then WOW your guests with it the next time!

Thanks for stopping by my kitchen today!

01 Jun 2013 Lemon Ice Cream

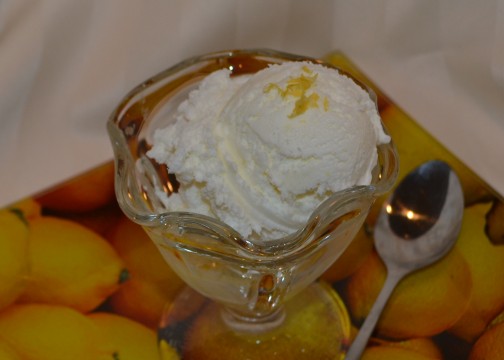
lemon ice cream closer

Bet you’ve never had Lemon Ice Cream!  Not lemon sorbet, or lemon sherbet, or lemon granita  or lemon frozen yogurt,  but lemon ice cream–creamy, rich, sweet, intense  lemon ice cream. Intrigued?  Tempted? I hope so, because I have a simple, oh-so-good recipe for you.  You do have an ice cream maker, right?  I use a “frozen bowl” ice cream maker, which seem to be everywhere for $40-$50 now, but sometimes you can get lucky.  This weekend my friend Sharon bought one at a garage sale for $5, and I saw one at  Savers for $12.99.

Homemade ice cream is very, very rich, and Lemon Ice Cream is no exception.  Serve small scoops (with an option for seconds, of course).  This recipe makes a quart of ice cream, richer and more filling than even the most premium commercial ice creams.  One quart of this ice cream will serve as many people as a half gallon of that store bought stuff.

I like to serve this ice cream on fruit pie, crisps and cobblers. My friend Sharon, whom I mentioned above, bought her ice cream maker after I fed her berry crisp with a scoop of this lemon ice cream.  This ice cream is also fantastic as a filling for an ice-cream sandwich.  To make a truly gourmet ice cream sandwich place a small scoop of Lemon Ice Cream between two ginger cookies, squish the sandwich a bit, square the filling up a bit, maybe roll the sides in a bit of chopped chocolate-milk, semi-sweet or white, then put the little bites of heaven in the freezer to firm up.   My pregnant daughter likes to eat  Lemon Ice Cream “as is” straight from a glass bowl with a long spoon.  She downed the sample above in one breath (at 9 o’clock in the morning one week before her due date!).

This recipe was first published in Gourmet magazine in 1999.  I’ve been making it since May 25, 2003.  Yes, I marked the date on my copy of the recipe, with this note, “Delicious and simple!”  “Simple” was written in caps and underlined twice!

Lemon Ice Cream

1 large lemon (zest plus 1/4 cup freshly squeezed lemon juice)

1 cup granulated sugar

1 cup cold milk (I usually only have 2% at home, so that’s what I use)

1 cup well chilled heavy cream


With a vegetable peeler or microplane remove the zest from the lemon, do NOT include any of that bitter white pith in with the zest.  Put the sugar and the lemon peel in a food processor or blender and whirl until the sugar is finely ground and the lemon zest has been incorporated into the sugar. Add in the milk and the cream (On occasion, I have used 2 cups half-and-half instead of the milk and cream mixture).  Blend just to combine.  Stir in 1/4 cup freshly squeezed lemon juice.  Process in ice cream maker for about 20 minutes.  Place soft ice cream in a freezer safe bowl, and set in freezer to harden up a bit (a few hours).  Ice Cream will keep at least a week, if not more, in the freezer but I doubt you will have to test the outer limits.

Thanks for stopping by my kitchen today!  Looks like the next few days are going to be scorchers.  Stay cool. Squeeze lemons. Make ice cream. By the way, I think the picture above is one of the best so far for this blog.  My webmaster, Ratty, fixed it up real nice, didn’t she?

04 Sep 2011 Sparkling Watermelon Lemonade

Last family BBQ of the season?  I wish I had posted this recipe as a season opener so that we could have had enjoyed this drink throughout the summer, but at least it is posted in time for the last BBQ of the summer. So toast the summer good-bye and pack away the white shoes with a glass of this sparkling Watermelon Lemonade.

This is  a summery, refreshing drink that’s lightly bubbly. No artificial colors, no artificial flavorings, no preservatives; just all natural ingredients! (…and it will use up all of that H-U-G-E watermelon you just bought!  My local grocery store had BIG ‘UNs for $2.49 yesterday.  How could I resist? Now, with this recipe for Watermelon Lemonade, none of that BIG ‘UN is going to waste!)

You could easily use this recipe and make a watermelon concentrate to freeze for future use.  Just mix the watermelon puree, the lemon juice, and the simple syrup, stir to blend. and then freeze (a quart Ziploc bag would work fine).  When ready to serve remove concentrate from freezer, defrost, add water and sparkling water, and stir until blended.

The kids are going to love this.  In fact, I think it will be their favorite. Go ahead and make some concentrate.  You know there is going to be a kid oriented event in the next few weeks.  Better to serve them good-for-you Watermelon Lemonade than a can of fizzy artificial flavorings and colorings.

This recipe has a long pedigree.  I found it here, http://traceysculinaryadventures.blogspot.com/2011/07/watermelon-lemonade.html (Tracey has posted a much better picture of the Watermelon Lemonade), where it was adapted from from Smitten Kitchen who adapted it from  Bubby’s.  I added the recipe for 8 servings  (why not make a pitcher  full?) and changed the ratio of bubbly water to straight water. You could make either version with all still water, or with all bubbly water.  Do what suits you. Make this recipe yours! Enjoy!  Here’s look to next summer, when we can have glass after glass after glass of this Sparkling Watermelon Lemonade.

Sparkling Watermelon Lemonade

For two glasses:

  • 1/4 cup freshly squeezed lemon juice (usually one lemon)
  • 1/2 cup fresh watermelon puree (Put cubes of seedless watermelon in blender and whirl until smooth.  Strain to remove seeds and pulp. )
  • 3-4 tablespoons simple syrup (recipe below, make first and let cool!)
  • 1/2 cup cold water
  • 1/4 cup sparkling water

Add all of the ingredients to a small pitcher and stir to combine.  Divide between two glasses and serve over ice.

For Eight Servings:

  • 1 cup freshly squeezed lemon juice (4-5 lemons)
  • 2 cups fresh, strained watermelon puree (about 1/2 a medium watermelon)
  • 1 cup simple syrup (recipe below, make first and let cool!)
  • 1  1/2 cups cold water
  • 1  1/2 cups sparkling water

Add all of the ingredients to a small pitcher and stir to combine.  Pour into ice filled glasses and serve.

Simple Syrup:

To make the simple syrup: Combine equal parts water and sugar in a small saucepan and bring to a simmer, stirring occasionally.  (1/4 cup of sugar and water for 2 servings, 1 cup of sugar and water for 8 servings). Continue simmering until the sugar has dissolved.  Turn off the heat and let the syrup cool to room temperature.  Leftover syrup can be stored in the refrigerator for up to one month.

Thanks for stopping by my kitchen today.  I hope I’ll be back cooking up a storm tomorrow.  Fingers crossed, I’ll see you then!

Polly