Archive for the Category ◊ Ice Creams & Sorbets ◊

21 Jul 2013 “Magic Shell” Topping for Ice Cream

magic shell with bottle[3] rattie

It’s summer.  It’s time for ice cream, and the easiest recipe ever posted on this site! Magic Shell!  You know the stuff, right?  You squeeze the chocolate-y liquid onto ice cream and it hardens up almost immediately.  Then you can use your spoon and shatter the thin chocolate all over the ice cream. Then you can stir the chocolate pieces  into your ice cream, and when you have a spoonful of the concoction the magic shell shatters again in your mouth.  It’s lovely.  It’s chocolate-y. It’s fun. It’s magic. It’s easy.

The recipe only calls for two ingredients.  And once you make it, you can keep it on the kitchen counter in a squeeze bottle for up to a month.

You need good chocolate, and coconut oil. Coconut oil?  Yep.  It’s not as hard to find as it used to be.  I even saw jars of coconut oil at Walmart, and Costco is selling huge bottles of it now.  It should be on the shelf of your grocery store, next to all the other oils.  If not there, and you don’t shop at either Walmart or Costco, try Trader Joe’s.

Magic Shell

  • 5  ½ oz. good quality chocolate, milk or dark, whatever is your personal preference (don’t use chocolate chips, use some good quality bar chocolate)
  • ½ cup coconut oil
  • Ice cream, for serving

Makes 1 cup

  1. Chop your chocolate and add it to a microwave-safe container along with coconut oil.
  2. Zap at 30-second intervals until chocolate melts into the coconut oil.  Stir well. At this point I like to pour my Magic Shell into a squeeze bottle, but this is not absolutely necessary.
  3. Pour mixture over ice cream, watch it harden, crack it open! Magic! Fun! Delicious!
  4. Because of the melting point of the coconut oil, the magic shell will stay liquid in a hot kitchen and solidify after sitting in a cold kitchen or the fridge. If your leftover shell hardens, just re-melt in the microwave. Stored at room temperature Magic Shell should keep for at least a month

Keep some of homemade “Magic Shell” and a carton of your favorite ice cream on-hand for quick, no cook, sort of special dessert.  Psssst…! Kids like to pour some rainbow sprinkles onto the chocolate sauce just before it hardens!

Thanks for stopping by my kitchen today.  See you again soon!


Print Friendly, PDF & Email
01 Jun 2013 Lemon Ice Cream

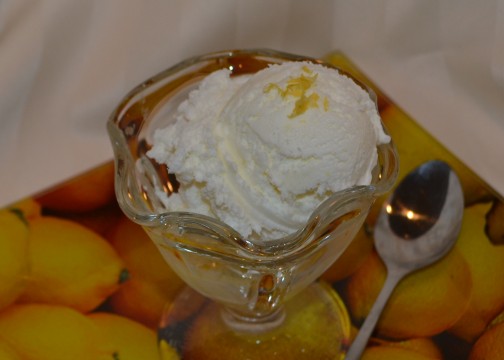
lemon ice cream closer

Bet you’ve never had Lemon Ice Cream!  Not lemon sorbet, or lemon sherbet, or lemon granita  or lemon frozen yogurt,  but lemon ice cream–creamy, rich, sweet, intense  lemon ice cream. Intrigued?  Tempted? I hope so, because I have a simple, oh-so-good recipe for you.  You do have an ice cream maker, right?  I use a “frozen bowl” ice cream maker, which seem to be everywhere for $40-$50 now, but sometimes you can get lucky.  This weekend my friend Sharon bought one at a garage sale for $5, and I saw one at  Savers for $12.99.

Homemade ice cream is very, very rich, and Lemon Ice Cream is no exception.  Serve small scoops (with an option for seconds, of course).  This recipe makes a quart of ice cream, richer and more filling than even the most premium commercial ice creams.  One quart of this ice cream will serve as many people as a half gallon of that store bought stuff.

I like to serve this ice cream on fruit pie, crisps and cobblers. My friend Sharon, whom I mentioned above, bought her ice cream maker after I fed her berry crisp with a scoop of this lemon ice cream.  This ice cream is also fantastic as a filling for an ice-cream sandwich.  To make a truly gourmet ice cream sandwich place a small scoop of Lemon Ice Cream between two ginger cookies, squish the sandwich a bit, square the filling up a bit, maybe roll the sides in a bit of chopped chocolate-milk, semi-sweet or white, then put the little bites of heaven in the freezer to firm up.   My pregnant daughter likes to eat  Lemon Ice Cream “as is” straight from a glass bowl with a long spoon.  She downed the sample above in one breath (at 9 o’clock in the morning one week before her due date!).

This recipe was first published in Gourmet magazine in 1999.  I’ve been making it since May 25, 2003.  Yes, I marked the date on my copy of the recipe, with this note, “Delicious and simple!”  “Simple” was written in caps and underlined twice!

Lemon Ice Cream

1 large lemon (zest plus 1/4 cup freshly squeezed lemon juice)

1 cup granulated sugar

1 cup cold milk (I usually only have 2% at home, so that’s what I use)

1 cup well chilled heavy cream


With a vegetable peeler or microplane remove the zest from the lemon, do NOT include any of that bitter white pith in with the zest.  Put the sugar and the lemon peel in a food processor or blender and whirl until the sugar is finely ground and the lemon zest has been incorporated into the sugar. Add in the milk and the cream (On occasion, I have used 2 cups half-and-half instead of the milk and cream mixture).  Blend just to combine.  Stir in 1/4 cup freshly squeezed lemon juice.  Process in ice cream maker for about 20 minutes.  Place soft ice cream in a freezer safe bowl, and set in freezer to harden up a bit (a few hours).  Ice Cream will keep at least a week, if not more, in the freezer but I doubt you will have to test the outer limits.

Thanks for stopping by my kitchen today!  Looks like the next few days are going to be scorchers.  Stay cool. Squeeze lemons. Make ice cream. By the way, I think the picture above is one of the best so far for this blog.  My webmaster, Ratty, fixed it up real nice, didn’t she?

Print Friendly, PDF & Email
04 Jun 2011 Frozen Bananas

Such an easy recipe, and one you’ll probably use all summer long, assuming the weather gets better.  June 4th here in San Jose, and it rained all day!  Unbelievable, but we ate frozen bananas for dessert anyway!  They were a hit.  I only wish we had waited 5 minutes for the bananas to soften a bit before we tore into them.  You can see the frost on the bananas in these pictures!  On hot days you won’t have to wait so long…

I’ve been making frozen bananas for a decade or so, and have decided that Hershey’s Special Dark is the best chocolate to compliment the taste of the banana (odd, since I am usually a milk chocolate devotee). There are a variety of toppings the chocolate covered banana can be rolled in.  The most popular, in my experience, are toasted coconut, chopped peanuts, and rainbow jimmies.  Other options include leaving them plain (for the boring people in your crowd!) chopped peanut butter chips, mini M&M’s, cookie crumbs, granola, and any kids cereal.  IMHO, bananas+cereal+bit of chocolate= a special summer breakfast.  I think your kids might nominate you for mom/pop-of-the-year, if you agreed with me!  Just think; frozen bananas as a special treat for a summer birthday (or for a summer half birthday for winter birthday kids–as all my kids were), or for the first day of summer vacation, or to celebrate the summer solstice…

Frozen Bananas

Quantities are approximate, as size of bananas varies widely.  If you end up with extra bananas, and not enough chocolate, just keep the extra bananas in the freezer until you are ready to make smoothies or banana bread.

  • 3-4 perfect bananas (not over-ripe and not green, no bruises or black spots)
  • 6 or 8 Popsicle sticks (if you don’t have Popsicle sticks craft sticks, lollipop sticks, chopsticks, or even the tops of plastic Popsicle molds can be used)
  • 2  4.25 oz. bars Hershey’s Special Dark chocolate (don’t substitute chocolate chips…if you do, you’ll have to add a few tablespoons of Crisco to help them melt…, and I think that’s yucky)
  • assorted toppings (rainbow jimmies, chopped peanuts or other nuts, mini M&M’s, chopped peanut butter chips, toasted coconut, granola, cereal…)
  1. Peel the bananas and remove any banana strings.  Inspect the bananas carefully and cut off any bruises or soft parts.  Cut the good bananas in half, and insert a stick into the flat, cut end, of each banana.  Place skewered bananas on a pan/plate/tray that will fit into your freezer and open freeze for an hour or so (or even overnight).
  2. Set out chosen toppings in shallow bowls or on pieces of wax paper or foil.
  3. Break chocolate into squares, place into good quality microwave safe bowl, and melt chocolate in microwave on 50% power for about 2 or 3 minutes.
  4. While chocolate is melting remove frozen bananas from freezer.
  5. Dip frozen banana into warm melted chocolate and, with a knife,  QUICKLY spread chocolate all over the banana.  Before chocolate hardens–work quickly–dip and roll banana in chosen topping.  Repeat with remaining bananas.
  6. Refreeze chocolate covered bananas for about 30 minutes or so.
  7. Remove bananas from freezer, place in a covered container or Ziploc bag, and return to freezer until ready to eat.  Frozen bananas keep well, or at least for a few weeks (I haven’t had any in the freezer for longer than 2 weeks…)

Thank for stopping by my kitchen today.  See you tomorrow!!

Print Friendly, PDF & Email
21 Nov 2010 Cinnamon Ice Cream

I had heard about cinnamon ice cream a year or so ago and was instantly intrigued.  It sounded lovely.  Odd, but lovely, and I had a feeling–foodie intuition, if I may be so bold–that Cinnamon Ice Cream would be the perfect side kick for warm apple, peach and pear pies, crisps and cobblers. It took me awhile to find a recipe because I don’t like eggs in my ice cream.  I like Philadelphia style ice cream; ice cream made with milk, cream, sugar, and flavorings only.  No eggs.  Ever. I finally found this recipe.  It looks like it’s made its rounds!  No wonder it took awhile to get to me. I found it on Erin’s Food Files , who found it in Elizabeth Faulkner’s Demolition Desserts, who saw it on the Martha Stewart Show!

I don’t think this is the right ice cream for an ice cream cone or an ice cream sundae. It’s much too rich, and it’s cinnamon. There are no chocolate chips nor caramel swirls nor candied nuts in this ice cream, just cinnamon.  Who wants that on a cone? So why do I have this ice cream pictured in a sundae glass?  LOL.  Ooops.  Sometimes I really ought to think things through!  BTW,  Ben&Jerry’s does have a Cinnamon Bun ice cream out now, so some folk might think differently than I do.  Some folk might like Cinnamon ice cream plain, in a sundae glass or on a cone.  That being said, this ice cream is magic on warm fruit and nut based desserts.  Magic.

I am pretty sure someone will be shot if there is none of this left for our Thanksgiving pies.  I made a double batch, so that had better be.

Cinnamon Ice Cream

2 cups whole milk
1/2 cup Sugar-in-the-Raw (turbinado sugar)
1/2 cup pure maple syrup (Grade B if you can find it, the taste is more assertive)
2 1/2 teaspoons ground cinnamon
2 cups heavy cream
1 teaspoon vanilla extract
1 teaspoon Kosher salt

Directions:

Combine the milk, sugar, maple syrup, and cinnamon in a medium saucepan over medium heat. Cook, stirring occasionally, until mixture just begins to bubble and sugar has dissolved, 6 to 8 minutes. Add cream, vanilla, and salt; stir to combine.  Pour into a bowl and set aside to cool, stirring occasionally. Cover and transfer to refrigerator to chill thoroughly, at least 1 hour and up to overnight.

Stir mixture briefly; pour into an ice-cream maker and process according to manufacturer’s instructions. Store ice cream in a covered container in the freezer, at least 1 hour and up to 1 week.

Serve over warm fruit pie, crisp, or cobbler.

GREAT day to stop by my kitchen today!  I think this recipe is going to transform your “This is GREAT!” fall desserts into your “OHMYGOD this is INCREDIBLE!” fall desserts 🙂
Let me know the reactions from your guests!!!

Print Friendly, PDF & Email