Tag-Archive for ◊ butter ◊

21 Dec 2019 Candy Cane Sparkle Cookies
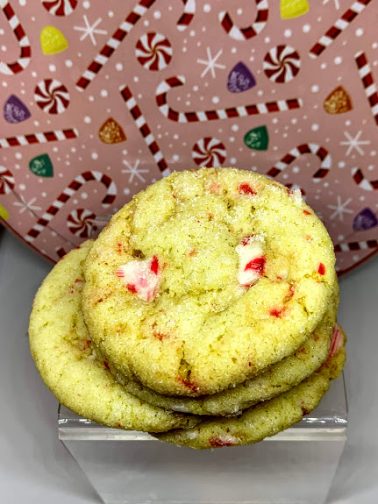
Candy Cane Sparkle Cookies, YUM!

Every Christmas has to include the three big Christmas flavors: Egg Nog, Gingerbread, and Candy Cane. Here is a sugar cookie made with crushed candy canes. The cookie is delicious! The candy cane flavor is not overpowering, it’s just right. The cookie is slightly chewy from the crushed candy canes, and yes, the cookie sparkles from the sugar.

Candy Cane Sparkle Cookies

  • 3/4 cup sugar
  • 1/2 cup butter, softened
  • 1 egg
  • 1/2 teaspoon vanilla extract
  • 1/4 teaspoon mint extract
  • 1 2/3 cup all purpose flour
  • 1 teaspoon cream of tartar
  • 1/2 teaspoon baking soda
  • 1/2 teaspoon salt
  • 1/2 cup crushed candy canes or peppermint candies (about 7 full sized candy canes or a 6 oz box of mini candy canes), divided use
  1. Preheat oven to 350 degrees. Line cookie trays with parchment paper.
  2. Crush candy canes (I place in a Ziploc bag and whack with a rolling pin, effective, but not very environmentally friendly. I have to find a better way)
  3. Combine sugar and butter in bowl of electric mixer and mix well, for 3-5 minutes or until light and fluffy.
  4. Add egg, vanilla and mint extracts to butter and sugar mixture. Mix well to combine.
  5. In a different bowl whisk together flour, cream of tartar, baking soda and salt.
  6. Slowly add flour mixture to butter-sugar mixture, combine well, on low speed of the electric mixer.
  7. Slowly add 1/4 cup crushed candy canes to cookie mixture. Stir only until combined.
  8. In another bowl combine 1/4 cup sugar and remaining 1/4 cup crushed candy canes.
  9. Shape dough into 3/4 inch balls (I use a small cookie scoop) and roll in the sugar-candy cane mixture.
  10. Place balls on parchment-lined cookie sheet, about 2 inches apart. Press down lightly on each cookie to flatten slightly. Sprinkle each cookie with a few of the remaining, larger pieces of the crushed candy canes.
  11. Bake cookies for 8-10 minutes at 350 degrees. Cookies should look cooked but not browned when removing them from oven.
  12. Let cookies cool for a minute or two on cookie sheet, then move to a wire rack to cool completely.

Makes approximately 3 dozen cookies.

07 Nov 2019 Paddington Cookies (Marmalade Bars)
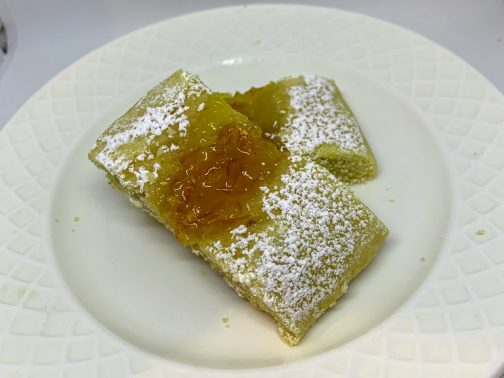
Marmalade Bars, Paddington Bear’s favorite.

What rock have I been hiding under? Up until a few hours ago, I had no idea that Paddington Bear loves marmalade. A quote from Paddington Bear himself,  “A wise bear always keeps a marmalade sandwich in his hat in case of emergency.”

My enlightenment came when I offered one of these cookies (previously known as “Jam Slices” to my daughter). My daughter took one bite and said, “The kids (my grandkids) will love these.” Whaaa? I gave her my ‘You’re crazy’ look and deadpanned “They have marmalade on them”.  She then gave me her ‘You’re crazy’ look and said, “They love Paddington Bear and Paddington Bear loves marmalade. They’ll love these cookies.”

It was not on my radar that Marmalade might make a comeback by way of the children of Millennials! With high hopes, I quickly renamed these cookies “Paddington Cookies”! I hope that they are a hit with the younger set as well as the older set.

The original recipe is from The Food Network’s “Holiday Cookie Cookbook”. I made two changes to the recipe and refined the method, so the FN’s “Jam Bars” are now much improved and have a much cooler name.

Paddington Cookies (Marmalade Bars)

  • 2 cups (250 grams) all-purpose flour
  • ½ teaspoon baking powder
  • ¼ teaspoon table salt
  • 1 ½ sticks (12 tablespoons/6 oz) unsalted butter, at room temperature
  • ½ cup + 2 Tablespoons sugar
  • 1 large egg, lightly beaten
  • 1 teaspoon vanilla
  • Finely grated zest of one orange
  • 4 to 6 tablespoons marmalade
  • A few tablespoons powdered sugar
  1. Line 2 baking sheets with parchment paper and preheat oven to 375 degrees.
  2. Whisk the flour, baking powder and salt in a medium bowl and set aside.
  3. Beat the butter and sugar in a large bowl with a mixer on medium-high speed until light and fluffy, 3 to 5 minutes.
  4. Beat in the egg, then the vanilla and orange zest.
  5. Reduce the mixer speed to low; add the flour mixture and beat until just combined (the dough will be very soft and a bit hard to work with in the next step).
  6. Divide the dough into 4 pieces and put 2 pieces on each prepared baking sheet. Shape each piece into a 12-by-1-inch log, about 3 inches apart.
  7. Using the handle of a wooden spoon, press a 1/2-inch-deep indentation down the middle of each log. Refrigerate until firm, about 30 minutes.
  8. Scoop the marmalade into a piping bag or into the corner of a Ziplok bag. Cut the corner of the bag off. Slowly squeeze the marmalade out of the bag, carefully filling the indentations. If you need more marmalade, no problem. Just refill bag and pipe onto cookies as needed.
  9. Place pans in preheated oven and bake until golden brown, 20 to 25 minutes.
  10. Let bars cool completely on the baking sheets, then transfer the logs to a cutting board and slice crosswise into 1-inch-wide cookies.
  11. Dust with powdered sugar

Thanks for stopping by my kitchen today!

03 Jul 2019 Italian Butter Cookies

Italian Butter Cookies

I love these cookies. Not the ones in the package. Not the ones from the bakery. These cookies. Made at home. With butter.

I’m sure you’ve all seen these cookies. I swear they are in every bakery and often overlooked because they look at bit plain and basic, and even, in some bakeries, a bit dry and floury. The cookies often appeal to kids though, probably because of the rainbow sprinkles.

This cookie will appeal to kids and grown ups, because it’s not floury, it’s not dry. It’s very buttery and very vanilla and very delicious.

The cookie is pretty straightforward, made from everyday pantry staples plus a package of rainbow sprinkles, but putting the cookies on the baking tray does require a piping bag and tip. It’s an extra step and extra clean up, but it’s not an Italian Butter Cookie without it. The other tricky part is knowing when to take the cookies out of the oven. Do not overbake or underbake. Watch the cookies carefully, look for a very light golden browning So deep breath, you can do it! The results will be worth it.

1 cup unsalted butter, at room temperature (2 sticks)

1 cup sugar

1 teaspoon salt

1 tablespoon vanilla extract

1 tablespoon milk

1 egg, at room temperature

2 ½ cups all purpose flour (313 grams)

½ teaspoon baking powder

Rainbow sprinkles

  1. Preheat the oven to 350 degrees F. and line baking sheets with parchment paper.
  • With an electric mixer, combine the butter, sugar, salt, vanilla and optional lemon or almond extracts.  Beat at medium speed until fluffy, 3-5 minutes.
  • Beat in the egg and milk and combine thoroughly.
  • Mix the baking powder into the flour and then slowly add the flour mixture to the butter-sugar-egg mixture. Beat until a dough forms.
  • NOTE: This dough should be piped right after it’s mixed.  Don’t let it rest for too long or refrigerate, as the dough will become stiff and more difficult to pipe.  If the dough does become too stiff to pipe, add a few drops of milk to loosen it. Fit a pastry bag with an extra-large French or open star pastry tip.  Fill the bag with half of the dough.
  • Pipe the dough into rounds about 2-inches in diameter.  Space the cookies about 1-1/2 inches apart as they do flatten and spread slightly. 
  • Sprinkle cookies rounds with rainbow sprinkles.
  • Bake the cookies for 15-17 minutes, or until they are light golden brown on the very edges and have very light brown bottoms! This is the hardest part of making this cookie: do not under bake the cookies and do not overbake. Do not allow cookies to brown beyond a very light golden brown on the outside edges and bottoms.
  • Cool the cookies on the baking sheets for 5 minutes before transferring them to a wire rack to cool completely.
  • Depending upon size, makes 24-36 cookies. I’ve started doubling this recipe. (Cookies freeze well.)
31 May 2019 Madelienes

Madeleines. What are they anyway?  Almost a cookie but really a slightly dry cake?  Yes, that’s right! No frosting? Nope, but they are often dusted with powdered sugar… No caramel swirl? Never! No bits of chocolate? Not usually… And what’s with that lump on the back? Gotta have a lump in the back! Sooo…, what’s the big deal? Madeleines are super plain, super dry, and super yummy, I love them! Madeleines are popular tea cakes in cafes around the world. The world loves them!

Madeleines are French tea cakes, but thought of as a cookie, and are instantly recognizable with their scalloped shell shape that is ribbed on one side and smooth, but with a hump, on the other. Direct from the oven these buttery cakes have wonderfully crisp edges, tender crumb and are best eaten right away, although they will keep in a tin on the counter for 3-4 days. A dusting of powdered sugar is all that they really need, although some brush still warm Madeleines with a tangy lemon glaze.  Starbucks dips tips of their Madeleines into chocolate.

Madeleines are quite easy to make, but you’ll need to purchase scalloped Madeleine molds to get started. The molds are available in different sizes and materials, but you’ll probably find non-stick pans to be the easiest to use.

I have tested out many recipes over the years.  This one is from Epicurious, but with changes to cooking times, method, and ingredients (I doubled the lemon zest, upped the vanilla, added in some baking powder, reduced the oven temperature and reduced the baking time).

The recipe below makes 24 Madeleines.

Madeleines

  • 2 large eggs
  • 2/3 cup sugar
  • 1 1/2 teaspoons vanilla
  • 1 teaspoon grated lemon zest (usually from one medium lemon)
  • 1/8 teaspoon salt
  • 1 cup (125 grams) all purpose flour
  • 5 oz (10 tablespoons, 1 1/4 sticks) unsalted butter, melted and cooled slightly (plus extra to brush in molds)
  • Powdered sugar
  • Extra melted butter to brush on pans
  1. Preheat oven to 350 degrees.
  2. Brush each madeleine mold with melted butter (use the additional butter, not the 5 oz needed for the batter!)
  3. Beat eggs and sugar with electric mixer just to blend
  4. Beat in vanilla, lemon zest, and salt
  5. In another bowl, whisk flour with baking powder and salt and then add gradually to butter-sugar-egg mixture.
  6. Gradually add melted and cooled butter to mixture, beating with electric mixer just to blend
  7. Spoon 1 tablespoon batter into each buttered madeleine mold
  8. Place in preheated oven and bake for 9-10 minutes or until edges are slightly browned and there is a visible hump in the middle of each madeleine.
  9. Remove from oven and let cool in pan for about 5 minutes before removing to a cooling rack to cool completely.
  10. Repeat with remaining batter. Recipe makes 24 standard sized madeleines
  11. When cool, dust with powdered sugar. If necessary dust with powdered sugar again just before serving.

Note: Batter can be made one day ahead. Refrigerate batter and baked on day two.

Variation: replace lemon zest with orange zest and add 1/8 – 1/4 teaspoon ground cardamom to the flour mixture.

Thanks for stopping by my kitchen today! I hope you find someone wonderful to share these special treats with 🙂