Tag-Archive for ◊ Fall ◊

03 Oct 2013 Butternut Squash : Little Pieces of Heaven

squash01

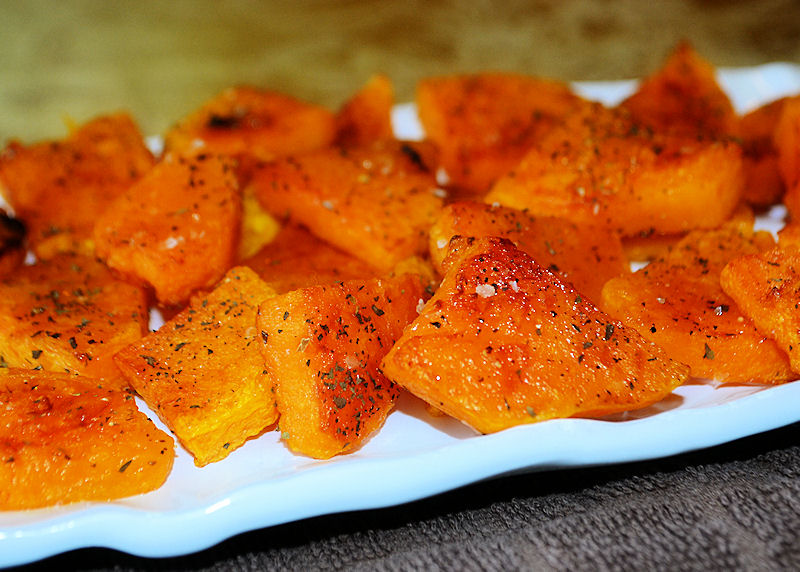
No one ever makes this recipe when I suggest it to them, EVER.   The recipe is just so…, so, …odd.  Mere mortals can’t put the ingredients together in their head and have any idea about how GOOD butternut squash tastes when cooked like this.  For years I’ve been banging my head against a wall trying to promote this recipe. I have submitted this recipe to two community cookbooks, and no one ever called to say how wonderful the recipe was, so I know no one tried it. My family loves this, of course.  These little pieces of heaven never make it to the table to be served with any meal.  We just crowd around the pan and eat it hot from the oven, elbowing out anyone who gets in our way.  I guess I could promote this recipe as our “Family’s Favorite  Secret Recipe”, one that we are now sharing with the world.  That might be more of a selling point than “No one ever makes this recipe when I suggest it to them, EVER”!

Anyway, I thought I found this recipe, a long, long time ago, in Jeffrey Steingarten’s book, The Man Who Ate Everything, but looking through the index now on Amazon I don’t see any mention of it in the index, or in the index of his other book, It Must Have Been Something I Ate. Now I am stumped, but I am still going to credit him for the recipe because I am pretty sure that’s where I found it, at least I think I am sure… I would have liked to have dreamed this up myself!  I would like to think I have a palate creative enough to roast some squash pieces, then sprinkle them with a little red wine vinegar and dried mint resulting in these Little Pieces of Heaven (really, they are just that) but I am fairly certain it didn’t happen that way…

Butternut Squash : Little Pieces of Heaven

  • 1 butternut squash
  • 2 tablespoons olive oil
  • 1 tablespoon melted butter (or an extra tablespoon olive oil)
  • a pinch of Kosher or other coarse salt (if you only have table salt, that’s fine too)
  • a pinch of black pepper
  • 2-3 teaspoons Red Wine Vinegar or Raspberry Vinegar
  • a pinch of Dried Mint
  1.  Preheat oven to 425 degrees.  Put rimmed baking sheet in oven to preheat, too.
  2. Peel and seed the squash.  Cut squash into bite sized pieces. (I like to slice the squash into rounds, or half circles, and then cut those larger slices into triangular shaped wedges.)
  3. Put the squash pieces into a large Ziploc bag or a bowl.  Add olive oil and optional melted butter and toss well.
  4. Remove hot tray from oven.  Pour oil coated squash pieces onto the hot tray and immediately place in hot oven.
  5. Bake for 10 minutes.  Check.  If the undersides of most of the pieces are slightly browned, remove tray from oven and turn pieces over.  (I do this one at a time with a fork.)  If the undersides are not yet browned.  Continue to bake for another 2-5 minutes, then remove from oven and turn pieces over.
  6. Return pan to hot oven.  Bake for another 7-12 minutes.  When the second sides are slightly browned and the squash looks cooked, remove pan from oven. You need those chewy browned edges for this dish to be spectacular.  If you are not getting them, broil the squash for a bit! (But don’t overcook the squash…) With this step, remember that cooking is an art, not a science.  You might have to adjust baking times/method to fit the strengths/weaknesses of your oven, the age of your particular squash and the size of the pieces you cut.
  7. After removing the pan from the oven, immediately sprinkle hot squash with vinegar (I put my thumb over the bottle top of the vinegar, and then shake a bit of vinegar onto the squash)–not too much–then sprinkle with coarse salt, a bit of black pepper and a sprinkling of dried mint.  Eat (or remove to a serving plate and then eat)

Thanks for stopping by my kitchen today!  Oh, look what came out of my garden, ten butternut squash from 2 plants! The missing squash is in the picture above 🙂  I’m quite pleased with my bounty.  BTW, if you still have tomatoes left, be sure to make my Fresh Tomato Lasagna as a final farewell to your Summer garden.

24 Jun 2013 Crab and Brie Macaroni and Cheese

Crab and brie mac n cheese

Whooooa Nelly!  Crab and Brie Macaroni and Cheese?  Over-the-top decadence in a comfort food?  YEP! And the decadence makes the comfort food even more comforting–like ‘died and gone to heaven’ comforting!  Yet another winning recipe from Better Homes and Gardens Special Interest Publication “Best Loved Reader Recipes; 125 Winners from 1930 to Today”. (My last post was a recipe for “Peach Iced Tea” inspired by a recipe from this magazine)

If someone is having a hard time, and that sweet “I am going to drop off a casserole” American tradition seems appropriate, THIS is the casserole to take.  I took it to my 120-miles away daughter who is bravely attempting a semester long college Physics course in a six-week summer session, working the 4 PM-midnight shift at Target, and sweltering in the hot central valley heat. I am not saying this Macaroni and Cheese is miraculous or anything, but she did  score 15 points over the class average on her first mid-term. Not dropping off a casserole to a friend-in-need anytime soon?  I’ll bet you’ll be going to a potluck then. Take this!  Want to eat it at home, like we did?  We had it with mixed roasted veggies, but a leafy green salad would be nice too, and a corn muffin.

This casserole is not cheap, but if you shop at Costco for your pound of brie and pound of crab (the only two expensive ingredients), it won’t break the bank and you’ll have made a casserole big enough feed a small army.

Truth be told, I was a bit afraid of this recipe at first, wondering if the Brie would be too strong, and wondering if I would be able to taste the crab over the brie.  Both worries proved needless.  Everything melds together nicely.  Comfortingly nice.  I’ll say it again, because it’s true, ‘died and gone to heaven’ nice!

I changed the recipe just just a bit; one, to conform to the quantities of crab and brie sold at Costco (no leftover bits and no need to buy two big cartons of anything) and two, to make the recipe a bit easier by  substituting panko instead of homemade bread crumbs. I also re-wrote the recipe a bit, making roux is not hard, just follow my instructions: brown the flour and butter (and don’t skimp on the butter), remove the pan from the heat, then vigorously stir in hot milk until sauce is smooth.

Enjoy your comfort food decadance.

Crab and Brie Macaroni and Cheese

  • 1 lb. dried macaroni (small shells or elbows)
  • 1 medium onion, chopped
  • 5 tablespoons butter (maybe a bit more)
  • 3 cups milk (I used 2%)
  • 1/3 cup all-purpose flour
  • 1 teaspoon salt
  • 1/2 teaspoon black pepper
  • 13-16 oz. Brie, cubed
  • 16 oz. refrigerated container crabmeat, drained and flaked
  • 1/2 cup Panko or favorite breadcrumbs
  1. Cook macaroni in salted water according to package directions.  (Choose the shortest cooking time since pasta will continue to cook when baked.) Drain and set aside.
  2. Preheat oven to 350 degrees. Grease a 9-in by 13-in casserole dish.
  3. In a large skillet over medium-high heat, saute onion in butter until tender and golden, about 15 minutes.  (Do not skimp on the butter.  You’ll need the full quantity of  butter to make the roux in the step 5.)
  4. Heat 3 cups of milk in microwave until hot (3-5 minutes).
  5. Meanwhile, over medium heat, stir flour into onion and butter mixture.  Stir constantly for 3 minutes (to cook flour and to incorporate butter into the flour).  If mixture is too lumpy or dry, add an additional tablespoon of butter.
  6. Remove hot pan with onion and roux from heat.  Pour in 1 cup of hot milk.  Stir well, and keep stirring-vigorously if needed-until mixture is smooth and lump free.  Add another cup of hot milk, stir and mix again.  When mixture is smooth and lump free, repeat with last cup of milk.
  7. Return pan to medium heat. Add cubed brie to sauce in pan.  Stir constantly until brie is melted and incorporated.  Remove pan from heat when brie has melted and the sauce is smooth once again.
  8. Fold drained crab into cheese sauce then stir in cooked and well-drained macaroni.
  9. Season with salt and pepper.
  10. Pour crab-brie-macaroni mixture into a well buttered 9-in x 13-in casserole dish.
  11. Sprinkle bread crumbs over top of macaroni and cheese.
  12. Bake in preheated 350 degree oven for 30 minutes or until mixture is heated through and bread crumbs have browned.  If breadcrumbs don’t brown, turn on the broiler and broil casserole for a few minutes.
  13. Remove casserole from oven. Let cool 5 – 10 minutes, then serve. In a bowl, while curled up on the couch with a good book or good movie, or on a plate with roasted veggies or a salad, and maybe a small corn muffin. Enjoy.  Feel better. Ace the Physics test!

Leftovers can be reheated in microwave or frozen for a future treat.

Thank you for stopping by my kitchen again today,  I love having you drop by!  Let’s see what else I can make from this magazine. It’s supposed to be on the shelves until July 15, 2013, so if you see it, you might want to pick up a copy.

27 Nov 2012 Mini Apple Pies

I hear mini pies are all the rage now. Bye-bye cake pops and chocolate with bacon, hellooooooo mini pies!  Here’s a great recipe with which to start.  Having made this recipe a few times, I now know a few things things about mini pies.  1.  The filing needs to be seasoned more than that of a regular pie 2.  The filling needs more “syrup”.

At first, I questioned this recipe; why put that much flour into the filling (I thought would taste, well, flour-y, and, having baked many a pie before, I was sure cornstarch or tapioca would be a better choice) and HOLY MOLY, I like cinnamon but a heaping tablespoon of cinnamon to 8 cups of apples?  In a weak moment, I did something completely out of character,  questioning the recipe all the way to the taste test,  I baked it,  “as is”.   (Did ya faint?!)

The recipe worked beautifully!  The filing is not flour-y nor is it too cinnamon-y. The recipe works because the extra flavor and the extra syrup is needed  in order for the filing to stand up to extra crust of a mini pie!  Well, of course!

I made these Mini Pies for the 22 members of my Dining For Women group who came to my house for a meeting last night.  I lost count of how many people asked me for the recipe, so that has prompted me, at long last, to post another recipe.

I found this recipe at Little Bit Funky.  There are lots of nice, helpful pictures posted there.  The picture showing the size of the cut apples is especially helpful (dice don’t slice!).

Mini pies are great to take to potlucks.  No knife or pie slice needed to serve.  No plate or fork needed to eat (just pick the mini pie out of the cupcake liner and bite! If there are any crumbs, a well placed cupcake liner catches them), and no one seems to even think of wanting whipped cream or ice-cream with mini pie. Whooo HOOOO!

 Mini Apple Pies

  • 8 cups of chopped fresh apples (I like granny smith or pippin mixed with jonagold or golden delicious…but in a pinch I use whatever I can get my hands on), diced to about ½” by ½” by ½”.
  • ¾ cup of all-purpose flour
  • 1 ½ cups sugar (yes, it’s a lot, but again, the extra syrup is needed)
  • 1 heaping tablespoon ground cinnamon
  • ½ teaspoon ground nutmeg
  • 4 tablespoons butter, cut into 24 small chunks
  • 2 boxes Pillsbury pie crusts (that’s 4 crusts), or if you are fabulous, 2 recipes of homemade pastry
  • a tiny bit of milk, cream or half-and-half
  • a tiny bit of white or raw sugar
  • decorative cupcake liners to display and serve, if desired

 Instructions

  1. Preheat oven to 400° F.
  2. Unroll the pie crust and cut to fit into the bottom of 24 cupcake tins (no need to spray or line the tins).  I used a 3 ¼” round cookie cutter, but the ring from a mason jar, and probably a ring made from a well washed tuna can with the top and bottom removed would work too.  Save the pastry scraps to re-roll for the top crust.
  3. Refrigerate the dough in the tins while you prepare the apples.
  4. Peel,  core, and dice the apples.
  5. Pour prepared apples into a large bowl and completely coat with the flour, sugar, cinnamon and nutmeg.
  6. Remove the pie crusts from the refrigerator.
  7. Divide the apples between the 24 bottom crusts.  You should have enough apple filling to “mound” into the pie crust.
  8. Top each mound with a piece of butter.
  9. Re-roll the leftover pastry and cut circles (or shapes if you want to get fancy) to form the top crust.
  10. Use you fingers to press the top crust into the bottom crust.
  11. Brush each top crust with a bit of milk, half-and-half, or cream and then sprinkle with sugar.
  12. Bake in a preheated 400 degree oven for 20-25 minutes  (check at 20 minutes, then every 2 minutes after that until the pies are perfectly browned).
  13. Cool in pans.  You should have no trouble removing the pies from the cupcake tin.  I like to put each pie into a decorative cupcake liner at this point.

Enjoy!

I have made mini mincemeat pies for years, but now I have another mini pie to add to the platter for all the mincemeat haters of the world! (BTW, in my experience, mincemeat haters are usually people who have never even tried mincemeat).  If there is a loud ruckus from the mincemeat lovers out there I just might share my recipe for mini mincemeat pies (with my personal secret ingredient) in another post!

Happy baking!  Thanks for stopping by my kitchen today (I’ve missed you…)


01 Sep 2012 Banana Pancakes with Caramel Syrup

Hmpfff…, just got through looking at the two hundred and seventeen pictures of a recent bride’s Hawaiian honeymoon.  As one of her friends commented, “The envy hurts”!  I went to Hawaii once.  I did.  It was with my kids’ swim team.  I forget exactly how many 8 – 14 year old’s were on that trip, but it was over a hundred. And a handful of chaperones and coaches. I sure know how to vacation in Hawaii.  NOT.

This morning I was inspired, by the aforementioned 217 pictures, to bring a bit of Hawaii to the breakfast table.  One of the few things I remember about my trip to Hawaii, aside from the twelve year old climbing from one balcony to another–yes, balconies on the outside of the building, outside of  the eighth floor no less–were the breakfasts.  Most mornings we had sushi from the ABC store, and I know most of you won’t relish that,  but one morning, I think it was the last one, we had some wonderful coconutty-banana pancakes.  I think by this time we had locked the kids in their rooms, turned on the TV, handed them a box Twinkies, and thrown away the keys. Yes, I am pretty sure it was an adult only breakfast that morning…

Yep…, transported to the tropics with banana pancakes!  If I had sprinkled the top of the pancakes with a bit of toasted coconut or some diced macadamia nuts I could have been transported even closer to the tropics. These pancakes raise high and are wonderfully light.  The syrup is as sweet as maple syrup, but with a lovely caramel flavor that really makes the pancakes shine.  I found this recipe on epicurious.com (love that site).  I shared these pancakes with one of the kids who went on the trip with me.  She’s almost all grown up now, but I will always remember how she loved Hawaii 🙂 Ohhhh, OK, I do have many wonderful memories of a vacation in Hawaii…

A few notes on this recipe.  If you don’t have self-raising flour, add 1 tsp of baking powder and 1/2 tsp salt to each cup of flour and to make your own homemade self-raising flour.  Don’t have buttermilk?  Stir 1 T lemon juice or 1 T. white vinegar into each cup of milk and let sit for 5 minutes; but next time you are at the store, buy two buttermilk cartons, one to use now and one to store in the freezer for next time (never run out of buttermilk).  Buttermilk powder is also a nice ingredient to have on hand (available on the baking aisle of most larger supermarkets), use as directed. The last option is to substitute yogurt (vanilla, plain, greek, banana) mixed with a little milk until the mixture has a thick pouring consistency for the buttermilk.

Don’t want to go to Hawaii?  Want to go down South?  Substitute peaches for the bananas, and add bourbon to the sauce, and throw some diced pecans over the tops of the pancakes!

Banana Pancakes with Caramel-Banana Syrup 

3 large bananas, peeled, divided use

1/2 cup (1 stick) butter, melted, divided use
3/4 cup (packed) golden brown sugar, divided use
1/4 cup water
1 teaspoon vanilla extract (or rum)
2 cups self-rising flour
2 cups buttermilk
2 large eggs
toasted coconut, diced macadamia nuts or pecans, optional

Whisk flour 1/4 cup brown sugar in large bowl. In another bowl mash one banana, then stir in buttermilk , eggs, and 1/4 cup melted butter.  Pour the banana mixture over the dry ingredients (some lumps will remain). Heat griddle over medium heat; brush with melted butter or spray with a cooking spray.  Pour batter by 1/3 cupfuls onto griddle. Cook pancakes until golden, about 2 minutes per side. Transfer pancakes to baking sheet; and place in 200 degree oven to keep warm, if desired.

Combine 1/4 cup melted butter, 1/2 cup light brown sugar, and 1/4 cup water in a saucepan. Bring mixture to boil over medium-high heat, and simmer until mixture thickens slightly, about 2 minutes. Slice 2 bananas into 1/4-inch-thick rounds and add to syrup along with vanilla extract. Remove syrup from heat and let sit while you finish cooking pancakes.

Serve pancakes with caramel-banana syrup, and toasted coconut and/or chopped nuts for sprinkling on top of hot pancakes.

Aloha! Thanks for stopping by my kitchen today!