Archive for the Category ◊ Seasonal ◊

01 Jun 2013 Lemon Ice Cream

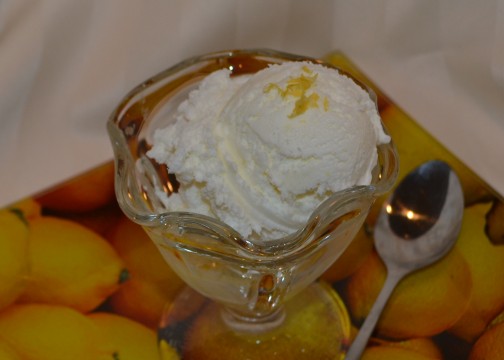
lemon ice cream closer

Bet you’ve never had Lemon Ice Cream!  Not lemon sorbet, or lemon sherbet, or lemon granita  or lemon frozen yogurt,  but lemon ice cream–creamy, rich, sweet, intense  lemon ice cream. Intrigued?  Tempted? I hope so, because I have a simple, oh-so-good recipe for you.  You do have an ice cream maker, right?  I use a “frozen bowl” ice cream maker, which seem to be everywhere for $40-$50 now, but sometimes you can get lucky.  This weekend my friend Sharon bought one at a garage sale for $5, and I saw one at  Savers for $12.99.

Homemade ice cream is very, very rich, and Lemon Ice Cream is no exception.  Serve small scoops (with an option for seconds, of course).  This recipe makes a quart of ice cream, richer and more filling than even the most premium commercial ice creams.  One quart of this ice cream will serve as many people as a half gallon of that store bought stuff.

I like to serve this ice cream on fruit pie, crisps and cobblers. My friend Sharon, whom I mentioned above, bought her ice cream maker after I fed her berry crisp with a scoop of this lemon ice cream.  This ice cream is also fantastic as a filling for an ice-cream sandwich.  To make a truly gourmet ice cream sandwich place a small scoop of Lemon Ice Cream between two ginger cookies, squish the sandwich a bit, square the filling up a bit, maybe roll the sides in a bit of chopped chocolate-milk, semi-sweet or white, then put the little bites of heaven in the freezer to firm up.   My pregnant daughter likes to eat  Lemon Ice Cream “as is” straight from a glass bowl with a long spoon.  She downed the sample above in one breath (at 9 o’clock in the morning one week before her due date!).

This recipe was first published in Gourmet magazine in 1999.  I’ve been making it since May 25, 2003.  Yes, I marked the date on my copy of the recipe, with this note, “Delicious and simple!”  “Simple” was written in caps and underlined twice!

Lemon Ice Cream

1 large lemon (zest plus 1/4 cup freshly squeezed lemon juice)

1 cup granulated sugar

1 cup cold milk (I usually only have 2% at home, so that’s what I use)

1 cup well chilled heavy cream


With a vegetable peeler or microplane remove the zest from the lemon, do NOT include any of that bitter white pith in with the zest.  Put the sugar and the lemon peel in a food processor or blender and whirl until the sugar is finely ground and the lemon zest has been incorporated into the sugar. Add in the milk and the cream (On occasion, I have used 2 cups half-and-half instead of the milk and cream mixture).  Blend just to combine.  Stir in 1/4 cup freshly squeezed lemon juice.  Process in ice cream maker for about 20 minutes.  Place soft ice cream in a freezer safe bowl, and set in freezer to harden up a bit (a few hours).  Ice Cream will keep at least a week, if not more, in the freezer but I doubt you will have to test the outer limits.

Thanks for stopping by my kitchen today!  Looks like the next few days are going to be scorchers.  Stay cool. Squeeze lemons. Make ice cream. By the way, I think the picture above is one of the best so far for this blog.  My webmaster, Ratty, fixed it up real nice, didn’t she?

Print Friendly, PDF & Email
15 Oct 2011 Pumpkin Spice Coffee

It took two years, but FINALLY, I have a Pumpkin Spice Coffee recipe that is delicious and…, wait for it…, better (yes, BETTER!) than Starbucks’ Pumpkin Spice Latte!  I don’t make this assertion casually.  I had taste tests.  With friends.  Eleven taste testers.  This Pumpkin  Spice Coffee won over Starbucks’ Pumpkin Spice Latte.  The coffee was made with an easy, homemade Pumpkin Spice Syrup. I found the recipe at Budding Baketress (after been tipped off by Foodgawker)!  Thank you, thank you! I made no ingredient changes, I just refined the method.

Now about the taste tests.  We tested a Starbucks Pumpkin Spice Latte, a Latte with Torani Pumpkin Spice syrup, a Latte with this Pumpkin Spice syrup, and coffee with this Pumpkin Spice syrup.  The hands down winner? The COFFEE with this homemade syrup!  The COFFEE!  The Torani syrup Pumpkin Spice Latte was set aside immediately.  Yuck. There is something in that syrup that was just NOT good.  I poured the bottle down the drain.  I wasn’t go to try it in anything else, and I wasn’t going to pass it on to anyone.  I was hoping we would find something close to the Starbucks Pumpkin Spice Latte (because I love, love– correction–loved, Starbucks’ Pumpkin Spice Latte, but after the taste test…the Starbucks version was set aside, TOO!  BTW, have you ever looked at the Starbuck’s Pumpkin Spice Latte?  Taken the top off,  eaten the whipped cream and looked? There is some nasty orange slime floating on top of the latte which is not at all appetizing….but even if there were no slime, homemade Pumpkin Spice syrup would win anyway.  YES, it’s true, bye-bye Starbucks!

Next in our taste testing,  we tried this homemade syrup in a latte, and then in coffee.  The coffee won!  We liked the stronger coffee flavor to compliment the complex pumpkiny-spicy deliciousness.  What a HUGE surprise!

Here is the recipe for the Pumpkin Spice Syrup, and the recipe for a batch of Pumpkin Spice Coffee which can be made to serve at parties, meetings or family get-togethers this fall,.  Of course, the syrup can also be used on a one cup of coffee at a time basis.  I have included directions for all three below.

Pumpkin Spice Syrup for Coffee

  • 1/3 cup pumpkin puree (fresh or canned)
  • 1 cup sugar
  • 1/2 teaspoon vanilla
  • 1 teaspoon cinnamon
  • 1/2 teaspoon nutmeg
  • 1/4 teaspoon cloves
  • 1/4 teaspoon ground ginger
  • 1 1/4 cups water
  1. In a small saucepan, combine pumpkin puree with vanilla and spices.  Stir well to combine.  Add in water, stir well.
  2. Bring pumpkin mixture to a boil. Reduce heat to medium, and simmer, stirring occasionally until it becomes syrup-y and begins to coat the spoon (about 10-15 minutes).
  3. Remove from heat. Cool. Then refrigerate until needed.

To make a batch of Pumpkin Spice Coffee

  • 1 cups of syrup
  • 2 cups of milk
  • 4 cups of very strong, hot, coffee
  • whipped cream, optional
  • sprinkles or ground nutmeg, optional
  1. While the coffee is brewing, heat milk with syrup.
  2. Blend with an immersion blender (or in a blender, or with a whisk).  Can be made ahead and refrigerated until ready to use.  Re-heat and re-blend then continue as directed below.
  3. Stir hot coffee into milk-pumpkin syrup mixture.  (I usually blend a bit more at this point, but it’s probably not necessary).
  4. Pour into cups.  Top with whipped cream, and maybe some sprinkles or ground nutmeg, if desired.  MMMMMMm (You can set a small pitcher of extra syrup out in case some people like a stronger/sweeter Pumpkin Spice Coffee).
  5. Makes approx. 6 servings.

To make one cup of Pumpkin Spice Coffee

This is up to you! Start with a cup of strong, hot coffee.  Stir in 1-2 T. pumpkin syrup, to taste.  Add hot milk, or 1/2 and 1/2 or whipping cream…what appeals to you?  Stir well.  If desired, top with some whipped cream and some ground nutmeg or sprinkles. Remaining Pumpkin Spice Syrup can be stored in the refrigerator.

Thanks for stopping by my kitchen today, and not by Starbucks!  You’ll find it cheaper to make your Pumpkin Spiced Coffees at home. And you might be surprised by how much better they taste, too! I was, and I am a loyal,  long time Starbucks aficionado.

Print Friendly, PDF & Email
04 Sep 2011 Sparkling Watermelon Lemonade

Last family BBQ of the season?  I wish I had posted this recipe as a season opener so that we could have had enjoyed this drink throughout the summer, but at least it is posted in time for the last BBQ of the summer. So toast the summer good-bye and pack away the white shoes with a glass of this sparkling Watermelon Lemonade.

This is  a summery, refreshing drink that’s lightly bubbly. No artificial colors, no artificial flavorings, no preservatives; just all natural ingredients! (…and it will use up all of that H-U-G-E watermelon you just bought!  My local grocery store had BIG ‘UNs for $2.49 yesterday.  How could I resist? Now, with this recipe for Watermelon Lemonade, none of that BIG ‘UN is going to waste!)

You could easily use this recipe and make a watermelon concentrate to freeze for future use.  Just mix the watermelon puree, the lemon juice, and the simple syrup, stir to blend. and then freeze (a quart Ziploc bag would work fine).  When ready to serve remove concentrate from freezer, defrost, add water and sparkling water, and stir until blended.

The kids are going to love this.  In fact, I think it will be their favorite. Go ahead and make some concentrate.  You know there is going to be a kid oriented event in the next few weeks.  Better to serve them good-for-you Watermelon Lemonade than a can of fizzy artificial flavorings and colorings.

This recipe has a long pedigree.  I found it here, http://traceysculinaryadventures.blogspot.com/2011/07/watermelon-lemonade.html (Tracey has posted a much better picture of the Watermelon Lemonade), where it was adapted from from Smitten Kitchen who adapted it from  Bubby’s.  I added the recipe for 8 servings  (why not make a pitcher  full?) and changed the ratio of bubbly water to straight water. You could make either version with all still water, or with all bubbly water.  Do what suits you. Make this recipe yours! Enjoy!  Here’s look to next summer, when we can have glass after glass after glass of this Sparkling Watermelon Lemonade.

Sparkling Watermelon Lemonade

For two glasses:

  • 1/4 cup freshly squeezed lemon juice (usually one lemon)
  • 1/2 cup fresh watermelon puree (Put cubes of seedless watermelon in blender and whirl until smooth.  Strain to remove seeds and pulp. )
  • 3-4 tablespoons simple syrup (recipe below, make first and let cool!)
  • 1/2 cup cold water
  • 1/4 cup sparkling water

Add all of the ingredients to a small pitcher and stir to combine.  Divide between two glasses and serve over ice.

For Eight Servings:

  • 1 cup freshly squeezed lemon juice (4-5 lemons)
  • 2 cups fresh, strained watermelon puree (about 1/2 a medium watermelon)
  • 1 cup simple syrup (recipe below, make first and let cool!)
  • 1  1/2 cups cold water
  • 1  1/2 cups sparkling water

Add all of the ingredients to a small pitcher and stir to combine.  Pour into ice filled glasses and serve.

Simple Syrup:

To make the simple syrup: Combine equal parts water and sugar in a small saucepan and bring to a simmer, stirring occasionally.  (1/4 cup of sugar and water for 2 servings, 1 cup of sugar and water for 8 servings). Continue simmering until the sugar has dissolved.  Turn off the heat and let the syrup cool to room temperature.  Leftover syrup can be stored in the refrigerator for up to one month.

Thanks for stopping by my kitchen today.  I hope I’ll be back cooking up a storm tomorrow.  Fingers crossed, I’ll see you then!

Polly


Print Friendly, PDF & Email
28 Jun 2011 Grilled Vegetable Platter

I love veggies, as long as they are cooked.  If they are grilled, even better.  I started grilling veggies a few years back.  I just sliced and grilled.  Except for loosing a significant number of veggies through the grill, they worked out great.  I grilled carrots, zucchini, asparagus, onions and sweet potatoes.  Now I am working on fancier grilled veggies; a little marinade, a little glaze, grill marks…

Last week I received an email, “Top Ten Recipes of June 2011”.   This email came from Taste of Home magazine.  I am not a huge fan of Taste of Home, too many of their recipes start out with a mix, but I am a sucker for Top Ten lists. So I opened the email.  The picture of the  Grilled Vegetable Platter looked good, the recipe had five stars out of five stars with twelve reviews, so I clicked away.  The recipe sounded good and looked simple enough, so I tested it…, winner, Winner, WINNER!

Don’t feel like you have to stick to the veggie combo listed.  Grill what you have and what you like.  I left out all the bell peppers.  I. don’t. like. bell. peppers.  I didn’t add in any mushrooms because I just posted that fabulous recipe for Grilled PortobellosTaste of Home reviewers also reported adding green beans, snow peas, sweet potato rounds, and halved cherry tomatoes  into the mix.

My change to the Taste of Home recipe is to make two marinade mixtures.  Use one to marinate the veggies in prior to grilling (and then discard that marinade with the Ziploc bag), and then use the second one to drizzle over the veggies after grilling, the second marinade is just slightly different from the first. I also substituted freshly minced garlic for the garlic powder in the first marinade.

Now for my number one tip on grilled veggies… Grill the veggies first, before the meat or the fish.  Veggies are grill hogs, taking up an entire grill, and some of them take a surprisingly long time to grill, onions especially. The asparagus will cook most quickly, then the squash, then the carrots, and the onion will probably still be cooking when you start in on the meat.  Just remove each veggie when done and, when your veggie platter is mostly complete, drizzle with the second marinade, and place the whole platter in a warm oven.  Another reason for cooking the veggies first?  You can be in the middle of cooking them when  your guests arrive, and I haven’t met a guest yet who is not impressed by a grill covered in marinated mixed veggies, some with nice char marks!

Grilled Vegetable Platter

For the pre-grilling marinade

  • 1/4 cup olive oil
  • 2 Tablespoons honey
  • 1 Tablespoon Balsamic Vinegar
  • 1 teaspoon dried oregano
  • 1 clove garlic, minced or 1/2 teaspoon garlic powder

For the post-grilling drizzle

  • 2 Tablespoon olive oil (this is the time to use your best tasting/most expensive olive oil)
  • 1 Tablespoon honey
  • 1/2 Tablespoon (which is equivalent to 1 1/2 teaspoons) Balsamic Vinegar
  • 1/8 teaspoon pepper
  • 1/4 teaspoon salt

Veggie Mix (mix it up to suit what you have on hand, what you like to eat, and how many people you are serving…keeping in mind grilled veggies make great leftovers and are almost as good eaten at room temperature as they are when they are eaten fresh from the grill)

  • 1 pound fresh asparagus, trimmed
  • 3 small carrots, cut in half lengthwise
  • 3 small zucchini, cut in half lengthwise
  • 1 large sweet red, yellow, or green bell pepper, cut into 1-inch strips
  • 2 medium yellow summer squash, cut into 1/2-inch slices
  • 1 sweet potato (I prefer Garnet Yams), peeled and cut into slices
  • 1 medium red onion, cut into four wedges (I used a sweet Vidalia onion)
  • other possible add ins or substitutions: mushrooms, halved tomatoes, green beans, snow peas…
  1. Combine the olive oil, honey, Balsamic vinegar, oregano and minced garlic or garlic powder for the marinade. Pour into a large resealable plastic bag; add the vegetables. Seal bag and turn to coat; refrigerate for 1-1/2 hours.
  2. Combine the ingredients for the drizzle; cover and set aside.
  3. Place vegetables on a grilling grid (I don’t do this…I place the veggies directly on the grill, and loose a fair number of asparagus spears, skinny carrots and zucchini).  Grill, covered, over medium heat for 4-6 minutes (adjust for each veggie) on each side or until crisp-tender. Note: The onion wedges will probably fall apart.  That’s OK.  Just grill the slices (the slices that don’t fall through the grill, that is).  As soon as each slice is nicely brown and feels soft, transfer to platter and drizzle with some of the second marinade mixture.
  4. Transfer to a large serving platter. Drizzle with the second “marinade” mixture.
  5. Serve, or if desired, place in warm oven (250 degrees) to stay warm until needed

So now you know what you will be grilling, what should you have for dessert?  S’mores (or S’mores Bars?), Frozen Bananas (always fun), or my personal favorites, Fresh Blueberry Pie or a Mixed Berry Pie?? Have some fun and search my recipes!

Outdoor grilling rocks! Hope you are enjoying both cooking and dining outside.  Next up, grilled artichokes! Thanks for stopping by my kitchen again today.  I love it when you pop in!


Print Friendly, PDF & Email