Tag-Archive for ◊ comfort food ◊

24 Jul 2014 Curried Chicken Meatballs with Apricot Rice Pilaf

curriedmeatballs01

I have a love-hate relationship with America’s Test Kitchen (and their related publications, Cooks Illustrated and Cooks Country).  I buy a LOT of their special interest publications. I like to read, and I enjoy reading recipes, and I like trying out new recipes. I like the pictures of each recipe and I like the all the notes that go along with each ATK recipe.  I have made some good things from ATK recipes, but I’ve made some not so good, too.  On the other hand, I hate, hate, hate, hate, hate that I cannot access any of the ATK recipes online without paying for them.  The only way around this is to get the name of the recipe you are interested in and Google it, or look on foodgawker or TasteSpotting for a hit, then go to a food blog, similar to this one, to get the actual recipe.  Compare this to Bon Appetit and Epicurious.  I subscribe to Bon Appetit, but even if I didn’t I could access all of their recipes for free on the Epicurious website, most of which have some wonderfully helpful comments.  I love being able to search Epicurious‘ recipe archives for any recipe they have published over the past years. I often find terrific recipes that way, searching on words such as “soup”,  “blueberries” and “brownies” and then scrolling through all the recipes with that key word. I don’t know why America’s Test Kitchen cannot do the same 😛

Anyways…, enough of my rant and onto my latest America’s Test Kitchen find!

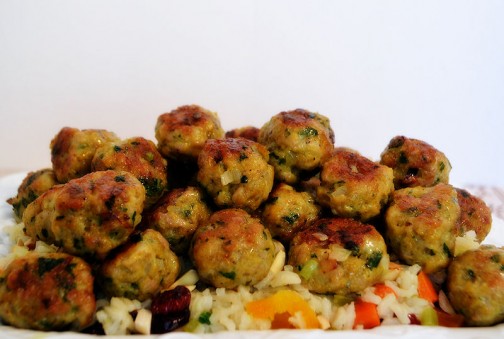
The original recipe (by the same name) was from one of America’s Test Kitchen 30-minute Meals cookbooks.  The meatballs, although very simple with a very plain list of ingredients, are quite tasty and virtually perfect! I wanted to up the curry powder just a bit, but my offspring vetoed that idea,  saying they were good just as they are, so I left the meatball recipe alone (but I did “heap” the 1 T. of curry powder!).  I always make these meatballs with ground chicken, but I see no reason why ground turkey, ground beef, or ground lamb couldn’t be used. The 1 lb. of ground meat makes about 30-36 small meatballs.

I did change the pilaf recipe a quite bit, as ATK’s was much too bland. (Pilaf, by definition, contains rice cooked in broth, ATK version was cooked in water, and only got worse after that.) I substituted butter for vegetable oil, broth for the water and added a bit  more variety, and taste,  with additional veggies, herbs, and garnishes.  I also added a bit of salt and spice…, and the magical touch, a bay leaf and a long piece of lemon peel (both of which are fished out before serving).

I didn’t think it was true, but it was! I was able to make this, from start to finish, in 30-minutes…, AND it was a mighty tasty, spur-of-the-moment dinner!   Serve with a side of veggies, if you want, steamed broccoli would be good… 🙂

Curried Chicken Meatballs with Apricot Rice Pilaf

For Pilaf

  • 1 T butter (approx)
  • ½ -1 cup finely chopped onion (your favorite variety)
  • ½ -1 cup finely chopped mixed vegetables (celery, carrots, bell peppers…)
  • 1 cup long-grain white rice
  • 1 ¾ cups hot chicken broth (or water). OK to sub abut ¼ cup of liquid for ¼ cup white wine (another option: add one long strip of lemon, lime or orange peel-with no white pith attached, to the rice mixture when adding the liquid)
  • 2 bay leaves
  • ½ -1 teaspoon salt (if your broth is salted, you might not need to add too much additional salt)
  • ½ – 1 cup chopped dried apricots or mixture of apricots and other dried fruits (raisins, cherries, cranberries)
  • 1/2 cup toasted slivered almonds or other nuts (pistachios, pine nuts, chopped pecans)
  • 1/4 cup minced cilantro, parsley, basil, green onion, frozen peas, sautéed mushrooms or mint for last minute stir-in and garnish (choose one, maybe two…or three)

 For Meatballs

  • 1 pound ground chicken (or turkey)
  • ½ cup very finely minced raw onion (grated onion works well, too)
  • ½ cup panko bread crumbs
  • ¼ cup chopped fresh cilantro
  • 1 tablespoon curry powder (maybe a bit more…)
  • 1 teaspoon salt and ½ teaspoon pepper, or to taste

From start to finish: about 30 minutes

  1. In large saucepan, heat butter over medium-high heat until shimmering.
  2. Add chopped onions and cook until softened, about 4 minutes.
  3. Add rice and cook until mostly opaque, about 4 minutes.
  4. Stir in choice of mixed veggies
  5. Add broth and bring mixture to a boil. Reduce heat to medium-low, cover and cook until rice is tender, about 20 minutes. When cooked, remove from heat and let rice stand and steam until needed.
  6. Meanwhile, in large bowl, combine chicken, onions, panko, cilantro, curry powder, salt and pepper. Mix with fork until well blended.  Don’t overwork the meat mixture.
  7. Using wet hands (or a small scoop), shape mixture into 1-inch meatballs. (Depending on size, of course, makes about 30-36 meatballs)
  8. Heat a bit of oil in a large frying pan until hot.
  9. Add meatballs and cook until browned on all sides, about 5 minutes, shaking pan as needed.
  10. Cover the pan and steam meatballs over medium heat for an additional 5 minutes.
  11. Now turn your attention back to the rice. Take lid off the pan and gently fluff rice with a fork. Pick out the bay leaves and the optional lemon or orange peel.
  12. Add apricots/dried fruit mixture, toasted almonds/nuts and choice of stir ins to rice (reserve about 1 tablespoon, each, of nuts and green stir-ins). Stir to thoroughly incorporate all ingredients.
  13. Transfer pilaf to a serving platter, top pilaf with hot, browned meatballs, and then sprinkle the reserved 1 T. of  nuts and cilantro, parsley, mint or green onion over the top. Add a serving spoon and . . . .
  14. Dinner is ready! YUM!

curriedmeatballs02

Thanks for stopping by my kitchen today 🙂  I hope that you make  and enjoy these and I hope they become a family favorite, as they have in my house!

29 Mar 2014 Caramel and Chocolate Covered Graham Crackers

Graham-crackers-2

It’s been a terrible, horrible, no good, very bad few days around here. We are all fine, but there was a family brouhaha that just didn’t sit right. We were all out of sorts, and, truth be told,  a bit afraid of what the future will bring, too.  So what to do? Make the all time favorite family comfort food, of course!

This recipe is rustic and quik, and it’s done in 20 minutes.  So it’s great just to start on this and put some of that pent up adrenaline to good use. But then there’s the cooling off period. Once made, these bars have to  sit in the refrigerator to harden up a bit. Again, another good thing.  A cooling off period is needed after a big family brouhaha.  Then comes the peace and contentment, sitting down with a good cup of coffee, some rustic chocolate covered graham crackers and reflecting on what went right and what went wrong, and figuring out how to right the wrongs and ultimately, bringing peace back to the family.

In August of 2005 my friends Sharon and Margie, from Lake Arrowhead Retreats, gave me a recipe for Saltine Toffee Cookies which they had found on AllRecipes.com.  Truth be told, the recipe didn’t sound very good.  Saltine crackers, brown sugar, butter, and melted chocolate?  Just say no.  But they insisted I try it.  They insisted the recipe was good.  I trusted them, they make some great food, so I tried it. It WAS good. VERY good.  Then I came to find out this recipe is sort of an Internet sensation and I might have been the last person on the planet to know about it!

Years pass, and one fine weekend, I took a chocolate making class.  The instructor of the class talked about how her mother used to make a ganache and pour it over crumbled up graham crackers as a bedtime snack for her and her siblings (I know, I know, what a Mom! I never did that for MY kids…).  Then the gears started churning.  Chocolate covered graham crackers are one of my favorite things in the whole wide world, but I had never made them.  The chocolate covered graham crackers from Starbucks are the best, but they are a bit too rich with a bit too much chocolate. OH!  The light bulb popped!  Could I make chocolate covered graham crackers for my kids, too?  I could one-up that other Mom, as well!  I could make chocolate covered graham crackers and with caramel!  Never mind that she was using a fancy ganache and I was just melting giant chocolate bars, LOL! What if I use the Saltine Toffee Cookie recipe but substitute graham crackers for the saltine crackers.  What if???

So I did it.  Many times.  My son says these are the best things I make. The last tin I made, hidden in the refrigerator behind the lettuce, lasted only three days.

Turns out, I am not the first person to think of this!  Lots of people on the Internet have used graham crackers instead of saltines with this recipe. Again, why am I one of the last people on the planet to know about this?! 🙂 Anyway, here’s my recipe.  You can find lots of versions all over, but this is the one that works for me.  Keep these Caramel Chocolate Covered Graham Crackers refrigerated, when they are not being eaten…  If these cookies sit out too long at room temperature the graham cracker starts to soften and loose it’s crunch 🙁 My 2005 copy of this recipe (with saltines rather than graham crackers) specifies that the recipe makes 35 servings. ROFLMAO!!! That’s so funny 🙂

Caramel and Chocolate Covered Graham Crackers

  • approx. 2/3 a box of graham crackers (two wax covered packages out of a box of 3 packages)
  • 1 cup butter
  • 1 cup dark brown sugar
  • 1 large sized (4 or 5 oz) chocolate bar, chopped (I like a Symphony Bar or a Cadbury Bar, if you like dark chocolate, the Hershey’s Special Dark Bar is good)
  • ¾ cup chopped nuts (if you like nuts.  I have never added nuts) OR, if it’s December, crushed candy canes! (I loooove this option!)
  1. Preheat oven to 400 degrees.
  2. Line a rimmed cookie sheet with graham crackers.  Place the graham crackers as close together as possible. You will need most of 2 waxed covered packages. Set tray aside.
  3. In a medium saucepan, combine butter and sugar and stir constantly, over medium heat, until sugar is melted.
  4. Raise heat slightly, to bring mixture to a boil.  Boil vigorously for 3 minutes, without stirring–shaking the pan occasionally is OK (the original directions said to “stir constantly” but I have found this to make a grainy caramel layer).
  5. Immediately pour caramel over graham crackers.  Use an offset spatula to quickly spread the caramel evenly over the crackers.
  6. Place tray in hot oven and bake for 5 minutes.
  7. Remove tray from oven and sprinkled chopped chocolate evenly over top.  Let chocolate just sit on top of caramel for 5 minutes.
  8. Spread the now melted chocolate evenly over the caramel.  Sprinkle with nuts (if using).
  9. Let tray sit until chocolate has hardened.  This make take a few hours.  To speed things up, put the tray in the refrigerator for about 15-20 minutes.
  10. When chocolate is set, break bars into uneven pieces. Sneak a piece or two.  Serve or cover and hide in refrigerator until needed.

Thanks for stopping by my kitchen today!  If there is a brouhaha in your family, I hope it’s over quickly and sweetly!

08 Mar 2014 Kipferls (Vanilla Hazelnut Butter Cookies)

kipferl2

I had never, ever heard of Kipferls before.  Then, in two weeks they came into my life twice!  First, my friend Priscilla made some in the Culinary School Pastry Arts program she is enrolled in. I didn’t try one because I don’t like nuts.  I dislike nuts so much that the name of the cookie didn’t even register.  Then I read “The Book Thief” and Kipferls are important in one chapter.  Since I was hosting book club this month and since the author had contributed his mother’s recipe for Kipferls to “The Book Club Cookbook” that my friend Kayte  gave me for my birthday last year, I decided to make the cookie. I had to do a Google image search to see what they looked like! Then came the hunt for Hazelnut Flour.  It’s out there. I found it at Sprouts.  I was shocked by the price.  I told the cashier that there must have been a mistake.  She said she doubted it.  I asked her to call for a manager for a price check.  YEP.  She was right.  There was no mistake.  It’s $16.95 for a 14 oz. packet of Hazelnut Flour (aka Hazelnut Meal). After creating such a fuss, and with my book club in less than seven hours, I bought the dangblasted expensive and pitifully small bag of Hazelnut Flour. BTW, you don’t have to buy this flour to make these cookies.

How to avoid using expensive Hazelnut Flour:

1. Make your own.  Preheat oven to 350°F. Place 6 ounces (1 1/4 cups) of shelled hazelnuts on a baking sheet in a single layer. Bake 8–10 minutes, stirring occasionally until the hazelnuts are fragrant and brown. Remove the nuts from the  oven and let cool slightly. While still warm, though, fold the nuts inside a clean kitchen towel and rub vigorously to remove their skins. Place skinned nuts in a food processor fitted with the stainless-steel blade, and process until they are finely ground.

2. Substitute Almond Flour or Almond Meal for the Hazelnut Flour.  Almond Meal is about one-third the price of Hazelnut flour.  My German friend Karin said she always makes her Kipferls with Almond Meal, but her German relatives grind their own nuts.

To continue with my saga…Upon returning home with my $16.95 package of Hazelnut Flour, I got out the recipe and got started.  No! Two vanilla beans?  TWO?  For 36 cookies?  It is now clear to me that I am making World’s Most Expensive Cookie and I am thinking these better be good.  (They were, thank goodness. So good I might have to make them again, and again, and again…)

This recipe is based upon Markus Zusak’s recipe for Kipferls as published in The Book Club Cookbook.  I made some changes to the method and to the ingredients.  Mr. Zusak’s mother mixed her dough by hand, I tried it for a bit, then resorted to my electric mixer.  I split the use of the vanilla beans, putting one in the cookie and one in the powdered sugar, Mr. Zusak put both in the powdered sugar. I had to quadruple the amount of powdered sugar to cover all the cookies, and I covered the cookies with the powdered sugar while the cookies were still warm* so get a crackly, almost melted sugar coating on the cookies. (*Let the cookies cool a little, to firm up a bit.  If you toss hot cookies in powdered sugar, the cookie will break.)

Kipferls

Crisp German Vanilla Hazelnut Butter Cookies

For the cookies

  • 1 ¾ cups all-purpose flour
  • 1 ¼ cups Hazelnut Flour or Hazelnut Meal or alternative (see above)
  • 2/3 cup granulated sugar
  • 14 tablespoons (1 ¾ sticks) butter, at room temperature
  • 1 whole vanilla bean, split in half, and insides scraped off with a knife.  Discard the outside of the vanilla bean

For the vanilla sugar

  • 1 1/3 cup powdered sugar
  • 1 whole vanilla bean, cut crosswise into 1-inch pieces (different preparation than above)
  1. Make the vanilla sugar first.  Place the powdered sugar with the chopped up vanilla bean in the bowl of a food processor fitted with a metal blade.  Process until the vanilla bean has been incorporated into the powdered sugar, several 10 second bursts.  Place a fine meshed sifter over a small bowl and sift the powdered sugar to remove the unblended pieces of vanilla bean.  Pour vanilla sugar into a large Ziploc bag. Set aside.
  2. Preheat oven to 350°F. Spray two baking sheets lightly with cooking spray or line with parchment paper.
  3. Combine all purpose flour, hazelnut flour/meal, and granulated sugar in a large bowl. Cut butter into 1/2-inch pieces and add to flour mixture. Scrape the inside out of the split vanilla bean and add to bowl.  With an electric mixer, mix dough for 3-4 minutes or until a soft dough is formed.
  4. Pinch off small pieces of dough (1 T; 1/2 oz; 15 grams) and mold gently between your palms to form 3-inch ropes, thicker in the middle and tapered at the ends.   This took a bit of doing to master.  I rolled the dough to the length of my three middle fingers.  I rolled the dough a bit more firmly with my ring and index finger so the ends of the dough would be thinner. Fashion each piece of rolled dough into a crescent shape and place onto the prepared trays, see picture above.
  5. Bake in preheated 350º oven for 15-20 minutes or just until the cookies are beginning to turn brown.  Mr. Kusak says that once the Kipferls are brown, they are over cooked.
  6. Remove cookies from oven.  Cool just slightly and then toss into the Ziploc bag with the vanilla sugar–tossing the cookies while they are still hot creates a slightly melted-on, and truly special coating.  Toss  cookies in vanilla sugar.
  7. Remove cookie to a cooling tray and repeat with remaining cookies and vanilla sugar.  If you have vanilla sugar left over, you can re-coat the cookies.
  8. Let cool completely before eating. The cookies will crisp up as they cool.

 Yield: About 3 ½ dozen cookies

Kipferls1

I hope you enjoy the World’s Most Expensive Cookie!  They ARE good and worth the cost and the effort. Thanks for stopping by my kitchen today!

PS…I am making another batch of these cookies to take to a Tahoe retreat this weekend.  One bag of that dangblasted expensive Hazelnut Flour does make three batches of these cookies…AND, Costco sells vanilla beans now.  Note my friend Sally’s point, put the vanilla beans in the powdered sugar as soon as you get them.  Once you are ready to make the cookies, remove the beans and use as outlined above.  The benefit is that some of the essence of the vanilla beans will have soaked into the sugar…yummmmm.

18 Jan 2014 Russian Tea

Russian-Tea-1a

Are you old enough to remember the “Russian Tea” phase back in the 70’s?  I was a teenager then, a very young teenager, and our Moms and Grandmas were mixing up batches of Russian Tea like crazy and giving everyone little jars of the stuff.  I think the mix had instant tea, Tang (remember Tang? Astronauts drank it!), powdered lemonade, and some spices.  You opened up your gift jar, spooned some mix into a cup, added hot water, stirred it up and  you were drinking Russian Tea!  I liked it. It was a different hot drink.  I wasn’t into coffee yet, Hot Chocolate was too childish, English tea with milk was OK, but boring. Russian Tea was fun and different–and a bit exotic.

Fast forward to February 7th, 2014, Opening Ceremonies for The XXII Winter Olympics will be held in Sochi, Russia and I will be hosting a Russian Themed Winter Olympic Dinner.  What to have to drink after dinner? My daughter suggested Vodka shots off the tip of a sword.  Umm, no.  A citrus-y, sweet, slightly spicy version of Russian Tea is more up my alley — but not made of Tang, Country Time Lemonade and Nestea. So I hit the Internet.  First spoiler, the so-called “Russian Tea” of the 70’s isn’t Russian at all. It’s an American concoction! The only thing Russian about it is it’s name.  Shhhhhhhhhh! Don’t tell anyone!  Real Russian tea is “Russian Caravan” tea, because tea used to be imported to Russia from China, via a 16-18 month caravan, and it acquired a smokey flavor from all of the caravan campfires, according to Wikipedia.  So, I went to my local Russian grocery store, yes, we have one in San Jose, and I couldn’t find “Russian Caravan” tea anywhere (nor anyone to help me), but lots of Earl Grey.  I am not serving Earl Grey tea at my Russian Dinner.  Early Gray Tea is English and I don’t like it, it’s too smokey!

So now I am back to my original “Russian” Tea quest.  I found some recipes on the Internet, checked out their star ratings, and tried a few.  One was truly horrid; it involved extracting the juice from oranges and lemons, then boiling the  rinds in sugar and water then adding  the liquid to cold tea. I was skeptical, but the very attractive, very sincere lady on the YouTube video seemed nice, and she was raving over her tea! So I tried it.  She was not honest. Her tea was bitter and horrid.  Of COURSE it was.  Boiling all that pith then adding it to the tea? I should have known better. Why do people post bad recipes?

Eventually, I came up with this version for fresh Russian Tea.  I like it.  I really like it. I served it to five friends and two relatives, and they all said they liked it.  Then I served it to another relative, the daughter who suggested I serve vodka shots off the end of a sword, and she hated it.  I was SHOCKED.  I tied her down and make her try it again.  She STILL didn’t like it.  Harrumph.  She’s no longer my favorite child.  My son loved the tea.  He said, “That’s good.  That’s really, really good.”  He’s a good boy. He’s my favorite child now.

This “Russian” tea is in the same family as hot tea with lemon and honey, but with orange added, and some cinnamon, and a few cloves, it’s a bit more complex (there’s no honey in this tea though).  I’m going to serve it at my Russian themed Winter Olympic dinner, but I’ll brew a pot of Earl Grey, too… for the weirdos.

You all know I am not a photographer, right?  I thought I was being deliciously creative setting up a picture to look like hot, citrus-y, Russian tea in cold, stark, white snow.  Epic fail.  What I got looks like tea in bubbles, oh, not even that, it looks like tea in pillow stuffing, which it is.  Can you overlook that?  Can you just try this hot, citrus-y, slightly spiced, American-Russian tea?  I think you will be glad you did.  Just make the tea once, and put it in the refrigerator to reheat as needed. Ponyat’? Da?

I am really getting into the Olympic/Russian thing now. I made Pierogi for dinner last night, and I ordered a Pierogi press and a Pierogi cookbook written by a real babuska from Amazon.  I am trying to find a Russian outfit to wear. It seems I should go as a babushka.  I already have all the right clothes in my closet…and you know, Vodka shots from the end of a sword might not be too far fetched!

Russian Tea

  • 4 strong black tea bags
  • 1 quart (4 cups boiling water)
  • Zest of 1 1/2 oranges
  • Juice of 1 1/2 oranges (about 2/3 cup)
  • Zest of 1 large lemon
  • Juice of 1 large lemon (about 1/4 cup)
  • 6 cloves (0k to double for spicier drink)
  • 1 cinnamon stick (ok to use 2 for spicier drink)
  • 1 cup sugar (might be ok to reduce to 3/4 cup for a less sweet drink)
  • 2 cups cold water 
  1. Make 1 quart of tea by pouring 1 quart of boiling water over 4 teabags and seep for 5 minutes.  Remove tea bags from hot tea and set tea aside.
  2. Zest the oranges and lemon. Put the zest in a small saucepan.
  3. Add 1 cup sugar and 2 cups cold water to the zest in the small saucepan.
  4. Bring water, sugar, and zest to a boil and boil for 5 minutes.
  5. Juice the oranges and lemon. Pour the juice into the brewed tea.
  6. Strain the  boiled water, sugar, spices and zest mixture the add to tea and juice mixture.
  7. Stir well and serve or refrigerate mixture until ready to use. Reheat in the microwave or on the stove top.
  8. Enjoy the Olympics!

Thanks for stopping by my kitchen today.  BTW, I tried one more drink in my quest for my Olympic dinner, but I think that one qualifies as a dessert (and a gold medal)!  White Hot Chocolate.  Too, too, too decadent to post…I must keep my fans from sinning…I must…I must…OK, OK, I’ll post it soon!