Tag-Archive for ◊ Thanksgiving ◊

29 Sep 2016 Pumpkin-Chocolate Cake

w

This is the BEST cake to serve at this time of year (or any other time of the year, actually)!  It’s a good chocolate cake – a very, very good chocolate cake; it’s moist, and nicely chocolate-y, and made richer with some pumpkin puree added.  The cake doesn’t taste of pumpkin, it just tastes well-rounded and delicious and the frosting tastes like Fall! There is a touch of cinnamon in the frosting, then the ganache topping is smoothed over the top and dripped down the sides which sends this cake into the realm of ‘One of the Best Cakes EVER’! My daughter, Abby, has been making this cake since she was in high school.  Her friends would ask for it for their birthdays (even for Summer birthdays)!

It goes without saying that this cake takes a bit of time to make and decorate, but if you are thinking of making this cake then you are thinking of making it for a special occasion, right?  The time and effort are worth it and there’s nothing complex or confusing about making this cake, it’s pretty straightforward. And you won’t be serving up a box mix and a can of chemicals to your friends and family, either 🙂

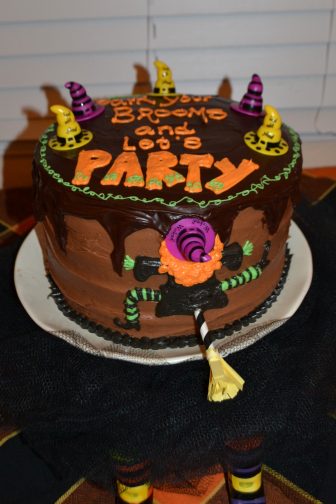
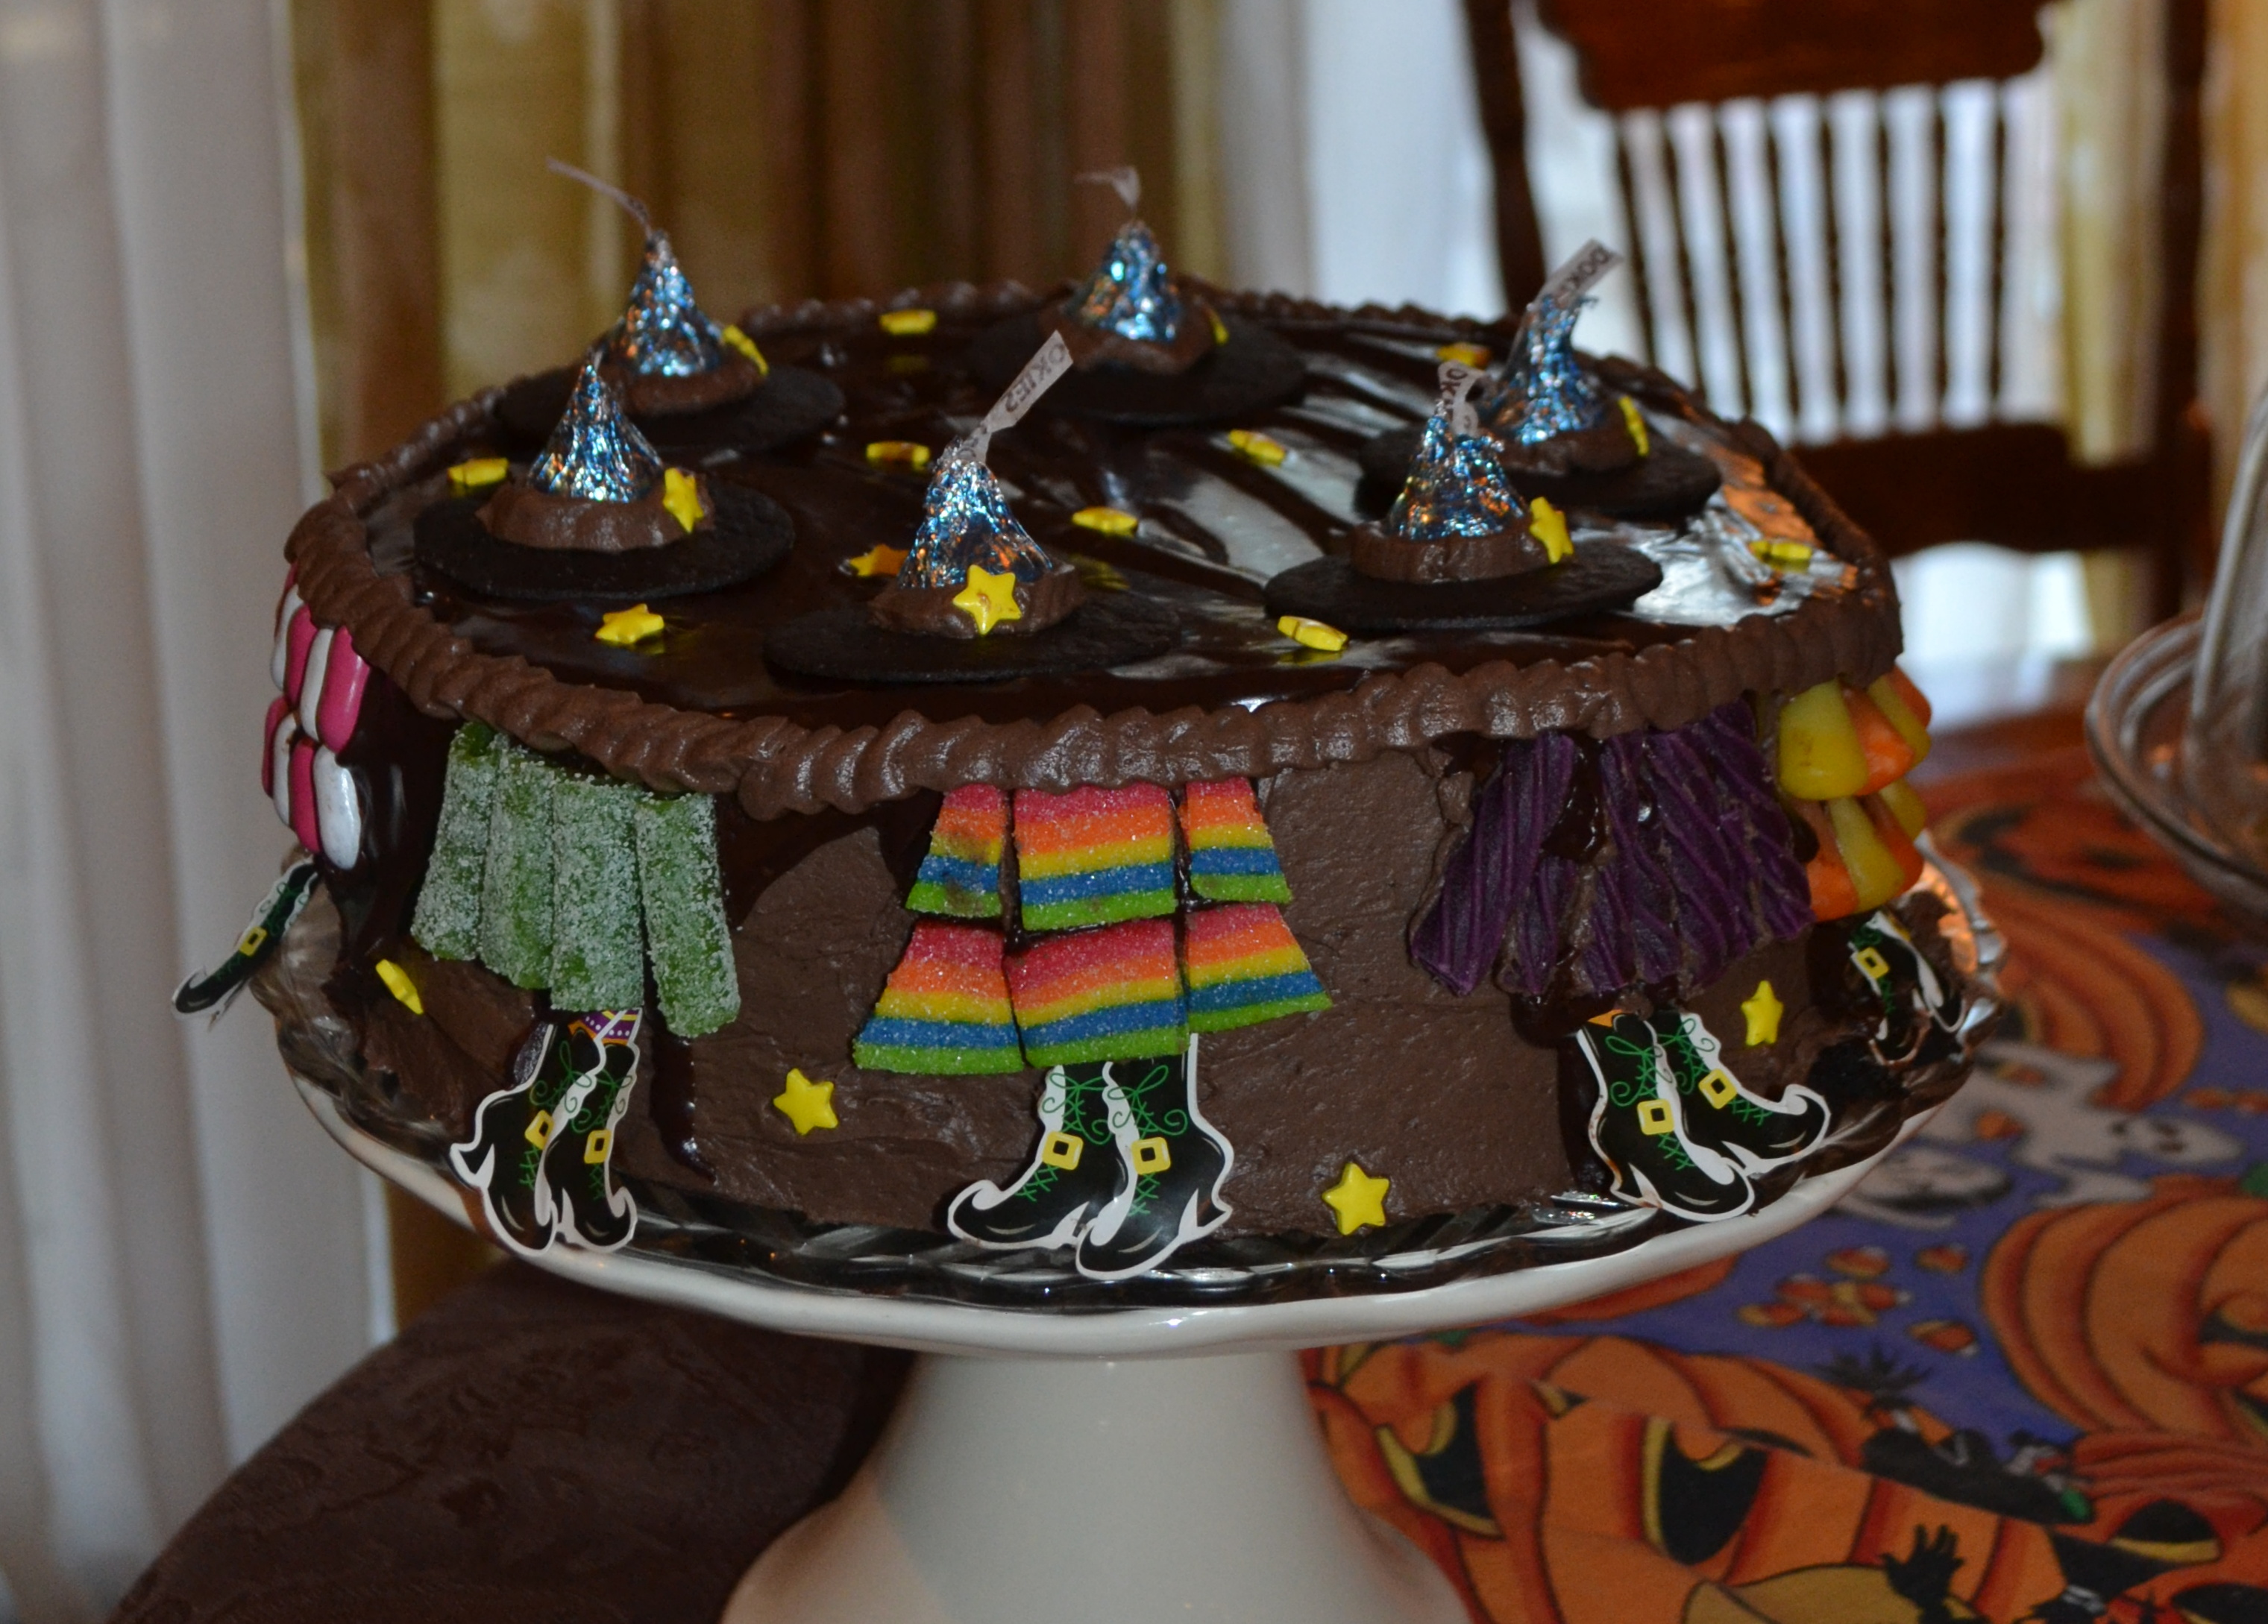
Now, your cake is going to look a bit different than the one above, since this cake was decorated for my witch themed Halloween party. Abby used candy, cupcake toppers, and Pinterest inspiration [to decorate the cake in the picture below] for my Halloween party last year.  Isn’t it cute?

Witches 2013 dessert abby's witch cake

The original recipe came from a Good Housekeeping magazine about, oh, 20 years ago?  I still see pictures from that recipe dancing around.  Don’t believe them!  For some reason in the picture the frosting under the ganache is orange.  I tried to do that and there is no way that I know of to turn a cocoa powder frosting bright orange.  I tried. Many times. It. Can’t.Be.Done. Sigh…

Not all recipes in magazines, cookbooks, newspapers and the Internet will work.  Mine will.  I only post recipes that I’ve tested and have been verified “Delicious!” by a multitude of family members and friends.  Many of my treasured recipes, like this Pumpkin-Chocolate Cake, I have made time and time again. You can do it, too! Make it once for Halloween, and I KNOW you’ll want to make it again for your Thanksgiving potlucks!

PUMPKIN-CHOCOLATE CAKE

For Cake

1 1/2 c. flour
2/3 c. unsweetened cocoa powder (Hershey’s Special Dark is good)
2 tsp. baking powder
1 tsp. baking soda
1/2 tsp. salt
1 (15 oz.) can pumpkin
1/2 c. buttermilk
2 tsp. vanilla
3/4 c. butter, softened
1 c. dark brown sugar
1 c. sugar
3 eggs plus one egg yolk
  • Preheat oven to 375 degrees.
  • Line the bottoms of 2 9-inch cake pans with parchment paper and lightly butter (or spray with Pam for Baking).
  • Sift flour, cocoa, baking powder, baking soda and salt together.
  • In another bowl stir together the pumpkin, buttermilk, and vanilla.
  • In the bowl of an electric mixer beat together the butter and the sugars until light and fluffy.
  • Beat in the eggs, one at a time, beating well after each addition, and then the egg yolk.
  • Reduce speed to low and beat in 1/3 flour mixture, and then 1/3 pumpkin mixture.
  • Repeat until all ingredients are used.
  • Pour batter into prepared pans.
  • Bake until cake passes the toothpick test, about 35 minutes.
  • Cool, frost and glaze as directed below.

For Frosting

6 oz. cream cheese, at room temperature
6 tablespoons butter (3/4 stick), softened
1 (16-oz.) box powdered sugar
3 T. cocoa powder
1/2 tsp. cinnamon
1 tsp. vanilla
2 – 3 T. cream (or milk)
  • Beat cream cheese and butter together until well blended.
  • Stir in powdered sugar, cinnamon, vanilla, and enough cream to make a stiff spreading consistency.
  • Spread 1 cup frosting between the two layers, and use the remaining frosting for the tops and sides.
  • Chill cake for a minimum of 30 minutes before glazing.

For Chocolate Glaze

4 oz. bittersweet chocolate, chopped
1 T. butter
3 T. corn syrup
1/2 c. heavy cream
  • Place chopped chocolate, butter, and corn syrup in a small bowl.
  • Heat heavy cream until boiling.
  • Pour hot cream over chocolate mixture in bowl.
  • Let sit for 3 minutes then blend with whisk until smooth.
  • Let glaze sit for  FOR AT LEAST 5 minutes to thicken slightly (it might be 15-20 minutes–better the glaze be on the thick side rather than the thin side)
  • Pour the glaze on top of the chilled and frosted cake. Smooth out glaze to edges, and then let drip down the sides.
  • Refrigerate to set glaze.
18 Jan 2014 Russian Tea

Russian-Tea-1a

Are you old enough to remember the “Russian Tea” phase back in the 70’s?  I was a teenager then, a very young teenager, and our Moms and Grandmas were mixing up batches of Russian Tea like crazy and giving everyone little jars of the stuff.  I think the mix had instant tea, Tang (remember Tang? Astronauts drank it!), powdered lemonade, and some spices.  You opened up your gift jar, spooned some mix into a cup, added hot water, stirred it up and  you were drinking Russian Tea!  I liked it. It was a different hot drink.  I wasn’t into coffee yet, Hot Chocolate was too childish, English tea with milk was OK, but boring. Russian Tea was fun and different–and a bit exotic.

Fast forward to February 7th, 2014, Opening Ceremonies for The XXII Winter Olympics will be held in Sochi, Russia and I will be hosting a Russian Themed Winter Olympic Dinner.  What to have to drink after dinner? My daughter suggested Vodka shots off the tip of a sword.  Umm, no.  A citrus-y, sweet, slightly spicy version of Russian Tea is more up my alley — but not made of Tang, Country Time Lemonade and Nestea. So I hit the Internet.  First spoiler, the so-called “Russian Tea” of the 70’s isn’t Russian at all. It’s an American concoction! The only thing Russian about it is it’s name.  Shhhhhhhhhh! Don’t tell anyone!  Real Russian tea is “Russian Caravan” tea, because tea used to be imported to Russia from China, via a 16-18 month caravan, and it acquired a smokey flavor from all of the caravan campfires, according to Wikipedia.  So, I went to my local Russian grocery store, yes, we have one in San Jose, and I couldn’t find “Russian Caravan” tea anywhere (nor anyone to help me), but lots of Earl Grey.  I am not serving Earl Grey tea at my Russian Dinner.  Early Gray Tea is English and I don’t like it, it’s too smokey!

So now I am back to my original “Russian” Tea quest.  I found some recipes on the Internet, checked out their star ratings, and tried a few.  One was truly horrid; it involved extracting the juice from oranges and lemons, then boiling the  rinds in sugar and water then adding  the liquid to cold tea. I was skeptical, but the very attractive, very sincere lady on the YouTube video seemed nice, and she was raving over her tea! So I tried it.  She was not honest. Her tea was bitter and horrid.  Of COURSE it was.  Boiling all that pith then adding it to the tea? I should have known better. Why do people post bad recipes?

Eventually, I came up with this version for fresh Russian Tea.  I like it.  I really like it. I served it to five friends and two relatives, and they all said they liked it.  Then I served it to another relative, the daughter who suggested I serve vodka shots off the end of a sword, and she hated it.  I was SHOCKED.  I tied her down and make her try it again.  She STILL didn’t like it.  Harrumph.  She’s no longer my favorite child.  My son loved the tea.  He said, “That’s good.  That’s really, really good.”  He’s a good boy. He’s my favorite child now.

This “Russian” tea is in the same family as hot tea with lemon and honey, but with orange added, and some cinnamon, and a few cloves, it’s a bit more complex (there’s no honey in this tea though).  I’m going to serve it at my Russian themed Winter Olympic dinner, but I’ll brew a pot of Earl Grey, too… for the weirdos.

You all know I am not a photographer, right?  I thought I was being deliciously creative setting up a picture to look like hot, citrus-y, Russian tea in cold, stark, white snow.  Epic fail.  What I got looks like tea in bubbles, oh, not even that, it looks like tea in pillow stuffing, which it is.  Can you overlook that?  Can you just try this hot, citrus-y, slightly spiced, American-Russian tea?  I think you will be glad you did.  Just make the tea once, and put it in the refrigerator to reheat as needed. Ponyat’? Da?

I am really getting into the Olympic/Russian thing now. I made Pierogi for dinner last night, and I ordered a Pierogi press and a Pierogi cookbook written by a real babuska from Amazon.  I am trying to find a Russian outfit to wear. It seems I should go as a babushka.  I already have all the right clothes in my closet…and you know, Vodka shots from the end of a sword might not be too far fetched!

Russian Tea

  • 4 strong black tea bags
  • 1 quart (4 cups boiling water)
  • Zest of 1 1/2 oranges
  • Juice of 1 1/2 oranges (about 2/3 cup)
  • Zest of 1 large lemon
  • Juice of 1 large lemon (about 1/4 cup)
  • 6 cloves (0k to double for spicier drink)
  • 1 cinnamon stick (ok to use 2 for spicier drink)
  • 1 cup sugar (might be ok to reduce to 3/4 cup for a less sweet drink)
  • 2 cups cold water 
  1. Make 1 quart of tea by pouring 1 quart of boiling water over 4 teabags and seep for 5 minutes.  Remove tea bags from hot tea and set tea aside.
  2. Zest the oranges and lemon. Put the zest in a small saucepan.
  3. Add 1 cup sugar and 2 cups cold water to the zest in the small saucepan.
  4. Bring water, sugar, and zest to a boil and boil for 5 minutes.
  5. Juice the oranges and lemon. Pour the juice into the brewed tea.
  6. Strain the  boiled water, sugar, spices and zest mixture the add to tea and juice mixture.
  7. Stir well and serve or refrigerate mixture until ready to use. Reheat in the microwave or on the stove top.
  8. Enjoy the Olympics!

Thanks for stopping by my kitchen today.  BTW, I tried one more drink in my quest for my Olympic dinner, but I think that one qualifies as a dessert (and a gold medal)!  White Hot Chocolate.  Too, too, too decadent to post…I must keep my fans from sinning…I must…I must…OK, OK, I’ll post it soon!

27 Nov 2012 Mini Apple Pies

I hear mini pies are all the rage now. Bye-bye cake pops and chocolate with bacon, hellooooooo mini pies!  Here’s a great recipe with which to start.  Having made this recipe a few times, I now know a few things things about mini pies.  1.  The filing needs to be seasoned more than that of a regular pie 2.  The filling needs more “syrup”.

At first, I questioned this recipe; why put that much flour into the filling (I thought would taste, well, flour-y, and, having baked many a pie before, I was sure cornstarch or tapioca would be a better choice) and HOLY MOLY, I like cinnamon but a heaping tablespoon of cinnamon to 8 cups of apples?  In a weak moment, I did something completely out of character,  questioning the recipe all the way to the taste test,  I baked it,  “as is”.   (Did ya faint?!)

The recipe worked beautifully!  The filing is not flour-y nor is it too cinnamon-y. The recipe works because the extra flavor and the extra syrup is needed  in order for the filing to stand up to extra crust of a mini pie!  Well, of course!

I made these Mini Pies for the 22 members of my Dining For Women group who came to my house for a meeting last night.  I lost count of how many people asked me for the recipe, so that has prompted me, at long last, to post another recipe.

I found this recipe at Little Bit Funky.  There are lots of nice, helpful pictures posted there.  The picture showing the size of the cut apples is especially helpful (dice don’t slice!).

Mini pies are great to take to potlucks.  No knife or pie slice needed to serve.  No plate or fork needed to eat (just pick the mini pie out of the cupcake liner and bite! If there are any crumbs, a well placed cupcake liner catches them), and no one seems to even think of wanting whipped cream or ice-cream with mini pie. Whooo HOOOO!

 Mini Apple Pies

  • 8 cups of chopped fresh apples (I like granny smith or pippin mixed with jonagold or golden delicious…but in a pinch I use whatever I can get my hands on), diced to about ½” by ½” by ½”.
  • ¾ cup of all-purpose flour
  • 1 ½ cups sugar (yes, it’s a lot, but again, the extra syrup is needed)
  • 1 heaping tablespoon ground cinnamon
  • ½ teaspoon ground nutmeg
  • 4 tablespoons butter, cut into 24 small chunks
  • 2 boxes Pillsbury pie crusts (that’s 4 crusts), or if you are fabulous, 2 recipes of homemade pastry
  • a tiny bit of milk, cream or half-and-half
  • a tiny bit of white or raw sugar
  • decorative cupcake liners to display and serve, if desired

 Instructions

  1. Preheat oven to 400° F.
  2. Unroll the pie crust and cut to fit into the bottom of 24 cupcake tins (no need to spray or line the tins).  I used a 3 ¼” round cookie cutter, but the ring from a mason jar, and probably a ring made from a well washed tuna can with the top and bottom removed would work too.  Save the pastry scraps to re-roll for the top crust.
  3. Refrigerate the dough in the tins while you prepare the apples.
  4. Peel,  core, and dice the apples.
  5. Pour prepared apples into a large bowl and completely coat with the flour, sugar, cinnamon and nutmeg.
  6. Remove the pie crusts from the refrigerator.
  7. Divide the apples between the 24 bottom crusts.  You should have enough apple filling to “mound” into the pie crust.
  8. Top each mound with a piece of butter.
  9. Re-roll the leftover pastry and cut circles (or shapes if you want to get fancy) to form the top crust.
  10. Use you fingers to press the top crust into the bottom crust.
  11. Brush each top crust with a bit of milk, half-and-half, or cream and then sprinkle with sugar.
  12. Bake in a preheated 400 degree oven for 20-25 minutes  (check at 20 minutes, then every 2 minutes after that until the pies are perfectly browned).
  13. Cool in pans.  You should have no trouble removing the pies from the cupcake tin.  I like to put each pie into a decorative cupcake liner at this point.

Enjoy!

I have made mini mincemeat pies for years, but now I have another mini pie to add to the platter for all the mincemeat haters of the world! (BTW, in my experience, mincemeat haters are usually people who have never even tried mincemeat).  If there is a loud ruckus from the mincemeat lovers out there I just might share my recipe for mini mincemeat pies (with my personal secret ingredient) in another post!

Happy baking!  Thanks for stopping by my kitchen today (I’ve missed you…)


15 Oct 2011 Pumpkin Spice Coffee

It took two years, but FINALLY, I have a Pumpkin Spice Coffee recipe that is delicious and…, wait for it…, better (yes, BETTER!) than Starbucks’ Pumpkin Spice Latte!  I don’t make this assertion casually.  I had taste tests.  With friends.  Eleven taste testers.  This Pumpkin  Spice Coffee won over Starbucks’ Pumpkin Spice Latte.  The coffee was made with an easy, homemade Pumpkin Spice Syrup. I found the recipe at Budding Baketress (after been tipped off by Foodgawker)!  Thank you, thank you! I made no ingredient changes, I just refined the method.

Now about the taste tests.  We tested a Starbucks Pumpkin Spice Latte, a Latte with Torani Pumpkin Spice syrup, a Latte with this Pumpkin Spice syrup, and coffee with this Pumpkin Spice syrup.  The hands down winner? The COFFEE with this homemade syrup!  The COFFEE!  The Torani syrup Pumpkin Spice Latte was set aside immediately.  Yuck. There is something in that syrup that was just NOT good.  I poured the bottle down the drain.  I wasn’t go to try it in anything else, and I wasn’t going to pass it on to anyone.  I was hoping we would find something close to the Starbucks Pumpkin Spice Latte (because I love, love– correction–loved, Starbucks’ Pumpkin Spice Latte, but after the taste test…the Starbucks version was set aside, TOO!  BTW, have you ever looked at the Starbuck’s Pumpkin Spice Latte?  Taken the top off,  eaten the whipped cream and looked? There is some nasty orange slime floating on top of the latte which is not at all appetizing….but even if there were no slime, homemade Pumpkin Spice syrup would win anyway.  YES, it’s true, bye-bye Starbucks!

Next in our taste testing,  we tried this homemade syrup in a latte, and then in coffee.  The coffee won!  We liked the stronger coffee flavor to compliment the complex pumpkiny-spicy deliciousness.  What a HUGE surprise!

Here is the recipe for the Pumpkin Spice Syrup, and the recipe for a batch of Pumpkin Spice Coffee which can be made to serve at parties, meetings or family get-togethers this fall,.  Of course, the syrup can also be used on a one cup of coffee at a time basis.  I have included directions for all three below.

Pumpkin Spice Syrup for Coffee

  • 1/3 cup pumpkin puree (fresh or canned)
  • 1 cup sugar
  • 1/2 teaspoon vanilla
  • 1 teaspoon cinnamon
  • 1/2 teaspoon nutmeg
  • 1/4 teaspoon cloves
  • 1/4 teaspoon ground ginger
  • 1 1/4 cups water
  1. In a small saucepan, combine pumpkin puree with vanilla and spices.  Stir well to combine.  Add in water, stir well.
  2. Bring pumpkin mixture to a boil. Reduce heat to medium, and simmer, stirring occasionally until it becomes syrup-y and begins to coat the spoon (about 10-15 minutes).
  3. Remove from heat. Cool. Then refrigerate until needed.

To make a batch of Pumpkin Spice Coffee

  • 1 cups of syrup
  • 2 cups of milk
  • 4 cups of very strong, hot, coffee
  • whipped cream, optional
  • sprinkles or ground nutmeg, optional
  1. While the coffee is brewing, heat milk with syrup.
  2. Blend with an immersion blender (or in a blender, or with a whisk).  Can be made ahead and refrigerated until ready to use.  Re-heat and re-blend then continue as directed below.
  3. Stir hot coffee into milk-pumpkin syrup mixture.  (I usually blend a bit more at this point, but it’s probably not necessary).
  4. Pour into cups.  Top with whipped cream, and maybe some sprinkles or ground nutmeg, if desired.  MMMMMMm (You can set a small pitcher of extra syrup out in case some people like a stronger/sweeter Pumpkin Spice Coffee).
  5. Makes approx. 6 servings.

To make one cup of Pumpkin Spice Coffee

This is up to you! Start with a cup of strong, hot coffee.  Stir in 1-2 T. pumpkin syrup, to taste.  Add hot milk, or 1/2 and 1/2 or whipping cream…what appeals to you?  Stir well.  If desired, top with some whipped cream and some ground nutmeg or sprinkles. Remaining Pumpkin Spice Syrup can be stored in the refrigerator.

Thanks for stopping by my kitchen today, and not by Starbucks!  You’ll find it cheaper to make your Pumpkin Spiced Coffees at home. And you might be surprised by how much better they taste, too! I was, and I am a loyal,  long time Starbucks aficionado.