Tag-Archive for ◊ chocolate ◊

01 Jun 2013 Lemon Ice Cream

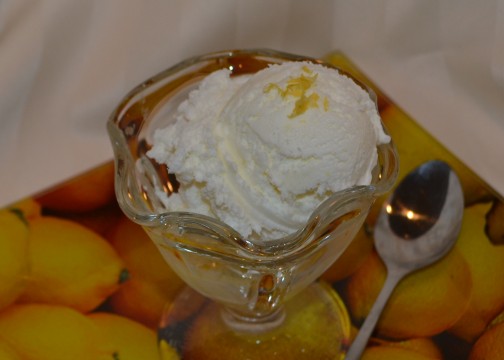
lemon ice cream closer

Bet you’ve never had Lemon Ice Cream!  Not lemon sorbet, or lemon sherbet, or lemon granita  or lemon frozen yogurt,  but lemon ice cream–creamy, rich, sweet, intense  lemon ice cream. Intrigued?  Tempted? I hope so, because I have a simple, oh-so-good recipe for you.  You do have an ice cream maker, right?  I use a “frozen bowl” ice cream maker, which seem to be everywhere for $40-$50 now, but sometimes you can get lucky.  This weekend my friend Sharon bought one at a garage sale for $5, and I saw one at  Savers for $12.99.

Homemade ice cream is very, very rich, and Lemon Ice Cream is no exception.  Serve small scoops (with an option for seconds, of course).  This recipe makes a quart of ice cream, richer and more filling than even the most premium commercial ice creams.  One quart of this ice cream will serve as many people as a half gallon of that store bought stuff.

I like to serve this ice cream on fruit pie, crisps and cobblers. My friend Sharon, whom I mentioned above, bought her ice cream maker after I fed her berry crisp with a scoop of this lemon ice cream.  This ice cream is also fantastic as a filling for an ice-cream sandwich.  To make a truly gourmet ice cream sandwich place a small scoop of Lemon Ice Cream between two ginger cookies, squish the sandwich a bit, square the filling up a bit, maybe roll the sides in a bit of chopped chocolate-milk, semi-sweet or white, then put the little bites of heaven in the freezer to firm up.   My pregnant daughter likes to eat  Lemon Ice Cream “as is” straight from a glass bowl with a long spoon.  She downed the sample above in one breath (at 9 o’clock in the morning one week before her due date!).

This recipe was first published in Gourmet magazine in 1999.  I’ve been making it since May 25, 2003.  Yes, I marked the date on my copy of the recipe, with this note, “Delicious and simple!”  “Simple” was written in caps and underlined twice!

Lemon Ice Cream

1 large lemon (zest plus 1/4 cup freshly squeezed lemon juice)

1 cup granulated sugar

1 cup cold milk (I usually only have 2% at home, so that’s what I use)

1 cup well chilled heavy cream


With a vegetable peeler or microplane remove the zest from the lemon, do NOT include any of that bitter white pith in with the zest.  Put the sugar and the lemon peel in a food processor or blender and whirl until the sugar is finely ground and the lemon zest has been incorporated into the sugar. Add in the milk and the cream (On occasion, I have used 2 cups half-and-half instead of the milk and cream mixture).  Blend just to combine.  Stir in 1/4 cup freshly squeezed lemon juice.  Process in ice cream maker for about 20 minutes.  Place soft ice cream in a freezer safe bowl, and set in freezer to harden up a bit (a few hours).  Ice Cream will keep at least a week, if not more, in the freezer but I doubt you will have to test the outer limits.

Thanks for stopping by my kitchen today!  Looks like the next few days are going to be scorchers.  Stay cool. Squeeze lemons. Make ice cream. By the way, I think the picture above is one of the best so far for this blog.  My webmaster, Ratty, fixed it up real nice, didn’t she?

06 Mar 2013 White Mint Dark Chocolate Layer Cake

chocmintcake

I know, I know, this is a horrible picture.  Don’t let that put you off though.  This is a delicious cake, one of my best!  The reason this picture is so bad, well, aside from me not being a talented photographer, is that everyone ate the cake!  This is the one piece  that was left, and it was left out all night.  It looks like it, too, doesn’t it? Poor cake.  I really should bake this cake again just to get a better picture of it.  Problem with that is, folks are hollering for the recipe! I served the cake at my Dining For Women meeting and had several requests for the recipe.  I told everyone it was on my website, but this morning  I was shocked to find I hadn’t posted it.  Ever. Oops. What have I been doing with my time?

So here is the recipe, finally!  I found the original  recipe on epicurious.com the year that my twins graduated from high school, in 2009, I believe.  I made it for their high school graduation.  See how good this cake is?  I know exactly when I first tasted it! (I was pretty impressed with myself!)

The only thing I changed was making two layers instead of three (I think three layer cakes are pretentious–and who has three matching layer cake pans anyway?).  Don’t change anything else!  Use peppermint extract, not mint.  AND, one more warning:  stick to the Lindt Mint Chocolate bar, or something very similar. My daughter made this cake one year with Ghirardelli Mint Squares (the ones with the liquid-y centers).  Not a good idea. She made the cake for my birthday cake.  The top layer kept sliding off the bottom layer.  Yes, more than once. The cook took it very hard.  I think there were tears.

There shouldn’t be tears served with this cake.

This cake can be dressed up a bit for Christmas.  Andes has Candy Cane mints now.  Those and a few candy canes or peppermints can adorn the sides/top of the cake or the cake platter. Hershey’s Candy Cane Kisses can be melted for the top of each layer, if you want, but they don’t taste nearly as good as the melted Lindt Mint chocolate bar…, and they don’t have the delightful thin crunch that comes from the melted Lindt bar.

Chocolate Mint Layer Cake

For Cake and Chocolate Mint Topping

1 ¾ c. flour
¾ c. unsweetened cocoa powder (use Hershey’s Special Dark)
1 ¼ tsp. baking soda
½ tsp. baking powder
¾ tsp. salt
2 c. sugar
¾ c. butter, at room temperature (1 ½ sticks)
3 eggs
4 tsp. vanilla
1 ½ c. buttermilk
1 large Lindt Mint Chocolate Bar, chopped

Preheat oven to 350 degrees. Butter and flour three 9-inch diameter cake pans. Line bottom of pans with parchment paper. Sift together flour, cocoa powder, baking soda, baking powder, and salt. In another bowl beat sugar and butter together until light and fluffy, at least 5 minutes. Add eggs, one at a time, beating well after each addition. Mix in vanilla. Beat for another 5 minutes. Add dry ingredients alternately with buttermilk in 3 additions each, beating just until blended. Divide batter equally between the three cake pans (a generous 2 cups of batter in each pan). Bake in preheated oven for about 25 minutes, or until cake springs back to touch. Remove cake and sprinkle chopped Lindt Mint Chocolate over tops of each layer. When chocolate melts, spread gently evenly across tops. Let cool in pans for 15 minutes then remove to racks to cool completely. Remove parchment paper.

For Creamy Minty Frosting

1 ½ 1-lb. boxes powdered sugar
½ c. butter, at room temperature
2 tsp. peppermint extract (not mint extract, peppermint extract)
¼ c. milk or cream, approximately
1 box Andes Mints, unwrapped and chopped

Combine powdered sugar, butter, extract, and milk/cream in a mixing bowl. Beat until light and fluffy, adding more milk or cream, 1 tsp. at a time, if needed to bring mixture to spreading consistency. Place approximately 1/5th of frosting on top of each layer cake. Carefully smooth frosting on top of mint chocolate covered cake layers. Place frosted layers on top of each other on a serving plate. Use remaining 2/5ths of frosting to carefully frost sides of cake. Sprinkle chopped mints on tops and sides of cake. Let sit for an hour or two before serving.

Thanks for stopping by my kitchen today!  If you like what you read, sign up.  You’ll get a three line email letting you know when I post another recipe.  I won’t use your email address for anything else, ever, I promise!


14 Sep 2012 Chocolate Peanut Butter Sandwich Cookies

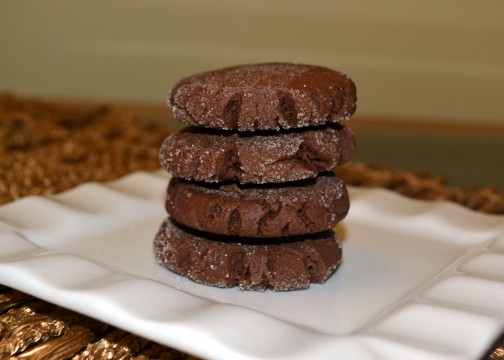
ChocPB cookies good Stack

I have been meaning to post this recipe forever, I just never had a good picture of the cookie.  The recipe only makes 32 cookies, and around here 32 cookies lasts approx 32 seconds.  My friend Josee made these for a Christmas Cookie Exchange two years ago (that’s how long I have wanted to post this recipe). I gave a dozen of these to a friend, Becky,  for a “Craft it Forward” exchange and I promised the recipe to her ONE year ago. (Bad Polly, bad, bad, bad, bad.)  But finally, I  made a batch that didn’t get scarfed immediately.  I made them for my Yoga Group, and they are too polite to eat a half dozen each at one sitting (but it could have been that I had them so busy bagging stuff for an upcoming fundraiser and they didn’t have any hands free to eat cookies!)  They did sing praises for the cookies they did eat though and encouraged me to post the recipe ASAP.

Now getting back to the first time I encountered this cookie.  It was my favorite cookie that year, maybe my favorite cookie in all the years of our exchange (of which there have only been three).  Oddly enough, I made my cookie that year from same cookie magazine Josee used, and I never even considered making these!  Even now, if I just looked at the recipe, I would not be inclined to make it. This is one cookie that tastes much, much better than it’s list of ingredients.  It tastes much, much better than it looks, too and, no matter how good the picture looks above  (do you like it?  I got a new camera!), it still doesn’t do the cookie justice.  Take a bite!  There’s a layer of peanut butter inside!  As one of my friends said, who shall remain nameless, “So how did you get the peanut butter IN there?”

So here it is, at long last, the recipe for Chocolate Peanut Butter Sandwich Cookies (originally published as “Peanut Butter Munchies” in the Better Homes and Gardens “100 Best Cookies”, 2009).

One more note,  I often loose track of how many balls I have, so now I line up a chocolate ball with a peanut butter ball before I start rolling.  One time I ran out of peanut butter balls! I have no idea how that happened.  So I just cracked open another bottle of wine and made another half batch of the peanut butter batter, and all was fine. Hic.  (Just kidding.  I don’t drink.  Ever.  Really!! No, REALLY, I don’t!!!)

Chocolate Peanut Butter Sandwich Cookies

For Chocolate Cookie

  • 1 ½ cups all-purpose flour
  • ½ cup unsweetened cocoa powder
  • ½ teaspoon baking soda
  • ½ cup butter (one stick, 4 oz), softened
  • ¼ cup peanut butter (I always use creamy)
  • ½ cup granulated sugar
  • ½ cup packed brown sugar (I use light brown sugar)
  • 1 egg
  • 1 tablespoon of milk or cream
  • 1 teaspoon vanilla

For Peanut Butter Filling

  • ½ cup peanut butter
  • 3/4 cup powdered sugar

For Sparkle

  • 2 tablespoon granulated sugar
  1. Preheat oven to 350 degrees F.
  2. In a bowl, combine flour, cocoa powder, and baking soda and set aside.
  3. In a large bowl of an electric mixer combine butter and peanut butter.  Beat for a minute or so. Add in both sugars and beat for another minute or so.  Beat in egg and milk.
  4. Slowly add the flour-cocoa powder mixture to the butter-peanut butter mixture and beat just until combined.  Roll ball into a snake shape and refrigerate for a short while (to make it easier to handle) while you mix up the peanut butter filling.
  5. Beat peanut butter and powdered sugar together until well combined.  Roll dough into 32 equal balls.
  6. Divide cookie dough into 32 equal portions.
  7. For each cookie, flatten a piece of chocolate dough and top with a peanut butter filling ball.  Wrap Chocolate cookie dough around the peanut butter filling, making a ball in the process.  Place balls on a cookie sheet, about 1 inch apart.
  8. Rub a bit of leftover dough or a very slight bit of butter onto the bottom of a glass.  Dip glass in sugar.  Press cookies flat with sugar coated glass. (redip glass in sugar before pressing down on each ball).
  9. Bake cookies in preheated 350 degree oven for 8-10 minutes, until the sides are just slightly cracked.  Cool on cookie sheet for a minute or so and then transfer to a wire rack to cool.

Becky, I hope you are reading this…, I’m sorry that I took so long.  Josee, thanks for introducing me to this excellent cookie! Everyone else, ENJOY!  This is one great cookie!

Thanks for stopping by my kitchen today, come back again soon!  Now that I am learning how to master an SLR camera, I will probably be posting more frequently 🙂  I have a terrific parchment wrapped salmon recipe and a long time favorite gazpacho recipe just waiting in the wings!

10 Oct 2011 Mocha Cheesecake Brownies

I am not a big fan of the food section of my local paper.  In fact, I am not a  fan at all.  I read it every Wednesday just to see which recipe will cause me to roll my eyes the most.  Sometimes I even post LOL comments on my Facebook page.  It’s THAT bad.  Occasionally, there are recipes that don’t cause me to roll my eyes. They cause me to fall asleep. LOL. Just kidding! NOT!  Sometimes there are recipes I think aren’t too bad, but rarely am I inspired to try one.  Then, last Wednesday there was a recipe that hit me over the head and hollered, “Try me, try me”.  The recipe was  “Mocha Cream Cheese Brownies”, and I did roll my eyes before I tried it.   Not because the recipe was bad, it was really very good (as  you have probably guessed based on the picture above).  I rolled my eyes because  the  name of  the brownie was wrong.  I’ve had cream cheese brownies, bars, breads, muffins.  The cream cheese is mixed with a bit of sugar and perhaps an egg, then layered in with the batter. When baked, you get a nice layer of cream cheese. This is  NOT a cream cheese brownie.  It’s a cheesecake brownie.  There’s a world of difference.  A world of yummy difference.

I baked the brownies, as directed, in a 9×9 pan.  I won’t do that again.  The brownies were too tall. They were so tall they were hard to get into my mouth!  And, I had to bake the brownies 15 minutes more than the recipe suggested to get the cheesecake layer to set.  Now I think they the size if the baking pan was wrong in the recipe (or maybe I just know better!). Next time I will bake these Mocha CheeseCAKE Brownies  in a 9×13 pan and then the suggested baking time will probably be spot on.

About one third of my pan of brownies is in the freezer right now.  I think they will freeze very well.  Brownies freeze well.  Cheesecake freezes well.  Why not Cheesecake Brownies?  If they don’t freeze well, I will update this post…but I am pretty sure that won’t be necessary.

This recipe was published in the San Jose Mercury News on Wednesday, October 5 as “Mocha-Cream Cheese Brownies” and attributed to Emly Luchetti, “The Fearless Baker”.

Mocha Cheesecake Brownies

Brownie Layer

  • 9 oz. dark chocolate (58-62% cacao)
  • 10 tablespoons butter, cubed
  • 1 cup sugar
  • 3 eggs
  • 3/4 cup flour
  • large pinch Kosher salt

Cheesecake Layer

  • 16 oz. cream cheese, softened
  • 1/2 cup sugar
  • 2 eggs
  • 2 teaspoons instant coffee granules or instant espresso powder
  • 1 teaspoon vanilla
  1. Preheat oven to 350 degrees.
  2. Grease a pan, your choice, a 9 inch square pan (as the original recipe originally specified), or as I suggest, a 9×13 oblong pan.
  3. Place the chopped chocolate and the cubed butter into a microwaveable bowl.  Melt the chocolate and the butter in the microwave.  (I did this on 50% power for three minutes, stirring after every minute.)  Let the chocolate cool to room temperature.  (You can get the rest of the ingredients for the brownie layer ready to go and also make the cheesecake layer while waiting for the chocolate mixture to cool) (Skip step #4  and come back to it when the chocolate has cooled.)
  4. Whisk 1 cup sugar and 3 eggs together until smooth.  Stir in the melted and cooled chocolate. Add in the flour and the salt and mix until well blended.
  5. Mix the cream cheese and 1/2 cup sugar together until smooth. Blend in the two eggs, and then the instant coffee and the vanilla.
  6. Pour the brownie batter into the bottom of the prepared pan.  Spread the cheesecake layer on top of the brownie layer. Swirl the cheesecake layer and the brownie layer together (use a spoon or a knife–don’t over swirl)
  7. Bake in 350 degree oven for 30-35 minutes or until a toothpick inserted in the center comes out clean. (I had to bake mine–in a 9×9 pan for an additional 15 minutes)
  8. Cool to room temperature.  Cut into bars. Serve.

Thanks for stopping by my kitchen today.  Have fun with these brownies.  They are deeelicious!