Tag-Archive for ◊ Summer ◊

22 Aug 2013 Salmon in Parchment

salmon

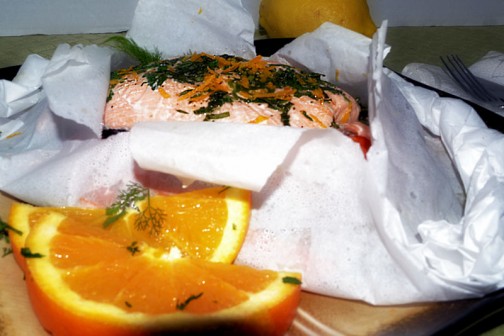
Every once in awhile you run across a recipe that changes everything!  This is one of those recipes.  Cooking salmon in the microwave, with veggies.  How simple is that? How convenient is that? This main dish is simple, delicious  and healthy.  You’ll need a salmon fillet, a cup of fresh julienne veggies, a large piece of parchment paper, a little liquid, and a microwave. Chop and prep, five minutes in the microwave, then BOOM, a tasty, spot on healthy dinner of salmon and veggies!

I can’t get enough of this!  As much as I love, love, love the combination of veggies below, I often have to switch up the veggies and change the sauce to accommodate what I have on hand. The method always works, it’s always good and it never heats up the kitchen.  PLUS, dinner can be ready in ten minutes flat!

Fully Customizable Microwave Salmon & Veggies in Parchment

Recipe by Polly Ferguson, based on a recipe by Alton Brown

  • 1 (8-ounce) salmon fillet, pin bones removed
  • 1/3 cup julienne fennel bulb
  • 1/3 cup julienne leeks, white part only
  • 1/3 cup julienne carrots
  • 1/3 cup julienne snow peas
  • ½ teaspoon Kosher salt
  • 1/8 teaspoon freshly ground black pepper
  • 1/8 teaspoon ground coriander (this could be customized too—curry powder, cumin, or any other powdered spice you are partial to and that would complement the veggies and the salmon could be used)
  • Herbs: 6 basil leaves, chopped finely (or any mixture of herbs from your garden, or spices from your cabinet, that appeals to you—parsley, cilantro, dill, mint, rosemary, green onion, chives, fresh ginger, tarragon, lemon pepper, garlic, chili powder, curry powder, herbs de province, paprika, etc…)
  • Other Stuff: 1 tsp. grated lemon or orange peel, diced pineapple, jalapeño, (maybe even some brown sugar or a drizzle of maple syrup, or a sprinkling of ground coffee or mustard…, pesto or marmalade…)
  • Liquid: 1 tablespoon dry vermouth, OR orange juice, OR white wine… (just don’t use lemon juice, major Yuck!) I’d really like to experiment with soy sauce or teriyaki sauce, rice wine, melted butter (!), dry sherry, coconut milk, Asian Fish Sauce or beer 🙂
  1. Take a rather large piece of parchment paper and fold it in half  like a book. Lay fennel, leeks, carrots, and snow peas on parchment in the center of the paper and on one side of the fold.
  2. Mix together salt, pepper, and ground coriander (or whatever spice mix appeals to you). Sprinkle vegetables with 1/2 of the spice mixture.
  3. Lay salmon on top of vegetables and sprinkle with the remaining spice mixture.
  4. Top salmon with choice of herbs, sprinklings, and 1 tablespoon of desired liquid (wine, vermouth, orange juice, teriyaki sauce…)
  5. Fold empty side of parchment over fish and starting at top, fold up both edges of parchment, overlapping folds as you move along. Once you reach the bottom tip, twist several times to secure tightly.
  6. Place on microwave safe plate and cook for 5 minutes, on high in microwave (or until fish reaches 131 degrees if you have an instant read thermometer and wish to use it–I don’t). Let the package sit for 2 minutes.
  7. Open parchment carefully and serve for a complete meal. Serve from the parchment package, if you’d like. If I am feeling fancy I take the skin off the salmon fillet, place the veggies on the plate, and put the salmon on top and sprinkle with a garnish of  green onion, parsley or snipped basil.

Thanks for stopping by my kitchen today! :)

02 Aug 2013 Beans!

beans01

I am so excited about this recipe!  It’s a paradigm shift recipe!  It’s not a recipe in the true sense of the word, it’s more of a road map to a particular destination.   A road map allows for more flexibility than a recipe, a road map allows the cook to make adjustments based upon personal preferences, taste, time, and what’s in the pantry.  I think most people have a road map for a few good dishes.  I have a road map for spaghetti sauce, chicken soup, stir-fry and hamburgers.  You might have a road map for meatloaf, burritos and rice bowls.  Most people have road maps for sandwiches and salads. A road map means there are guidelines, easy ones, usually ones that can be memorized, and that can always be adapted as the situation requires.

So here it is, a guideline for a pot of beans, in the crockpot no less!  Crockpot cooking is great for summer, the kitchen doesn’t get heated up, and a pot of beans pairs well with almost everything that can be BBQ’d.  In the winter months, a bowl of beans with some cornbread or tortillas is almost the definition of comfort food. Another plus, crockpot cooking is fuss free, so toss everything in the pot and then go sit in the sun or shovel snow.

Many thanks to Mark Bittman of the New York Times for this road map. Thank you, thank you, thank you!!

BTW…, for years I have been looking for a good baked beans recipe, so that’s what I make with this recipe:  meaty, slightly sweet Boston-style beans.  YUM! They go with everything and I have  a serious love for leftover beans on toast (I’m English).  My son mastered this recipe in one take and he makes killer spicy teriyaki beans with chicken.  I can see others going for more of a Mexican style bean. What sort of beans do you like? Make them!

The House Special Beans

  • 1 lb of dried beans, any kind, I like small white and pinquitos but black, pintos, garbanzos, kidney, or a combination of different kinds of beans can also be used.  Don’t have a full pound of beans?  Add in some split peas or lentils to make up the difference.  Remember these are dried beans (about $1.25 for a pound bag) we are not using canned beans here (and there is no need to soak the beans first).
  • 4 cups of liquid, any kind.  Find a mixture that appeals to you. I start with a bottle of beer, then I add in about 1/4 cup of ketchup, 1/4 cup of Worcestershire sauce, 1/4 cup maple syrup, 1/4 cup of brown sugar and a squirt of mustard, using molasses instead of maple syrup and brown sugar would be good too. If my Dad were here I’d stir in 1/4 cup of bourbon. Then I add water, broth (any kind), or cold coffee to make the 4 cups (too much coffee will make the beans a bit bitter, so stick to less than 1 cup of cold coffee).  My son adds BBQ sauce, sriracha, honey, teriyaki or soy sauce along with beer and coffee.  Don’t like beer?  Use some leftover wine. Don’t drink at all, stick to broth and water.   Health nut?  Stir in carrot juice and some of that green liquid you’re so fond of !
  • Seasonings, any kind.  Start with a healthy amount of salt and pepper, then add in what appeals to you.  I add in 2 t. salt, 1 t. black pepper, 1 t. cumin, 2 t. chili powder, minced garlic, and 2 bay leaves.  Other options include oregano, basil, coriander, red pepper, curry powder, ginger, paprika, liquid smoke, parsley, sage, rosemary and thyme…
  • 1 lb meat, any kind, a bit more or a bit less is fine.  I like beef, and I buy something on sale, beef shanks, top sirloin, stew meat, steak, anything.  Throw in a pork chop or two, or some ground meat (brown it first and drain off the fat), chicken (with or without the bones, but boneless chicken does tend to get a bit overcooked), sausage, ham, cooked bacon…, or go for a combo.  Sausage and chicken? Beef and bacon? Or leave out the meat all together if  you’d rather.
  • 2 lbs finely minced or grated veggies, any kind.  I always add diced onion, grated carrots, and minced celery.  Then I might add some shredded zucchini, turnip, cabbage, spinach or kale, whatever I have on hand. Throw in some potatoes. Lots of folk like bell peppers, dice some up and throw them in.  Leeks are yummy. A few diced jalapenos would spice things up. Even canned pumpkin works. The only veggie I don’t add is tomatoes. I heard once that tomatoes interfere with the cooking process of dried beans, so I leave them out (I also don’t use tomato juice as a liquid, but I do stir in a bit of ketchup, and have had no problem with that).

Directions:

  1. Put the dried beans in the bottom of the crock-pot.
  2. Get out a 4-cup measure.  Combine your liquids.  When you have 4 cups, pour it over the beans in the bottom of the crock-pot.
  3. On top of the beans and liquid, add the meat.  I add the meat as is, then remove the fat and bones, and shred the meat after cooking.  You can do the same, or you can add cubes of boneless, skinless meat.
  4. Sprinkle desired seasonings on top of the meat.  (If you add bay leaves, count them so you know how many to remove before serving!)
  5. Finely mince, dice, or shred the veggies.  Add the veggies on top of the meat. (The liquid will not cover the veggies, yet).
  6. With a spatula or a spoon, press on the ingredients to lightly pack.
  7. Put the lid on the slow cooker, plug it in, turn on high, and go out and play! If you are around, check the beans after a few hours.  If the beans look dry add a bit more water, stock, beer, or wine (don’t stir, just pour it on top).
  8. Let beans cook for 6-8 hours.  Turn off.
  9. After the beans have cooled for a bit, taste them.  Needs more salt?  More maple syrup? More heat? Add it now.  If you added large hunks of meat with bones, remove bones and shred the meat. Remove the bay leaves, if you used them.
  10. If you want to add in extras, do it now.  You could stir in some diced tomatoes now, if you’d like, they won’t do any harm at this point (let cook for an additional 30 minutes or so).  Sometimes I stir cooked bacon at this point.  You could stir in frozen corn, if you’d like. Adding chopped parsley, cilantro, or green onion makes the beans look pretty and brightens them up a bit for a pretty presentation.
  11. Remember, beans seem to taste better the day after they are made, so don’t be afraid of letting them rest in the refrigerator for a bit.

Soooo, do you have the road map memorized?  1 lb beans, 1 lb meat, 2 lbs veggies, 1 qt (4 cups) liquid. Seasonings. Crock-pot. High. 6-8 hours, while you go out and play 🙂

Thanks for stopping by my kitchen today!  Go ahead now, make some beans! Let me know what you used and how they turn out 🙂 I can’t stop my son from making these beans! We’re drowning in beans…, but we’re not broke! Beans we can afford 🙂

21 Jul 2013 “Magic Shell” Topping for Ice Cream

magic shell with bottle[3] rattie

It’s summer.  It’s time for ice cream, and the easiest recipe ever posted on this site! Magic Shell!  You know the stuff, right?  You squeeze the chocolate-y liquid onto ice cream and it hardens up almost immediately.  Then you can use your spoon and shatter the thin chocolate all over the ice cream. Then you can stir the chocolate pieces  into your ice cream, and when you have a spoonful of the concoction the magic shell shatters again in your mouth.  It’s lovely.  It’s chocolate-y. It’s fun. It’s magic. It’s easy.

The recipe only calls for two ingredients.  And once you make it, you can keep it on the kitchen counter in a squeeze bottle for up to a month.

You need good chocolate, and coconut oil. Coconut oil?  Yep.  It’s not as hard to find as it used to be.  I even saw jars of coconut oil at Walmart, and Costco is selling huge bottles of it now.  It should be on the shelf of your grocery store, next to all the other oils.  If not there, and you don’t shop at either Walmart or Costco, try Trader Joe’s.

Magic Shell

  • 5  ½ oz. good quality chocolate, milk or dark, whatever is your personal preference (don’t use chocolate chips, use some good quality bar chocolate)
  • ½ cup coconut oil
  • Ice cream, for serving

Makes 1 cup

  1. Chop your chocolate and add it to a microwave-safe container along with coconut oil.
  2. Zap at 30-second intervals until chocolate melts into the coconut oil.  Stir well. At this point I like to pour my Magic Shell into a squeeze bottle, but this is not absolutely necessary.
  3. Pour mixture over ice cream, watch it harden, crack it open! Magic! Fun! Delicious!
  4. Because of the melting point of the coconut oil, the magic shell will stay liquid in a hot kitchen and solidify after sitting in a cold kitchen or the fridge. If your leftover shell hardens, just re-melt in the microwave. Stored at room temperature Magic Shell should keep for at least a month

Keep some of homemade “Magic Shell” and a carton of your favorite ice cream on-hand for quick, no cook, sort of special dessert.  Psssst…! Kids like to pour some rainbow sprinkles onto the chocolate sauce just before it hardens!

Thanks for stopping by my kitchen today.  See you again soon!


08 Jun 2013 Peach Iced Tea

2 Peach Iced Tea Vert

I made a Peach Iced Tea! I am so excited that I have to share the recipe with you, even as I work to make it more natural (off to the farmer’s market tomorrow for my first try). I didn’t want you all to have to wait until I got the natural version perfected as this version works fine!  I know there are hot days and summer parties in your near future–graduations, Father’s Day, showers, birthday parties, July 4th celebrations, and BBQ’s, so I know you need this recipe now!

This tea, as is, is not too sweet, and definitely has a pronounced peach flavor; it’s like Snapple Peach Iced Tea, only better!  Make the big-batch peach base to keep in the freezer and you’ll be able to whip up a quart of Peach Iced Tea for yourself and a good book! Or make a gallon or two  for a  summer party in a flash.  I, for one, would love to go to a summer party where there’s something to drink other than bottles of beer, soda and water 🙂 (BTW, I have a recipe posted for Blueberry Lemonade, too, which is also very good!).

The peach part of the tea was inspired by a recipe I found in a “Better Homes and Gardens Special Interest Publication” entitled , “Best Loved Reader Recipes; 125 Winners from 1930 to Today”.  The recipe in the magazine was for a “Sparkling Peach Punch”, where the base below is mixed with ginger ale or sparkling water.  I tried both versions. The ginger ale version was very sweet, the sparkling water version was given a thumbs up by my daughters, but the iced tea version created by yours truly was the star of the show.

Notes:

#1 Make the base and freeze it in three 1-quart batches or six 2-cup batches.  Each 1-quart peach base will mix with 2 quarts of strong tea to make 12 cups/3 quarts of  Peach Iced Tea, add ice and you have a party!  Each 2-cup peach base mixed with 6 cups of strong tea will make 8 cups/2 quarts of Peach Iced Tea, add ice and a friend and you have a cool and tasty summer drink with which you and  your friend can enjoy a little down time.

#2 Make the tea twice as strong as you would for regular hot tea!  I prefer English or Irish tea bags such as Barry’s Irish Gold, or Yorkshire Gold or PG tips.  Trader Joe’s Irish Breakfast tea is also very good (but, oddly, the English Breakfast tea isn’t very good at all). I use 3 or 4 tea bags to each quart of boiling water.  If I had to use Lipton or Red Rose Tea, I’d use at least six tea bags to a quart of boiling water.  I haven’t experimented with green tea, as I am not a big fan, but I am sure green tea could substitute for the black tea, and of course, decaf tea could be used too, if that is your preference.

#3 I don’t know why there is gelatin in the base, that’s one of the things I am going to experiment with and try to remove, but, I think it probably does add to the overall peachiness of the drink. Yes, yes, yes, one of the first things I will experiment with is using fresh peaches in place of the canned peaches…but until that happens, make this version, it’s yummy!

Peach Iced Tea

For the Peach Base:

  • 3 cups water
  • 1 1/2 cups sugar
  • 13-ounce package peach-flavored gelatin
  • 1 29-ounce can peach slices in light syrup
  • 4 11 ounce cans peach nectar (find them on the shelves of the grocery store next to the bottled juices)
  • 1/2 cup lemon juice
  1. Combine water, sugar, and gelatin in a saucepan. Bring to a boil, stir to dissolve the gelatin then remove from heat and allow to cool.
  2. Place undrained peach slices in blender, and blend until smooth.
  3. In a 1 gallon capacity bowl, pan or pitcher combine gelatin mixture, pureed peaches, peach nectar, and lemon juice. Stir to combine.
  4. Divide peach mixture into three 1-quart batches or six 2-cup batches.  Use now (see steps below), or freeze until needed.  According to the original recipe, the base can be frozen for up to 3 months.

To Brew the Tea and Combine With the Peach Flavor:

  • Desired quantity of peach base (remove from freezer an hour or two before needing)
  • Tea bags (Make the tea twice as strong as you would for regular hot tea, see note #2 above)
  • Boiling water (You will need to make 2X the amount of water for the quantity of base you are using, see note #1 above)
  1. Pour the required amount of boiling water over the tea bags and let steep for 3-5 minutes.  Don’t let the tea steep for more than 5 minutes or it will start to get bitter.
  2. Fill a pitcher half full of  ice.  Pour the hot brewed tea over the ice. Discard the tea bags.
  3. Stir the peach base into the iced tea.
  4. Pour into glass and enjoy! ahhhhhhhh

It’s mercilessly HOT here, and I hate hot, but a glass of Peach Iced Tea, a day off, and a good book does make the summer somewhat enjoyable(!)

Thanks for stopping by my kitchen today!  I am going to try some more recipes from this magazine–Calypso Shrimp Skewers, Coconut Salmon Curry, Macaroni and Brie with Crab, Green Beans with Basil and Mint, so stay tuned!

BTW, if you have the magazine, I’ve already tried the “Bagel, Lox and Egg Strata” recipe… The picture looked great.  The make-ahead casserole wasn’t bad, but neither was it great, and I see no reason to make it again.