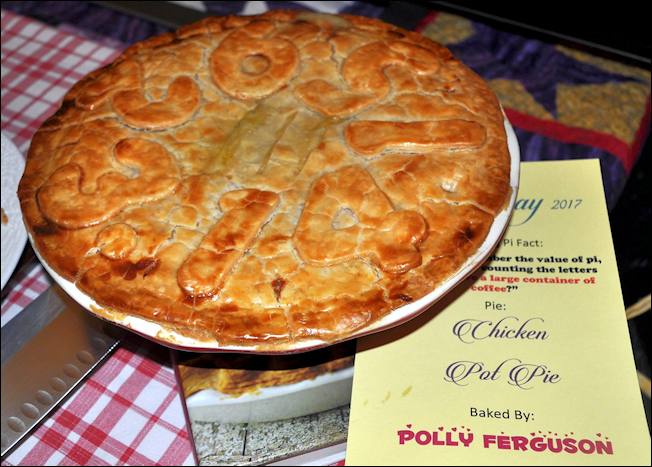
Tag-Archive for ◊ celery ◊

02 Aug 2013 Beans!

beans01

I am so excited about this recipe!  It’s a paradigm shift recipe!  It’s not a recipe in the true sense of the word, it’s more of a road map to a particular destination.   A road map allows for more flexibility than a recipe, a road map allows the cook to make adjustments based upon personal preferences, taste, time, and what’s in the pantry.  I think most people have a road map for a few good dishes.  I have a road map for spaghetti sauce, chicken soup, stir-fry and hamburgers.  You might have a road map for meatloaf, burritos and rice bowls.  Most people have road maps for sandwiches and salads. A road map means there are guidelines, easy ones, usually ones that can be memorized, and that can always be adapted as the situation requires.

So here it is, a guideline for a pot of beans, in the crockpot no less!  Crockpot cooking is great for summer, the kitchen doesn’t get heated up, and a pot of beans pairs well with almost everything that can be BBQ’d.  In the winter months, a bowl of beans with some cornbread or tortillas is almost the definition of comfort food. Another plus, crockpot cooking is fuss free, so toss everything in the pot and then go sit in the sun or shovel snow.

Many thanks to Mark Bittman of the New York Times for this road map. Thank you, thank you, thank you!!

BTW…, for years I have been looking for a good baked beans recipe, so that’s what I make with this recipe:  meaty, slightly sweet Boston-style beans.  YUM! They go with everything and I have  a serious love for leftover beans on toast (I’m English).  My son mastered this recipe in one take and he makes killer spicy teriyaki beans with chicken.  I can see others going for more of a Mexican style bean. What sort of beans do you like? Make them!

The House Special Beans

  • 1 lb of dried beans, any kind, I like small white and pinquitos but black, pintos, garbanzos, kidney, or a combination of different kinds of beans can also be used.  Don’t have a full pound of beans?  Add in some split peas or lentils to make up the difference.  Remember these are dried beans (about $1.25 for a pound bag) we are not using canned beans here (and there is no need to soak the beans first).
  • 4 cups of liquid, any kind.  Find a mixture that appeals to you. I start with a bottle of beer, then I add in about 1/4 cup of ketchup, 1/4 cup of Worcestershire sauce, 1/4 cup maple syrup, 1/4 cup of brown sugar and a squirt of mustard, using molasses instead of maple syrup and brown sugar would be good too. If my Dad were here I’d stir in 1/4 cup of bourbon. Then I add water, broth (any kind), or cold coffee to make the 4 cups (too much coffee will make the beans a bit bitter, so stick to less than 1 cup of cold coffee).  My son adds BBQ sauce, sriracha, honey, teriyaki or soy sauce along with beer and coffee.  Don’t like beer?  Use some leftover wine. Don’t drink at all, stick to broth and water.   Health nut?  Stir in carrot juice and some of that green liquid you’re so fond of !
  • Seasonings, any kind.  Start with a healthy amount of salt and pepper, then add in what appeals to you.  I add in 2 t. salt, 1 t. black pepper, 1 t. cumin, 2 t. chili powder, minced garlic, and 2 bay leaves.  Other options include oregano, basil, coriander, red pepper, curry powder, ginger, paprika, liquid smoke, parsley, sage, rosemary and thyme…
  • 1 lb meat, any kind, a bit more or a bit less is fine.  I like beef, and I buy something on sale, beef shanks, top sirloin, stew meat, steak, anything.  Throw in a pork chop or two, or some ground meat (brown it first and drain off the fat), chicken (with or without the bones, but boneless chicken does tend to get a bit overcooked), sausage, ham, cooked bacon…, or go for a combo.  Sausage and chicken? Beef and bacon? Or leave out the meat all together if  you’d rather.
  • 2 lbs finely minced or grated veggies, any kind.  I always add diced onion, grated carrots, and minced celery.  Then I might add some shredded zucchini, turnip, cabbage, spinach or kale, whatever I have on hand. Throw in some potatoes. Lots of folk like bell peppers, dice some up and throw them in.  Leeks are yummy. A few diced jalapenos would spice things up. Even canned pumpkin works. The only veggie I don’t add is tomatoes. I heard once that tomatoes interfere with the cooking process of dried beans, so I leave them out (I also don’t use tomato juice as a liquid, but I do stir in a bit of ketchup, and have had no problem with that).

Directions:

  1. Put the dried beans in the bottom of the crock-pot.
  2. Get out a 4-cup measure.  Combine your liquids.  When you have 4 cups, pour it over the beans in the bottom of the crock-pot.
  3. On top of the beans and liquid, add the meat.  I add the meat as is, then remove the fat and bones, and shred the meat after cooking.  You can do the same, or you can add cubes of boneless, skinless meat.
  4. Sprinkle desired seasonings on top of the meat.  (If you add bay leaves, count them so you know how many to remove before serving!)
  5. Finely mince, dice, or shred the veggies.  Add the veggies on top of the meat. (The liquid will not cover the veggies, yet).
  6. With a spatula or a spoon, press on the ingredients to lightly pack.
  7. Put the lid on the slow cooker, plug it in, turn on high, and go out and play! If you are around, check the beans after a few hours.  If the beans look dry add a bit more water, stock, beer, or wine (don’t stir, just pour it on top).
  8. Let beans cook for 6-8 hours.  Turn off.
  9. After the beans have cooled for a bit, taste them.  Needs more salt?  More maple syrup? More heat? Add it now.  If you added large hunks of meat with bones, remove bones and shred the meat. Remove the bay leaves, if you used them.
  10. If you want to add in extras, do it now.  You could stir in some diced tomatoes now, if you’d like, they won’t do any harm at this point (let cook for an additional 30 minutes or so).  Sometimes I stir cooked bacon at this point.  You could stir in frozen corn, if you’d like. Adding chopped parsley, cilantro, or green onion makes the beans look pretty and brightens them up a bit for a pretty presentation.
  11. Remember, beans seem to taste better the day after they are made, so don’t be afraid of letting them rest in the refrigerator for a bit.

Soooo, do you have the road map memorized?  1 lb beans, 1 lb meat, 2 lbs veggies, 1 qt (4 cups) liquid. Seasonings. Crock-pot. High. 6-8 hours, while you go out and play 🙂

Thanks for stopping by my kitchen today!  Go ahead now, make some beans! Let me know what you used and how they turn out 🙂 I can’t stop my son from making these beans! We’re drowning in beans…, but we’re not broke! Beans we can afford 🙂

20 Apr 2012 Ham Bone Bean Soup

I love Honeybaked ham.  Love it, love it, love it; but have you heard the definition of eternity? Two people and a ham!  Thank goodness I have a panini press for grilled ham and Swiss sandwiches.  Thank goodness I know how to make and enjoy ham and pineapple pizza. Finally, the last of the ham appeared, the bone,  and now it’s time for Ham Bone Soup.

I could NOT find a recipe on the Internet that I liked.  I knowwww, shocking!  So I took a bit from this and a bit from that and came up with this recipe.  It tastes good,  looks good, and is fibrously good for you with lentils, split peas, yellow peas, 4 kinds of beans, tomatoes, onions, celery and carrots plus chicken broth and ham broth. The spices came from a soup on the Honeybaked Ham website, cinnamon, cumin and thyme. I knowwww, sounds odd, but it’s what gives this soup it’s depth.

Enjoy.  (BTW, The new definition of eternity?  One person and a vat of Ham Bone Soup!) This makes a LOT of soup, about 6 quarts. “Fortunately” a friend of mine broke her ankle, so I was able to take one-third of it over to her.  Now I  should check my Facebook to see if anyone has had a baby lately*

Ham Bone Bean Soup

  • 4 cups chopped ham from the ham bone
  • one ham bone plus assorted root veggies and peelings, covered with water
  • 1/4 cup lentils
  • 1/4 cup split peas
  • 1/4 cup yellow peas
  • 2-3 cups water
  • 1 large onion, diced ( approx. 2 cups)
  • 2 tablespoons olive oil (approx.)
  • 2 cups diced celery (include some leaves)
  • 1 leek sliced
  • 4-5 carrots, peeled and sliced (about 2 cups)
  • 28 oz. can crushed tomatoes
  • 3-4 quarts broth (mixture of ham bone broth and chicken broth)
  • 1 tsp. dried thyme
  • 1 teaspoon cumin
  • 1/2 teaspoon cinnamon
  • 2 bay leaves
  • 1/2  teaspoon black pepper
  • salt, to taste (depends on saltiness of chicken broth) maybe about 1 teaspoonful
  • 4 or 5 16 oz. cans beans (use your favorites, of course)  I used 2 cans white beans plus one can each black beans, pinto beans, and pinquito beans (all my favorites)
  1.  First off, cut the meat off the hambone, so that you have 4 cups diced ham, set aside.
  2. Now make some stock from the ham bone. Put the ham bone in a large pot, cover with water and add a whole quartered onion (peel and all), a handful of carrots (or the peelings), some coarsely chopped celery, and any other extra veggie you have on hand.  Bring the mixture to a boil and then simmer for 4 hours.  When cooked, strain the broth. Discard the bone and veggies.  Keep the broth. (The broth can be made one or two days in advance, just refrigerate cooled broth until ready to use)
  3. In another pan, boil the lentils, split peas, and yellow peas (or all lentils, or all split peas) in about 2 cups of water until very soft, about 45 minutes.  Add more water to pan if necessary.  Let cool, and then blend into a liquid.  This puree will thicken the soup (and hide the “icky dried stuff” from picky family members).
  4. Heat olive oil in a large skillet.  Add in chopped onion.  Gently sautee until onion is cooked through and slightly caramelized.  Stir in chopped celery and sliced leek, saute for an additional 3 minutes or so.
  5. In a large soup pot, pour in the ham bone broth and enough chicken broth to equal about 3 quarts.  Stir in crushed tomatoes and lentil/split pea puree and spices (cinnamon, cumin, thyme, bay leaves, salt and pepper). Bring to a boil. Stir in carrots. Simmer until carrots are almost tender, about 20-30 minutes.
  6. Drain and rise the canned beans.  Add to simmering broth.  If soup seems too thick, stir in up to one additional quart of chicken broth.  Simmer for an additional 30 minutes.  Remove bay leaves.  Let soup cool, then refrigerate overnight (if possible, soup always tastes better if refrigerated overnight).
  7. When ready to serve, reheat soup, add diced ham, and simmer for an additional 15 minutes.  Taste broth.  If necessary add more salt, pepper, and cinnamon.  Serve hot with some nice bread, foccacia, or cornbread.

Hope you like this. Hope it was just the soup you were looking for but couldn’t find anywhere else on the Internet.

*Update:  Woke this morning to find the empty soup pot on the kitchen counter and three dirty soup bowls stacked in the sink along and dredges of sourdough toast everywhere.   Looks like my son and two friends had a late night snack after I went to bed.  They emptied the pan; there’s no more Ham Bone Soup left.  Should I put a happy face icon after this update, or a sad face icon?!

Thanks for stopping by my kitchen today!


30 Mar 2012 Chicken Tortilla Soup

The weather has just taken another cold turn. YES!  One last chance for a warming and comforting  soup!  Bring on the wind and the rain. We can enjoy Spring later  I have nothing against tulips and sproinging (yes, that’s a real word, and I love it, it is what lambs do), but with one last winter storm I am sure I will appreciate it that much more.

This soup is delicious, (would I post it if it wasn’t?  Rhetorical question: of course not!)  I am also posting this recipe because most everyone I know enjoys tortilla soup, but not many of us have a tried and true recipe in our repotoire.   My friend Adele made this soup  for an Ina Garden (AKA The Barefoot Contessa) themed cookbook club.  Two of us immediately re-made the soup for our families, and both to rave reviews.  I think Adele found a winner! Yay, Adele (and Ina)!

I had to twiddle with the original recipe a bit (I just can’t help myself). I added corn and black beans, plus I pureed part of the soup to make a thicker broth, which I enjoy, but you can totally skip the pureeing part if  you want fewer steps, less mess, and still have a tasty, hearty soup.

So, without any further ado, here’s my version of Adele’s version of Ina’s Garten’s “Mexican Chicken Soup” (from Ina Garten’s 2006 book, “Barefoot Contessa at Home“).

Chicken Tortilla Soup

  • 4 cups cooked chicken,shredded or chopped (baked, grilled, or poached chicken breast &/or thighs, or shredded  meat from a roasted chicken)
  • 2-4 tablespoons olive oil
  • 2 cups chopped onions (brown or red, or a combo, 1 or 2)
  • 1 cup chopped celery (2-3 stalks)
  • 2 -4  jalapeno peppers, seeded and minced
  • 4 garlic cloves, minced
  • 1 large can (28 oz.) crushed tomatoes
  • 1  or 2 15-oz. cans black or pinquito beans (one of each is nice, too)
  • 2 cups chopped carrots (about 4)
  • approx. 2  1/2 quarts chicken broth (10 cups)
  • 2 teaspoons ground cumin
  • 2 teaspoons ground coriander
  • 1 tablespoon chili powder
  • approx. 1 tablespoon salt, to taste
  • 1 teaspoon black pepper, to taste
  • 2 cups frozen corn
  • 1/2 cup chopped fresh cilantro
  • 6 small corn tortillas (approx. 6 inch diameter)
  • for toppings (be SURE to include these!): lime wedges, chopped cilantro, grated jack and/or cheddar cheese, sliced avocado, and crushed corn chips (optional)
  1. If cooking the chicken specifically for this recipe, sprinkle chicken thighs or breasts (or combo) with salt, pepper, garlic powder, cumin, and chili powder.  Bake in preheated 350 degree oven for approximately 20 minutes, turn chicken over and continue to cook for an additional 10-15 minutes.  (cooking time determined by how large the chicken pieces are and whether or not the chicken pieces have bones).  Remove chicken from oven and when cool enough to handle, dice or shred and set aside. Discard  bones and skin.
  2. Heat approximately 2 tablespoons olive oil in large skillet.
  3. Add onions to hot oil in skillet.  Saute onions until translucent, 5-8 minutes.
  4. Add celery and desired quantity of chopped jalapenos  to onions and saute for an additional 2-3 minutes.
  5. Add garlic cloves and saute for another 30 seconds or so.  Do not let the garlic brown.
  6. Remove approx one third of the onion-celery-jalapeno-garlic mixture and place in blender. Leave the remaining 2/3 in the pan.
  7. Add 1/3 of each can of beans to the blender (you can add one can of beans or two, depends on how you like your soup and how much fiber you want), along with enough of the crushed tomatoes to make a puree-able mixture (1/3 – 1/2 of the can).  Whirl on high until mixture is pureed.
  8. In large stockpot heat the chicken broth, add the pureed mixture, the reserved onion-celery-jalapeno-garlic mixture, the chopped carrots, the drained and rinsed can(s) of bean(s),and the spices (cumin, coriander, chili powder, salt and pepper).
  9. Bring soup to boil, then reduce heat and simmer for 30 minutes.
  10. Add shredded chicken and corn and simmer for an additional 5 minutes.
  11. Cut tortillas into noodle-like strips. (Cut tortillas in half and then cut crosswise into 1/2-inch strips.)
  12. Stir cut tortillas and chopped cilantro into soup and simmer for an additional 5 minutes, or until chicken is heated through.
  13. Serve the soup hot, topped with lime wedges, chopped avocado, grated cheese, and crushed tortilla chips (if desired, and everyone I served this soup to, desired everything, including the crushed tortilla chips! The t-shirt people–my running addicted friends–added the most chips!!!  LOL)
Note:  If you are just going to eat half the soup, divide the soup and add half the tortilla strips.  When you eat the remaining half of the soup, add the remaining tortilla strips. The soup keeps well, but the tortilla strips, when sitting in a liquid, don’t)
Thanks for stopping by my kitchen today.  It took me so long to type, edit and insert a picture into this post that the weather has turned warm again.  Shoot!


04 Oct 2011 Chicken Pot Pie

It rained here yesterday!  Happy, happy October, my very favorite month of the whole year.  I was so excited with the cooler weather and the rain that  I put on slippers and a sweatshirt to celebrate.   Then I decided to teach my son how to make Chicken Pot Pie.  He has his own apartment now, and needs to know how to make things like this.  I went shopping for ingredients, started to prep them…and no man-child.  He ended up staying late at work, and I had to make the pie by myself.  He was home when it came out of the oven though (how does he doe that?!).  He walked in, kissed me and said, “I love it when you make stuff like this.” he then proceeded to eat half the pie.  Then he called his friend to say there was Chicken Pot Pie at his house, and to come over and have some!  I’d say the pie was a hit.

This is my son.  He’s a good sport about learning how to cook and wearing an apron his mom made for him!

This is a pretty simple Chicken Pot Pie.  Absolute comfort food!  No spices other than salt and pepper, so the true taste  of sauteed chicken and fresh veggies shine through…and are then snuggled up in a smooth gravy and encased in pastry.  Yummmm!

The hardest part of this pie comes after removing it from the oven.  You have to wait!  You have to wait for the gravy to set up a bit, or it will run all over your pastry.  If you can’t wait, it’s  not really a bad thing!  The loose first slice will still taste delicious and by the time you are ready for your second slice, the filling will have set a bit.

Believe me, after making your own Chicken Pot Pie, you will never buy one from the frozen foods  section again.  You might never order one from a restaurant either…

Chicken Pot Pie

  • 2 tablespoons olive oil
  • 2 tablespoons butter
  • 1 cup chopped onion
  • 1 cup diced carrots
  • 1 cup diced celery
  • 1 lb. boneless, skinless chicken (breast or thighs, or a combination)
  • salt and pepper to taste
  • 1/3 cup flour
  • 1 can condensed chicken broth (or 1 1/2 cups homemade chicken broth)
  • 1/2 cup half-and-half or milk
  • 1/2 cup fresh or frozen corn kernels
  • 1/2 cup petite frozen peas
  • 2 9″ Pillsbury pie crusts (1 box) OR 1 homemade double crust pastry
  • 1 egg, beaten with 1 tablespoon water, optional
  1. Preheat oven to 350 degrees.
  2. Melt the butter along with the olive oil (you can use all oil, if you want) in a large skillet over medium heat.
  3. When the butter has melted and the oil is hot, add the chopped onion and saute over medium heat for a few minutes.
  4. Stir in the diced carrot and celery and saute for approx. 5 more minutes, still over medium heat, stirring occasionally.
  5. While the veggies are sauteing, dice the chicken and sprinkle with salt and pepper.
  6. Stir the diced and seasoned chicken into the veggie mixture and saute for three more minutes, still stirring occasionally.
  7. Sprinkle the flour over the chicken and veggie mixture, stir constantly over medium heat for 3 minutes (the flour might try to stick to the bottom of the pan, try to release it by stirring vigorously. If necessary add another tablespoon or so of butter or oil. Do not burn the flour!).
  8. While the chicken/veggie/flour mixture  is sauteing, combine the chicken broth and half-and-half or milk and microwave for three minutes.  When the microwave beeps, remove the pan from the heat and remove the liquid from the microwave.
  9. Now you are going to make the gravy.  Turn the heat off the pan.  Stir in 1/2 cup of the hot broth-milk mixture.  Stir until mixture is smooth.  Add another 1/2 cup of broth-milk mixture. Stir until smooth.  Repeat two more times using 1/2 cup broth-milk mixture each time.
  10. Return chicken-veggie-gravy mixture to heat.  Stir in frozen (of fresh) corn and peas. Simmer for gently over medium heat to defrost the frozen veggies.
  11. Turn off heat and let filling sit while you unroll the pasty and place one sheet in the bottom of a pie pan.
  12. Pour the filling over the pastry in the bottom of the pie pan, and cover with the second roll of pasty.  Cut 3-5 vent holes in top of top pastry (with scissors or a knife).  Crimp the edges of the pastry so the filling is fully encased.
  13. If you want a nice, shiny crust, brush pastry lightly with egg wash (egg beaten with 1 tablespoon water).  This is optional (but nice if you want to show off!) You won’t need all of the egg wash. (Scramble the leftover egg for the baby, or the dog!)
  14. Bake in preheated 350 degree oven for 40 to 45 minutes.
  15. Remove pie from oven and let sit…for as long as you can.  The longer the pie sits, the thicker the gravy will get.  Letting the pie sit for 30 minutes to an hour, is about right. (Don’t worry, the filling will remain hot.)
  16. Serve, and enjoy.

Thanks for stopping by my kitchen today.  Hope you enjoyed the visit.  See you again, soon, I hope!