Tag-Archive for ◊ cheese ◊

29 Nov 2020 Polly’s Mac n’ Cheese
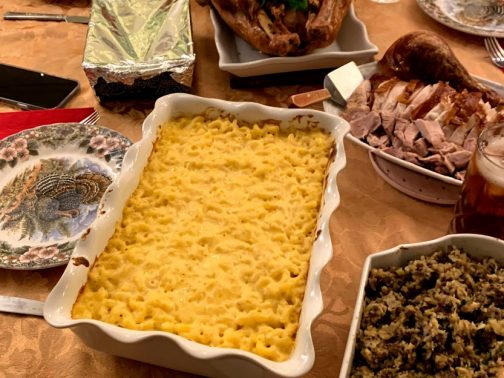
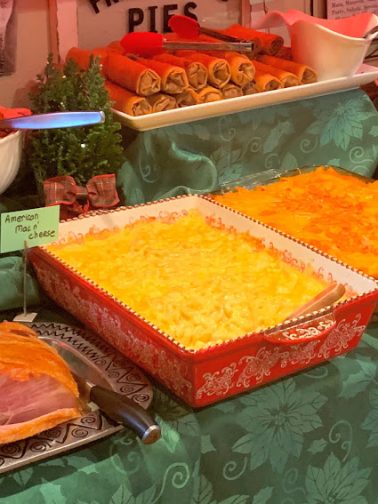
Thanksgiving Dinner with Mac n’ Cheese
Christmas Party buffet with Mac n’ Cheese

Polly’s Mac n’ Cheese (YEP, I’m claiming it)

I’ve been promising to post this recipe forever, but I have held off because it’s impossible (for me anyway) to get a good picture of Mac n’ Cheese. The issue is partly Mac n’ Cheese’s fault, right? It’s just not photogenic; it’s flat, it’s monotone (just white noodles and melted cheese), and it has NO pops of color anywhere! Garnish Mac n’ Cheese? That would just look silly. So here it is, my recipe for Mac n’ Cheese, without a good picture 🙂

It’s taken a long time to perfect this recipe and there is nothing crazy about it. It’s a traditional macaroni and cheese; no fancy cheeses. No veggies, no lobster, no bacon, no truffle oil, no breadcrumbs and definitely no Flamin’ Hot Cheetos! Just elbow noodles, cheddar cheese, and a roux.

That being said, I do have ONE secret ingredient, I use some chicken broth in the sauce to add more umami, if you will, to the dish.  I use homemade chicken broth/stock/bone broth, not the processed, canned or boxed stuff. 

If you must use a commercial broth, deepen the flavor first.  Pour the broth into a pan, add some bone-in chicken (anything: a thigh, a drumstick or two, leftover carcass of a rotisserie chicken…). Then toss in a bay leaf or two, some chopped onion (with the skin), and perhaps some chopped carrot or celery (whatever you have languishing in the veggie drawer). Let the to-be-enhanced broth simmer while prepping the rest of the ingredients. Drain solids from broth and discard. Use broth as directed below.

One other tip, I wouldn’t use that pre-shredded cheese. I haven’t tasted any pre-shredded cheese that has the required sharpness, and I don’t know how all those additives used to prevent the cheese from clumping will affect the final dish.

Just for the record, Mac n’ Cheese is a side dish, never a main.

INGREDIENTS

  • 2-3 cups homemade or enriched Chicken broth, heated
  • 2-3 cups whole milk, heated
  • NOTE: you need 5 cups total of liquid–use 50/50 chicken broth/milk or 60/40 or 25/75, whatever suits you or whatever fits what you have on hand.
  • 4 Tablespoons butter
  • 1/3 cup flour
  • ¼-½ teaspoon powdered mustard (not so much for taste, but to help with emulsion)
  • 1 lb sharp cheddar cheese grated, approx. 4 cups (Ok to sub a bit of mozzarella, up to 1 cup, for some of the sharp cheddar. Also, if you have odd bits and pieces of various cheeses leftover, use them but remember that the flavor of the dish will change–and kids will object)
  • Salt and pepper, to taste (chicken broth varies in saltiness, so taste the cheese sauce and add salt and pepper as needed.)
  • 1 lb elbow macaroni (cooked in generously salted water, for the shortest time mentioned on the package, rinse with cold water, and drain.)

DIRECTIONS

  1. Preheat oven to 350 degrees.
  2. Combine milk and chicken broth in a large container and microwave until hot.
  3. In a large skillet, melt butter and stir in the flour.
  4. Stirring constantly, cook the flour-butter mixture over medium heat for 3 minutes, taking care not to brown the roux.
  5. Turn off the heat under the roux.
  6. Slowly add about 1 cup of the chicken broth-milk mixture into the roux. Whisk and stir constantly until all liquid is absorbed and mixture looks homogenous and there are no lumps in the sacue. Repeat until all milk-broth mixture has been incorporated into the butter-flour mixture.
  7. Return mixture to heat and simmer gently for 3 minutes, stirring occasionally.
  8. Taste.  Add salt, pepper  to taste along with a small quantity of powdered mustard.
  9. Gradually add cheese a handful at a time. Stir until completely melted, then add another handful and repeat process until all cheese has been incorporated.
  10. Stir cooked elbow macaroni into cheese sauce.
  11. Pour into greased 9×13 casserole dish.
  12.  Bake in preheated 350 oven for 30 minutes. Do not overbake or cheese sauce will begin to separate.
  13.  Cool for 10 minutes or so before serving.

NOTES from experience: To make ahead, make cheese sauce and boil noodles, but store separately. Bring to room temperature. Combine. Bake as above.

I have made premade cheese sauce and frozen it , then defrosted it overnight in the refrigerator.  I do reheat the cheese sauce and whip with immersion blender before combining with boiled noodles.

OK to sprinkle extra cheese on top if you like that look.

Enjoy!

03 Jun 2019 Filipino Chicken Barbecue (Skewers)

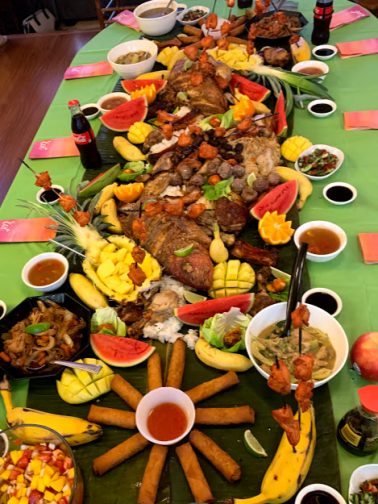
I know nothing about Filipino cooking, but my daughter organized a Boodle Fight for one of our cookbook club meetings. Knowing nothing, and needing to know something fast, I researched cookbooks and ordered one that sounded good, landing on “I Am A Filipino: And This Is How We Cook” by Nicole Ponseca. I made several recipes, Chicken Barbecue, Banana Ketchup Ribs, Pancit, Coconut Flan.  Two recipes were keepers, as is, no changes…, Chicken Barbecue and Banana Ketchup BBQ Ribs.

Good news, Epicurious is going all out on promoting this recipe, too, it’s a keeper! Can you see the chicken on the skewers in the picture above?  Look at all that food! A Boodle Fight is a GREAT idea! If you can’t do all of it, start with the Chicken Barbecue Skewers.

You’ll need some Banana Ketchup, which is ketchup made from bananas, not tomatoes, but tastes nothing like bananas, and is still a vibrant red color! I bought my first bottle of Banana Ketchup on Amazon.  It cost 4 times the amount of my 2nd, 3rd, 4th, and 5th bottle of Banana Ketchup.  If you have a Filipino market close by, a bottle of Banana Ketchup will cost less than two dollars, if you order it off of Amazon it will cost over eight dollars. Do what you have to do, get a bottle of Banana Ketchup and make the Chicken Barbecue on Skewers.

Filipino Chicken Barbecue (Skewers)

  • 2 1/4 cups (540 ml) banana ketchup
  • 1 cup (240 ml) 7UP or Sprite
  • 1/2 cup (120 ml) fresh lemon juice
  • 1/2 cup (120 ml) soy sauce
  • 1/2 cup (120 ml) white sugarcane vinegar
  • 1/2 cup (110 g) packed brown sugar
  • 1/4 cup (35 g) minced garlic
  • 3 pounds (1.4 kg) boneless, skinless chicken thighs, cut into 1-inch pieces
  • Cooking spray or vegetable oil, for greasing
  • Wooden skewers
  1. Stir together the banana ketchup, 7UP/Sprite, lemon juice, soy sauce, vinegar, brown sugar, and garlic, keep stirring until the sugar has dissolved.
  2. Add the chicken pieces and toss. Cover the bowl or pour mixture into a Ziplok bag and marinate in the refrigerator for at least 1 hour and preferably overnight.
  3. When you are ready to cook the meat, heat a grill pan over high heat or heat a charcoal or gas grill to medium.
  4. Reserving the marinade, thread 3 or 4 pieces of chicken on each skewer, letting the pieces touch slightly, and set them on a plate or baking sheet.
  5. Pour the marinade into a saucepan and bring it to a simmer over medium-high heat. Reduce the heat to medium and cook for 10 minutes; set it aside.
  6. Spray the pan or grill grate lightly with cooking spray. Place the skewers on the grill pan or grill and cook, turning them and basting them often with the heated marinade, until they are cooked through or the center of a piece of chicken registers 165°F (75°C) on an instant-read thermometer. This should take between 8 and 15 minutes, depending on your cooking surface (discard any leftover marinade).
  7. Transfer to a platter. Serve and share.

Thanks for stopping by my kitchen today!

11 Sep 2013 Caprese Garlic Bread (with Tomatoes, Mozzarella and Basil)
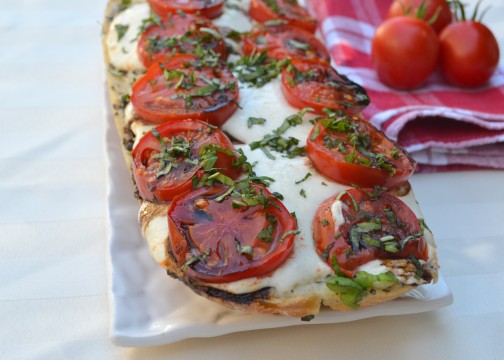
caprese bread

It’s just garlic bread, folks, but it’s garlic bread with an upgrade! After running across this recipe at Two Peas and their Pod,  I decided I needed to make it! I quickly sent texts to a few friends and invited them to come over for a light supper and four replied “YES”!  I served this bread, a platter of cold shrimp, some sliced melon, iced tea and lemon meringue pie. It’s  great having friends who are good with spur-of-the-moment things 🙂

The bread was very good!  The Balsamic Reduction highlighted the simple tomato, cheese, and basil topping.  I made a few changes to the original recipe:  I used my own garlic bread base, I adjusted the cooking time for the balsamic reduction and I baked the tomatoes on the bread instead of laying them on after cooking.  BTW, do not skip the balsamic reduction, it’s fabulous!

I hope you have some backyard (or farmer’s market)  tomatoes on hand, because store bought tomatoes just aren’t invited to this party! And the photo above shows a bit too much cheese.  I bought fresh mozzarella from Costco and it came pre-sliced, so I just went with it.  Turns out I used double the cheese!  Oooops!  No one complained though 🙂  The recipe below has the correct amount of cheese listed but if you want to up it a bit, that’s up to you. One other piece of advice, the tomatoes shrink when baked, so pile them on the bread.  I think I could have added another slice of tomato to each row!

Caprese Garlic Bread

AKA: Garlic Bread with Tomatoes, Mozzarella and Basil

  • 1 loaf sourdough bread, horizontally cut in half (french bread would work, too.  The original recipe called for ciabatta, but I am in the SF Bay Area and sourdough rules around here!)
  • 4 tablespoons salted butter, softened
  • 3 cloves garlic, minced
  • 1/4 cup grated Parmesan cheese (plus and extra tablespoon or so for garnish)
  • 3 Tablespoons dried onion, if you have it
  • 2 teaspoons dried basil (or 2 Tablespoons fresh)
  • 2 teaspoons dried parsley (or 2 Tablespoons fresh)
  • 12 oz. fresh mozzarella cheese, sliced
  • 1/2 cup balsamic vinegar
  • 2-3 medium tomatoes, sliced
  • Salt and freshly ground black pepper, to taste
  • 1/3 cup chopped fresh basil
  1. While you are getting all the ingredients together and doing the prep work, make the balsamic reduction. Place 1/2 cup balsamic vinegar in a small saucepan. Bring the vinegar to a boil, decrease the heat to low, and simmer, stirring occasionally, until the mixture is reduced by about half. How do you know when the vinegar has been reduced by half? Keep the measuring jug near the pan.  Every once in awhile pour the hot vinegar into the measuring cup.  If it’s not at 1/4 cup yet, pour it back in the pan and continue boiling. Keep doing this until the vinegar has been reduced to 1/4 cup. This will take about 10-15  minutes. Set the reduction aside to cool.  You won’t  need to use it until just before serving.
  2. Preheat oven to 400 degrees F.
  3. In a small bowl combine butter, garlic, dried onion, basil, parsley, and parmesan cheese.  
  4. Cut the loaf of bread in half horizontally. Place both sides of the loaf on a large baking sheet with the cut side up. Spread the garlic butter mixture over both sides of the cut bread.  Spread to all the corners and completely to the outer edge of the bread.
  5. Place the mozzarella cheese slices on top of the bread, making sure the cheese covers the bread completely.
  6. Top the cheese with the sliced tomatoes.  Sprinkle tomatoes with salt and pepper, to taste. If desired, sprinkle a bit of parmesan cheese over the tomaotes.
  7. Bake the bread at 400 degrees for 12-15 minutes or until the cheese is melted.
  8. Remove the bread from oven.  Sprinkle fresh basil over the top of the bread and drizzle with balsamic reduction.
  9. Cut into slices and serve.

That’s all there is too it!  Enjoy the last of your summer tomatoes!  They are special, aren’t they? And thanks for dropping by today!

24 Jun 2013 Crab and Brie Macaroni and Cheese

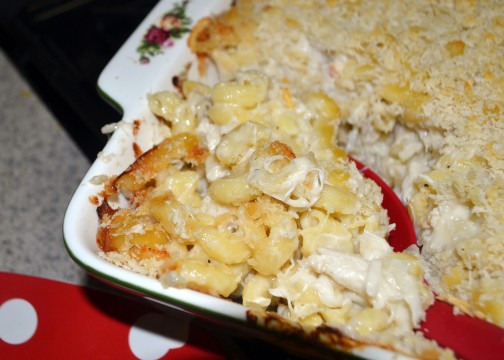
Crab and brie mac n cheese

Whooooa Nelly!  Crab and Brie Macaroni and Cheese?  Over-the-top decadence in a comfort food?  YEP! And the decadence makes the comfort food even more comforting–like ‘died and gone to heaven’ comforting!  Yet another winning recipe from Better Homes and Gardens Special Interest Publication “Best Loved Reader Recipes; 125 Winners from 1930 to Today”. (My last post was a recipe for “Peach Iced Tea” inspired by a recipe from this magazine)

If someone is having a hard time, and that sweet “I am going to drop off a casserole” American tradition seems appropriate, THIS is the casserole to take.  I took it to my 120-miles away daughter who is bravely attempting a semester long college Physics course in a six-week summer session, working the 4 PM-midnight shift at Target, and sweltering in the hot central valley heat. I am not saying this Macaroni and Cheese is miraculous or anything, but she did  score 15 points over the class average on her first mid-term. Not dropping off a casserole to a friend-in-need anytime soon?  I’ll bet you’ll be going to a potluck then. Take this!  Want to eat it at home, like we did?  We had it with mixed roasted veggies, but a leafy green salad would be nice too, and a corn muffin.

This casserole is not cheap, but if you shop at Costco for your pound of brie and pound of crab (the only two expensive ingredients), it won’t break the bank and you’ll have made a casserole big enough feed a small army.

Truth be told, I was a bit afraid of this recipe at first, wondering if the Brie would be too strong, and wondering if I would be able to taste the crab over the brie.  Both worries proved needless.  Everything melds together nicely.  Comfortingly nice.  I’ll say it again, because it’s true, ‘died and gone to heaven’ nice!

I changed the recipe just just a bit; one, to conform to the quantities of crab and brie sold at Costco (no leftover bits and no need to buy two big cartons of anything) and two, to make the recipe a bit easier by  substituting panko instead of homemade bread crumbs. I also re-wrote the recipe a bit, making roux is not hard, just follow my instructions: brown the flour and butter (and don’t skimp on the butter), remove the pan from the heat, then vigorously stir in hot milk until sauce is smooth.

Enjoy your comfort food decadance.

Crab and Brie Macaroni and Cheese

  • 1 lb. dried macaroni (small shells or elbows)
  • 1 medium onion, chopped
  • 5 tablespoons butter (maybe a bit more)
  • 3 cups milk (I used 2%)
  • 1/3 cup all-purpose flour
  • 1 teaspoon salt
  • 1/2 teaspoon black pepper
  • 13-16 oz. Brie, cubed
  • 16 oz. refrigerated container crabmeat, drained and flaked
  • 1/2 cup Panko or favorite breadcrumbs
  1. Cook macaroni in salted water according to package directions.  (Choose the shortest cooking time since pasta will continue to cook when baked.) Drain and set aside.
  2. Preheat oven to 350 degrees. Grease a 9-in by 13-in casserole dish.
  3. In a large skillet over medium-high heat, saute onion in butter until tender and golden, about 15 minutes.  (Do not skimp on the butter.  You’ll need the full quantity of  butter to make the roux in the step 5.)
  4. Heat 3 cups of milk in microwave until hot (3-5 minutes).
  5. Meanwhile, over medium heat, stir flour into onion and butter mixture.  Stir constantly for 3 minutes (to cook flour and to incorporate butter into the flour).  If mixture is too lumpy or dry, add an additional tablespoon of butter.
  6. Remove hot pan with onion and roux from heat.  Pour in 1 cup of hot milk.  Stir well, and keep stirring-vigorously if needed-until mixture is smooth and lump free.  Add another cup of hot milk, stir and mix again.  When mixture is smooth and lump free, repeat with last cup of milk.
  7. Return pan to medium heat. Add cubed brie to sauce in pan.  Stir constantly until brie is melted and incorporated.  Remove pan from heat when brie has melted and the sauce is smooth once again.
  8. Fold drained crab into cheese sauce then stir in cooked and well-drained macaroni.
  9. Season with salt and pepper.
  10. Pour crab-brie-macaroni mixture into a well buttered 9-in x 13-in casserole dish.
  11. Sprinkle bread crumbs over top of macaroni and cheese.
  12. Bake in preheated 350 degree oven for 30 minutes or until mixture is heated through and bread crumbs have browned.  If breadcrumbs don’t brown, turn on the broiler and broil casserole for a few minutes.
  13. Remove casserole from oven. Let cool 5 – 10 minutes, then serve. In a bowl, while curled up on the couch with a good book or good movie, or on a plate with roasted veggies or a salad, and maybe a small corn muffin. Enjoy.  Feel better. Ace the Physics test!

Leftovers can be reheated in microwave or frozen for a future treat.

Thank you for stopping by my kitchen again today,  I love having you drop by!  Let’s see what else I can make from this magazine. It’s supposed to be on the shelves until July 15, 2013, so if you see it, you might want to pick up a copy.