Tag-Archive for ◊ Winter ◊

24 Feb 2017 Italian Wedding Soup

italian-wedding-soup

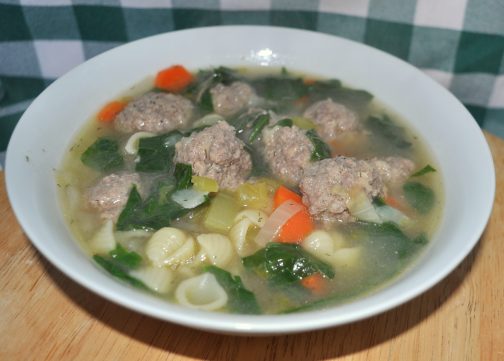
Italian Wedding Soup is easy to make, and is good as soon as it’s made (no need to sit overnight to intensify the flavors).  Not being Italian, I can’t claim this is just like my Nonna made. Nor can I claim to know the origin of the name, “Italian Wedding Soup”, but I did do a bit of Internet research.  Contrary to what some think, this soup is NOT served at Italian Weddings (although, because of it’s name, it is served at some Italian-American weddings in…Pennsylvania!).  Another theory is that the soup is a good “marriage” of ingredients, possibly green vegetables and meat. The most common story is the soup is easy enough for a new bride (or new groom) to make as one of their first home-cooked meals.  My non-Italian, non-traditional thought it that it’s great for a couple to make together.  One person could make the meatballs while the other makes the vegetable broth base.  Throw the vegetable broth and the meatballs together, simmer for a few minutes, and then sit down to enjoy a bowl or two of heart-warming Italian Wedding Soup.

This recipe is based upon one by Ina Garten, but I have changed Ina’s recipe somewhat.  The major change is I cook the meatballs in the broth, rather than bake them in the oven as Ina directs. I also make my meatballs out of ground beef instead of Ina’s ground chicken/ground chicken sausage combo.  I like a tastier meatball, and I think beef goes better with the Parmesan in the meatball than chicken does. I also added basil to the meatball. I don’t know why Ina forgot that!

I love soup. I can eat it for breakfast, lunch or dinner. One tip, every time I make a pot of soup, I freeze one or two individual servings.  It’s wonderful to have a ready-made, wholesome bowl of soup in the freezer for those days when you are rushing from points A to Z with no time to spare.  A bowl of soup in the freezer can keep you away from those fast food places. Honest.

Now go on, try it…Italian Wedding Soup!

Italian Wedding Soup

For the soup base

  • 2 Tablespoons olive oil
  • 1 cup chopped onion
  • 1 cup chopped celery
  • 1 1/2 cups sliced carrots
  • 2 teaspoons dill
  • 1/4 cup chopped fresh parsley (use more of the parsley in the meatballs)
  • 10-12 cups chicken broth (homemade is the best, of course)
  • 1/2 cup dry white wine
  • 1 cup small pasta (orzo, tubetini, small stars, mini shells..)
  • 1 batch of meatballs (recipe below)
  • 12 oz. baby spinach, stems removed and leaves coarsely chopped
  • salt and pepper, to taste
  • additional grated Parmesan, optional (for serving)

Heat the olive oil in a large, heavy bottomed soup pan.  Add the onion and saute until slightly caramelized, about 6 minutes.  Stir in chopped celery and saute for another 3 minutes. Stir in carrots, dill, parsley, chicken broth, and wine and bring to a boil. While soup is boiling, stir in pasta and meatballs.  Simmer for 8-10 minutes. Stir in chopped spinach and simmer for an additional 2 minutes.  Turn heat off. Taste broth.  Add salt and pepper as needed. Ladle soup into bowls and sprinkle with additional grated Parmesan, if desired.

For the Meatballs

  • 1 1/4 – 1 1/2 lbs lean ground beef (can substitute ground turkey or ground chicken, but the meatballs won’t taste as good!)
  • 2/3 cup fresh breadcrumbs (2 slices of bread, crusts removed, whirled in food processor OR, in a pinch, stir in bought bread crumbs or Panko)
  • 2 teaspoons dried basil, crushed
  • minced garlic, to taste (1 or 2 cloves, minced OR 1/2 teaspoon garlic OR onion powder)
  • 3 tablespoons chopped fresh parsley
  • 1/2 cup grated Parmesan
  • 3 Tablespoons milk
  • 1 egg
  • salt and pepper, to taste

Place ground beef, breadcrumbs, basil, garlic, parsley, cheese, and desired amount of salt and pepper in a bowl. Mix lightly with a fork (don’t use hands because the resulting meatballs will be too dense).  In another bowl, combine the milk with the egg and beat lightly.  Stir the egg/milk mixture into the meat mixture, again, using your fork. When all ingredients are evenly distributed, use a small scoop or a tablespoon to portion meat and form into about 40 meatballs. Roll the scooped meat gently in palm of your hand to form into a ball. Use meatballs as directed above.


20 Dec 2014 Minty Malty Hot Chocolate

You HAVE to try this!  It’s delicious, and it’s mild and smooth and warm and comforting, and sooooo Christmassy!.  I don’t know about you, but I don’t like bitter hot chocolate (Starbucks!), and I don’t like hot chocolate that is so strong I can hardly finish it (Starbucks!), or so rich I feel sick after drinking it (Paris!).  This hot chocolate is perfect. Mild. Creamy. Totally Yummy. Totally Christmassy.  Serve it with a candy cane stirrer or crushed candy canes sprinkled on top of the whipped cream. I served it at my Christmas party and it was a big hit.

Make it to watch your favorite Christmas movie with, or to read your favorite Christmas book with, or to just sit under the Christmas tree and watch the lights.  Make it for after a long walk in the snow (or, in California, in the rain), or for the Christmas Carolers (there’s so few of them now). Or to celebrate having finished all your Christmas shopping. Or make it for Santa and leave it out with the cookies–with testers for the whole family, of course. Make it for Christmas morning, to open the presents with, or make it for Christmas night to end the day with.  Just make it.  You’ll love it.

There is a problem though, finding Chocolate Malted Milk Powder.  I had to order it from Amazon.  The first time I made it, I made it with Vanilla Malted Milk Powder though, which is easily found in any grocery store, then I added cocoa powder and sugar to taste. It was great! (I used 1/2 cup Vanilla Malted Powder…, and just kept adding equal amounts of cocoa powder and sugar until it tasted right.)

The original recipe starts with a gallon of milk, and leftovers do keep well in refrigerator and warm up well in the microwave, but if you want to make half a recipe, I have written the recipe with easy to half measurements. If you are making for a party, mix everything on top of stove, then pour into a crockpot to keep warm.

Trust me!  This is delicious.  Let me know how you like it.

Minty Malty Hot Chocolate

  • 1 gallon whole milk
  • 1 11 oz pkg (about 20-22) chocolate-covered cream filled mint patties (Mini York Peppermint Patties)
  • 1 ½ cups chocolate malted milk powder* (order from Amazon)
  • 1 tablespoon vanilla
  • Whipped cream, marshmallows, mini candy canes or crushed peppermints topping (optional)

Combine all ingredients in a pan on top of the stove, stir  until mint patties melt.  Stir occasionally, and watch like a hawk. Once milk gets hot enough to boil over, there’s no stopping it.  Just gently heat the milk and melt the mint  patties. (Can be made a few days in advance.) Beat to combine well.  Serve from pan, or place in crock pot to keep warm up.  (Can keep in crockpot for at least 2 hours.) Top with whipped cream, marshmallows, mini candy canes or some crushed up peppermints…, or serve “as is”.

*Or sub ½ cup vanilla malted milk powder and enough cocoa powder and chocolate to taste. I did this once, delicious, but don’t remember the quantities…, just a bit of this and a bit of that. Then a bit more of this, a bit more… Until it tastes delicious!

Thanks for stopping by my kitchen today,

18 Jan 2014 Russian Tea

Russian-Tea-1a

Are you old enough to remember the “Russian Tea” phase back in the 70’s?  I was a teenager then, a very young teenager, and our Moms and Grandmas were mixing up batches of Russian Tea like crazy and giving everyone little jars of the stuff.  I think the mix had instant tea, Tang (remember Tang? Astronauts drank it!), powdered lemonade, and some spices.  You opened up your gift jar, spooned some mix into a cup, added hot water, stirred it up and  you were drinking Russian Tea!  I liked it. It was a different hot drink.  I wasn’t into coffee yet, Hot Chocolate was too childish, English tea with milk was OK, but boring. Russian Tea was fun and different–and a bit exotic.

Fast forward to February 7th, 2014, Opening Ceremonies for The XXII Winter Olympics will be held in Sochi, Russia and I will be hosting a Russian Themed Winter Olympic Dinner.  What to have to drink after dinner? My daughter suggested Vodka shots off the tip of a sword.  Umm, no.  A citrus-y, sweet, slightly spicy version of Russian Tea is more up my alley — but not made of Tang, Country Time Lemonade and Nestea. So I hit the Internet.  First spoiler, the so-called “Russian Tea” of the 70’s isn’t Russian at all. It’s an American concoction! The only thing Russian about it is it’s name.  Shhhhhhhhhh! Don’t tell anyone!  Real Russian tea is “Russian Caravan” tea, because tea used to be imported to Russia from China, via a 16-18 month caravan, and it acquired a smokey flavor from all of the caravan campfires, according to Wikipedia.  So, I went to my local Russian grocery store, yes, we have one in San Jose, and I couldn’t find “Russian Caravan” tea anywhere (nor anyone to help me), but lots of Earl Grey.  I am not serving Earl Grey tea at my Russian Dinner.  Early Gray Tea is English and I don’t like it, it’s too smokey!

So now I am back to my original “Russian” Tea quest.  I found some recipes on the Internet, checked out their star ratings, and tried a few.  One was truly horrid; it involved extracting the juice from oranges and lemons, then boiling the  rinds in sugar and water then adding  the liquid to cold tea. I was skeptical, but the very attractive, very sincere lady on the YouTube video seemed nice, and she was raving over her tea! So I tried it.  She was not honest. Her tea was bitter and horrid.  Of COURSE it was.  Boiling all that pith then adding it to the tea? I should have known better. Why do people post bad recipes?

Eventually, I came up with this version for fresh Russian Tea.  I like it.  I really like it. I served it to five friends and two relatives, and they all said they liked it.  Then I served it to another relative, the daughter who suggested I serve vodka shots off the end of a sword, and she hated it.  I was SHOCKED.  I tied her down and make her try it again.  She STILL didn’t like it.  Harrumph.  She’s no longer my favorite child.  My son loved the tea.  He said, “That’s good.  That’s really, really good.”  He’s a good boy. He’s my favorite child now.

This “Russian” tea is in the same family as hot tea with lemon and honey, but with orange added, and some cinnamon, and a few cloves, it’s a bit more complex (there’s no honey in this tea though).  I’m going to serve it at my Russian themed Winter Olympic dinner, but I’ll brew a pot of Earl Grey, too… for the weirdos.

You all know I am not a photographer, right?  I thought I was being deliciously creative setting up a picture to look like hot, citrus-y, Russian tea in cold, stark, white snow.  Epic fail.  What I got looks like tea in bubbles, oh, not even that, it looks like tea in pillow stuffing, which it is.  Can you overlook that?  Can you just try this hot, citrus-y, slightly spiced, American-Russian tea?  I think you will be glad you did.  Just make the tea once, and put it in the refrigerator to reheat as needed. Ponyat’? Da?

I am really getting into the Olympic/Russian thing now. I made Pierogi for dinner last night, and I ordered a Pierogi press and a Pierogi cookbook written by a real babuska from Amazon.  I am trying to find a Russian outfit to wear. It seems I should go as a babushka.  I already have all the right clothes in my closet…and you know, Vodka shots from the end of a sword might not be too far fetched!

Russian Tea

  • 4 strong black tea bags
  • 1 quart (4 cups boiling water)
  • Zest of 1 1/2 oranges
  • Juice of 1 1/2 oranges (about 2/3 cup)
  • Zest of 1 large lemon
  • Juice of 1 large lemon (about 1/4 cup)
  • 6 cloves (0k to double for spicier drink)
  • 1 cinnamon stick (ok to use 2 for spicier drink)
  • 1 cup sugar (might be ok to reduce to 3/4 cup for a less sweet drink)
  • 2 cups cold water 
  1. Make 1 quart of tea by pouring 1 quart of boiling water over 4 teabags and seep for 5 minutes.  Remove tea bags from hot tea and set tea aside.
  2. Zest the oranges and lemon. Put the zest in a small saucepan.
  3. Add 1 cup sugar and 2 cups cold water to the zest in the small saucepan.
  4. Bring water, sugar, and zest to a boil and boil for 5 minutes.
  5. Juice the oranges and lemon. Pour the juice into the brewed tea.
  6. Strain the  boiled water, sugar, spices and zest mixture the add to tea and juice mixture.
  7. Stir well and serve or refrigerate mixture until ready to use. Reheat in the microwave or on the stove top.
  8. Enjoy the Olympics!

Thanks for stopping by my kitchen today.  BTW, I tried one more drink in my quest for my Olympic dinner, but I think that one qualifies as a dessert (and a gold medal)!  White Hot Chocolate.  Too, too, too decadent to post…I must keep my fans from sinning…I must…I must…OK, OK, I’ll post it soon!

02 Aug 2013 Beans!

beans01

I am so excited about this recipe!  It’s a paradigm shift recipe!  It’s not a recipe in the true sense of the word, it’s more of a road map to a particular destination.   A road map allows for more flexibility than a recipe, a road map allows the cook to make adjustments based upon personal preferences, taste, time, and what’s in the pantry.  I think most people have a road map for a few good dishes.  I have a road map for spaghetti sauce, chicken soup, stir-fry and hamburgers.  You might have a road map for meatloaf, burritos and rice bowls.  Most people have road maps for sandwiches and salads. A road map means there are guidelines, easy ones, usually ones that can be memorized, and that can always be adapted as the situation requires.

So here it is, a guideline for a pot of beans, in the crockpot no less!  Crockpot cooking is great for summer, the kitchen doesn’t get heated up, and a pot of beans pairs well with almost everything that can be BBQ’d.  In the winter months, a bowl of beans with some cornbread or tortillas is almost the definition of comfort food. Another plus, crockpot cooking is fuss free, so toss everything in the pot and then go sit in the sun or shovel snow.

Many thanks to Mark Bittman of the New York Times for this road map. Thank you, thank you, thank you!!

BTW…, for years I have been looking for a good baked beans recipe, so that’s what I make with this recipe:  meaty, slightly sweet Boston-style beans.  YUM! They go with everything and I have  a serious love for leftover beans on toast (I’m English).  My son mastered this recipe in one take and he makes killer spicy teriyaki beans with chicken.  I can see others going for more of a Mexican style bean. What sort of beans do you like? Make them!

The House Special Beans

  • 1 lb of dried beans, any kind, I like small white and pinquitos but black, pintos, garbanzos, kidney, or a combination of different kinds of beans can also be used.  Don’t have a full pound of beans?  Add in some split peas or lentils to make up the difference.  Remember these are dried beans (about $1.25 for a pound bag) we are not using canned beans here (and there is no need to soak the beans first).
  • 4 cups of liquid, any kind.  Find a mixture that appeals to you. I start with a bottle of beer, then I add in about 1/4 cup of ketchup, 1/4 cup of Worcestershire sauce, 1/4 cup maple syrup, 1/4 cup of brown sugar and a squirt of mustard, using molasses instead of maple syrup and brown sugar would be good too. If my Dad were here I’d stir in 1/4 cup of bourbon. Then I add water, broth (any kind), or cold coffee to make the 4 cups (too much coffee will make the beans a bit bitter, so stick to less than 1 cup of cold coffee).  My son adds BBQ sauce, sriracha, honey, teriyaki or soy sauce along with beer and coffee.  Don’t like beer?  Use some leftover wine. Don’t drink at all, stick to broth and water.   Health nut?  Stir in carrot juice and some of that green liquid you’re so fond of !
  • Seasonings, any kind.  Start with a healthy amount of salt and pepper, then add in what appeals to you.  I add in 2 t. salt, 1 t. black pepper, 1 t. cumin, 2 t. chili powder, minced garlic, and 2 bay leaves.  Other options include oregano, basil, coriander, red pepper, curry powder, ginger, paprika, liquid smoke, parsley, sage, rosemary and thyme…
  • 1 lb meat, any kind, a bit more or a bit less is fine.  I like beef, and I buy something on sale, beef shanks, top sirloin, stew meat, steak, anything.  Throw in a pork chop or two, or some ground meat (brown it first and drain off the fat), chicken (with or without the bones, but boneless chicken does tend to get a bit overcooked), sausage, ham, cooked bacon…, or go for a combo.  Sausage and chicken? Beef and bacon? Or leave out the meat all together if  you’d rather.
  • 2 lbs finely minced or grated veggies, any kind.  I always add diced onion, grated carrots, and minced celery.  Then I might add some shredded zucchini, turnip, cabbage, spinach or kale, whatever I have on hand. Throw in some potatoes. Lots of folk like bell peppers, dice some up and throw them in.  Leeks are yummy. A few diced jalapenos would spice things up. Even canned pumpkin works. The only veggie I don’t add is tomatoes. I heard once that tomatoes interfere with the cooking process of dried beans, so I leave them out (I also don’t use tomato juice as a liquid, but I do stir in a bit of ketchup, and have had no problem with that).

Directions:

  1. Put the dried beans in the bottom of the crock-pot.
  2. Get out a 4-cup measure.  Combine your liquids.  When you have 4 cups, pour it over the beans in the bottom of the crock-pot.
  3. On top of the beans and liquid, add the meat.  I add the meat as is, then remove the fat and bones, and shred the meat after cooking.  You can do the same, or you can add cubes of boneless, skinless meat.
  4. Sprinkle desired seasonings on top of the meat.  (If you add bay leaves, count them so you know how many to remove before serving!)
  5. Finely mince, dice, or shred the veggies.  Add the veggies on top of the meat. (The liquid will not cover the veggies, yet).
  6. With a spatula or a spoon, press on the ingredients to lightly pack.
  7. Put the lid on the slow cooker, plug it in, turn on high, and go out and play! If you are around, check the beans after a few hours.  If the beans look dry add a bit more water, stock, beer, or wine (don’t stir, just pour it on top).
  8. Let beans cook for 6-8 hours.  Turn off.
  9. After the beans have cooled for a bit, taste them.  Needs more salt?  More maple syrup? More heat? Add it now.  If you added large hunks of meat with bones, remove bones and shred the meat. Remove the bay leaves, if you used them.
  10. If you want to add in extras, do it now.  You could stir in some diced tomatoes now, if you’d like, they won’t do any harm at this point (let cook for an additional 30 minutes or so).  Sometimes I stir cooked bacon at this point.  You could stir in frozen corn, if you’d like. Adding chopped parsley, cilantro, or green onion makes the beans look pretty and brightens them up a bit for a pretty presentation.
  11. Remember, beans seem to taste better the day after they are made, so don’t be afraid of letting them rest in the refrigerator for a bit.

Soooo, do you have the road map memorized?  1 lb beans, 1 lb meat, 2 lbs veggies, 1 qt (4 cups) liquid. Seasonings. Crock-pot. High. 6-8 hours, while you go out and play 🙂

Thanks for stopping by my kitchen today!  Go ahead now, make some beans! Let me know what you used and how they turn out 🙂 I can’t stop my son from making these beans! We’re drowning in beans…, but we’re not broke! Beans we can afford 🙂