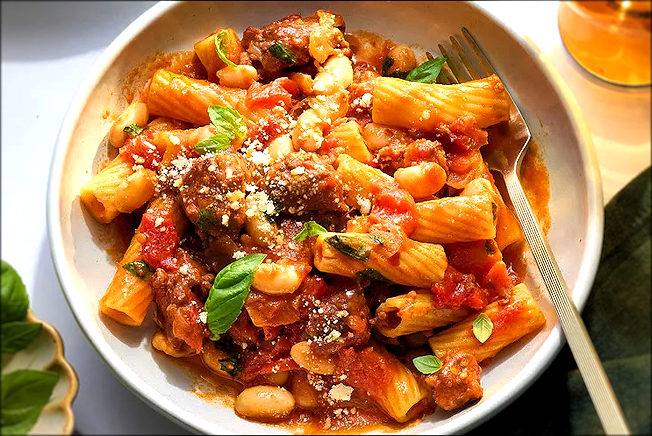
Tag-Archive for ◊ sausage ◊

02 Aug 2013 Beans!

beans01

I am so excited about this recipe!  It’s a paradigm shift recipe!  It’s not a recipe in the true sense of the word, it’s more of a road map to a particular destination.   A road map allows for more flexibility than a recipe, a road map allows the cook to make adjustments based upon personal preferences, taste, time, and what’s in the pantry.  I think most people have a road map for a few good dishes.  I have a road map for spaghetti sauce, chicken soup, stir-fry and hamburgers.  You might have a road map for meatloaf, burritos and rice bowls.  Most people have road maps for sandwiches and salads. A road map means there are guidelines, easy ones, usually ones that can be memorized, and that can always be adapted as the situation requires.

So here it is, a guideline for a pot of beans, in the crockpot no less!  Crockpot cooking is great for summer, the kitchen doesn’t get heated up, and a pot of beans pairs well with almost everything that can be BBQ’d.  In the winter months, a bowl of beans with some cornbread or tortillas is almost the definition of comfort food. Another plus, crockpot cooking is fuss free, so toss everything in the pot and then go sit in the sun or shovel snow.

Many thanks to Mark Bittman of the New York Times for this road map. Thank you, thank you, thank you!!

BTW…, for years I have been looking for a good baked beans recipe, so that’s what I make with this recipe:  meaty, slightly sweet Boston-style beans.  YUM! They go with everything and I have  a serious love for leftover beans on toast (I’m English).  My son mastered this recipe in one take and he makes killer spicy teriyaki beans with chicken.  I can see others going for more of a Mexican style bean. What sort of beans do you like? Make them!

The House Special Beans

  • 1 lb of dried beans, any kind, I like small white and pinquitos but black, pintos, garbanzos, kidney, or a combination of different kinds of beans can also be used.  Don’t have a full pound of beans?  Add in some split peas or lentils to make up the difference.  Remember these are dried beans (about $1.25 for a pound bag) we are not using canned beans here (and there is no need to soak the beans first).
  • 4 cups of liquid, any kind.  Find a mixture that appeals to you. I start with a bottle of beer, then I add in about 1/4 cup of ketchup, 1/4 cup of Worcestershire sauce, 1/4 cup maple syrup, 1/4 cup of brown sugar and a squirt of mustard, using molasses instead of maple syrup and brown sugar would be good too. If my Dad were here I’d stir in 1/4 cup of bourbon. Then I add water, broth (any kind), or cold coffee to make the 4 cups (too much coffee will make the beans a bit bitter, so stick to less than 1 cup of cold coffee).  My son adds BBQ sauce, sriracha, honey, teriyaki or soy sauce along with beer and coffee.  Don’t like beer?  Use some leftover wine. Don’t drink at all, stick to broth and water.   Health nut?  Stir in carrot juice and some of that green liquid you’re so fond of !
  • Seasonings, any kind.  Start with a healthy amount of salt and pepper, then add in what appeals to you.  I add in 2 t. salt, 1 t. black pepper, 1 t. cumin, 2 t. chili powder, minced garlic, and 2 bay leaves.  Other options include oregano, basil, coriander, red pepper, curry powder, ginger, paprika, liquid smoke, parsley, sage, rosemary and thyme…
  • 1 lb meat, any kind, a bit more or a bit less is fine.  I like beef, and I buy something on sale, beef shanks, top sirloin, stew meat, steak, anything.  Throw in a pork chop or two, or some ground meat (brown it first and drain off the fat), chicken (with or without the bones, but boneless chicken does tend to get a bit overcooked), sausage, ham, cooked bacon…, or go for a combo.  Sausage and chicken? Beef and bacon? Or leave out the meat all together if  you’d rather.
  • 2 lbs finely minced or grated veggies, any kind.  I always add diced onion, grated carrots, and minced celery.  Then I might add some shredded zucchini, turnip, cabbage, spinach or kale, whatever I have on hand. Throw in some potatoes. Lots of folk like bell peppers, dice some up and throw them in.  Leeks are yummy. A few diced jalapenos would spice things up. Even canned pumpkin works. The only veggie I don’t add is tomatoes. I heard once that tomatoes interfere with the cooking process of dried beans, so I leave them out (I also don’t use tomato juice as a liquid, but I do stir in a bit of ketchup, and have had no problem with that).

Directions:

  1. Put the dried beans in the bottom of the crock-pot.
  2. Get out a 4-cup measure.  Combine your liquids.  When you have 4 cups, pour it over the beans in the bottom of the crock-pot.
  3. On top of the beans and liquid, add the meat.  I add the meat as is, then remove the fat and bones, and shred the meat after cooking.  You can do the same, or you can add cubes of boneless, skinless meat.
  4. Sprinkle desired seasonings on top of the meat.  (If you add bay leaves, count them so you know how many to remove before serving!)
  5. Finely mince, dice, or shred the veggies.  Add the veggies on top of the meat. (The liquid will not cover the veggies, yet).
  6. With a spatula or a spoon, press on the ingredients to lightly pack.
  7. Put the lid on the slow cooker, plug it in, turn on high, and go out and play! If you are around, check the beans after a few hours.  If the beans look dry add a bit more water, stock, beer, or wine (don’t stir, just pour it on top).
  8. Let beans cook for 6-8 hours.  Turn off.
  9. After the beans have cooled for a bit, taste them.  Needs more salt?  More maple syrup? More heat? Add it now.  If you added large hunks of meat with bones, remove bones and shred the meat. Remove the bay leaves, if you used them.
  10. If you want to add in extras, do it now.  You could stir in some diced tomatoes now, if you’d like, they won’t do any harm at this point (let cook for an additional 30 minutes or so).  Sometimes I stir cooked bacon at this point.  You could stir in frozen corn, if you’d like. Adding chopped parsley, cilantro, or green onion makes the beans look pretty and brightens them up a bit for a pretty presentation.
  11. Remember, beans seem to taste better the day after they are made, so don’t be afraid of letting them rest in the refrigerator for a bit.

Soooo, do you have the road map memorized?  1 lb beans, 1 lb meat, 2 lbs veggies, 1 qt (4 cups) liquid. Seasonings. Crock-pot. High. 6-8 hours, while you go out and play 🙂

Thanks for stopping by my kitchen today!  Go ahead now, make some beans! Let me know what you used and how they turn out 🙂 I can’t stop my son from making these beans! We’re drowning in beans…, but we’re not broke! Beans we can afford 🙂

20 Nov 2010 Turkey Dressing/Stuffing

Yesterday I went to Costco and Trader Joe’s.  Both places had samples of make-it-from-a-box turkey Dressing/Stuffing.  Did they think the samples would entice people to buy that stuff? What WAS it?  The texture was glue-y…, the taste was…, was…, there was no taste, it was just warm.  It’s no wonder we have a generation of kids who don’t like much more than hamburgers, fries, chicken nuggets, and soda.  If I were served that stuffing, I’d be longing for McDonald’s, too. C’mon, folks. We can do better than that.  I know I am preaching to the choir, but I was so taken aback at how horrible that boxed stuff was that I just can’t keep my mouth shut.

Here’s my recipe for Dressing/Stuffing for turkey or chicken.  It’s evolved over the years.  Thirty plus of them. I’ve made Thanksgiving dinner for 30 consecutive years.  That’s right.  Thirty years.  No break.  Before that, my Dad used to make the stuffing when I was a kid.  It was always sage and onion.  He boiled the onions, then chopped them, mixed them with breadcrumbs, lots of powdered sage-sometimes too much, cooked turkey liver and pork  sausage, and then used the onion water to moisten the dressing before stuffing it into the bird.  When I was a teenager, my friend’s mother told me her secret, she said to use crackers instead of bread in the stuffing, so I did, and still do, most of the time.  I have tried making this dressing with cornbread too, but it didn’t work out very well.  I had cornbread mush.  It wasn’t very appetizing. One of these days I will try the cornbread again, because it should have worked. I must have done something wrong.

My recipe is amazingly similar to my friend, Kayte’s, whose mother told me the cracker secret.  Kayte and I have been friends for over 40 years, but we had never compared stuffing recipes until she wrote hers down and shared it with our cookbook club. Kayte’s recipe evolved through the Irish women on her side of the family, mine evolved through English men, we overlapped a bit with the cracker tip, and we basically have the same recipe!  It’s a good one, too!

This is an old school dressing. Nothing too fancy, but compared to those samples of that boxed stuff, it’s out-of-this-world!

Advance Prep Tip:  Prepare and saute all  ingredients, then refrigerate (or freeze) until needed.  On Turkey Day, defrost if needed, and then just mix the prepared ingredients with the crushed crackers or toasted bread crumbs, stir in the fresh herbs, moisten with broth and eggs, and bake according to the directions below.

Turkey Dressing (or Stuffing)

  • 1 1 lb. box saltine crackers with salt (or 1 lb. loaf sourdough bread or 2 baguettes, stale, cut into ¼ inch cubes, and toasted)
  • 2-4 tablespoons butter or  olive oil or vegetable oil, divided use
  • 2 cups diced onion
  • 2 cups diced celery
  • about 3 cups turkey or chicken stock, divided use
  • 1 lb. mushrooms, chopped (not sliced–mushrooms should be about the same size as the onions and celery)
  • 1 lb. pork sausage (Jimmy Dean’s Sage is my preferred sausage)
  • 2 Granny Smith apples, peeled and grated
  • ¼ cup chopped fresh sage plus 1 teaspoon dried sage (or 1 tablespoon dried sage), or to taste
  • ¼ cup chopped fresh parsley
  • 1 teaspoon black pepper, or to taste
  • ¼ cup melted butter (or bacon fat), optional
  • Directions

    1. Crush the crackers and set aside.  Hints…you want crushed crackers, not cracker meal. I crush the crackers in their sleeve over a large bowl, and when the package bursts I let them fall into the bowl and use my fingers to crush any larger pieces.  Set crackers aside.  If you are using bread cubes, pour them into the large bowl, and set aside
    2. Heat 1-2 tablespoons butter or oil in a large skillet over medium high heat.  When hot, stir in chopped onion and saute until soft, about 8 minutes.  Stir in chopped celery, and saute for another 3 minutes or so.  Add 1 cup of hot stock to pan.  Stir to release any stuck on brown bits from the bottom of the pan. Let simmer for 10 minutes.  Remove mixture from pan and let cool.
    3. To same pan add a bit more oil, and the pork sausage.  Brown sausage over medium high heat and then set aside to drain on paper towels.
    4. Add more oil to hot pan, if necessary, and add chopped mushrooms.  Saute mushrooms until cooked.  Turn off heat and let mushrooms cool slightly.
    5. Add the onion/celery mixture, the drained sausage, the cooked mushrooms, and the grated apple to the cracker crumbs. Toss to combine. Stir in sage, parsley, and pepper. Adjust seasonings if necessary.
    6. In a separate bowl combine the beaten eggs with 2 cups of stock.  Pour this mixture over the crumb, meat, veggie mixture in the large bowl and stir to combine.  If needed, add a bit more stock for mixture to be uniformly moist and clumpy.
    7. Stuff turkey with dressing and bake according to directions on turkey package for your sized turkey OR pour mixture into a 9 x 13 inch pan**see NOTE below!. Drizzle with 1/4 cup melted butter and cover with foil.
    8. Bake at 350 degrees for 30 minutes the uncover and bake for an additional 12-20 minutes.  If dressing looks dry, stir and add another 1/2 to 1 cup broth.  When baked dressing should be puffy and have a nicely browned top crust

    **NOTE:  This year I am going to put some of the stuffing mixture into sauteed mushroom caps, and then bake for 20 minutes.  I will use the stuffed mushrooms to make a ring on the serving plate, and then mound additional stuffing in the middle of the plate.  Won’t that look nice?  I expect the stuffing aficionados in the family–that would be all of us!–to go wild over this.

    Enjoy!  Happy Thanksgiving!

    22 Oct 2010 Breakfast Biscuits

    These homemade breakfast biscuits are bigger, better, prettier and tastier than anything you’ll find at a fast food place or diner, and probably have a lot less fat. How can you resist these?  Don’t be scared.  They go together pretty quickly, and the payoff is enormous. Make customized versions, and you’ll fast become a legend in your own kitchen!

    Start with this  recipe as a guide, then customize, customize, customize. Use whatever meat you have on hand, with bacon, sausage and ham being perennial breakfast favorites (and seem to make most people swoon).  The Breakfast Biscuit pictured above has no meat, only onions, peppers, and tomatoes. I’ve made the Breakfast Biscuits exactly like the ones below,as well as sausage and olive breakfast biscuits,  Honey Baked Ham breakfast biscuits, and the veggie biscuits above.  I want to incorporate asparagus and mushrooms in the next ones. Note, most veggies will need to be precooked (leftover from dinner?), but the tomatoes can be fresh picked.  Now, I am not endorsing this, but one of my friends told me she made these with refrigerated biscuit dough and they worked out very well…

    This recipe makes 6 breakfast biscuits, and they are big. If you have a chance to get medium eggs, do so, I found the large eggs were just a tad too large, some of the whites spilled out of the biscuits, but no biggie.

    Breakfast Biscuits

    For the topping:

    3 bell peppers, cut into thin strips (or substitute any cooked veggie, or none at all)
    1 onion, thinly sliced
    1 – 2 tablespoons butter
    1 cup finely diced cooked ham (or sausage, or bacon…salmon?)

    For the biscuit dough:

    2 cups flour
    2 teaspoons baking powder
    1 teaspoon salt
    1 stick cold butter, cut into bits (I grate frozen, or very cold, butter into the flour)
    1/2 cup plus 2 tablespoons milk
    2 cups grated Münster, Monterey Jack, or Cheddar/Jack mix or Mozzarella mix (or whatever you have on hand, use it all up!)
    6 eggs (medium or small work best)

    In a large skillet cook the bell peppers (or other veggie) and the onion in the butter over medium heat, stirring, until the vegetables are softened, stir in the ham, and remove the skillet from the heat. (This can be made 1 day in ahead, if needed.)

    Preheat oven to 425 degrees.

    Make the biscuit dough:

    In a bowl whisk together the flour, the baking powder, and the salt, add the butter, and blend the mixture until it resembles coarse meal. Add the milk and stir the mixture until it just forms a dough. Gather the dough into a ball, on a lightly floured surface knead it gently 6 times, and cut it into 6 equal pieces. Roll each piece of dough into an approx. 7-inch round, form a 1/2-inch-high rim on each round by turning in the edge of the dough and pinching it until the shell measures approx. 5 inches. This does not have to be perfect, but a high outer crust will help contain the egg. The rustic look is great! Transfer the rimmed rounds to 2 buttered large baking sheets.

    Divide the cheese among the shells. Top with veggie/ham mixture. Now, make a well in the center by pushing the filling to the rim (this step is important!).

    Original directions: Crack and drop an egg carefully into the well of each shell. Bake the bicuits in the middle of a preheated 425°F. oven for 12 to 15 minutes, or until the egg yolks are just set.

    My directions: Following the original directions produced  hard-boiled eggs, which made the biscuits easy to eat (and pleasing to the kids because they were, most definitely, finger food–they turn out like small pizzas!) BUT, I like soft eggs, so I cook the biscuits without the eggs for ten minutes.  Then I carefully crack an egg into the center of the biscuit and continue cooking until the egg yolk is set, but still soft (usually 3-4 minutes more), and the white is completely cooked.

    Thanks for stopping by my kitchen this morning. I’d love to hear what you have to say!

    05 Sep 2010 Blasted Sausages

    Holy Moly, this recipe delivers in both taste and presentation. The original recipe stated this is a traditional Tuscan harvest dish, but I know I have never run across anything like this before (not that I have ever been to Tuscany…).  I found this recipe in “150 Best American Recipes”, but I changed it up a bit to suit my taste (and reduced the quantities to serve a small crowd, rather than a whole village).  Now’s the time to make this recipe.  The grape harvest is in.

    My son came home from college last night for a quick 36 hour visit.  I almost fainted when he asked me to teach him to cook something while he was here.  Did he REALLY say that?  Be still my heart! Lucky for him, I had been wanting to make this recipe and had all the ingredients on hand.  This is an easy-easy recipe, a great one for newbie 19 year old cooks (and stretched-to-the-max parents of small children, and older folk who are tired of cooking but still want to eat well…)

    I just had to give my son the MamaBear warnings about how HOT pans are after being in a 500 degree oven.  I’ll remind you, too.  Use thick pot holders. Be careful. Have fun with this.  It’s truly delicious.  If I had a Bistro, this would definitely be on the menu.

    Blasted Sausages and Grapes

    1 1/2 lbs Sweet Italian Sausages (usually 6)
    1 can beer (or water)
    3 T. butter,melted
    1 lb red seedless grapes, stemmed
    2 tablespoons balsamic vinegar

    Rustic mashed potatoes (recipe summary included in body of recipe)

    Preheat oven to 500 degrees.

    In a large saucepan over medium-high heat cover the sausages with beer or water and parboil for 8 minutes to rid sausages of excess fat. Drain.

    Pour melted butter into a baking pan (or a large ovenproof skillet). Add the grapes to the pan and toss to coat with the melted butter. Place the sausages in the pan with the grapes and butter.  Push the sausages down into the grapes.

    Put the roasting pan or skillet with the grapes and sausages into 500 degrees for 12 minutes. Turn sausages over, and roast for an additional 12 minutes. (While the sausages are cooking, make some Rustic Mashed Potatoes.  Cube one russet potato for each guest, do not peel.  Put cubed potatoes in a pan of salted water and bring to a boil.  Boil for approx 20 minutes (could be longer if your potato cubes are larger).  When potatoes are soft, drain and place in large mixing bowl.  Add 1T of butter to mixing bowl for each potato.  Whip potatoes and butter lightly together with an electric mixer. Pour in 1T. milk, cream or sour cream for each potato.  Whip again.  Rustic Mashed Potatoes should remain a bit lumpy. Taste, then add as much salt and pepper as needed.)

    With a slotted spoon remove sausages to serving platter.  Top or surround the sausages with the cooked grapes. Retain the pan juices in the bottom of the pan and move to a small saucepan.  Stir in  2 tablespoons of good balsamic vinegar.  Cook juices and vinegar over medium-high heat until the mixture is thick and syrupy. Drizzle the sauce over the sausages and serve immediately with the Rustic Mashed Potatoes.

    Thanks for stopping by my kitchen today.  Your visits help lift my spirits, as did the weather. I am always glad to open the door to you and close the door on summer. It’s going to be Fall soon, my very, very, very favorite season of the year. Enjoying a plate of Blasted Sausages and Roasted Grapes is a great way to celebrate.