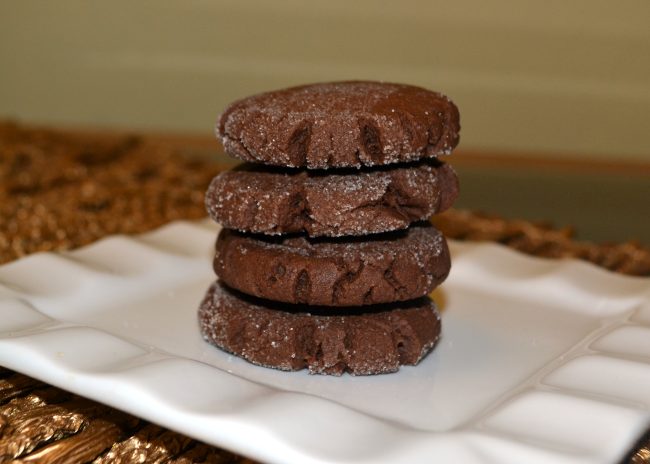
Archive for the Category ◊ Sweets ◊

09 Sep 2019 Sweet and Cinnamon-y Apple Bread
Sweet and Cinnamon-y Apple Bread

Bread baking is my Everest, meaning I haven’t conquered it yet.  I’m not even at base camp so the bread recipes that appeal to me are easy and pretty much foolproof.  Here’s one of them! The recipe is easy… I see you shaking your head. Is it because you’ve already noticed the 22 steps? Granted, that seems like a lot, but there are 22 because I broke each step down into tiny increments. You can do this! You can have a loaf of Sweet Apple Bread ready to eat in about two hours! For a fancy, fruit-filled, yeasted bread, that’s a pretty quick turnaround time! The two hours is not all hands-on work either, that time includes two periods of rest for the dough to rise AND the baking time! The resulting product is delicious and impressive. Around here the aroma of this bread baking reliably gets sleepyheads out of bed and ready to face the day with a smile on their faces!

The bread is not burned! Darned filter!
I bake better than the I take pictures.

I didn’t create this recipe; I am not nearly that smart. I found it in Better Homes and Garden, Fall Baking at the same time as my daughter, who found it online. Then I googled it, and the recipe is all over the Internet, so I don’t know who or where it first came from first, but it’s a good one, a keeper, and almost infallible.  I did have it fail once, though. I didn’t measure the apples.  I wanted more apples and more apples, so I probably ended up with double the apples and one soggy, flat, never-did-bake loaf, so don’t do that! Measure the apples! I have made this bread with both cinnamon and Apple Pie Spice and I prefer it with Apple Pie Spice. If you can’t find it at your local grocery store, order it from Penzey’s Spices.

My daughter’s first loaf of Sweet and Cinnamon-y Apple Bread

While looking for this recipe on line, my daughter came across an almost identical recipe made with pumpkin. Unbeknownst to each other, we both made it, on the same afternoon, and we both thought it needed some upgrading, so we’ll work on that. Look for an enhanced pumpkin bread soon but until then, make this one! It’s a winner!

Sweet and Cinnamon-y Apple Loaf

For the dough:

  • 3/4 cup milk
  • 1 package (2 ½ teaspoons) active dry yeast
  • 1 egg, lightly beaten
  • 1/4 cup butter, melted
  • 2 tablespoons sugar (divided use)
  • 1/2 teaspoon salt
  • 3 cups (375 grams) all-purpose flour

For the filling:

  • 1/4 cup melted or very, very soft butter
  • 1 tsp. sugar
  • 1-1/2 cups peeled and finely chopped Granny Smith apple (usually one very large apple)
  • 3/4 cup (75 grams) packed brown sugar
  • 2 teaspoons Apple Pie Spice or Cinnamon

For the icing:

  • 2 ounces cream cheese, softened (optional)
  • 1 cup powdered sugar
  • 1/2 teaspoon vanilla
  • 1 to 2 tablespoons milk
  1. In the microwave, heat milk until just until lukewarm, approx. 105°F to 115°F, about 30-60 seconds, depending on the wattage of your microwave.
  2. Combine warm milk, yeast, and ½ tsp of sugar in small bowl. Stir until yeast is dissolved. Let stand 5 minutes.
  3. In bowl of electric mixer combine egg, 1/4 cup melted butter, the rest of the granulated sugar, and salt. Beat for 30 seconds.
  4. Add yeast mixture to egg/butter mixture. Beat with mixer on medium until combined.
  5. Add half the flour to mixture in bowl. Beat on low 30 seconds, scraping bowl as needed, then beat for 3 minutes on medium.
  6. Stir in remaining flour. Beat for another 2 minutes or so.
  7. Shape dough into ball (dough will not be smooth).
  8. Place dough in greased bowl; turn once to completely grease surface of dough.

Note: To make ahead: prepare as directed up to this step. Do not let dough rise. Cover bowl and refrigerate for up to 24 hours.

  • Cover the dough with greased plastic wrap and let rise in warm place until nearly double in size 45 to 60 minutes (longer if dough has been refrigerated).
  • Grease 9×5-inch loaf pan, or line with parchment paper.

Note: Here comes the tricky part but it just sounds as if it’s tricky. Don’t stress it at all. The measurements are just approximate. Even the number of slices in the stacks are approximate. Eyeball everything! Have fun with it! Do. Not. Stress! This is a free-form bread. You can’t make a mistake. Go for it!

  1. Turn dough out onto lightly floured surface. Roll dough into 20×12-inch rectangle (approximately, jagged edges are no problem).
  2. Brush dough with 1/4 cup melted or very soft butter then sprinkle with 1 tsp. white sugar.
  3. In a small bowl, combine chopped apples, brown sugar, and apple pie spice or cinnamon. Sprinkle this mixture equidistantly over the dough.
  4. Cut the dough rectangle in half lengthwise to make two 20×6-inch strips (approximately)
  5. Cut each strip vertically into five 6×4-inch strips.
  6. Carefully make 2 stacks of 5 strips each. Cut each stack lengthwise into three 4×2-inch pieces.
  7. Now lift the stacks, and loosely stagger stacks in pan, cut sides up. You’ll have to push and pull to make all stacks fit. This is not a problem.  Lightly push down on dough to fill corners and level the top of the loaf.
  8. Cover loaf with greased plastic wrap and let rise in warm place until nearly double in size (40 to 45 minutes).
  9. Preheat oven to 350°F. Bake loaf for about 45 minutes or until golden brown and an instant-read thermometer inserted near center registers 200°F.
  10. Cool in pan 10 minutes.
  11. In a medium mixer bowl combine ingredients for icing: room temperature cream cheese, powdered sugar, and vanilla. Beat on medium speed until smooth. Beat in enough milk to make a glaze of drizzling consistency. (NOTE: I usually make the icing without the cream cheese)
  12. Remove loaf from pan and drizzle with icing. Cool at least 20 minutes more before eating (but bread will keep well for a few days).

Thanks for stopping by my kitchen today! Happy baking!

Print Friendly, PDF & Email
08 Sep 2019 Pumpkin Spice Biscotti
Pumpkin Spice Biscotti

It’s that time of year. Let the fall baking commence! I’ve started with these: Pumpkin Spice Latte Biscotti, my entry for my cookbook club’s ‘Pumpkin Dessert Showstopper Challenge’ last year (sometimes we act like we are contestants on the mythical ‘Great American Baking Show’!).

These biscotti have a subtle pumpkin spice taste, are crunchy around the edges, and somewhat soft and cake-y on the inside. I really should put the word biscotti in quotes since these are not traditional: they are not teeth shattering-ly crunchy, they don’t contain nuts or almond extract, and with the two non-traditional drizzles with a shower of cinnamon-sugar, they are also showstoppingly pretty 🙂

You won’t find this recipe anywhere else on the web. I started with another recipe (regretfully, I don’t remember where I found the original recipe), upped and re-mixed the spices and added the three toppings.

NOTE: When I made these biscotti last year, Caramel Chips (not to be confused with Caramel Bits) were available everywhere. This year I couldn’t find them anywhere (have they been discontinued?) so I substituted Butterscotch Chips for the Caramel Chips.

If you like my version of ‘biscotti’, check out my recipe for Gingerbread Biscotti, also on this website 🙂

Pumpkin Spice Biscotti

  • 3 1/4 cups All-Purpose Flour (400 grams)
  • 1 1/2 tsp. Baking Powder
  • 1 Tablespoon Instant Espresso Powder
  • 1/2 tsp. Salt
  • 1 Tablespoon Cinnamon
  • 2 tsp. Ginger
  • 1 tsp. Nutmeg
  • 1/2 cup Unsalted Butter, room temperature
  • 1 cup Sugar
  • 2 large Eggs
  • 1 1/2 tsp. Vanilla Extract
  • 3/4 cup Pumpkin Puree

To decorate

  • white chocolate and caramel chips, not combined, melted separately (it’s okay to sub Butterscotch Chips for the Caramel Chips, see the NOTE above)
  • Cinnamon-Sugar mixture
  1. Preheat oven to 300° F. and line a large baking sheet with parchment paper. Set aside.
  2. In a medium bowl, combine the flour, baking powder, salt, and spices. Whisk well to combine. Set aside.
  3. In a large bowl of a stand mixer fitted with a paddle attachment, cream the butter and sugar together until light and fluffy.
  4. Add eggs, one at a time, beating well after each addition. Add vanilla and pumpkin and beat to combine.
  5. Add dry ingredients and mix until well combined. Batter will be slack, and a bit worrisome because it’s so hard to work with, but it will be fine (it might be easier to refrigerate dough for a few hours to make it easier to handle, but this is not necessary).
  6. On the prepared baking sheet, spoon dough into two logs about 2″ wide by 12+” long (they will spread). Using moistened hands, shape and smooth the dough.
  7. Bake in preheated oven for 40-60 minutes, or until firm and hollow sounding when tapped. Remove from oven and allow to rest on the pan for at least 10 minutes and up to a few hours
  8. Remove logs to a cutting board and using a serrated knife at an angle, cut into 1-inch slices. Return slices to rack over a baking sheet, with cut side down, and bake 15-30+ minutes, or until biscotti loses it’s cake-y feel.
  9. Remove from oven and allow to cool completely.
  10. Melt chocolate. Coat one side of biscotti with either caramel chips or white chocolate. Let dry.
  11. Turn biscotti over and drizzle with the chocolate (caramel or white) not used in previous step
  12. Before the drizzled chocolate hardens, sprinkle with cinnamon-sugar mixture.
  13. After chocolate hardens shake off excess cinnamon sugar
  14. Store airtight. Freezes well.

Thanks for stopping by my kitchen today. Be sure to stop by again for the Gingerbread Biscotti recipe after devouring these!

Print Friendly, PDF & Email
29 Aug 2019 Coconut Mango Cheesecake

This is one of my favorite cheesecakes! It’s showy and special and tastes wonderful 🙂 The method for this cheesecake is different from my usual method, but it works like a dream, and I’ve never had this cheesecake crack. The only tricky part is getting the right ‘Cream of Coconut’. Try to find the Coco Lopez brand, or any other brand used for making mixed drinks such as the Pina Colada. Don’t use canned coconut milk or even the new canned coconut cream [this is getting so confusing!], you need Cream of Coconut. It’s sweet and thick. Here are pictures of the two brands I have used successfully.

Hope you can make this for a special occasion in your life. It’s a winner!

Coconut-Mango Cheesecake

Coconut Crust:

  • 2 cups sweetened flaked coconut
  • 8 whole graham crackers, broken
  • 1/4 cup sugar
  • 1/4 cup (1/2 stick) unsalted butter, diced

Cheesecake:

  • 32-ounces Philadelphia-brand cream cheese (do not use reduced-fat, fat-free, or whipped) The cream cheese MUST be at room temperature. Do not proceed with cold cream cheese!
  • 2/3 cup sugar
  • 1 15-ounce can (sweetened) cream of coconut (such as Coco López, look for it in the alcohol mixers section. Do NOT USE COCONUT MILK!)
  • 1 teaspoon coconut extract
  • 1/8 teaspoon salt
  • 5 large eggs

Glaze:

  • ¼ cup  water
  • 1 pkg unflavored gelatin
  • 2 ½-3 cups mango puree (from 2 16 oz packages frozen mango chunks)
  • 1/2 cup sugar, or to taste
  • ½ teaspoon vanilla

For crust:

  1. Preheat oven to 350°F.
  2. Blend all ingredients in processor until finely ground and sticking together, 1 to 2 minutes.
  3.  Press crumb mixture onto bottom and 2 1/2 inches up sides of 10-inch-diameter spring form pan with 2 3/4- to 3-inch-high sides.
  4. Bake crust until golden, 14 to 15 minutes.
  5. Cool crust on rack.
  6. Increase oven temperature to 425°F.

For filling:

  1. Blend cream cheese and sugar in bowl of electric mixer. Stir in cream of coconut, coconut extract and salt. Add eggs 1 at a time. Mix to blend.
  2.  Pour filling into crust. Bake cheesecake 10 minutes at 425°F .
  3. Reduce oven temperature to 250°F. Bake until center is softly set, about 1 hour 35 minutes longer.
  4. Turn off oven, keeping the oven door closed. Cool cake in oven 1 hour.
  5. Refrigerate cake, uncovered, at least 12 hours or overnight.

For glaze:

  1. Place water in small cup or bowl.  Sprinkle gelatin over water. Let stand until gelatin softens, about 10 minutes.
  2. Meanwhile, pour mango puree and sugar into small saucepan. Taste that flavor is correct. Add more mango puree or more sugar if needed.
  3. Stir mixture over low heat until sugar dissolves, bubbles form at edge of pan, and mixture is hot.
  4. Add gelatin mixture and stir 1 minute to dissolve. Stir in vanilla.
  5. Cool mango mixture until lukewarm, stirring occasionally.
  6. Pour glaze into center of cheesecake. Rotate and tilt the pan until glaze is spread evenly over top.
  7. Chill cheesecake to set glaze, approximately 3 hours.

Notes: DO AHEAD! This recipe can be made 1 day ahead. Cover and keep chilled.

Print Friendly, PDF & Email
15 Aug 2019 Triple Chocolate Mousse Torte

This is the cake I wanted for my birthday this year and it’s what a friend requested for her birthday a few months ago. It’s a fabulous trifecta of chocolate: semi sweet chocolate in a brownie-like cake on the bottom, a smooth and rich milk chocolate mousse for the middle layer, and a creamy white chocolate mousse for the top layer.  After that description, I’m guessing you’ll want it for your birthday, too! The torte not only tastes fantastic, it looks impressive, it slices well and it holds it’s shape after being cut. Magnifique!

The torte is a bit of effort to make, but each step, each layer, is easy and is relatively quick to accomplish.  Make the bottom layer before going to bed, let it cool on the counter while you sleep.  The next day, make the middle layer, refrigerate it, and wash the dishes. Then make the top layer and refrigerate the cake until serving time. Cake will keep 24 hours in refrigerator, but I always serve it on the day I make the second and third layers.

And look, here’s a link to a how-to video about making the torte!

The original recipe is from Cooks Illustrated. I think it was a cover recipe for one of their magazines. You can access the recipe online at Cooksillustrated.com, but it will cost you (and I hate that about Cooks Illustrated recipes).

So, after watching the video you’ll know this is not a difficult recipe. Just follow the directions. Melt the chocolate slowly. Fold the whipped cream into the chocolate mixtures. Use an electric mixer when specified and hand whisk or a spatula when specified.  If you can read, you can make this cake. “It’s all about the recipe” is my tag line, and I truly believe it!

I use Lindt chocolate bars in each layer. You’ll need two of the large bars for the bottom layer (around 70% cacao), two large milk chocolate bars for the middle layer, and two white chocolate bars for the top layer. Throw in an extra bar of your favorite type to grate on top. That’s about $20 worth of chocolate. In a pinch, you could use chocolate chips, which would be cheaper but wouldn’t taste quite as good and you’d have a harder time melting the chocolate (chocolate chips are not made to melt).

You’ll need a 9-inch springform pan, with sides at least 3 inches high to make this torte. If you’re in town, you can borrow mine. You could also order one off of Amazon, the Fat Daddio’s brand is my favorite. TJ Maxx/HomeGoods has started carrying Fat Daddio’s pans, usually at half the price Amazon sells them for, but it’s hit-or-miss at TJMaxx, isn’t it? Sur la Table and other specialty cooking stores will definitely carry 9-inch springform pans, usually at the same price as Amazon.

Triple Chocolate Mousse Torte

THE BOTTOM LAYER

  •  6 tablespoons (3 oz) unsalted butter, cut into 6 pieces (plus extra for greasing pan)
  •  7 ounces semi sweet or bittersweet chocolate, finely chopped (I prefer semi-sweet).
  •  ¾ teaspoon instant espresso powder
  •  1½ teaspoons vanilla extract
  •  4 eggs (separated)
  • Pinch salt
  •  1/3 cup light brown sugar
  1. Preheat oven to 325 degrees F. Butter the bottom and sides of a 9-inch springform pan with sides at least 3 inches high and set aside.
  2. Melt the butter, chocolate and espresso powder in a large heatproof bowl set over a bowl of really hot water, stirring occasionally until smooth. Remove from heat and cool for 5 minutes.
  3. Whisk in the vanilla and egg yolks into the chocolate mixture and set aside.
  4. With a stand mixer fitted with the whisk attachment, beat the egg whites and salt at medium speed until frothy, about 30 seconds. Add half of the brown sugar and beat until combined, about 15 seconds. Add the remaining brown sugar and beat at high speed until soft peaks form when the whisk is lifted, about 1 minute longer, scraping down the sides halfway through.
  5. With a hand-held whisk, whisk one-third of the beaten egg whites into the chocolate mixture. Using a rubber spatula, fold in the remaining egg whites until no white streaks remain.
  6. Carefully transfer the batter to the prepared springform pan, gently smoothing the top with an offset spatula.
  7. Bake until the cake has risen, is firm around the edges, and the center has just set but is still soft (the center of cake will spring back after pressing gently with your finger), 13 to 18 minutes.
  8. Transfer the pan to a wire rack to cool completely, about 1 hour. (The cake will collapse as it cools).
  9. Do not remove the cake from the pan!

THE MIDDLE LAYER:

  •  2 tablespoons cocoa powder (preferably Dutch-processed, Hershey’s is fine).
  •  5 tablespoons hot water
  •  7 ounces milk chocolate, finely chopped
  •  1½ cups cold heavy cream
  •  1 tablespoon granulated sugar
  •  1/8 teaspoon table salt
  1. Whisk together the cocoa powder and hot water in a small bowl and set aside.
  2. Melt the chocolate in a bowl set over another bowl filled with very, very hot water, stirring occasionally until smooth. Remove from heat and cool for 5 minutes.
  3. Whisk the cocoa powder mixture into the melted chocolate until smooth.
  4. With an electric mixer whisk the cream, granulated sugar and salt on medium speed until the mixture begins to thicken, about 30 seconds. Increase the speed to high and whip until soft peaks form.
  5. With a handheld wire whisk, stir one-third of the whipped cream into the chocolate mixture to lighten. Using a rubber spatula, fold in the remaining whipped cream until no white streaks remain.
  6. Spoon the mousse into the springform pan over the cooled cake and gently tap the pan on counter 3 times to remove any large air bubbles; smooth the top with an offset spatula. Refrigerate for at least 15 minutes while preparing the top layer.

THE TOP LAYER

  •  ¾ teaspoon powdered gelatin
  •  1 tablespoon water
  •  6 ounces white chocolate, finely chopped
  •  1½ cups cold heavy cream (divided use)
  • Additional grated chocolate (milk or dark) or cocoa powder for decoration, optional
  1. In a small bowl, sprinkle the gelatin over the water; let stand for at least 5 minutes.
  2. Place the white chocolate in a medium bowl.
  3. Bring ½ cup of the heavy cream to a simmer in a small saucepan over medium-high heat or in the microwave.
  4. Stir the gelatin mixture, into the hot cream, whisking until fully dissolved.
  5. Pour the cream-gelatin mixture over the white chocolate and whisk until the chocolate is melted and the mixture is completely smooth (I usually sit the bowl of chocolate over another bowl of boiling water to help it melt).
  6. Cool mixture to room temperature, stirring occasionally, 5 to 8 minutes. The mixture will thicken slightly.
  7. With an electric mixer whisk the remaining 1 cup heavy cream at medium speed until it begins to thicken, about 30 seconds. Increase the speed to high and whip until soft peaks form when the whisk is lifted.
  8. Whisk one-third of the whipped cream, with a hand held whisk, into the white chocolate mixture to lighten. Using a rubber spatula, fold the remaining whipped cream into the white chocolate mixture until no white streaks remain.
  9. Spoon the white chocolate mousse into the pan over the middle layer. Smooth the top with an offset spatula.
  10. Return the cake to the refrigerator and chill until set, at least 2½ hours.
  11. Garnish the top of cake with grated chocolate or dust with cocoa powder, if desired.
  12. Run a thin knife between the cake and side of the springform pan, then remove the side of pan. Place torte on serving plate.
  13. Cut into slices and share (for clean slices, dip a sharp knife into hot water and wipe dry between cuts).

NOTES: The cake can be made up to 1 day in advance and refrigerated.

Print Friendly, PDF & Email