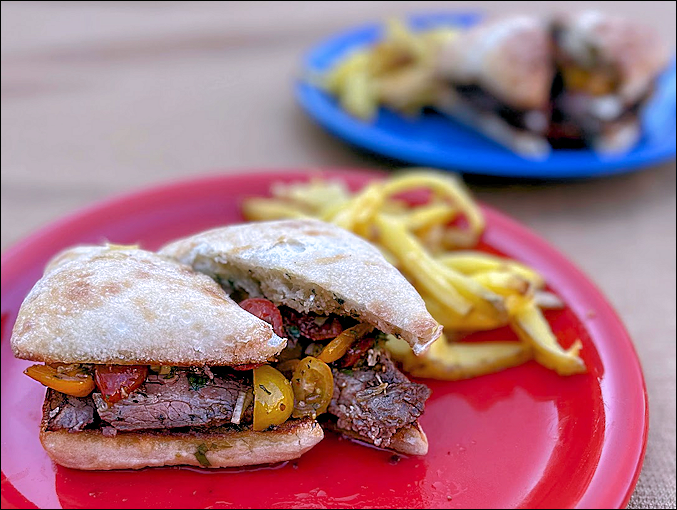
27 Apr 2020 Blackberry Ribs
Blackberry Ribs on the grill

Blackberry Ribs, one of my family’s favorite BBQ dishes (a close runner up is my Triple Threat Chicken, also on this page).

Quantities are set for 3 lbs. of baby back ribs. I usually make a Costco batch, six pound of pork ribs with double the rub and double the sauce.

This is an easy recipe. Ribs are rubbed, baked in the oven, dunked in the Blackberry BBQ sauce and then finished on the grill.

To cut down on work and mess on BBQ day, ribs can be baked in advance, cooled, brushed with the Blackberry BBQ sauce and refrigerated.  On BBQ day remove ribs from refrigerator, bring to room temperature, then grill until warm throughout.

I like a fruity BBQ sauce, but it’s adventurous fare for some.  Some of your less adventurous eaters might register reservations before tasting, but after tasting, they’ll be fine, and happy!

On another note, one time I couldn’t find blackberries, so substituted blueberries, which worked fine, too

I’ve been making Blackberry Ribs since 2007. I found the original recipe on Epicurious.

Ingredients:

  • 3 lbs. baby back ribs

For the Rub:

  • 4 tsp. chili powder added 1 tsp each of chipotle and ancho chili powders
  • 2 tsp. garlic powder
  • 2 tsp. salt
  • 1 tsp. black pepper
  • 1 tsp cumin powder
  • 1 tsp. sugar

For the Blackberry BBQ sauce:

  • 2 ½ cups fresh blackberries (12-18 oz)
  • ½ cup ketchup
  • ½ cup honey
  • 2 tablespoon fresh ginger paste or diced fresh ginger
  • 2 tablespoons balsamic vinegar
  • 2 tsp. Tabasco (or to taste) or substitute desired quantity of crushed red pepper flakes
  • 2 tsp. salt

Instructions:

  1. Line baking sheets with foil, you’ll need two or three baking sheets.
  2. Place racks of ribs on foil-lined baking sheets.
  3. Mix rub ingredients together in a small bowl.
  4. Sprinkle rub ingredients onto ribs, putting most on the front meaty sides, and only a sprinkle on the back boney sides. Rub in.
  5. Let ribs sit for until they come to room temperature, or for about 30 minutes.
  6. Preheat oven to 400 degrees.
  7. Place ribs in a preheated hot oven, meaty side up, for 50 minutes. Prepare grill if planning to BBQ now.
  8. While ribs are baking, prepare Blackberry BBQ Sauce.
  9. Place all sauce ingredients into a blender and puree until smooth.
  10. Strain the puree into a heavy-duty medium saucepan. Discard all the solids collected in the sieve.
  11. Bring puree to a boil and simmer slowly for about 10 minutes, stirring often.
  12. Reduce the sauce to 1 cup. (Measure this by pouring sauce into a 1 cup measuring jug. If not reduced to 1 cup, return puree to pan and continue cooking. Measure again. Continue like this until sauce is reduced to the 1 cup mark. (NOTE: if doubling the recipe, reduce sauce to 2 cups) . If  sauce is too thick, thin with a splash of beer, bourbon, coffee, water, juice, Chambord…your choice, make it your own!)
  13. Season sauce to taste with salt, pepper, and hot sauce, if needed.
  14. Remove ribs from oven.
  15. When cool enough to handle cut rack of ribs into 1 or 2 rib portions.
  16. Brush ribs with sauce on all sides. Use only a little more than half the sauce. Save some sauce to brush onto rubs after grilling. (At this point, ribs can be refrigerated to be grilled later.)
  17. Place ribs on hot grill. (Adding soaked wood chips to the charcoal is a good idea, too.)
  18. Cover grill for smoke to infuse the ribs.
  19. Reheat remaining Blackberry BBQ sauce (OK to warm in microwave)
  20. Grill ribs until hot, turning as necessary.
  21. Remove ribs to serving platter and brush with reserved and warmed Blackberry BBQ Sauce

Share and Enjoy!

Print Friendly, PDF & Email
29 Mar 2020 Sourdough Bread
 |  Category: Breads  | Tags: , , , ,  | 2 Comments

I’ve heard there’s a yeast shortage in these days of Coronavirus Quarantine. I find that truly odd. I didn’t know there were so many people wanting, and able, to make their own bread. Yeasted breads were my Everest for a long, long time, most of my life, in fact. Recently, though, I have gotten into making Sourdough bread. I have posted my recipe below. If you need a starter and live nearby, text me. I will set out a jar on my front porch for you to pick up. Now let’s just hope you are able to get your hands on enough flour, which has been a challenge recently. If you can’t find bread flour, all-purpose can be substituted.

You’ll need a 5 or 6 quart covered Dutch Oven (although my daughter gets by with the smaller version) a Banneton Mold (order on-line) or substitute a greased and floured bowl. It might be a good idea to watch a few technique videos about stretching and folding if my description of the technique is not enough.

I make a few loaves of this bread each week. My adult children have standing orders. In the days past, when I used to be able to go out or host dinner parties, I would often serve a loaf. Everyone seems to love it.

PLAN AHEAD! This recipe takes a minimum of 3 days to make. You need to feed the starter, make the dough, age the dough, bake the dough, and only then can you eat the bread.

SOURDOUGH BREAD

  • 150 grams starter (fed 8-18 hours previously)
  • 235 grams water (I use slightly warm water)
  • 420 grams bread flour (OR 60 grams whole wheat flour PLUS 300 grams bread flour)
  • ¼ tsp diastatic malt powder (optional, helps with rising. Available on Amazon)
  • 11 grams salt

NOTES ON STARTER:

  1. Starter should be fresh, bubbling, and at room temperature.
  2. Before using starter, measure out 50 grams into another glass jar, stir in 100 grams of water and 100 grams of flour until well combined. Cover loosely and set on counter. Use this mixture to make next loaf but be sure to retain another 50 grams for the following loaf. It’s a never-ending cycle.
  3. NOTE: Starter should not sit out on counter more than 24 hours. Refrigerate until needed. Then feed. Leave on counter. Wait 8-18 hours. Make another loaf of bread, retaining and feeding another 50 grams of starter. Like I said, it’s a never-ending cycle.

TO PREPARE DOUGH

  1. In a medium mixing bowl combine room temperature, fed (8-18 hours previously), fresh, bubbling starter with the water and stir well.
  2. In another bowl combine flour, malt powder and salt, stir to combine.
  3. Add the dry ingredients to the wet ingredients.
  4. Stir with fork, hand, wooden spoon or spatula to hydrate the flour. Don’t use an electric mixer or a dough hook.
  5. Place dough onto a piece of baking parchment, flatten slightly, and dimple with fingers. Dust with more flour, if needed. Cover the dough with a bowl and let sit for 15 minutes.
  6. Remove bowl from the top of the dough. If dough is still wet, sprinkle with more bread flour. Grab two sides of dough and stretch, without tearing. Fold the dough back on top of itself. Turn dough 180 degrees, stretch and fold these two ends. Cover dough ball with mixing bowl and let sit for 15-20 minutes. Do this two more times and let set 15-20 minutes between each stretch and fold.
  7. After the fourth rest, shape the dough into a round, tuck in the bottom edges of the dough under itself until the top is smooth. Cover with the mixing bowl again and let rest 5 minutes.
  8. Place dough ball into a flour-covered 8 or 9-inch banneton mold. Allow dough to rise until it has visibly expanded and usually to the top edge of the banneton.
  9. Cover dough with plastic wrap in refrigerate for 12-36 hours to develop sourdough flavor (the longer in the refrigerator, the sourer the bread).

WHEN READY TO BAKE.

  1. Remove dough from refrigerator an hour or so before baking.
  2. Turn banneton mold upside down onto a piece of parchment paper. Wait for dough to flop out of the mold and onto the paper.
  3. Preheat oven to 475, with a 5- or 6-quart Dutch Oven IN the oven.
  4. When dough is out of mold, slash top with a razor blade or lame.
  5. When oven is hot and Dutch oven is hot, using the parchment paper, transfer the dough to the Dutch oven. Quickly replace the lid and put the Dutch oven with dough in hot oven.
  6. Bake 18 minutes at 475 and then remove lid. Continue to bake bread for another 16 minutes. Internal temperature of bread should be 205-210 degrees.
  7. Remove bread from Dutch oven and let cool to internal temperature of 90 degrees before cooking.

Thanks for stopping by my kitchen today. Have fun making, and enjoying, your own sourdough bread!

Print Friendly, PDF & Email
23 Dec 2019 Christmas Present Cookies
There’s a surprise in the middle!
Chocolate-Orange Christmas Present Cookies

Most of my cookie recipes are from recipes I’ve collected over the years. Some I modify to suit my taste, to improve on method, or to add another component. This recipe I made up all by myself in the 1990s. It’s a basic spritz cookie recipe, with the addition of orange zest and orange extract and then for some reason (maybe the cookie press was malfunctioning?) I made long ribbon strips, laid down chocolate squares on top of the cookie dough, then piped another strip on top, and made chocolate filled Christmas presents.

The orange-chocolate flavor is one that I associate with Christmas. Being a British transplant, there was always a bit of England in my Christmas stocking, one of them being a Terry’s chocolate-orange.

Christmas Presents (Cookies)

  • 1 ½ cups butter
  • 1 cup of sugar
  • 3 ½ cups Flour
  • 1 tsp baking powder
  • 1 egg
  • Zest of 2-3 Oranges (I like my cookies with a lot of orange flavor)
  • ½ tsp Vanilla
  • 1 ½ tsp Orange Extract
  • 3 3.5oz Hershey bars (milk or Special Dark) DIVIDED USE
  1. Preheat oven to 375 degrees.
  2. Sift flour and baking powder together. Set aside.
  3. In the bowl of an electric mixer, cream butter and sugar together, 3-5 minutes.
  4. When the butter-sugar mixture is light and fluffy, add the egg, vanilla, orange extract, and the orange zest.
  5. With the mixer on low, gradually add in the flour and beat until just combined.
  6. Choose Method 1 or Method 2 to make the presents
  7. Method 1: Using a cookie press (No refrigeration needed) Using a cookie press fitted with a ribbon plate. Spritz one long ribbon. Break the chocolate bars into squares and place along the ribbon, with about ½ inch between each piece of chocolate. Spritz another ribbon on top of the first ribbon and chocolate. Cut between the chocolate pieces, and push slightly on each end to seal the present. Place the presents on a cookie tray lined with parchment paper, about one inch apart.
  8. Method 2: Using a rolling pin (refrigeration necessary) Separate dough into two equal size disks, and wrap in plastic wrap. Refrigerate the dough for 2 hours or until firm enough to roll. Roll Dough out into a square. It is ok if dough is thin because you will add another layer of dough on top. Break up the chocolate pieces, and place them all around the dough in a grid, all pieces about ½ inch apart. Roll out the second disk of dough to the same size as the first.  Then place second dough square on top of the first dough square, and gently press dough around the chocolate pieces (so that you can see where you need to cut). Using a ravioli cutter, pizza cutter, knife, or cookie cutter, cut cookies around each piece of chocolate. Gently press all sizes of the cookies to seal. Place presents on a parchment-lined baking sheet, about one inch apart.
  9. Bake cookies for 9-11 minutes. You don’t want cookies to brown, but you want all the dough to cook. Cookie bottoms should be a very light golden brown. (Everyone rolls or pipes different thicknesses of dough, which necessitate different cooking times. Use your judgement here. You might need to add a minute or two to the cooking times)
  10. Once cookies come out of the oven, move cookies to a cooling rack to cool completely.
  11. Melt leftover chocolate using your favorite method (I like to microwave chocolate in a bowl in 30 seconds increments until melted), then place melted chocolate into a quart size zip lock bag, and cut a small hole at the tip of the bag.
  12. Pipe the melted chocolate onto each cookie to look like a ribbon and bow (this might take some practice. Just sample the ugly ones and put the pretty ones on the cookie plate). Chill cookies in refrigerator until chocolate hardens.
  13. Then, serve and enjoy!!

Print Friendly, PDF & Email
22 Dec 2019 Chicken Curry Sandwiches
Chicken Curry Sandwiches

Chicken Curry finger sandwiches have been a staple at my English Teas for decades. I don’t remember where I found the recipe, but it’s a keeper. The curry mixture keeps well in the refrigerator, covered, for a few days.

Chicken Curry Sandwiches

  • 2 cups cooked and finely diced chicken
  • 2 hard boiled eggs, cooled, peeled and diced
  • ½ to 1 cup mayonnaise (personal preference, I try not to use more than ½ cup)
  • ¾ cup finely diced celery
  • ¼ cup finely diced green onions
  • 1 teaspoon fresh lemon juice
  • ½ to 1 teaspoon salt, to taste
  • 1 to 2 tablespoons curry powder (taste and add more if needed, depends on the brand of curry powder used)
  1. Gently combine all ingredients.
  2. Let mixture sit for a few hours for flavors to develop.
  3. Spread onto choice of bread and enjoy (since I usually serve this filling in crustless finger sandwiches I usually use a bakery white bread)

Makes enough filling for 4 good sized sandwiches or 12 finger sandwiches.

Print Friendly, PDF & Email