Tag-Archive for ◊ quick and easy ◊

02 Aug 2013 Beans!

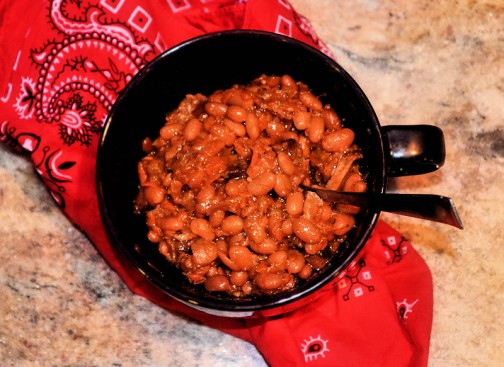
beans01

I am so excited about this recipe!  It’s a paradigm shift recipe!  It’s not a recipe in the true sense of the word, it’s more of a road map to a particular destination.   A road map allows for more flexibility than a recipe, a road map allows the cook to make adjustments based upon personal preferences, taste, time, and what’s in the pantry.  I think most people have a road map for a few good dishes.  I have a road map for spaghetti sauce, chicken soup, stir-fry and hamburgers.  You might have a road map for meatloaf, burritos and rice bowls.  Most people have road maps for sandwiches and salads. A road map means there are guidelines, easy ones, usually ones that can be memorized, and that can always be adapted as the situation requires.

So here it is, a guideline for a pot of beans, in the crockpot no less!  Crockpot cooking is great for summer, the kitchen doesn’t get heated up, and a pot of beans pairs well with almost everything that can be BBQ’d.  In the winter months, a bowl of beans with some cornbread or tortillas is almost the definition of comfort food. Another plus, crockpot cooking is fuss free, so toss everything in the pot and then go sit in the sun or shovel snow.

Many thanks to Mark Bittman of the New York Times for this road map. Thank you, thank you, thank you!!

BTW…, for years I have been looking for a good baked beans recipe, so that’s what I make with this recipe:  meaty, slightly sweet Boston-style beans.  YUM! They go with everything and I have  a serious love for leftover beans on toast (I’m English).  My son mastered this recipe in one take and he makes killer spicy teriyaki beans with chicken.  I can see others going for more of a Mexican style bean. What sort of beans do you like? Make them!

The House Special Beans

  • 1 lb of dried beans, any kind, I like small white and pinquitos but black, pintos, garbanzos, kidney, or a combination of different kinds of beans can also be used.  Don’t have a full pound of beans?  Add in some split peas or lentils to make up the difference.  Remember these are dried beans (about $1.25 for a pound bag) we are not using canned beans here (and there is no need to soak the beans first).
  • 4 cups of liquid, any kind.  Find a mixture that appeals to you. I start with a bottle of beer, then I add in about 1/4 cup of ketchup, 1/4 cup of Worcestershire sauce, 1/4 cup maple syrup, 1/4 cup of brown sugar and a squirt of mustard, using molasses instead of maple syrup and brown sugar would be good too. If my Dad were here I’d stir in 1/4 cup of bourbon. Then I add water, broth (any kind), or cold coffee to make the 4 cups (too much coffee will make the beans a bit bitter, so stick to less than 1 cup of cold coffee).  My son adds BBQ sauce, sriracha, honey, teriyaki or soy sauce along with beer and coffee.  Don’t like beer?  Use some leftover wine. Don’t drink at all, stick to broth and water.   Health nut?  Stir in carrot juice and some of that green liquid you’re so fond of !
  • Seasonings, any kind.  Start with a healthy amount of salt and pepper, then add in what appeals to you.  I add in 2 t. salt, 1 t. black pepper, 1 t. cumin, 2 t. chili powder, minced garlic, and 2 bay leaves.  Other options include oregano, basil, coriander, red pepper, curry powder, ginger, paprika, liquid smoke, parsley, sage, rosemary and thyme…
  • 1 lb meat, any kind, a bit more or a bit less is fine.  I like beef, and I buy something on sale, beef shanks, top sirloin, stew meat, steak, anything.  Throw in a pork chop or two, or some ground meat (brown it first and drain off the fat), chicken (with or without the bones, but boneless chicken does tend to get a bit overcooked), sausage, ham, cooked bacon…, or go for a combo.  Sausage and chicken? Beef and bacon? Or leave out the meat all together if  you’d rather.
  • 2 lbs finely minced or grated veggies, any kind.  I always add diced onion, grated carrots, and minced celery.  Then I might add some shredded zucchini, turnip, cabbage, spinach or kale, whatever I have on hand. Throw in some potatoes. Lots of folk like bell peppers, dice some up and throw them in.  Leeks are yummy. A few diced jalapenos would spice things up. Even canned pumpkin works. The only veggie I don’t add is tomatoes. I heard once that tomatoes interfere with the cooking process of dried beans, so I leave them out (I also don’t use tomato juice as a liquid, but I do stir in a bit of ketchup, and have had no problem with that).

Directions:

  1. Put the dried beans in the bottom of the crock-pot.
  2. Get out a 4-cup measure.  Combine your liquids.  When you have 4 cups, pour it over the beans in the bottom of the crock-pot.
  3. On top of the beans and liquid, add the meat.  I add the meat as is, then remove the fat and bones, and shred the meat after cooking.  You can do the same, or you can add cubes of boneless, skinless meat.
  4. Sprinkle desired seasonings on top of the meat.  (If you add bay leaves, count them so you know how many to remove before serving!)
  5. Finely mince, dice, or shred the veggies.  Add the veggies on top of the meat. (The liquid will not cover the veggies, yet).
  6. With a spatula or a spoon, press on the ingredients to lightly pack.
  7. Put the lid on the slow cooker, plug it in, turn on high, and go out and play! If you are around, check the beans after a few hours.  If the beans look dry add a bit more water, stock, beer, or wine (don’t stir, just pour it on top).
  8. Let beans cook for 6-8 hours.  Turn off.
  9. After the beans have cooled for a bit, taste them.  Needs more salt?  More maple syrup? More heat? Add it now.  If you added large hunks of meat with bones, remove bones and shred the meat. Remove the bay leaves, if you used them.
  10. If you want to add in extras, do it now.  You could stir in some diced tomatoes now, if you’d like, they won’t do any harm at this point (let cook for an additional 30 minutes or so).  Sometimes I stir cooked bacon at this point.  You could stir in frozen corn, if you’d like. Adding chopped parsley, cilantro, or green onion makes the beans look pretty and brightens them up a bit for a pretty presentation.
  11. Remember, beans seem to taste better the day after they are made, so don’t be afraid of letting them rest in the refrigerator for a bit.

Soooo, do you have the road map memorized?  1 lb beans, 1 lb meat, 2 lbs veggies, 1 qt (4 cups) liquid. Seasonings. Crock-pot. High. 6-8 hours, while you go out and play 🙂

Thanks for stopping by my kitchen today!  Go ahead now, make some beans! Let me know what you used and how they turn out 🙂 I can’t stop my son from making these beans! We’re drowning in beans…, but we’re not broke! Beans we can afford 🙂

31 Jul 2013 Blueberry Heaven


Do you ever go into a bakery?  Of COURSE you do!  Do you ever buy a pastry that looks delicious, but then are seriously disappointed in the taste…? And then, to top it off, are you overwhelmed by the amount of  fat you’ve just consumed for something that really wasn’t that all that great?  Me, too 🙁 Do you ever wish, on a weekend morning with your second cup of coffee, for that imagined deliciousness, without all greasy pastry and sugary icing?  Me, too 🙂 Pssssst…  Come here! No, come closer! I am going to tell you how to make a breakfast pastry as delicious as the one you are dreaming of…, and without the load upon load of grease and sugar!

Now. Seriously…, am I your best friend, or what?!

It’s so simple!  You need 2 slices of bread, a bit of cream cheese, and a handful of blueberries. It helps if you have a sandwich maker or a panini press, but if you don’t, use a frying pan and make this Blueberry Heaven just like you would a grilled cheese sandwich.

I found the original recipe here: http://www.fitfromconception.com/2012/06/blueberry-breakfast-grilled-cheese.html  No, I am not pregnant, roflmao.  Neither are any of my children.  I have no idea how I ended up at that website, but I am glad I did.

Blueberry Heaven

[a Stand-in for Fat and Sugar Laden Blueberry Pastries]

For each serving:

  • 2 slices of bread, any kind.  Make it whole wheat if that’s the way you roll.  I use Orrowheat Country Buttermilk Bread.  Cinnamon bread would probably be delicious, as would almost any kind of homemade bread (don’t use homemade rye bread or anything like that!).
  • Plain cream cheese, enough to spread on two slices of bread.
  • a sprinkling of sugar, less than 1/4 tsp, optional
  • a handful of fresh blueberries, about 24 (jam can be substituted)
  • Butter, optional, unless you are using a frying pan


  1. Preheat sandwich maker, panini press, or frying pan.
  2. Spread each slice of bread with cream cheese, no measurements here, just coat the slices of bread to your preference. (If you are using a frying pan, spread the other side of the bread with butter)
  3. Sprinkle a bit, and I do mean a bit, less than 1/4 tsp of sugar over the cream cheese, just to sweeten up the cream cheese a little bit. (I’ve made this without the sugar, and it’s just not the same.)
  4. Arrange blueberries on one slice of the cream cheese covered bread.  Use as many as you want, but I think 24 is about perfect.  I like to evenly space the blueberries on the bread so I get an equal number of  blueberries in every bite.
  5. Put the other slice of cream cheese covered bread onto of the blueberries, cream cheese to cream cheese.
  6. Put the sandwich in the press, latch close, and cook for 2 minutes. (If using a frying pan, put the sandwich, butter side down on the preheated frying pan.  When the first side is golden brown, flip, and cook the second side until it is golden brown too.)
  7. Remove sandwich from the press or the pan and let cool a bit, the filing will be mad hot right out of the press. Be careful.
  8. Enjoy! It’s a little slice of heaven, isn’t it?
  9. Repeat.  You’ll want to make one for someone else… 🙂

Thanks for stopping by my kitchen today! Aren’t you glad you don’t have to drive over to the Olde Time Bakery for a pastry that will only make you feel badly about yourself? Hooray!!

21 Jul 2013 “Magic Shell” Topping for Ice Cream

magic shell with bottle[3] rattie

It’s summer.  It’s time for ice cream, and the easiest recipe ever posted on this site! Magic Shell!  You know the stuff, right?  You squeeze the chocolate-y liquid onto ice cream and it hardens up almost immediately.  Then you can use your spoon and shatter the thin chocolate all over the ice cream. Then you can stir the chocolate pieces  into your ice cream, and when you have a spoonful of the concoction the magic shell shatters again in your mouth.  It’s lovely.  It’s chocolate-y. It’s fun. It’s magic. It’s easy.

The recipe only calls for two ingredients.  And once you make it, you can keep it on the kitchen counter in a squeeze bottle for up to a month.

You need good chocolate, and coconut oil. Coconut oil?  Yep.  It’s not as hard to find as it used to be.  I even saw jars of coconut oil at Walmart, and Costco is selling huge bottles of it now.  It should be on the shelf of your grocery store, next to all the other oils.  If not there, and you don’t shop at either Walmart or Costco, try Trader Joe’s.

Magic Shell

  • 5  ½ oz. good quality chocolate, milk or dark, whatever is your personal preference (don’t use chocolate chips, use some good quality bar chocolate)
  • ½ cup coconut oil
  • Ice cream, for serving

Makes 1 cup

  1. Chop your chocolate and add it to a microwave-safe container along with coconut oil.
  2. Zap at 30-second intervals until chocolate melts into the coconut oil.  Stir well. At this point I like to pour my Magic Shell into a squeeze bottle, but this is not absolutely necessary.
  3. Pour mixture over ice cream, watch it harden, crack it open! Magic! Fun! Delicious!
  4. Because of the melting point of the coconut oil, the magic shell will stay liquid in a hot kitchen and solidify after sitting in a cold kitchen or the fridge. If your leftover shell hardens, just re-melt in the microwave. Stored at room temperature Magic Shell should keep for at least a month

Keep some of homemade “Magic Shell” and a carton of your favorite ice cream on-hand for quick, no cook, sort of special dessert.  Psssst…! Kids like to pour some rainbow sprinkles onto the chocolate sauce just before it hardens!

Thanks for stopping by my kitchen today.  See you again soon!


23 Feb 2013 Cold Brewed Iced Coffee (for the Yummiest Iced Lattes)

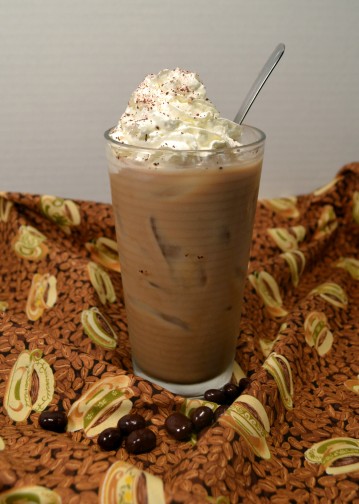
Iced Coffee with Whip

I like coffee.  I loooooove coffee.  Not that hot, black and bitter brewed coffee, but that expensive stuff brewed by the tablespoonful and mixed with steamed and foamed milk.  I have lived with an espresso machine since my ex-husband moved out.  It was a good switch. I am on my fourth one now (fourth espresso machine, not fourth ex-husband!).  Three had to be  retired (again, the three espresso machines not ex-husbands) and one  was fired for making terrible, horrible, no good, very bad lattes.  In addition to hot lattes, from spring through fall I really, really enjoy an Iced Latte in the afternoon, and, for Iced Lattes, with this recipe  no espresso machine is  required! Is there dancing in the aisles?

To make the Cold Brewed Iced Latte base, just get 12 oz of good quality coarse ground coffee beans, 7 cups of water, and a bowl that can be covered.  Are Toffee Nut Iced Coffee’s your little bit of heaven?  Not a problem. Vanilla Iced Coffee’s?  Easy peasy…

My friends and I are loading up my Minnie Winnie (small RV) and heading off to Palm Springs for the Camel & Ostrich Races and the Blessing of the Dates.  (Nooooo, I don’t know why we thought that would be a good idea!!! And no, I am not making this up, both are real events, held yearly, in Palm Springs and, from what I understand, in Arizona, too).  It’s become a tradition for us to load Iced Coffee Base (decaf)  into the Minnie Winnie when we head out.  Iced Lattes every afternoon while touring the US, what a nice way to live!  Don’t be jealous…raise your hand! You can come on the next trip!

Cold Brewed Iced Coffee Concentrate

  • 7 cups water (you could go gourmet and use bottled water…)
  • 12 oz. favorite rich coffee (coarse  or drip grind, decaf or regular)
  1. Pour the entire 12 oz of coffee into a bowl that can be covered (with a lid…or a plate)
  2. Pour the water over the coffee. Stir to make sure all grounds are saturated with water. Cover the bowl.
  3. Let the coffee and water sit, covered and undisturbed, for 24 hours.
  4. Now comes the messy part.  Strain the coffee.  I put a coffee filter in a mesh strainer, balance it on top of a pitcher, and pour cups of the mixture through the filter. The Iced Coffee base collects in the pitcher and  I throw the used coffee grinds away as I go.  You might need to use two coffee filters.  The decanting takes awhile, but it’s definitely worthwhile–messy but easy.
  5. Once all the coffee concentrate has been filtered, put a lid on the pitcher, and store it in the refrigerator for up to three weeks. (Handy Tip: write dates on the container with an erasable marker.  For example:  Made 2/13/13. Good until 3/6/13.  When the container is empty, wash the dates off!  I mark all my plastic containers with erasable markers now.  It’s so handy.)

Iced Latte

  • ¼ cup* of Cold Brewed Iced Coffee Concentrate (above)
  • ¾ cup of milk (If you want, you could experiment with the milk.  I use 1 or 2%, but I have heard of others using coconut milk, almond milk, chocolate milk, and of course soy milk. Some even like evaporated milk with a splash of sweetened condensed milk).
  • 4 or 5 ice cubes
  • Optional: sugar (white or raw), Splenda, Torano Syrup (Vanilla and Toffee Nut are favorites), Bailey’s Irish Creme, Kahlua, 1-3 Tablespoons chocolate syrup, Sprinkles (Trader Joe’s has a “Sugar, Chocolate, Coffee Bean Grinder” that’s fun), a chocolate covered espresso bean or mini chocolate chips…
  • whipped cream and a straw (I think these are musts, but some people are a bit more serious and go without!)
  1. Pour the concentrate into the glass.
  2. Add the milk and stir.
  3. Stir in any optional ingredients (sweetener or syrups)  Stir well.
  4. Plop  in some ice cubes. Stir again.
  5. Top with whipped cream, and sprinkles if you’d like (sprinkles, grated chocolate, a dusting of cocoa powder or cinnamon, or even a squirt of chocolate or caramel syrup), and, of course, a straw.

* ¼ cup of concentrate plus ¾ cup of milk seems to please most of my friends (A LOT!), but I do have one friend who doubles the coffee.  She has ½ cup concentrate and ¾ cup of milk. She’s German.  She likes strong coffee.

Thanks for stopping by my kitchen today!  You have in your hands one my favorite recipes. I hope you’ll be enjoying warm weather and iced lattes very soon!

P.S  If you’d like to get an email notifying you of the next recipe I post, please enter your email address in the box to the left. Don’t worry!  I won’t abuse your email address (I don’t know how to, for starters…) or use it for anything other than an occasional, short email notification of a new posted recipe.