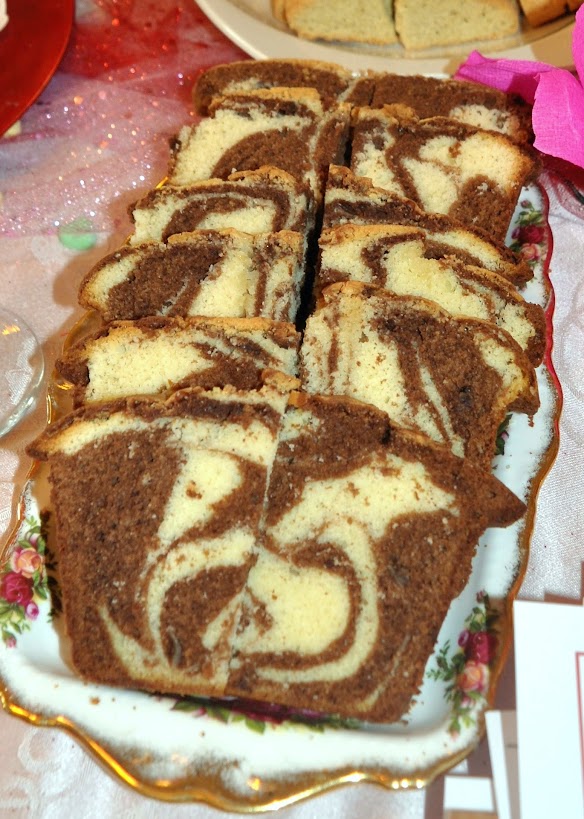
Archive for the Category ◊ Breakfast & Brunch ◊

26 Jan 2018 Potatoes Baked in Cream (Potato Gratin)

potatoes-baked-in-cream-with-abby

Did the name of the recipe entice you click on this?! Well then, that makes us friends forever!

When my friends from Southern France were staying with us, they offered to make a side dish for dinner.  They didn’t use a recipe. They sliced up a few potatoes, sprinkled them with salt and pepper, poured a carton of cream over the top, and put the whole thing in the oven. Sixty minutes later my family’s love affair with Potatoes Baked in Cream began.

Last year I found an actual written down recipe, one that I can pass on, one with precise quantities and directions.  The recipe is from David Tanis’ cookbook, “Market Cooking”. I made one change to Chef Tanis’ recipe, I cut out an additional four tablespoons of butter! Chef Tanis calls his recipe “Classic Potato Gratin”, but to me and my family it will always be “Potatoes Baked in Cream”.

I think you will be surprised at how delicious this very simple dish is. I certainly was. Sublime. After you taste Potatoes Bake in Cream, that will be your word of the day. Sublime.

An important note:  Leftovers don’t reheat well, so make sure you eat all of the potatoes in one sitting (invite friends over, take the dish to a potluck, serve these potatoes for a holiday meal…). I haven’t tried reheating leftovers in the oven, so that might work (see David Tanis’ *note below). I have tried reheating leftovers in the microwave.  Don’t do it on 100% power!  I had so-so results reheating on 50% power. I wouldn’t serve them to anyone else, but I was able to eat them!  I have also had so-so results from throwing a handful of diced ham into a hot frying pan, dicing up a serving of leftover casserole, and reheating over medium heat. It made for a good breakfast, but nothing-nothing-like the original casserole served hot from the oven.

Another important note: The potatoes need to be sliced thinly and evenly. 1/8th inch or 3/16ths an inch is about right. You can do this with a very sharp knife and by working slowly and carefully, like my French friends did. I use a mandolin to slice the potatoes. If you don’t have one, I’d suggest getting one.  I bought mine on Amazon after looking at all the reviews and selecting the highest rated one. Later I started seeing mandolins at Savers/Goodwill for about $6.  I bought used mandolins for my daughters. Go to Savers.

Potatoes Baked in Cream (Potato Gratin)

  • 3 pounds russet potatoes
  • butter to coat the baking dish (Chef Tanis uses 4 more tablespoons butter to dot top of casserole, I don’t)
  • Salt and pepper
  • 2½ cups heavy whipping cream (don’t even think about substituting anything for the cream, such as half and half or whole milk, it just won’t work!)
  1. Pre-heat the oven to 375°. Peel the potatoes and put them in cold water (to prevent them from turning brown while you finish the prep work. Slice only one layer of potatoes as a time. Keep the other potatoes in the cold water. The browning happens fast when the potatoes are so thinly cut).
  2. Smear a baking dish thickly with butter. (I use a 9×13 dish but I am looking for a dish that’s the same size and a bit shallower since the quantity of potatoes only come half way up the sides of the 9×13 pan. The waste of space bothers me a bit as I’d like to have a dedicated Potatoes Baked in Cream pan because, after all, this is a dish I will be making over and over! That being said, I’ve been using the same 9×13 pan for a few years now, so it’s really not a problem.)
  3. Drain and dry one peeled potato at a time. Using a mandolin or a very sharp knife, slice one potatoes at a time as thinly as possible. Quickly lay the potato slices in the bottom of the baking dish, overlapping them just slightly to make a “roof tile” style pattern. Sprinkle each layer of potatoes lightly with salt and pepper. Slice more potatoes and make another layer. Continue in this fashion, seasoning each layer, until all the potatoes are used. You should have at least 3, but no more than 4 layers.
  4. Pour the cream over the potatoes and tilt the pan to distribute well. With your hands, push down on the top layer to even out the pile (I don’t do this, but Chef Tanis says to). The cream should just barely cover the potatoes; add a little more if necessary.
  5. Cover the casserole dish tightly with foil and place in oven. Bake for 30 minutes at 375°.
  6. After 30 minutes remove the foil from the casserole, and return to the oven for another 30-35 minutes to finish cooking the potatoes and turn the top of the gratin to a crispy, deep golden brown.
  7. Let the gratin rest for 10 minutes before serving.

*Note from David Tanis: The gratin can also be cooled and left at room temperature for several hours, then reheated in a moderate oven. (I haven’t tested this)

Thank you for stopping by my kitchen today, what is cooking for tomorrow, hmmmm…. Pork and Tomatillo Stew?

Print Friendly, PDF & Email
03 Mar 2017 Double Chocolate Marble Loaf

double-chocolate-marble-loaf

Weekend Cake!  Isn’t that a delightful subcategory of dessert? According to Dorrie Greenspan it’s a French concept. Weekend Cake is good for anything from breakfast through late night snacking.  Weekend Cake travels well, is long lasting and is best if left to sit a day before eating.

This recipe for Double Chocolate Marble Loaf, a “weekend cake” is from her cookbook, “Baking Chez Moi” . I’ve never been much for Marble Cake, often finding it to be dry and muddled.  Not this one! It’s truly delicious.  I’ve only made the orange chocolate-white chocolate version, but I am dying to make the mocha-cardamom version and the chocolate-mint version.

Double Chocolate Marble Loaf

  • 2 cups all-purpose flour (272 grams)
  • 1¼ teaspoons baking powder
  • 3/4 teaspoon fine sea salt
  • 1½ sticks (12 tablespoons or 6 ounces/170 grams) unsalted butter, at room temperature
  • 1 cup granulated sugar (200 grams)
  • 4 large eggs, at room temperature
  • 1½ teaspoons pure vanilla extract
  • 1/2 cup whole milk, at room temperature
  • 4 ounces best-quality white chocolate, melted and cooled (Lindt)
  • 1/4 teaspoon orange or peppermint oil (I used a bittersweet chocolate-orange chocolate bar, so no oil)
  • 4 ounces semisweet or bittersweet chocolate, melted and cooled
  1. Center a rack in the oven and preheat the oven to 325 degrees. Pull out an insulated baking sheet or stack two regular baking sheets one on top of the other. Line the (top) baking sheet with parchment paper or a silicone baking mat. Butter a 9-by-5-inch loaf pan, dust with flour and tap out the excess; set it on the baking sheet(s).
  2. Whisk the flour, baking powder and salt together in a small bowl.
  3. Working in the bowl of a stand mixer fitted with the paddle, or a large bowl with a hand mixer, beat butter on medium speed for 3 minutes, or until smooth. Add sugar and beat for another 2 to 3 minutes, scrape sides. Add the eggs, one at a time, and beat for a minute after each one goes in. The batter may curdle, but you needn’t worry.
  4. Reduce mixer speed to low and mix in the vanilla. Still on low speed, add the flour mixture in 3 additions and the milk in 2, beginning and ending with the dry ingredients and mixing only until each addition is incorporated.
  5. Scrape half of the batter into another bowl. Using a flexible spatula, gently stir the white chocolate into half of the batter. If you’re using the orange oil, stir it in as well. Stir the dark chocolate into the other half of the batter.
  6. Using a spoon or scoop, drop dollops of the light and dark batters randomly into the prepared pan — don’t think too much about the pattern — and then plunge a table knife deep into the batter and zigzag it across the pan. It’s best to move forward and not to backtrack. Don’t overdo it — 6 to 8 zigzags should suffice.
  7. Bake the cake for 80 to 90 minutes, or until a tester inserted deep into the center comes out clean. (My cake was done in 70 minutes, and I might have taken it out 5 minutes sooner.) Check the cake at the halfway mark, turn it around and, if it’s getting too brown, cover it loosely with a foil tent. Transfer the cake to a cooling rack and let it rest for 10 minutes, then unmold it, turn right side up on the rack and let come to room temperature.
  8. Storing: Wrapped well, the cake will keep at room temperature for up to 4 days. It can be wrapped airtight and frozen for up to 2 months; defrost it in its wrapper.

Spiced Mocha Variation: add 1 tsp. ground cardamom into the white chocolate portion and 2 ½ tsp. instant coffee or espresso mixed with 1 T. hot water to the dark chocolate portion. Omit the orange oil.

Mint Chocolate Variation: stir ¼ tsp. peppermint oil into the white chocolate portion and use only regular semi-sweet or bittersweet chocolate in the dark chocolate portion. Omit the orange oil.

Print Friendly, PDF & Email
20 Jul 2014 Toasted Coconut Waffles

coconut-waffle01 They taste like a tropical vacation!  I liked them with butter and apricot jam.  My kids were hollering for pineapple, mango, and some toasted nuts but I gave them what I had on hand, maple syrup and whipped cream (poor, poor deprived children). I cut this recipe out of a Bon Appetit magazine in December, 2013 but didn’t make them until July 2014. I’m glad I don’t clear my refrigerator of assorted clippings and notes and pictures all that often, and I am glad I saved this recipe for seven months! The note above the recipe states the recipe is from Elmwood Cafe in Berkeley.  I wonder what they serve them with… You’ll need some coconut oil for this recipe.  I don’t think it affects the taste much, but I think it adds to the delightful crunch.  I did make one change to the recipe, I reduced the amount of toasted coconut. Only ¾ cup of toasted coconut is incorporated into the batter, but the recipe stated to toast 1 ½ cups, using the extra ¾  to sprinkle on top of the cooked waffles, that’s way too much coconut for sprinkling, an extra ¼ cup will do you. I toasted the coconut and mixed up the dry ingredients before I went to bed, which made Sunday morning a bit easier.  I just had to stir in the eggs, milk, and coconut oil and heat up the waffle iron. The batter made 7 large, round waffles (which leaves some for us to throw in the toaster tomorrow morning). Word of advice, if you like waffles, and want to enjoy them on a regular basis, get two waffle irons.  The horrible thing about waffles is that it’s hard to get everyone a hot waffle at the same time.  Two waffles irons solves this problem–unless you have a really large family and need three waffle irons… It goes without saying that you have to like coconut (and the Hawaiian mojo) to like these waffles. But who doesn’t like coconut…, or Hawaii!? Toasted Coconut Waffles, take me awayyyyy. . . .

BTW, my notoriously picky 5 year old grandson, who at last count eats only 27 different foods (he has some sort of selective eating disorder), ate half a waffle and told me it was GOOD.  Hooray! I might be making these on a regular basis now, especially since scrambled eggs, a long time favorite, has slipped off of his list.  I just might have this recipe committed to memory by next month 🙂

Toasted Coconut Waffles

  • 1 cup shredded coconut (original recipe specified unsweetened, but I didn’t have any, so used sweetened coconut)
  • 1 ½ cups all-purpose flour
  • ½ cup cornstarch (yes, my eyes popped, too.  Not a misprint.  On-half a cup of cornstarch!)
  • 1 teaspoon kosher salt
  • 1 teaspoon baking powder
  • ½ teaspoon baking soda
  • 2 large eggs
  • 1 cup buttermilk (or soured milk)
  • 1 cup whole milk (I had whole milk on hand, so I used it, but I am sure 2% would be fine, too)
  • 2/3 cup coconut oil, melted
  • ½ cup sugar (use 2 tablespoons less if you are using sweetened shredded coconut)
  1. The original recipe said to preheat oven to 400°F, toast coconut on a rimmed baking sheet until golden brown, 2 minutes. then let cool. I find it easier to toast the coconut in a dry frying pan over medium heat.  Just keep stirring and then watch closely.  Once the coconut is a nice golden brown remove it from the pan and let cool on a plate.
  2. Whisk flour, cornstarch, salt, baking powder, and baking soda in a large bowl (I did this the night before, covered, and left on counter).
  3. Whisk eggs, buttermilk, milk, oil, and sugar in a medium bowl. Whisk buttermilk mixture into dry ingredients (do not over mix). Mix in ¾ cup coconut; set aside remaining ¼ cup coconut for sprinkling on waffles.
  4. Heat a waffle iron until very hot.
  5. Ladle approx 2/3 cup of batter onto hot waffle iron, close lid, and cook waffles until golden brown (each waffle iron is different, but usually 4-6 minutes).
  6. Serve topped with your choice of toppings: butter, syrup, apricot/pineapple jam, diced fresh bananas/mango/pineapple, toasted pecans, whipped cream and reserved coconut.

Thanks for stopping by my kitchen today.  I hope you I’ll be offering up some recipes on a more regular basis now. I am home from an extended European vacation and pretty much convinced that what I make at home is better than anything anywhere else 🙂

Print Friendly, PDF & Email
18 Jan 2014 Russian Tea

Russian-Tea-1a

Are you old enough to remember the “Russian Tea” phase back in the 70’s?  I was a teenager then, a very young teenager, and our Moms and Grandmas were mixing up batches of Russian Tea like crazy and giving everyone little jars of the stuff.  I think the mix had instant tea, Tang (remember Tang? Astronauts drank it!), powdered lemonade, and some spices.  You opened up your gift jar, spooned some mix into a cup, added hot water, stirred it up and  you were drinking Russian Tea!  I liked it. It was a different hot drink.  I wasn’t into coffee yet, Hot Chocolate was too childish, English tea with milk was OK, but boring. Russian Tea was fun and different–and a bit exotic.

Fast forward to February 7th, 2014, Opening Ceremonies for The XXII Winter Olympics will be held in Sochi, Russia and I will be hosting a Russian Themed Winter Olympic Dinner.  What to have to drink after dinner? My daughter suggested Vodka shots off the tip of a sword.  Umm, no.  A citrus-y, sweet, slightly spicy version of Russian Tea is more up my alley — but not made of Tang, Country Time Lemonade and Nestea. So I hit the Internet.  First spoiler, the so-called “Russian Tea” of the 70’s isn’t Russian at all. It’s an American concoction! The only thing Russian about it is it’s name.  Shhhhhhhhhh! Don’t tell anyone!  Real Russian tea is “Russian Caravan” tea, because tea used to be imported to Russia from China, via a 16-18 month caravan, and it acquired a smokey flavor from all of the caravan campfires, according to Wikipedia.  So, I went to my local Russian grocery store, yes, we have one in San Jose, and I couldn’t find “Russian Caravan” tea anywhere (nor anyone to help me), but lots of Earl Grey.  I am not serving Earl Grey tea at my Russian Dinner.  Early Gray Tea is English and I don’t like it, it’s too smokey!

So now I am back to my original “Russian” Tea quest.  I found some recipes on the Internet, checked out their star ratings, and tried a few.  One was truly horrid; it involved extracting the juice from oranges and lemons, then boiling the  rinds in sugar and water then adding  the liquid to cold tea. I was skeptical, but the very attractive, very sincere lady on the YouTube video seemed nice, and she was raving over her tea! So I tried it.  She was not honest. Her tea was bitter and horrid.  Of COURSE it was.  Boiling all that pith then adding it to the tea? I should have known better. Why do people post bad recipes?

Eventually, I came up with this version for fresh Russian Tea.  I like it.  I really like it. I served it to five friends and two relatives, and they all said they liked it.  Then I served it to another relative, the daughter who suggested I serve vodka shots off the end of a sword, and she hated it.  I was SHOCKED.  I tied her down and make her try it again.  She STILL didn’t like it.  Harrumph.  She’s no longer my favorite child.  My son loved the tea.  He said, “That’s good.  That’s really, really good.”  He’s a good boy. He’s my favorite child now.

This “Russian” tea is in the same family as hot tea with lemon and honey, but with orange added, and some cinnamon, and a few cloves, it’s a bit more complex (there’s no honey in this tea though).  I’m going to serve it at my Russian themed Winter Olympic dinner, but I’ll brew a pot of Earl Grey, too… for the weirdos.

You all know I am not a photographer, right?  I thought I was being deliciously creative setting up a picture to look like hot, citrus-y, Russian tea in cold, stark, white snow.  Epic fail.  What I got looks like tea in bubbles, oh, not even that, it looks like tea in pillow stuffing, which it is.  Can you overlook that?  Can you just try this hot, citrus-y, slightly spiced, American-Russian tea?  I think you will be glad you did.  Just make the tea once, and put it in the refrigerator to reheat as needed. Ponyat’? Da?

I am really getting into the Olympic/Russian thing now. I made Pierogi for dinner last night, and I ordered a Pierogi press and a Pierogi cookbook written by a real babuska from Amazon.  I am trying to find a Russian outfit to wear. It seems I should go as a babushka.  I already have all the right clothes in my closet…and you know, Vodka shots from the end of a sword might not be too far fetched!

Russian Tea

  • 4 strong black tea bags
  • 1 quart (4 cups boiling water)
  • Zest of 1 1/2 oranges
  • Juice of 1 1/2 oranges (about 2/3 cup)
  • Zest of 1 large lemon
  • Juice of 1 large lemon (about 1/4 cup)
  • 6 cloves (0k to double for spicier drink)
  • 1 cinnamon stick (ok to use 2 for spicier drink)
  • 1 cup sugar (might be ok to reduce to 3/4 cup for a less sweet drink)
  • 2 cups cold water 
  1. Make 1 quart of tea by pouring 1 quart of boiling water over 4 teabags and seep for 5 minutes.  Remove tea bags from hot tea and set tea aside.
  2. Zest the oranges and lemon. Put the zest in a small saucepan.
  3. Add 1 cup sugar and 2 cups cold water to the zest in the small saucepan.
  4. Bring water, sugar, and zest to a boil and boil for 5 minutes.
  5. Juice the oranges and lemon. Pour the juice into the brewed tea.
  6. Strain the  boiled water, sugar, spices and zest mixture the add to tea and juice mixture.
  7. Stir well and serve or refrigerate mixture until ready to use. Reheat in the microwave or on the stove top.
  8. Enjoy the Olympics!

Thanks for stopping by my kitchen today.  BTW, I tried one more drink in my quest for my Olympic dinner, but I think that one qualifies as a dessert (and a gold medal)!  White Hot Chocolate.  Too, too, too decadent to post…I must keep my fans from sinning…I must…I must…OK, OK, I’ll post it soon!

Print Friendly, PDF & Email