Archive for the Category ◊ Cakes & Cupcakes ◊

25 Jun 2019 Raspberry-Ricotta Snack Cake

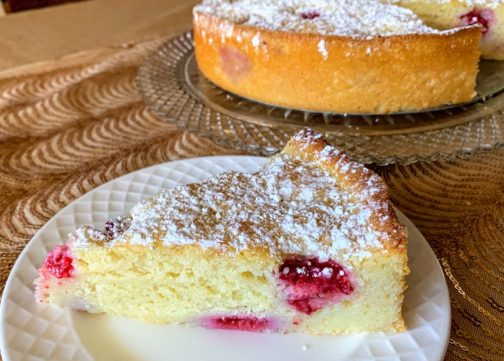
This cake is simply delicious, light and moist, unassuming and satisfying. It’s good for breakfast, it’s good for a light dessert, and it’s good for an afternoon tea or snack. It’s good for company, it’s good for a family treat, and it’s good for just honoring the fact that you are alive, it’s Summer, and having something completely homemade with fresh fruit is the right thing to do.

The original recipe is from Epicurious, which called for using frozen berries. I’ve only ever made this with fresh raspberries, so that is reflected in the recipe below. Others have made this cake with blackberries, blueberries, pitted and halved cherries, diced mango, and *gasp* chocolate chips.

Not being a ricotta lover, I wouldn’t have made this cake if weren’t made for me at a Cookbook Club retreat a few years ago. I loved it, the ricotta wasn’t overwhelming and is important to the character of this cake. The ricotta keeps the cake moist and light, and allows it to stay moist for two days or more.

If there are any leftover slices, wrap and freeze for an on-demand treat later on.

1 1/2 cups all-purpose flour (188 grams)

1 cup sugar (198 grams)

2 teaspoons baking powder

1 teaspoon salt

3 large eggs

15 oz carton ricotta

1 teaspoon vanilla extract

1/2 cup (1 stick) unsalted butter, melted

1 cup raspberries (6 oz carton) divided use (can substitute blueberries, cherries, blackberries, small chunks of mango, or even, *gasp*, chocolate chips) Ok to add a few extra berries on top of batter.

Zest of 1 small lemon (OK to sub lime or orange zest)

Approx. 1 teaspoon white sugar, vanilla sugar, coarse sugar, or raw sugar, optional

  1. Preheat oven to 350°.
  2. Line a 9″-diameter cake pan with parchment paper and lightly coat with nonstick spray.
  3. Whisk flour, sugar, baking powder, and salt in a large bowl and set aside.
  4. With an electric mixer, whisk eggs, ricotta, and vanilla in a medium bowl until smooth.
  5. Stir in dry ingredients, whisk just until blended.
  6. Stir in butter just until combined.
  7. By hand, fold 3/4 cup raspberries (or other fruit), taking care not to crush berries.
  8. Fold in zest.
  9. Pour batter into prepared pan and scatter remaining 1/4 cup raspberries (or other fruit) over top (OK to add more berries to make a pleasing design on top.)
  10. Sprinkle a small amount of sugar, vanilla sugar, or raw sugar on top of cake.
  11. Bake cake until golden brown and a tester inserted into the center comes out clean, 50–60 minutes. Let cool at least 20 minutes before unmolding.
  12. If desired, sprinkle with powdered sugar before serving.

Do ahead: Cake can be made 2 days ahead. Store tightly wrapped at room temperature.

Print Friendly, PDF & Email
31 May 2019 Madelienes

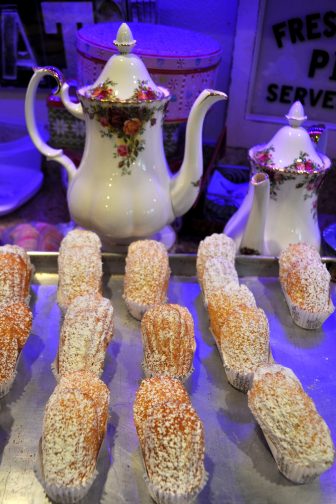
Madeleines. What are they anyway?  Almost a cookie but really a slightly dry cake?  Yes, that’s right! No frosting? Nope, but they are often dusted with powdered sugar… No caramel swirl? Never! No bits of chocolate? Not usually… And what’s with that lump on the back? Gotta have a lump in the back! Sooo…, what’s the big deal? Madeleines are super plain, super dry, and super yummy, I love them! Madeleines are popular tea cakes in cafes around the world. The world loves them!

Madeleines are French tea cakes, but thought of as a cookie, and are instantly recognizable with their scalloped shell shape that is ribbed on one side and smooth, but with a hump, on the other. Direct from the oven these buttery cakes have wonderfully crisp edges, tender crumb and are best eaten right away, although they will keep in a tin on the counter for 3-4 days. A dusting of powdered sugar is all that they really need, although some brush still warm Madeleines with a tangy lemon glaze.  Starbucks dips tips of their Madeleines into chocolate.

Madeleines are quite easy to make, but you’ll need to purchase scalloped Madeleine molds to get started. The molds are available in different sizes and materials, but you’ll probably find non-stick pans to be the easiest to use.

I have tested out many recipes over the years.  This one is from Epicurious, but with changes to cooking times, method, and ingredients (I doubled the lemon zest, upped the vanilla, added in some baking powder, reduced the oven temperature and reduced the baking time).

The recipe below makes 24 Madeleines.

Madeleines

  • 2 large eggs
  • 2/3 cup sugar
  • 1 1/2 teaspoons vanilla
  • 1 teaspoon grated lemon zest (usually from one medium lemon)
  • 1/8 teaspoon salt
  • 1 cup (125 grams) all purpose flour
  • 5 oz (10 tablespoons, 1 1/4 sticks) unsalted butter, melted and cooled slightly (plus extra to brush in molds)
  • Powdered sugar
  • Extra melted butter to brush on pans
  1. Preheat oven to 350 degrees.
  2. Brush each madeleine mold with melted butter (use the additional butter, not the 5 oz needed for the batter!)
  3. Beat eggs and sugar with electric mixer just to blend
  4. Beat in vanilla, lemon zest, and salt
  5. In another bowl, whisk flour with baking powder and salt and then add gradually to butter-sugar-egg mixture.
  6. Gradually add melted and cooled butter to mixture, beating with electric mixer just to blend
  7. Spoon 1 tablespoon batter into each buttered madeleine mold
  8. Place in preheated oven and bake for 9-10 minutes or until edges are slightly browned and there is a visible hump in the middle of each madeleine.
  9. Remove from oven and let cool in pan for about 5 minutes before removing to a cooling rack to cool completely.
  10. Repeat with remaining batter. Recipe makes 24 standard sized madeleines
  11. When cool, dust with powdered sugar. If necessary dust with powdered sugar again just before serving.

Note: Batter can be made one day ahead. Refrigerate batter and baked on day two.

Variation: replace lemon zest with orange zest and add 1/8 – 1/4 teaspoon ground cardamom to the flour mixture.

Thanks for stopping by my kitchen today! I hope you find someone wonderful to share these special treats with 🙂

Print Friendly, PDF & Email
11 Jul 2017 Chocolate Cake, Mocha Filling & Coffee-with-Cream Frosting
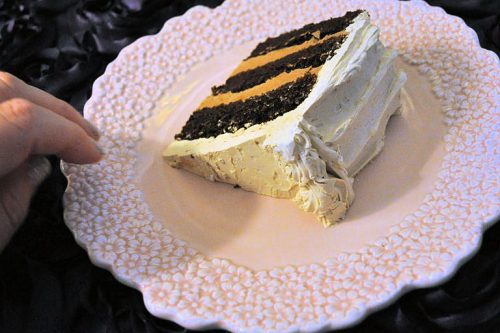
mocha-cake2-768x512
My daughter got married recently. I made the cake.  Three layer cakes (some of them double recipes), all with different fillings and frostings.  One cake was red velvet cake with cheesecake filling and a white chocolate Swiss buttercream frosting–because my grandson likes red velvet cake and the groom likes cheesecake.  Another cake was a wedding white cake with a tangy lemon filling and a lemon kissed Italian meringue frosting–because that’s what the bride wanted. The middle layer was a rich chocolate cake, with a mocha filling and a coffee-with-cream frosting–because that’s my favorite and I was making the cake, and I was the M-O-B, so I got to insist upon it!

I hope to get all the recipes for all the cakes posted, but let me start with this one, my current favorite special occasion cake: 3 layers of cake, 2 layers of mocha filling, and then all that is en robed in a coffee-with-cream frosting.  The recipe for the cake is an Ina Garten recipe from 2007 which was featured in Food and Wine magazine as “Double Chocolate Layer Cake” where I found it.  There is a frosting recipe included with Ina’s recipe, but I use a Ruth Cousineau recipe that ran in Gourmet Magazine in December of 2008 for “Coffee and Mocha Buttercreams”, which is a cooked meringue recipe, which is a whole lot of bother but tastes so much better than an American Buttercream, and makes two amazing variations. Using both variations, with this super rich chocolate cake (buttermilk and hot coffee in the batter) makes this cake a standout.

The cake is huge.  Cut thin slices (which is fine because the slices hold together very well). I had 10 people over for dinner last weekend, everyone had a decent sized piece of cake, and 5 people took a piece home, and I still and one-quarter of the cake leftover!  The picture above is from that one-quarter cake, and had been sitting in the refrigerator for three days before I decided to take a picture of it. Please note, my baked goods are better than my pictures!

Rich Chocolate Cake

  • 1 ¾ cups (8 oz/219g) all purpose flour
  • 2 cups sugar
  • ¾ cup unsweetened cocoa powder (I use Hershey’s, it’s all that’s needed)
  • 2 teaspoons baking soda
  • 1 teaspoon baking powder
  • 1 teaspoon kosher salt
  • 1 cup buttermilk
  • ½ cup vegetable oil
  • 2 eggs
  • 1 teaspoon vanilla extract
  • 1 cup freshly brewed, strong, hot coffee
  1. Make the coffee! Bring buttermilk and eggs to room temperature.
  2. Preheat oven to 350° F.
  3. Prepare 2 or 3 nine inch pans. (NOTE: original recipe called for two pans, I prefer three pans. It’s up to you.) Spray the pans with Pam for Baking, or spread with softened butter, or line with parchment paper. I line with parchment paper and then either lightly spray or lightly butter the parchment paper.
  4. Mix the flour, sugar, cocoa powder, baking soda, baking powder, and salt together and set aside.
  5. Mix buttermilk, oil, eggs and vanilla in another bowl.
  6. With an electric mixer, add the buttermilk mixture into the flour mixture, mixing just until all ingredients are blended.
  7. Slowly beat in the hot coffee, beating until all ingredients are fully incorporated.
  8. You will have about 6 cups of batter. Pour an equal amount of batter into each of the prepared pans.
  9. Bake the cakes at 350° F for 25 minutes for 3 layers (35 minutes for 2 layers), but don’t rely on time alone, check the cakes for before taking them out of the oven. The tops of the cakes should spring back when lightly pressed with a finger and the cake should be slightly pulling away from the sides of the pan.
  10. Remove from oven and let cakes cool in pans for about 30 minutes then invert onto cooling racks to cool completely.

Coffee-with-Cream and Mocha Buttercreams

  • 2 cups sugar, divided
  • ¾ cup water
  • 6 large egg whites at room temperature 30 minutes
  • 2 tablespoons plus 1 teaspoon instant-espresso powder
  • 1 tablespoon pure vanilla extract
  • ½ teaspoon cream of tartar
  • ¼ teaspoon salt
  • 6 sticks (1 ½ pounds) unsalted butter, cut into tablespoon sized pieces and softened
  • 6 ounces fine-quality 60%-cacao bittersweet chocolate, melted and cooled to lukewarm

Special Equipment needed: a candy thermometer; a stand mixer fitted with whisk attachment

  1. Bring 1 ¾ cups sugar and water to a boil in a 3-quart heavy saucepan over medium heat, stirring until sugar has dissolved, then wash down any sugar crystals from side of pan with a pastry brush dipped in cold water. Boil, without stirring, until it registers 220° to 225° F, 15 to 20 minutes.
  2. At this point, while continuing to boil syrup, beat whites with espresso powder, vanilla, cream of tartar, and salt in mixer at medium speed until they just hold soft peaks. Add remaining ¼ cup sugar, 1 tablespoon at a time, beating, and beat until whites just hold stiff peaks.
  3. When syrup reaches soft-ball stage (238 to 242°F), immediately pour syrup in a slow stream down side of bowl into whites (avoid beaters) while beating at high speed. Beat until completely cool, 25 to 30 minutes. With mixer at medium speed, add butter 1 tablespoon at a time, beating well after each addition (see cooks’ note, below) and until buttercream is smooth. (Mixture may look curdled before all butter is added but will come together at end.)
  4. Transfer 2 cups buttercream to a small bowl and stir in chocolate. If buttercream is too soft to spread, chill, stirring occasionally.

Notes:

  • If buttercream looks soupy after some butter is added, meringue is too warm: Chill bottom of bowl in an ice bath for a few seconds before continuing to beat in remaining butter.
  • Buttercreams can be made 1 week ahead and chilled or 1 month ahead and frozen. Bring to room temperature (do not use a microwave), about 2 hours, and beat with an electric mixer until spreadable.

Thank you for stopping by my kitchen today. I hope you make this cake and get rave reviews.  I know you will.  This cake is delicious!

Print Friendly, PDF & Email
03 Mar 2017 Double Chocolate Marble Loaf
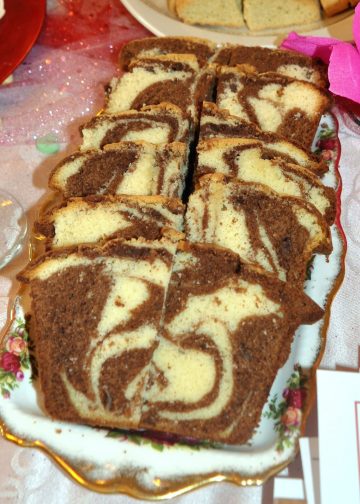
double-chocolate-marble-loaf

Weekend Cake!  Isn’t that a delightful subcategory of dessert? According to Dorrie Greenspan it’s a French concept. Weekend Cake is good for anything from breakfast through late night snacking.  Weekend Cake travels well, is long lasting and is best if left to sit a day before eating.

This recipe for Double Chocolate Marble Loaf, a “weekend cake” is from her cookbook, “Baking Chez Moi” . I’ve never been much for Marble Cake, often finding it to be dry and muddled.  Not this one! It’s truly delicious.  I’ve only made the orange chocolate-white chocolate version, but I am dying to make the mocha-cardamom version and the chocolate-mint version.

Double Chocolate Marble Loaf

  • 2 cups all-purpose flour (272 grams)
  • 1¼ teaspoons baking powder
  • 3/4 teaspoon fine sea salt
  • 1½ sticks (12 tablespoons or 6 ounces/170 grams) unsalted butter, at room temperature
  • 1 cup granulated sugar (200 grams)
  • 4 large eggs, at room temperature
  • 1½ teaspoons pure vanilla extract
  • 1/2 cup whole milk, at room temperature
  • 4 ounces best-quality white chocolate, melted and cooled (Lindt)
  • 1/4 teaspoon orange or peppermint oil (I used a bittersweet chocolate-orange chocolate bar, so no oil)
  • 4 ounces semisweet or bittersweet chocolate, melted and cooled
  1. Center a rack in the oven and preheat the oven to 325 degrees. Pull out an insulated baking sheet or stack two regular baking sheets one on top of the other. Line the (top) baking sheet with parchment paper or a silicone baking mat. Butter a 9-by-5-inch loaf pan, dust with flour and tap out the excess; set it on the baking sheet(s).
  2. Whisk the flour, baking powder and salt together in a small bowl.
  3. Working in the bowl of a stand mixer fitted with the paddle, or a large bowl with a hand mixer, beat butter on medium speed for 3 minutes, or until smooth. Add sugar and beat for another 2 to 3 minutes, scrape sides. Add the eggs, one at a time, and beat for a minute after each one goes in. The batter may curdle, but you needn’t worry.
  4. Reduce mixer speed to low and mix in the vanilla. Still on low speed, add the flour mixture in 3 additions and the milk in 2, beginning and ending with the dry ingredients and mixing only until each addition is incorporated.
  5. Scrape half of the batter into another bowl. Using a flexible spatula, gently stir the white chocolate into half of the batter. If you’re using the orange oil, stir it in as well. Stir the dark chocolate into the other half of the batter.
  6. Using a spoon or scoop, drop dollops of the light and dark batters randomly into the prepared pan — don’t think too much about the pattern — and then plunge a table knife deep into the batter and zigzag it across the pan. It’s best to move forward and not to backtrack. Don’t overdo it — 6 to 8 zigzags should suffice.
  7. Bake the cake for 80 to 90 minutes, or until a tester inserted deep into the center comes out clean. (My cake was done in 70 minutes, and I might have taken it out 5 minutes sooner.) Check the cake at the halfway mark, turn it around and, if it’s getting too brown, cover it loosely with a foil tent. Transfer the cake to a cooling rack and let it rest for 10 minutes, then unmold it, turn right side up on the rack and let come to room temperature.
  8. Storing: Wrapped well, the cake will keep at room temperature for up to 4 days. It can be wrapped airtight and frozen for up to 2 months; defrost it in its wrapper.

Spiced Mocha Variation: add 1 tsp. ground cardamom into the white chocolate portion and 2 ½ tsp. instant coffee or espresso mixed with 1 T. hot water to the dark chocolate portion. Omit the orange oil.

Mint Chocolate Variation: stir ¼ tsp. peppermint oil into the white chocolate portion and use only regular semi-sweet or bittersweet chocolate in the dark chocolate portion. Omit the orange oil.

Print Friendly, PDF & Email