Tag-Archive for ◊ creamy ◊

24 Jun 2013 Crab and Brie Macaroni and Cheese

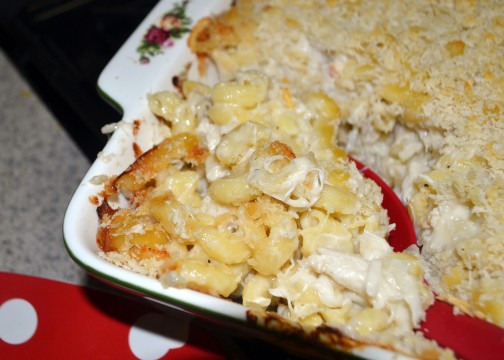
Crab and brie mac n cheese

Whooooa Nelly!  Crab and Brie Macaroni and Cheese?  Over-the-top decadence in a comfort food?  YEP! And the decadence makes the comfort food even more comforting–like ‘died and gone to heaven’ comforting!  Yet another winning recipe from Better Homes and Gardens Special Interest Publication “Best Loved Reader Recipes; 125 Winners from 1930 to Today”. (My last post was a recipe for “Peach Iced Tea” inspired by a recipe from this magazine)

If someone is having a hard time, and that sweet “I am going to drop off a casserole” American tradition seems appropriate, THIS is the casserole to take.  I took it to my 120-miles away daughter who is bravely attempting a semester long college Physics course in a six-week summer session, working the 4 PM-midnight shift at Target, and sweltering in the hot central valley heat. I am not saying this Macaroni and Cheese is miraculous or anything, but she did  score 15 points over the class average on her first mid-term. Not dropping off a casserole to a friend-in-need anytime soon?  I’ll bet you’ll be going to a potluck then. Take this!  Want to eat it at home, like we did?  We had it with mixed roasted veggies, but a leafy green salad would be nice too, and a corn muffin.

This casserole is not cheap, but if you shop at Costco for your pound of brie and pound of crab (the only two expensive ingredients), it won’t break the bank and you’ll have made a casserole big enough feed a small army.

Truth be told, I was a bit afraid of this recipe at first, wondering if the Brie would be too strong, and wondering if I would be able to taste the crab over the brie.  Both worries proved needless.  Everything melds together nicely.  Comfortingly nice.  I’ll say it again, because it’s true, ‘died and gone to heaven’ nice!

I changed the recipe just just a bit; one, to conform to the quantities of crab and brie sold at Costco (no leftover bits and no need to buy two big cartons of anything) and two, to make the recipe a bit easier by  substituting panko instead of homemade bread crumbs. I also re-wrote the recipe a bit, making roux is not hard, just follow my instructions: brown the flour and butter (and don’t skimp on the butter), remove the pan from the heat, then vigorously stir in hot milk until sauce is smooth.

Enjoy your comfort food decadance.

Crab and Brie Macaroni and Cheese

  • 1 lb. dried macaroni (small shells or elbows)
  • 1 medium onion, chopped
  • 5 tablespoons butter (maybe a bit more)
  • 3 cups milk (I used 2%)
  • 1/3 cup all-purpose flour
  • 1 teaspoon salt
  • 1/2 teaspoon black pepper
  • 13-16 oz. Brie, cubed
  • 16 oz. refrigerated container crabmeat, drained and flaked
  • 1/2 cup Panko or favorite breadcrumbs
  1. Cook macaroni in salted water according to package directions.  (Choose the shortest cooking time since pasta will continue to cook when baked.) Drain and set aside.
  2. Preheat oven to 350 degrees. Grease a 9-in by 13-in casserole dish.
  3. In a large skillet over medium-high heat, saute onion in butter until tender and golden, about 15 minutes.  (Do not skimp on the butter.  You’ll need the full quantity of  butter to make the roux in the step 5.)
  4. Heat 3 cups of milk in microwave until hot (3-5 minutes).
  5. Meanwhile, over medium heat, stir flour into onion and butter mixture.  Stir constantly for 3 minutes (to cook flour and to incorporate butter into the flour).  If mixture is too lumpy or dry, add an additional tablespoon of butter.
  6. Remove hot pan with onion and roux from heat.  Pour in 1 cup of hot milk.  Stir well, and keep stirring-vigorously if needed-until mixture is smooth and lump free.  Add another cup of hot milk, stir and mix again.  When mixture is smooth and lump free, repeat with last cup of milk.
  7. Return pan to medium heat. Add cubed brie to sauce in pan.  Stir constantly until brie is melted and incorporated.  Remove pan from heat when brie has melted and the sauce is smooth once again.
  8. Fold drained crab into cheese sauce then stir in cooked and well-drained macaroni.
  9. Season with salt and pepper.
  10. Pour crab-brie-macaroni mixture into a well buttered 9-in x 13-in casserole dish.
  11. Sprinkle bread crumbs over top of macaroni and cheese.
  12. Bake in preheated 350 degree oven for 30 minutes or until mixture is heated through and bread crumbs have browned.  If breadcrumbs don’t brown, turn on the broiler and broil casserole for a few minutes.
  13. Remove casserole from oven. Let cool 5 – 10 minutes, then serve. In a bowl, while curled up on the couch with a good book or good movie, or on a plate with roasted veggies or a salad, and maybe a small corn muffin. Enjoy.  Feel better. Ace the Physics test!

Leftovers can be reheated in microwave or frozen for a future treat.

Thank you for stopping by my kitchen again today,  I love having you drop by!  Let’s see what else I can make from this magazine. It’s supposed to be on the shelves until July 15, 2013, so if you see it, you might want to pick up a copy.

20 Mar 2012 Cheesy Spinach Manicotti

I must admit, I make a pretty mean Manicotti.  I’d forgotten how good it is until I made some on the spur-of-the-moment this week.  My Manicotti is  probably not very authentic, seeing as I have no genuine Italian reference point at all.  I don’t think it helps much that the recipe here got it’s start from the back of a box of Manicotti noodles either!  Maybe I should just call this dish Cheesey Spinach Pasta Rolls and ditch the whole faux Italian thing!

The instructions below will guide you in putting together a whole pan of Manicotti, but the recipe part is just for the creamy cheesey gooey yummy manicotti filling.  You’ll need about 3 cups of your favorite spaghetti sauce to finish the dish (I make a hearty meat, mushroom, onion, red wine spaghetti sauce to serve with this dish, the recipe is posted on this site)  along with one box of  manicotti noodles (those really big. long pasta tubes).  I’ve used the filling below to stuff  large shell pasta, too, so you can use those if you can’t find the manicotti noodles.

BTW, leftovers  microwave wonderfully well. My my son has already zapped a few several times today. I hope he has left me some, leftover Manicotti is such a treat.

Cheesey Spinach Manicotti 

Approx 3 cups prepared spaghetti sauce, warmed

1 8 0z. box manicotti noodles, cooked according to package direction, rinsed and drained

For the filling:

  • 10 oz. box frozen chopped spinach, defrosted, and squeezed dry
  • 16 oz. carton ricotta
  • 8 oz marscapone
  • 1/2 cup grated Parmesan cheese
  • 6  1 oz. packages of string cheese, cubed OR 6 oz mozzarella cut into 1/4 inch cubes
  • 1/8 teaspoon nutmeg
  • 2 eggs
  • additional grated cheese, Parmesan and/or mozzarella, for sprinkling on top of baked casserole.
  1.  Preheat oven to 350 degrees.
  2. Squeeze the spinach really, really dry and place in a large bowl.
  3. Stir in the cheeses: ricotta (I didn’t used to like ricotta, so I have substituted cottage cheese for the ricotta before),  marscapone, grated Parmesan, and cubed string cheese or part-skim mozzarella. Stir well.
  4. Lightly beat the eggs and add to the spinach-cheese mixture.
  5. Stir in the nutmeg.
  6. Fill cooked manicotti with the filling.  The best way to do this is to put all the filling in a large Ziploc bag.  Push the filling to one corner of the bag, then cut the corner off the bag–to make a sort of pastry bag-and squirt the filling into the manicotti. If this method doesn’t work for you, just use several long handled spoons (ice tea spoons work well) to fill the tubes.  Some of the manicotti will have split.  Try not to use the split ones, but if you have to just roll them tight and lay them seam side down in the pan.  I think there are two more noodles than will comfortably fit into a 9×13 pan in each manicotti package, so you are OK discarding two tubes.
  7. Place 1 cup of the warm spaghetti sauce in the bottom of the 9×13 pan.
  8. Arrange the stuffed manicotti on top of the spaghetti sauce.
  9. Cover the arranged manicotti in the pan with the remaining 2 cups sauce–you might need a little more or a little less sauce. If you have leftover sauce, you can always serve it, warmed, on the side.  Some people appreciate more sauce.
  10. Cover the baking dish with foil and place  in a preheated 350 degree oven. Bake for 30-35  minutes.
  11. Remove foil, sprinkle any remaining cheese over top of the casserole, increase heat to 425 degrees and bake for an additional 10 minutes or until sauce is bubbling and cheese has melted and nicely browned.
  12. Remove casserole from oven and let sit for approx. 10 minutes before serving.
Enjoy!  Invite the family over for dinner. Maybe serve an antipasto platter to kick off the evening?  I love antipasto, it’s a very social appetizer.  Dessert?  What is easier than a scoop of spumoni or gelato? Go ahead and gild the lily and  serve some biscotti and coffee on the side, too!  Can I come over?
Have fun, and thanks for stopping by my kitchen today.


04 Oct 2011 Chicken Pot Pie

It rained here yesterday!  Happy, happy October, my very favorite month of the whole year.  I was so excited with the cooler weather and the rain that  I put on slippers and a sweatshirt to celebrate.   Then I decided to teach my son how to make Chicken Pot Pie.  He has his own apartment now, and needs to know how to make things like this.  I went shopping for ingredients, started to prep them…and no man-child.  He ended up staying late at work, and I had to make the pie by myself.  He was home when it came out of the oven though (how does he doe that?!).  He walked in, kissed me and said, “I love it when you make stuff like this.” he then proceeded to eat half the pie.  Then he called his friend to say there was Chicken Pot Pie at his house, and to come over and have some!  I’d say the pie was a hit.

This is my son.  He’s a good sport about learning how to cook and wearing an apron his mom made for him!

This is a pretty simple Chicken Pot Pie.  Absolute comfort food!  No spices other than salt and pepper, so the true taste  of sauteed chicken and fresh veggies shine through…and are then snuggled up in a smooth gravy and encased in pastry.  Yummmm!

The hardest part of this pie comes after removing it from the oven.  You have to wait!  You have to wait for the gravy to set up a bit, or it will run all over your pastry.  If you can’t wait, it’s  not really a bad thing!  The loose first slice will still taste delicious and by the time you are ready for your second slice, the filling will have set a bit.

Believe me, after making your own Chicken Pot Pie, you will never buy one from the frozen foods  section again.  You might never order one from a restaurant either…

Chicken Pot Pie

  • 2 tablespoons olive oil
  • 2 tablespoons butter
  • 1 cup chopped onion
  • 1 cup diced carrots
  • 1 cup diced celery
  • 1 lb. boneless, skinless chicken (breast or thighs, or a combination)
  • salt and pepper to taste
  • 1/3 cup flour
  • 1 can condensed chicken broth (or 1 1/2 cups homemade chicken broth)
  • 1/2 cup half-and-half or milk
  • 1/2 cup fresh or frozen corn kernels
  • 1/2 cup petite frozen peas
  • 2 9″ Pillsbury pie crusts (1 box) OR 1 homemade double crust pastry
  • 1 egg, beaten with 1 tablespoon water, optional
  1. Preheat oven to 350 degrees.
  2. Melt the butter along with the olive oil (you can use all oil, if you want) in a large skillet over medium heat.
  3. When the butter has melted and the oil is hot, add the chopped onion and saute over medium heat for a few minutes.
  4. Stir in the diced carrot and celery and saute for approx. 5 more minutes, still over medium heat, stirring occasionally.
  5. While the veggies are sauteing, dice the chicken and sprinkle with salt and pepper.
  6. Stir the diced and seasoned chicken into the veggie mixture and saute for three more minutes, still stirring occasionally.
  7. Sprinkle the flour over the chicken and veggie mixture, stir constantly over medium heat for 3 minutes (the flour might try to stick to the bottom of the pan, try to release it by stirring vigorously. If necessary add another tablespoon or so of butter or oil. Do not burn the flour!).
  8. While the chicken/veggie/flour mixture  is sauteing, combine the chicken broth and half-and-half or milk and microwave for three minutes.  When the microwave beeps, remove the pan from the heat and remove the liquid from the microwave.
  9. Now you are going to make the gravy.  Turn the heat off the pan.  Stir in 1/2 cup of the hot broth-milk mixture.  Stir until mixture is smooth.  Add another 1/2 cup of broth-milk mixture. Stir until smooth.  Repeat two more times using 1/2 cup broth-milk mixture each time.
  10. Return chicken-veggie-gravy mixture to heat.  Stir in frozen (of fresh) corn and peas. Simmer for gently over medium heat to defrost the frozen veggies.
  11. Turn off heat and let filling sit while you unroll the pasty and place one sheet in the bottom of a pie pan.
  12. Pour the filling over the pastry in the bottom of the pie pan, and cover with the second roll of pasty.  Cut 3-5 vent holes in top of top pastry (with scissors or a knife).  Crimp the edges of the pastry so the filling is fully encased.
  13. If you want a nice, shiny crust, brush pastry lightly with egg wash (egg beaten with 1 tablespoon water).  This is optional (but nice if you want to show off!) You won’t need all of the egg wash. (Scramble the leftover egg for the baby, or the dog!)
  14. Bake in preheated 350 degree oven for 40 to 45 minutes.
  15. Remove pie from oven and let sit…for as long as you can.  The longer the pie sits, the thicker the gravy will get.  Letting the pie sit for 30 minutes to an hour, is about right. (Don’t worry, the filling will remain hot.)
  16. Serve, and enjoy.

Thanks for stopping by my kitchen today.  Hope you enjoyed the visit.  See you again, soon, I hope!


13 Feb 2011 French Hot Chocolate

Just in time for Valentine’s Day: French Hot Chocolate!

This is soooo good, made with real cream and real chocolate–bearing no resemblance at all to that powdery mix in a paper packet. The serving ritual makes this really special. Pass a bowl of the chocolate cream mixture, then pass a pot of steaming hot milk (I like to put the milk in a teapot).  Let each person scoop a desired amount of the chocolate cream into their cup.  Pass the hot milk so the person can fill the cup up the rest of the way.  Make sure everyone has a spoon.  Stirring the hot chocolate is the fun part.  So is the sipping to taste.  Then maybe adding a bit more chocolate cream.  Then stirring some more and sipping some more.  Ahhhh.   So civilized.  So social.  So calming.  So special.

I was going with ¼ chocolate cream to ¾ hot milk, when one of my taste testers announced that half chocolate cream and half milk was just about right!  Serve this in small cups. This is rich. To cut the fat, I put non-fat milk in the teapot 🙂

I found this recipe at MakeAndTakes.

The chocolate cream mixture can be kept for a few days in the refrigerator, but you need to put the cream in a sieve, and then cover with plastic. This is, truly, the best hot chocolate you’ll ever make.

French Hot Chocolate

To make the chocolate cream:

1 cup chopped chocolate (your choice–milk, semisweet, bittersweet, or combination. You can also use chocolate chips!)
1 cup corn syrup
1/4 cup water
2 cups cold whipping cream

To serve:

2 quarts (8 cups) hot milk (go ahead and use non-fat or low-fat, it will make you feel better!)

To make chocolate cream: Heat chopped chocolate, corn syrup, and water in a small saucepan, stirring until chocolate has melted.  Set mixture aside to cool. Beat the cream in a large mixing bowl until peaks form.  Slowly add the chocolate sauce to the whipped cream in a steady stream while beating.  After all the sauce has been added to the cream, beat for a few more seconds until the cream is thick.  Place in chocolate cream refrigerator until ready to use.  To keep chocolate cream for longer than an hour or two, place the chocolate cream in a sieve over a slightly larger bowl and cover with plastic warp.

To serve: Heat the desired quantity of milk (2 qts if using the whole batch of chocolate cream, and serving 10-12 people) until steaming (I heat the milk in the MW).  Pour hot milk into serving pitcher (I use a teapot).  Pass the chocolate cream, and spoon a bit of the into the bottom of cup or mug.  Add enough hot milk to fill cup.  Stir to combine.

One batch makes enough to serve 10-12 people (depending on size of cups or mugs).

Thanks for stopping by my kitchen today! Take the time to make an occasion of serving this hot chocolate.  You’ll be glad you did!