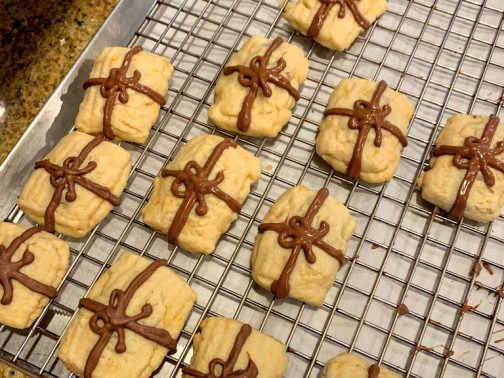
Chocolate-Orange Christmas Present Cookies
Most of my cookie recipes are from recipes I’ve collected over the years. Some I modify to suit my taste, to improve on method, or to add another component. This recipe I made up all by myself in the 1990s. It’s a basic spritz cookie recipe, with the addition of orange zest and orange extract and then for some reason (maybe the cookie press was malfunctioning?) I made long ribbon strips, laid down chocolate squares on top of the cookie dough, then piped another strip on top, and made chocolate filled Christmas presents.
The orange-chocolate flavor is one that I associate with Christmas. Being a British transplant, there was always a bit of England in my Christmas stocking, one of them being a Terry’s chocolate-orange.

Christmas Presents (Cookies)
- 1 ½ cups butter
- 1 cup of sugar
- 3 ½ cups Flour
- 1 tsp baking powder
- 1 egg
- Zest of 2-3 Oranges (I like my cookies with a lot of orange flavor)
- ½ tsp Vanilla
- 1 ½ tsp Orange Extract
- 3 3.5oz Hershey bars (milk or Special Dark) DIVIDED USE
- Preheat oven to 375 degrees.
- Sift flour and baking powder together. Set aside.
- In the bowl of an electric mixer, cream butter and sugar together, 3-5 minutes.
- When the butter-sugar mixture is light and fluffy, add the egg, vanilla, orange extract, and the orange zest.
- With the mixer on low, gradually add in the flour and beat until just combined.
- Choose Method 1 or Method 2 to make the presents
- Method 1: Using a cookie press (No refrigeration needed) Using a cookie press fitted with a ribbon plate. Spritz one long ribbon. Break the chocolate bars into squares and place along the ribbon, with about ½ inch between each piece of chocolate. Spritz another ribbon on top of the first ribbon and chocolate. Cut between the chocolate pieces, and push slightly on each end to seal the present. Place the presents on a cookie tray lined with parchment paper, about one inch apart.
- Method 2: Using a rolling pin (refrigeration necessary) Separate dough into two equal size disks, and wrap in plastic wrap. Refrigerate the dough for 2 hours or until firm enough to roll. Roll Dough out into a square. It is ok if dough is thin because you will add another layer of dough on top. Break up the chocolate pieces, and place them all around the dough in a grid, all pieces about ½ inch apart. Roll out the second disk of dough to the same size as the first. Then place second dough square on top of the first dough square, and gently press dough around the chocolate pieces (so that you can see where you need to cut). Using a ravioli cutter, pizza cutter, knife, or cookie cutter, cut cookies around each piece of chocolate. Gently press all sizes of the cookies to seal. Place presents on a parchment-lined baking sheet, about one inch apart.
- Bake cookies for 9-11 minutes. You don’t want cookies to brown, but you want all the dough to cook. Cookie bottoms should be a very light golden brown. (Everyone rolls or pipes different thicknesses of dough, which necessitate different cooking times. Use your judgement here. You might need to add a minute or two to the cooking times)
- Once cookies come out of the oven, move cookies to a cooling rack to cool completely.
- Melt leftover chocolate using your favorite method (I like to microwave chocolate in a bowl in 30 seconds increments until melted), then place melted chocolate into a quart size zip lock bag, and cut a small hole at the tip of the bag.
- Pipe the melted chocolate onto each cookie to look like a ribbon and bow (this might take some practice. Just sample the ugly ones and put the pretty ones on the cookie plate). Chill cookies in refrigerator until chocolate hardens.
- Then, serve and enjoy!!

