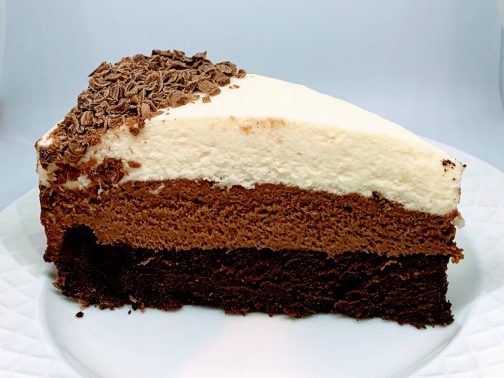
This is the cake I wanted for my birthday this year and it’s what a friend requested for her birthday a few months ago. It’s a fabulous trifecta of chocolate: semi sweet chocolate in a brownie-like cake on the bottom, a smooth and rich milk chocolate mousse for the middle layer, and a creamy white chocolate mousse for the top layer. After that description, I’m guessing you’ll want it for your birthday, too! The torte not only tastes fantastic, it looks impressive, it slices well and it holds it’s shape after being cut. Magnifique!
The torte is a bit of effort to make, but each step, each layer, is easy and is relatively quick to accomplish. Make the bottom layer before going to bed, let it cool on the counter while you sleep. The next day, make the middle layer, refrigerate it, and wash the dishes. Then make the top layer and refrigerate the cake until serving time. Cake will keep 24 hours in refrigerator, but I always serve it on the day I make the second and third layers.
And look, here’s a link to a how-to video about making the torte!
The original recipe is from Cooks Illustrated. I think it was a cover recipe for one of their magazines. You can access the recipe online at Cooksillustrated.com, but it will cost you (and I hate that about Cooks Illustrated recipes).
So, after watching the video you’ll know this is not a difficult recipe. Just follow the directions. Melt the chocolate slowly. Fold the whipped cream into the chocolate mixtures. Use an electric mixer when specified and hand whisk or a spatula when specified. If you can read, you can make this cake. “It’s all about the recipe” is my tag line, and I truly believe it!
I use Lindt chocolate bars in each layer. You’ll need two of the large bars for the bottom layer (around 70% cacao), two large milk chocolate bars for the middle layer, and two white chocolate bars for the top layer. Throw in an extra bar of your favorite type to grate on top. That’s about $20 worth of chocolate. In a pinch, you could use chocolate chips, which would be cheaper but wouldn’t taste quite as good and you’d have a harder time melting the chocolate (chocolate chips are not made to melt).
You’ll need a 9-inch springform pan, with sides at least 3 inches high to make this torte. If you’re in town, you can borrow mine. You could also order one off of Amazon, the Fat Daddio’s brand is my favorite. TJ Maxx/HomeGoods has started carrying Fat Daddio’s pans, usually at half the price Amazon sells them for, but it’s hit-or-miss at TJMaxx, isn’t it? Sur la Table and other specialty cooking stores will definitely carry 9-inch springform pans, usually at the same price as Amazon.
Triple Chocolate Mousse Torte
THE BOTTOM LAYER
- 6 tablespoons (3 oz) unsalted butter, cut into 6 pieces (plus extra for greasing pan)
- 7 ounces semi sweet or bittersweet chocolate, finely chopped (I prefer semi-sweet).
- ¾ teaspoon instant espresso powder
- 1½ teaspoons vanilla extract
- 4 eggs (separated)
- Pinch salt
- 1/3 cup light brown sugar
- Preheat oven to 325 degrees F. Butter the bottom and sides of a 9-inch springform pan with sides at least 3 inches high and set aside.
- Melt the butter, chocolate and espresso powder in a large heatproof bowl set over a bowl of really hot water, stirring occasionally until smooth. Remove from heat and cool for 5 minutes.
- Whisk in the vanilla and egg yolks into the chocolate mixture and set aside.
- With a stand mixer fitted with the whisk attachment, beat the egg whites and salt at medium speed until frothy, about 30 seconds. Add half of the brown sugar and beat until combined, about 15 seconds. Add the remaining brown sugar and beat at high speed until soft peaks form when the whisk is lifted, about 1 minute longer, scraping down the sides halfway through.
- With a hand-held whisk, whisk one-third of the beaten egg whites into the chocolate mixture. Using a rubber spatula, fold in the remaining egg whites until no white streaks remain.
- Carefully transfer the batter to the prepared springform pan, gently smoothing the top with an offset spatula.
- Bake until the cake has risen, is firm around the edges, and the center has just set but is still soft (the center of cake will spring back after pressing gently with your finger), 13 to 18 minutes.
- Transfer the pan to a wire rack to cool completely, about 1 hour. (The cake will collapse as it cools).
- Do not remove the cake from the pan!
THE MIDDLE LAYER:
- 2 tablespoons cocoa powder (preferably Dutch-processed, Hershey’s is fine).
- 5 tablespoons hot water
- 7 ounces milk chocolate, finely chopped
- 1½ cups cold heavy cream
- 1 tablespoon granulated sugar
- 1/8 teaspoon table salt
- Whisk together the cocoa powder and hot water in a small bowl and set aside.
- Melt the chocolate in a bowl set over another bowl filled with very, very hot water, stirring occasionally until smooth. Remove from heat and cool for 5 minutes.
- Whisk the cocoa powder mixture into the melted chocolate until smooth.
- With an electric mixer whisk the cream, granulated sugar and salt on medium speed until the mixture begins to thicken, about 30 seconds. Increase the speed to high and whip until soft peaks form.
- With a handheld wire whisk, stir one-third of the whipped cream into the chocolate mixture to lighten. Using a rubber spatula, fold in the remaining whipped cream until no white streaks remain.
- Spoon the mousse into the springform pan over the cooled cake and gently tap the pan on counter 3 times to remove any large air bubbles; smooth the top with an offset spatula. Refrigerate for at least 15 minutes while preparing the top layer.
THE TOP LAYER
- ¾ teaspoon powdered gelatin
- 1 tablespoon water
- 6 ounces white chocolate, finely chopped
- 1½ cups cold heavy cream (divided use)
- Additional grated chocolate (milk or dark) or cocoa powder for decoration, optional
- In a small bowl, sprinkle the gelatin over the water; let stand for at least 5 minutes.
- Place the white chocolate in a medium bowl.
- Bring ½ cup of the heavy cream to a simmer in a small saucepan over medium-high heat or in the microwave.
- Stir the gelatin mixture, into the hot cream, whisking until fully dissolved.
- Pour the cream-gelatin mixture over the white chocolate and whisk until the chocolate is melted and the mixture is completely smooth (I usually sit the bowl of chocolate over another bowl of boiling water to help it melt).
- Cool mixture to room temperature, stirring occasionally, 5 to 8 minutes. The mixture will thicken slightly.
- With an electric mixer whisk the remaining 1 cup heavy cream at medium speed until it begins to thicken, about 30 seconds. Increase the speed to high and whip until soft peaks form when the whisk is lifted.
- Whisk one-third of the whipped cream, with a hand held whisk, into the white chocolate mixture to lighten. Using a rubber spatula, fold the remaining whipped cream into the white chocolate mixture until no white streaks remain.
- Spoon the white chocolate mousse into the pan over the middle layer. Smooth the top with an offset spatula.
- Return the cake to the refrigerator and chill until set, at least 2½ hours.
- Garnish the top of cake with grated chocolate or dust with cocoa powder, if desired.
- Run a thin knife between the cake and side of the springform pan, then remove the side of pan. Place torte on serving plate.
- Cut into slices and share (for clean slices, dip a sharp knife into hot water and wipe dry between cuts).
NOTES: The cake can be made up to 1 day in advance and refrigerated.


