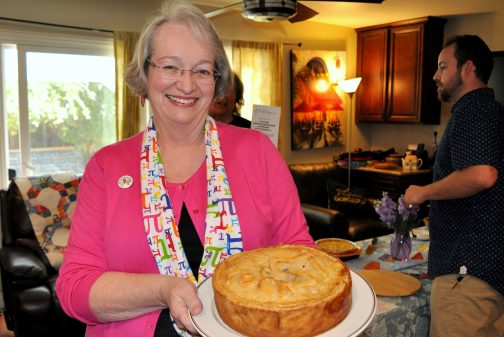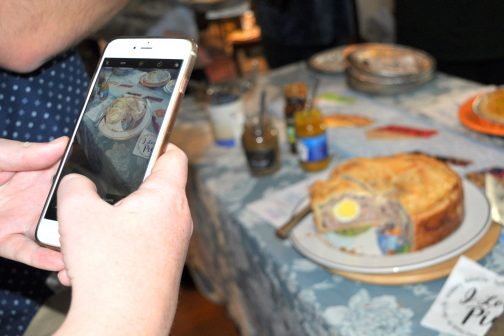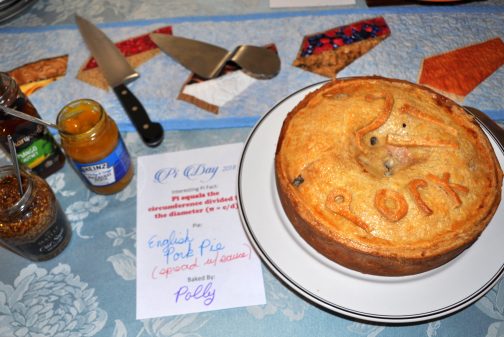

Finally! A Pork Pie recipe that is pretty darn good (and not that hard to produce)! My Dad, a traditional Yorkshire-man, loved pork pies. I really, really wish he were still here to taste my version. To my mind, this Pork Pie favorably rivals the famous Melton Mowbry Pork Pies, but that might just be a braggadocious assertion 🙂
I have modified a recipe by new wave British chef, Richard Bertinet, for my version of Pork Pie. I have used Chef Bertinet’s version of hot-water crust pastry, unchanged (hot-water crust pastry is only used for making savory pies that are eaten cold). I made some substantial changes to his filling recipe though. First, I changed the meats and the ratios. Then I added onion (which is so not traditional). I upped the spices and added a few different ones. I added eight hard boiled eggs (which are optional) and, to the “jelly”, I added a good shot of bourbon, which has been in no recipe I’ve ever seen, but I did it for my Dad and, in my mind, it will remain the magical addition to this very tasty version of a British Pork Pie.
Pork Pie is a traditional picnic, quick meal, or bar snack in England. It’s a firm solid pie, nothing drips out of a Pork Pie. Instead of gravy moistening the meat, there’s a jelly-like substance. Don’t be afraid of it! It’s delicious. In my version the “jelly” is broth, bourbon and a little unflavored gelatin (see recipe for notes on making the broth).
This recipe requires a 9″ Springform pan. You will also need a meat grinder or a food processor. Have neither? You can still do this, just chop everything very, very finely. A food syringe would be wonderful to have, too, but not to worry if you don’t have one. Above all, you will also need a plan! The recipe has three components: hot water crust pastry, pork filling, and a broth based “jelly”. Cooking time will be approximately 2 ½ hours. Before baking, the pastry will need approximately 90 minutes to “rest”. The filling can be made while the pastry is resting. Make Pork Pie at least one day before serving. The meat and jelly need at least 8 hours to settle, set, and chill before serving.
The British like to spread condiments on their pork pies, so serve your pork pie with a jar of Branston’s Pickle*, Piccalilli Relish*, Mango Chutney or coarse mustard (*available on Amazon, some Indian markets and some supermarkets with large international sections).

Polly’s English Pork Pie
For the Hot-water Crust Pastry:
- 175g/ 6 oz lard (or, if you can afford it/find it, use goose or duck fat like Richard Bertinet suggests)
- 175ml/6 fluid oz. water
- 1 tsp salt
- 1 tsp sugar
- 450g/16 oz all-purpose flour
- 1 egg , lightly beaten with a fork
- Put the lard, water, salt and sugar in a pan and bring to a boil, stirring as the lard melts. When it comes to a boil, count to 30 seconds and immediately take the pan off the heat.
- While the lard is melting, put the flour into a large bowl. Make a well in the center of the flour and stir in the beaten egg.
- Pour the hot liquid mixture into the flour mixture, stirring continuously with a wooden spoon.
- When the mixture forms quite a dough, cover the bowl with a clean kitchen towel and let rest and cool for 1 hour.
- While the dough is resting, make the filling.
For the Three Porks Filling
- 1 onion, diced
- 1 bunch of green onions, sliced
- 3 garlic cloves, minced
- Salt and pepper, to taste
- Olive oil, as needed OR use the oil from the can of anchovies
- 1 small can (2 oz) anchovy fillets, drained and chopped
- Heat oil in a medium frying pan. Add in chopped onion, and sauté until soft and translucent.
- Add in green onion and sauté for another 2-3 minutes.
- Add in garlic and sauté for 1 minute. Do not let garlic darken.
- Turn off heat and stir in diced anchovies. Set mixture aside to cool.
- 1 ¼ lbs pork chops, with some fat (pork shoulder or country style pork ribs can be used, too)
- 8 oz diced pancetta
- 8 oz bacon, diced
- Salt and pepper, to taste
- 1 teaspoon dried sage
- 1 whole nutmeg, grated OR approximately 2 teaspoons of ground nutmeg
- ½ teaspoon mace
- 8 hard-boiled eggs, shelled (the eggs just need to be softly hard boiled, the eggs will have additional cooking time in the oven) – optional
- 1 egg, lightly beaten
- Prepare meat for food processor (large chunks) or meat grinder (long strips). Include some fat! Take your time to season each piece of meat with salt and pepper (heavy on the pepper), crumbled sage, mace, and freshly grated nutmeg.
- Combine seasoned pork with diced pancetta, diced bacon, and the reserved onion mixture. Make sure everything is well combined.
- Grind the three pork and onion mixture with a meat grinder on a coarse setting or briefly process with short burst in food processor (do not over process, you don’t want a paste, you want chopped meat).
- Set ground meat aside and turn attention to pastry now.
To Fill Pie
- Turn the pastry onto a lightly floured work surface.
- Roll pastry into a rectangle. Fold the dough into thirds by taking one side into the center and then bringing the opposite side over the top. Flatten the dough into a rough oblong shape. Cover with plastic wrap and place in refrigerator for 30 minutes (or longer, if needed)
- Prepare 9″ springform pan by lightly greasing and flouring bottom and sides.
- Preheat oven to 400° Fahrenheit.
- Remove pastry from refrigerator.
- Cut off ¼ of pastry and set aside for top.
- Roll remaining ¾ pastry into a large circle to fit along the bottom and up the sides of the 9″ springform pan. Be careful with the rolling out. Pastry should be thick, and equally thick throughout, the sheet (this pie needs a thick, firm shell on the bottom, sides, and top).
- Gently fold pastry to lift into prepared pan. Place pastry in center of pan and ensure it covers all the way up all the sides of the pan. Patch any holes or tears.
- Place 1/3 of filling in bottom of pastry case. (If you choose not to use eggs, place all the filling in the pastry case.)
- Place shelled hard-boiled eggs in a ring on top of filling in bottom of pan, optional.
- Lightly spoon remaining filling over the ring of eggs. Be sure eggs are completely covered and the top is evenly smoothed.
- Roll out remaining pasty into circle to fit on top of filling.
- Firmly adhere top to side pastry. Trim excess crust.
- If you have any excess pastry, make decorations for top of pie, if desired.
- Beat egg lightly, then brush over top of pastry.
- Using the handle of a wooden spoon, make several holes into top of pastry (for steam to escape). Be careful where you poke. Don’t pierce a hard-boiled egg!
- Place pie in oven. Bake at 400° for 30 minutes.
- Reduce heat to 325°, bake for an additional 90 minutes.
- Meanwhile, make the “jelly”
For the “jelly”
- 7 oz really good quality pork or chicken stock (I make my own. If your pork came with bones, boil the bones with a bit of extra meat, even throw in an extra pork chop, if you have one. Add in some diced veggies for taste. I like onions, carrots, celery and a bay leaf, simmer for at least an hour. Taste the broth, it should taste good and rich. If you don’t say “mmmm”, keep simmering until you do. Add salt and pepper if needed. If you have more meat, bones, or veggies, add them too. If you have homemade chicken stock, use that. If you have only canned stock, jazz it up a bit. Pour broth into a pan and add in a piece of chicken or some chicken bones if you have them, and any veggies you have on hand plus a bay leaf. Simmer and taste. Once you get a really good taste, strain, throw out the veggies, bones, etc. retain the broth).
- 4 oz bourbon
- 1 pkt unflavored gelatin
- About 15 minutes before pie is done, put 2 tablespoons of cold broth or water in a small bowl, sprinkle gelatin on top, and let sit until gelatin is soft.
- Meanwhile, heat broth to a light simmer. Remove from heat.
- Stir in softened gelatin and 4 oz bourbon.
- When cooked, remove pie from oven.
- If you have a baking syringe, fill it with the gelatin mixture and inject pie with stock mixture, avoiding eggs, all over the top of the pie. If you don’t have a syringe, with wooden spoon, re-punch holes in pastry and punch 3-5 additional holes (avoiding the eggs, of course). Pour gelatin mixture into all the holes. Let mixture settle, then add more liquid. Keep doing this until all the gelatin has been added.
- When pie has cooled, cover and refrigerate, preferably overnight but for at least 8 hours.
- Remove from refrigerator 2 hours before serving. Serve in wedges with jars of Branston Pickle, Piccalilli, Mango Chutney, and whole grain mustard on the side.
Thanks for stopping by my kitchen today!


