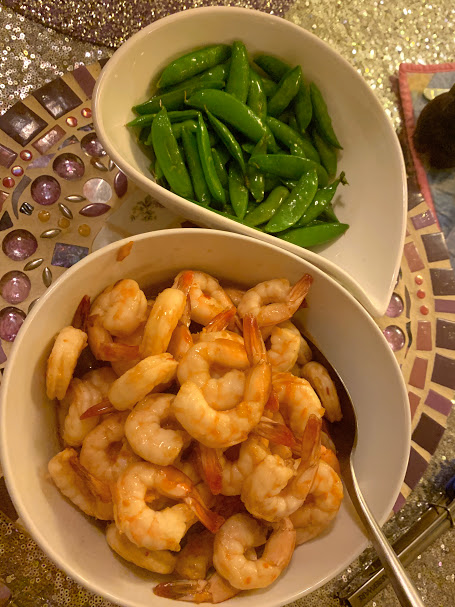
Tag-Archive for ◊ potluck ◊

11 Jul 2017 Chocolate Cake, Mocha Filling & Coffee-with-Cream Frosting

mocha-cake2-768x512
My daughter got married recently. I made the cake.  Three layer cakes (some of them double recipes), all with different fillings and frostings.  One cake was red velvet cake with cheesecake filling and a white chocolate Swiss buttercream frosting–because my grandson likes red velvet cake and the groom likes cheesecake.  Another cake was a wedding white cake with a tangy lemon filling and a lemon kissed Italian meringue frosting–because that’s what the bride wanted. The middle layer was a rich chocolate cake, with a mocha filling and a coffee-with-cream frosting–because that’s my favorite and I was making the cake, and I was the M-O-B, so I got to insist upon it!

I hope to get all the recipes for all the cakes posted, but let me start with this one, my current favorite special occasion cake: 3 layers of cake, 2 layers of mocha filling, and then all that is en robed in a coffee-with-cream frosting.  The recipe for the cake is an Ina Garten recipe from 2007 which was featured in Food and Wine magazine as “Double Chocolate Layer Cake” where I found it.  There is a frosting recipe included with Ina’s recipe, but I use a Ruth Cousineau recipe that ran in Gourmet Magazine in December of 2008 for “Coffee and Mocha Buttercreams”, which is a cooked meringue recipe, which is a whole lot of bother but tastes so much better than an American Buttercream, and makes two amazing variations. Using both variations, with this super rich chocolate cake (buttermilk and hot coffee in the batter) makes this cake a standout.

The cake is huge.  Cut thin slices (which is fine because the slices hold together very well). I had 10 people over for dinner last weekend, everyone had a decent sized piece of cake, and 5 people took a piece home, and I still and one-quarter of the cake leftover!  The picture above is from that one-quarter cake, and had been sitting in the refrigerator for three days before I decided to take a picture of it. Please note, my baked goods are better than my pictures!

Rich Chocolate Cake

  • 1 ¾ cups (8 oz/219g) all purpose flour
  • 2 cups sugar
  • ¾ cup unsweetened cocoa powder (I use Hershey’s, it’s all that’s needed)
  • 2 teaspoons baking soda
  • 1 teaspoon baking powder
  • 1 teaspoon kosher salt
  • 1 cup buttermilk
  • ½ cup vegetable oil
  • 2 eggs
  • 1 teaspoon vanilla extract
  • 1 cup freshly brewed, strong, hot coffee
  1. Make the coffee! Bring buttermilk and eggs to room temperature.
  2. Preheat oven to 350° F.
  3. Prepare 2 or 3 nine inch pans. (NOTE: original recipe called for two pans, I prefer three pans. It’s up to you.) Spray the pans with Pam for Baking, or spread with softened butter, or line with parchment paper. I line with parchment paper and then either lightly spray or lightly butter the parchment paper.
  4. Mix the flour, sugar, cocoa powder, baking soda, baking powder, and salt together and set aside.
  5. Mix buttermilk, oil, eggs and vanilla in another bowl.
  6. With an electric mixer, add the buttermilk mixture into the flour mixture, mixing just until all ingredients are blended.
  7. Slowly beat in the hot coffee, beating until all ingredients are fully incorporated.
  8. You will have about 6 cups of batter. Pour an equal amount of batter into each of the prepared pans.
  9. Bake the cakes at 350° F for 25 minutes for 3 layers (35 minutes for 2 layers), but don’t rely on time alone, check the cakes for before taking them out of the oven. The tops of the cakes should spring back when lightly pressed with a finger and the cake should be slightly pulling away from the sides of the pan.
  10. Remove from oven and let cakes cool in pans for about 30 minutes then invert onto cooling racks to cool completely.

Coffee-with-Cream and Mocha Buttercreams

  • 2 cups sugar, divided
  • ¾ cup water
  • 6 large egg whites at room temperature 30 minutes
  • 2 tablespoons plus 1 teaspoon instant-espresso powder
  • 1 tablespoon pure vanilla extract
  • ½ teaspoon cream of tartar
  • ¼ teaspoon salt
  • 6 sticks (1 ½ pounds) unsalted butter, cut into tablespoon sized pieces and softened
  • 6 ounces fine-quality 60%-cacao bittersweet chocolate, melted and cooled to lukewarm

Special Equipment needed: a candy thermometer; a stand mixer fitted with whisk attachment

  1. Bring 1 ¾ cups sugar and water to a boil in a 3-quart heavy saucepan over medium heat, stirring until sugar has dissolved, then wash down any sugar crystals from side of pan with a pastry brush dipped in cold water. Boil, without stirring, until it registers 220° to 225° F, 15 to 20 minutes.
  2. At this point, while continuing to boil syrup, beat whites with espresso powder, vanilla, cream of tartar, and salt in mixer at medium speed until they just hold soft peaks. Add remaining ¼ cup sugar, 1 tablespoon at a time, beating, and beat until whites just hold stiff peaks.
  3. When syrup reaches soft-ball stage (238 to 242°F), immediately pour syrup in a slow stream down side of bowl into whites (avoid beaters) while beating at high speed. Beat until completely cool, 25 to 30 minutes. With mixer at medium speed, add butter 1 tablespoon at a time, beating well after each addition (see cooks’ note, below) and until buttercream is smooth. (Mixture may look curdled before all butter is added but will come together at end.)
  4. Transfer 2 cups buttercream to a small bowl and stir in chocolate. If buttercream is too soft to spread, chill, stirring occasionally.

Notes:

  • If buttercream looks soupy after some butter is added, meringue is too warm: Chill bottom of bowl in an ice bath for a few seconds before continuing to beat in remaining butter.
  • Buttercreams can be made 1 week ahead and chilled or 1 month ahead and frozen. Bring to room temperature (do not use a microwave), about 2 hours, and beat with an electric mixer until spreadable.

Thank you for stopping by my kitchen today. I hope you make this cake and get rave reviews.  I know you will.  This cake is delicious!

24 Mar 2017 Chocolate Peanut Butter Chip Cookies


chocolate-peanut-butter-chip-cookies

This recipe is from the back of the bag of Reese’s Peanut Butter Chips (see picture below).  The cookie is fabulous.  It’s like a peanut butter cup in cookie form.

My daughter made these cookies for a “Back of the Box” themed Cookbook Club meeting.  She loves peanut butter.  She saw the chips.  She read the recipe on the back of the bag.  She made the cookies. Everyone swooned. End of story.

Well, not quite the end of the story because now I’m posting the recipe, as is, lifted right off the back of the Reese’s Peanut Butter Chip bag. You’ve just read the recipe and my swooning review. You are going to go out to get a bag of Reese’s Peanut Butter Chips. You are going to make the cookie. You and yours will swoon. You’ll go down as one of the best cookie bakers EVER!

End of story.

Chocolate Peanut Butter Chip Cookies

  • 3/4 cup cocoa powder (natural baking powder-like Hershey’s, NOT Dutch processed cocoa powder)
  • 1 teaspoon baking soda
  • 1 10 oz. pkg REESE’S Peanut Butter Chips – divided use
  • 1 1/4 cups butter (2-1/2 sticks), at room temperature
  • 2 eggs
  • 2 cups sugar
  • 2 teaspoons vanilla extract
  • 2 cups all-purpose flour
  • 1/2 teaspoon salt


  1.  Preheat oven to 350°F.
  2. Stir together flour, cocoa, baking soda and salt; set aside.
  3. Beat butter and sugar in large bowl with mixer until fluffy, 3-5 minutes.
  4. Add eggs and vanilla; beat well.
  5. Gradually add flour mixture, beating well.
  6.  Stir in most of the  peanut butter chips. Hold out some peanut butter chips to decorate the tops of the cookies before baking.
  7. Drop by rounded teaspoons onto ungreased, preferably parchment lined, unrimmed cookie sheet. If desired, press 2, 3, or 4 peanut butter chips onto the top of each cookie.
  8. Bake 8 to 9 minutes. (Do not over bake; cookies will be soft. They will puff while baking and flatten while cooling.)
  9. Cool slightly; remove from cookie sheet to wire rack. Cool completely.
  10. Makes about 4 dozen cookies, but depends on the size of your cookie.

Thanks for stopping by my kitchen today!

reese-s-peanut-butter-chips

20 Mar 2017 B.O.B. Brownies

bob-brownies-bite

Google “Back of the Box” recipes and you’ll get lists such as 10 Best Back-of-the-box recipes from Epicurious, or Buzz Feed or The Daily Meal.  Never 20 best back-of-the-box recipes or 100 best back-of-the-box recipes.  Nope. Just 10. Because there are only about 10 really good back-of-the-box recipes 🙂

In my (albeit, limited) experience, it seems most back-of-the-box recipes sound good but in reality are quite plain and quite bland.  There are 10 good ones though!  Toll House Chocolate Chip Cookies, Philadelphia Cheesecake, Alber’s Cornbread, Rice Krispie Treats, Lipton Onion Dip jump to mind.  Pssst…! And now I have found another one! It’s on the back of the bag of Dutch Process cocoa powder that I purchased at Costco (brand name: Rodelle Organics).

These brownies are delicious, and just my type of brownie.  Everyone seems to have their own preferred brownie type, right? This is mine.  Slightly crunchy top, oh-so-chocolately flavor, dense-but not fudge, light-but not cakey.  These are just right!  AND, they’re easy-to-make, and one batch fills a 9×13 pan!  The brownies slice well, too. What more could one want?

B.O.B.* Brownies

*Back of Bag (Rodelle Organic Dutch Process Baking Cocoa, sold at Costco)

  • 1 cup plus 2 T. butter
  • 2 ¼ cups sugar
  • 5 eggs (yes, 5. I was shocked, too)
  • 1 ½ tsp. vanilla
  • ¾ cup plus 1 T. flour
  • ¾ cup plus 1 T. Dutch Process cocoa powder (no substitutions)
  • 1 tsp. salt
  • ½ cup semisweet chocolate chips
  • ¾ cup chopped nuts (optional)
  1. Preheat oven to 350 degrees.
  2. Line 9×13 inch baking pan with parchment paper and spray lightly with cooking spray.
  3. Melt butter and sugar in a heavy saucepan on very low heat.
  4. Let the mixture slightly cool and transfer to a large bowl. Beat well.
  5. Add eggs, gradually, mixing well.
  6. Add vanilla extract.
  7. Sift dry ingredients together.
  8. Add dry ingredients to egg mixture, stirring gently and minimally.
  9. Stir in chips and nuts.
  10. Pour mixture into prepared pan and bake approximately 35 minutes. Do not overbake.
  11. Cool before cutting.
  12. Cut into squares and enjoy.
29 Sep 2016 Pumpkin-Chocolate Cake

w

This is the BEST cake to serve at this time of year (or any other time of the year, actually)!  It’s a good chocolate cake – a very, very good chocolate cake; it’s moist, and nicely chocolate-y, and made richer with some pumpkin puree added.  The cake doesn’t taste of pumpkin, it just tastes well-rounded and delicious and the frosting tastes like Fall! There is a touch of cinnamon in the frosting, then the ganache topping is smoothed over the top and dripped down the sides which sends this cake into the realm of ‘One of the Best Cakes EVER’! My daughter, Abby, has been making this cake since she was in high school.  Her friends would ask for it for their birthdays (even for Summer birthdays)!

It goes without saying that this cake takes a bit of time to make and decorate, but if you are thinking of making this cake then you are thinking of making it for a special occasion, right?  The time and effort are worth it and there’s nothing complex or confusing about making this cake, it’s pretty straightforward. And you won’t be serving up a box mix and a can of chemicals to your friends and family, either 🙂

Now, your cake is going to look a bit different than the one above, since this cake was decorated for my witch themed Halloween party. Abby used candy, cupcake toppers, and Pinterest inspiration [to decorate the cake in the picture below] for my Halloween party last year.  Isn’t it cute?

Witches 2013 dessert abby's witch cake

The original recipe came from a Good Housekeeping magazine about, oh, 20 years ago?  I still see pictures from that recipe dancing around.  Don’t believe them!  For some reason in the picture the frosting under the ganache is orange.  I tried to do that and there is no way that I know of to turn a cocoa powder frosting bright orange.  I tried. Many times. It. Can’t.Be.Done. Sigh…

Not all recipes in magazines, cookbooks, newspapers and the Internet will work.  Mine will.  I only post recipes that I’ve tested and have been verified “Delicious!” by a multitude of family members and friends.  Many of my treasured recipes, like this Pumpkin-Chocolate Cake, I have made time and time again. You can do it, too! Make it once for Halloween, and I KNOW you’ll want to make it again for your Thanksgiving potlucks!

PUMPKIN-CHOCOLATE CAKE

For Cake

1 1/2 c. flour
2/3 c. unsweetened cocoa powder (Hershey’s Special Dark is good)
2 tsp. baking powder
1 tsp. baking soda
1/2 tsp. salt
1 (15 oz.) can pumpkin
1/2 c. buttermilk
2 tsp. vanilla
3/4 c. butter, softened
1 c. dark brown sugar
1 c. sugar
3 eggs plus one egg yolk
  • Preheat oven to 375 degrees.
  • Line the bottoms of 2 9-inch cake pans with parchment paper and lightly butter (or spray with Pam for Baking).
  • Sift flour, cocoa, baking powder, baking soda and salt together.
  • In another bowl stir together the pumpkin, buttermilk, and vanilla.
  • In the bowl of an electric mixer beat together the butter and the sugars until light and fluffy.
  • Beat in the eggs, one at a time, beating well after each addition, and then the egg yolk.
  • Reduce speed to low and beat in 1/3 flour mixture, and then 1/3 pumpkin mixture.
  • Repeat until all ingredients are used.
  • Pour batter into prepared pans.
  • Bake until cake passes the toothpick test, about 35 minutes.
  • Cool, frost and glaze as directed below.

For Frosting

6 oz. cream cheese, at room temperature
6 tablespoons butter (3/4 stick), softened
1 (16-oz.) box powdered sugar
3 T. cocoa powder
1/2 tsp. cinnamon
1 tsp. vanilla
2 – 3 T. cream (or milk)
  • Beat cream cheese and butter together until well blended.
  • Stir in powdered sugar, cinnamon, vanilla, and enough cream to make a stiff spreading consistency.
  • Spread 1 cup frosting between the two layers, and use the remaining frosting for the tops and sides.
  • Chill cake for a minimum of 30 minutes before glazing.

For Chocolate Glaze

4 oz. bittersweet chocolate, chopped
1 T. butter
3 T. corn syrup
1/2 c. heavy cream
  • Place chopped chocolate, butter, and corn syrup in a small bowl.
  • Heat heavy cream until boiling.
  • Pour hot cream over chocolate mixture in bowl.
  • Let sit for 3 minutes then blend with whisk until smooth.
  • Let glaze sit for  FOR AT LEAST 5 minutes to thicken slightly (it might be 15-20 minutes–better the glaze be on the thick side rather than the thin side)
  • Pour the glaze on top of the chilled and frosted cake. Smooth out glaze to edges, and then let drip down the sides.
  • Refrigerate to set glaze.