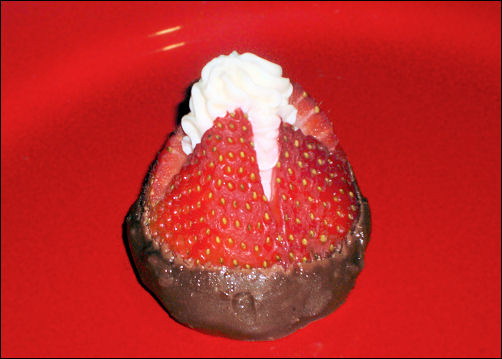
Tag-Archive for ◊ dip ◊

22 Jul 2011 Traditional Arabic Hummus

Traditional Arabic hummus.  How do I know its traditional?  Because I learned how to make it from my Saudi and Kuwaiti students in 1981 and 1982.  I watched how they made it, wrote everything down, and have followed the recipe ever since.  Well, once I tinkered with it and added a bit of cumin and coriander.   My kids reacted most negatively.  I remember their scorn quite clearly,  “What did you do to the hummus? It tastes FOUL!”  Lesson learned.  No tinkering with the authentic 🙂

This was the first recipe my son learned how to follow and  for a long time was the only thing he knew how to make.  Truth be told, his hummus is better than mine!  Why?  He follows the recipe!  He shells the garbanzo beans, just like my students used to do.  (Before 1981 I didn’t even know the garbanzos had shells, but they do.  Pop one out of its clear little membrane, and you’ll see!)  Over the years I have gotten lazy, and I now no longer shell the garbanzos.  As a result, my hummus isn’t as smooth as my son’s or as my students’ used to be.

Do as you wish, shell the garbanzos or not, just don’t even think of tinkering with the other simple ingredients.

Traditional Arabic Hummus

  • 1 can Garbanzo beans
  • 4 garlic cloves, minced
  • 1/2 cup sesame paste (available at most larger supermarkets now, in the middle eastern foods section)
  • approx. 1/2 cup reserved garbanzo liquid
  • 2 tablespoons freshly squeezed lemon juice
  • 2 tablespoons olive oil
  • paprika (optional)
  1. Drain the garbanzo beans, reserving the liquid.
  2. Shell the garbanzo beans if desired (shelling the garbanzos results in a much smoother dip).
  3. Place drained garbanzos, approx. 1/2 cup reserved liquid, lemon juice and olive oil in a blender and process until smooth.
  4. That’s IT!   Isn’t that easy?
  5. Add more garbanzo liquid if needed to make a softer dip.  Remove dip to a serving bowl.  My students used to spread the hummus onto a dinner plate and drizzle with a bit of olive oil and a sprinkle of paprika.  Americans usually serve it out of a bowl.  My students served hummus only with triangles of warm pita bread.  American often serve with pita bread plus carrot and celery sticks, cucumber rounds, red pepper strips, and cherry tomatoes.

From following my students around I also have recipes for Sambusas and Kapsa, and so many warm and fond memories of teaching English as a Second Language to some wonderful pre-literate Arabic and Saudi women.

Thanks for stopping by my middle eastern kitchen today. Enjoy the hummus.  It’s better than that stuff you can buy in tubs, and much cheaper!

19 Jul 2011 Corn Dogs

I am sooooo bad.  I KNOW I shouldn’t cook like this.  I know it. I know it. I know it.  But I did.  And my little experiment turned out wonderfully well.  Who knew homemade corn dogs were so easy to make?   I guess there is no need to go to the fair now, or to make that once every other year stop at the Hot Dog On A Stick outlet in the mall.

I made mini corn dogs, so that counts for something, right?  I cut each bun length hot dog into 3 pieces, speared each piece with a good quality toothpick, rolled it around in the cornbread batter, and then placed it in the <gasp> hot fat to <gasp, gasp> deep fry.

Bad girl, BAD girl.

Delicious outcome though.

We–my son, my daughter, my grandson, and my houseguest–ate them standing at the stove, putting the mustard and ketchup on the paper towel I was draining the corn dogs on.Dip, bite, mmmm, dip, bite, mmmmm, dip, bite, mmmmmm…

Tes At Home led me astray. Her Tastespotting picture showed up in my RSS feed right at lunch time. I followed her directions exactly.  The only thing I have added in is a suggested temperature for the hot oil (I know, I know, it’s a sin that I know such things), and I did increase the salt a bit <gasp>, and I rewrote the directions just a bit, just to make them sound more like me…, BUT! The recipe is ALL Tes At Home 🙂

Mini Corn Dog

  • 6-8 hot dogs, your choice…all beef, turkey, Kosher, vegan, super premium, ultra bargain discount, regular length or bun length, it doesn’t matter…, whatever you prefer or have on hand
  • 1 cup corn meal
  • 1 cup flour
  • additional flour for coating the hot dogs (2-3 tablespoons)
  • 4 tsp baking powder
  • 2 1/2 tbsp sugar
  • 1 tsp salt
  • 1 egg
  • 1 cup milk
  • Oil for deep frying
  1. Cook the hot dogs in boiling water for few minutes.  (I know they are already precooked, but do it anyway so they can get all that plumping business out of the way.) Remove cooked hot dogs from the water, drain,  and set aside.
  2. Combine corn meal, flour, salt and baking powder in a mixing bowl.
  3. In another bowl, whisk egg and sugar until sugar is dissolved,  then stir in milk.
  4. Add the milk mixture to the flour mixture and stir well.  Let the batter rest in the refrigerator for 10-15 minutes.
  5. Heat oil in the deep fryer over the medium heat.
  6. If desired, cut hot dogs into halves or thirds. Spear each piece with a good quality toothpick.
  7. Roll  hot dog pieces in flour and then dip into the corn bread batter, coating well.  (The cornbread batter coats surprisingly well.  No worries here!)
  8. When the oil reaches 365 degrees, place the cornbread covered, toothpick skewered, hot dog into the hot oil. (I have a small pan for deep frying, so I could only cook two mini dogs at a time.)
  9. Deep fry until golden brown. Serve hot, with ketchup and mustard for dipping, of course.

Note: I had enough batter for six bun sized hot dogs cut into thirds, 18 mini hot dogs–and I put the batter on pretty thickly (the corn bread batter is my favorite part).

Aren’t you glad you stopped by my kitchen today?  Just what you needed to know…, how to coat a hot dog in a corn bread batter and deep fry it!  Deeeeeelicious!!!  Serve with a green salad and a glass of orange juice.  My daughter sees no reason why these can’t be frozen and then reheated in the oven as needed.  I don’t either.  Costco sells them twenty four to a box just that way!

Now for all my Facebook, “Polly, Julie and Julia” friends.  YES,  to make matters WORSE I then cut some Reese’s Peanut Butter cups in half , wrapped each half in that roll out crescent roll stuff, baked at 375 for 10 minutes, sprinkled with powdered sugar, and ate.  Ummm, no.  That refrigerated crescent roll stuff is bad news.  The rolls tasted and smelled like chemicals. That being said, of the eight I made guess how many are left?  ZERO.

Now, aren’t you glad to know you can make killer corn dogs at home any time you want?!  I’ll try to post something a little more sane tomorrow….

05 Jan 2011 Blue Cheese Dip

My first post of 2011!  How exciting!

I think I’ll start with an appetizer.  I haven’t posted many appetizers in the past.  I’ve always been a bit appetizer challenged.  My Hot Bean Dip is good, but new Year’s Eve, champagne, and Hot Bean Dip?  I don’t think so.

This holiday season I  tried three of Ina Garten’s appetizer recipes from her most recent cookbook,  How Easy is That?:  Savory Coeur a la Creme, Stilton and Walnut Crackers, and Chunky Blue Cheese & Yogurt Dip.  One was OK, one was good, and one was very, very good.  The Savory Coeur a la Creme was a bit of a bust.  I took it to my Cookbook Club, and everyone liked the topping, which was purchased Major Grey Chutney, but they weren’t nearly as enthusiastic about the recipe-made Savory Coeur a la Creme under the chutney.  The Stilton and Walnut Crackers were good, and perhaps post-worthy, but I will have to give them another try first.  I think they might be better if I cut them a bit thinner, I’ll let you know. I fell  hard for the Blue Cheese Dip though.  Delicious!! It is made with Greek yogurt so it is lighter than many blue cheese dips (most of which are made with a few cups of sour cream).  I don’t know why I photographed the dip next to a sliced baguette.  I didn’t put the dip on bread. That would have been weird. I dipped celery sticks into it.  When they were gone, I dipped cucumber slices.  I finished up with the carrot sticks.  I think I had a month’s worth of veggies in the three hours leading up to New Year’s Eve 2011 🙂

I could see thinning out leftover dip and using it as a salad dressing, IF I had any leftovers…

Blue Cheese Dip

  • ¼ cup finely chopped shallot
  • 1 teaspoon minced garlic
  • 2 tablespoons freshly squeezed lemon juice
  • 7 ounces Greek-style yogurt (I used non-fat because I couldn’t find a whole milk version)
  • ½ cup mayonnaise
  • 4 ounces sharp blue cheese, crumbled
  • 5 dashes Tabasco sauce (more or less to taste, but I found 5 to be just perfect)
  • 1 teaspoon Kosher salt
  • ½ teaspoon freshly ground black pepper
  • 3 tablespoons of minced chives
  1. Start at two hours in advance (making the night before is also acceptable).
  2. Place the shallot, garlic, lemon juice, yogurt, mayonnaise, blue cheese, Tabasco, salt and pepper in the bowl of a food processor.  Pulse the processor twelve times, until the mixture is almost smooth but still a bit chunky.
  3. Add the chives and pulse two or three more times.
  4. Transfer to a serving bowl, cover with plastic wrap, and chill for at least two hours to allow the flavors to develop.
  5. Serve with raw veggies for dipping.

Thank you, Ina!  And thank YOU for stopping by my kitchen today!  Come by again tomorrow,  I have another appetizer recipe to share!

27 Jul 2010 Strawberry Volcanoes

Everyone is making chocolate covered strawberries now. Everyone. Sooooo…, it’s time for us to move onto Strawberry Volcanoes! Just look at that picture! Am I right, or am I right?! I saw a picture of Strawberry Volcanoes on TasteSpotting a few weeks ago and knew then this was the direction in which to move. Their picture was one of strawberries filled with freshly whipped cream, but I wanted something that would hold up longer on a dessert buffet. I decided to fill the strawberries with a cream cheese dip that I have made and served with strawberries for, hmmm…, at least a few decades. I loved the name “Strawberry Volcanoes”, so I am keeping THAT. The recipe below is just a guide. Dip your strawberries in a favorite chocolate and then fill with a favorite filling. Go for it! Create your own, “signature” Strawberry Volcanoes! You can start with my version or just make them like this all the time (like I am going to do)!

Strawberry Volcanoes

Adjust the quantities to fit the number of volcanoes you want to make. Don’t worry, though, leftovers of any component should not be a problem! ( Leftover chocolate? Stir in toasted coconut, raisins and/or nuts. Drop by teaspoonfuls onto wax paper. Let chocolate harden and snack! Leftover dip? Get more strawberries and dip them in it, or use as a filling for a cake or cupcakes. Leftover strawberries? Just eat, or freeze for a smoothie later.)

About 48 very large, very ripe strawberries
1 12 oz. package chocolate chips or a favorite large chocolate bar (you’ll need at least 6 oz.) Any kind of chocolate will work … milk, dark or white.

8 oz. cream cheese, softened
1/4 cup sugar
1/3 cup sour cream
2 teaspoons vanilla

Wash strawberries and remove the green stem and leaves. If necessary, slightly slice the strawberry so it has a nice flat bottom and sits nicely on a platter. Let dry on paper towels.

While strawberries are drying, make the filling. With an electric mixer, beat the cream cheese with the sugar, sour cream, and vanilla until smooth and creamy (no lumps). Transfer the mixture to a large Ziploc bag or a piping bag fitted with a star tip. Refrigerate until ready to use.

Line a tray big enough to hold all strawberries with wax paper and set aside.

A few hours before serving time, melt chocolate or chocolate bar in the microwave on 50% power. (You might only need 1/2 the bag of the chips, you can start with that if you want and then melt more as you go, or melt the whole bag, up to you.) First, set the microwave oven for two minutes on 50% power, stir, and return chocolate to microwave for an additional minute and an additional stir. Repeat as necessary until the chocolate is completely melted. Dip the wide top end of the dry strawberry into melted chocolate. Place on the wax paper covered tray and let sit on it’s chocolate “bottom” (stem end, really) until hard (place tray in refrigerator to speed up this process).

With sharp knife, cut an X into the pointed (non-chocolate covered) end of the strawberry. Make the cut go about halfway down the strawberry. Fill the X with the filling, letting a  little “erupt” out of the top (remember you are making strawberry volcanoes!). If using the Ziploc bag method, push all the filling to one bottom corner of the bag. Snip the corner off, and squirt the filling out of the hole in the bag. If you have a piping bag and a star tip, you know the drill!

Thanks for stopping by my kitchen today.  Come back again tomorrow!