Archive for the Category ◊ Teaching Boys to Cook Series ◊

22 Aug 2013 Salmon in Parchment

salmon

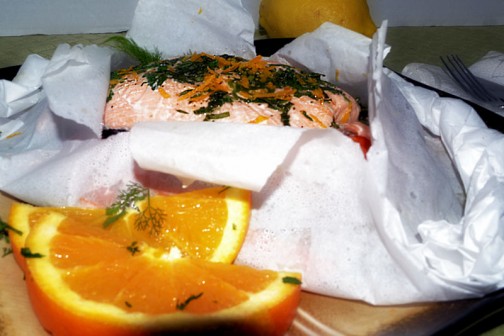
Every once in awhile you run across a recipe that changes everything!  This is one of those recipes.  Cooking salmon in the microwave, with veggies.  How simple is that? How convenient is that? This main dish is simple, delicious  and healthy.  You’ll need a salmon fillet, a cup of fresh julienne veggies, a large piece of parchment paper, a little liquid, and a microwave. Chop and prep, five minutes in the microwave, then BOOM, a tasty, spot on healthy dinner of salmon and veggies!

I can’t get enough of this!  As much as I love, love, love the combination of veggies below, I often have to switch up the veggies and change the sauce to accommodate what I have on hand. The method always works, it’s always good and it never heats up the kitchen.  PLUS, dinner can be ready in ten minutes flat!

Fully Customizable Microwave Salmon & Veggies in Parchment

Recipe by Polly Ferguson, based on a recipe by Alton Brown

  • 1 (8-ounce) salmon fillet, pin bones removed
  • 1/3 cup julienne fennel bulb
  • 1/3 cup julienne leeks, white part only
  • 1/3 cup julienne carrots
  • 1/3 cup julienne snow peas
  • ½ teaspoon Kosher salt
  • 1/8 teaspoon freshly ground black pepper
  • 1/8 teaspoon ground coriander (this could be customized too—curry powder, cumin, or any other powdered spice you are partial to and that would complement the veggies and the salmon could be used)
  • Herbs: 6 basil leaves, chopped finely (or any mixture of herbs from your garden, or spices from your cabinet, that appeals to you—parsley, cilantro, dill, mint, rosemary, green onion, chives, fresh ginger, tarragon, lemon pepper, garlic, chili powder, curry powder, herbs de province, paprika, etc…)
  • Other Stuff: 1 tsp. grated lemon or orange peel, diced pineapple, jalapeño, (maybe even some brown sugar or a drizzle of maple syrup, or a sprinkling of ground coffee or mustard…, pesto or marmalade…)
  • Liquid: 1 tablespoon dry vermouth, OR orange juice, OR white wine… (just don’t use lemon juice, major Yuck!) I’d really like to experiment with soy sauce or teriyaki sauce, rice wine, melted butter (!), dry sherry, coconut milk, Asian Fish Sauce or beer 🙂
  1. Take a rather large piece of parchment paper and fold it in half  like a book. Lay fennel, leeks, carrots, and snow peas on parchment in the center of the paper and on one side of the fold.
  2. Mix together salt, pepper, and ground coriander (or whatever spice mix appeals to you). Sprinkle vegetables with 1/2 of the spice mixture.
  3. Lay salmon on top of vegetables and sprinkle with the remaining spice mixture.
  4. Top salmon with choice of herbs, sprinklings, and 1 tablespoon of desired liquid (wine, vermouth, orange juice, teriyaki sauce…)
  5. Fold empty side of parchment over fish and starting at top, fold up both edges of parchment, overlapping folds as you move along. Once you reach the bottom tip, twist several times to secure tightly.
  6. Place on microwave safe plate and cook for 5 minutes, on high in microwave (or until fish reaches 131 degrees if you have an instant read thermometer and wish to use it–I don’t). Let the package sit for 2 minutes.
  7. Open parchment carefully and serve for a complete meal. Serve from the parchment package, if you’d like. If I am feeling fancy I take the skin off the salmon fillet, place the veggies on the plate, and put the salmon on top and sprinkle with a garnish of  green onion, parsley or snipped basil.

Thanks for stopping by my kitchen today! :)

Print Friendly, PDF & Email
08 Oct 2011 Quesadilla Pie

Looking for something new for lunch? I have the perfect thing!  This lunch has to be baked, so it’s a great fall-winter recipe.  I found it at Simply Recipes awhile back .  Finding this recipe was a paradigm shift in lunches around here.

For me now it’s not so much a recipe, but a method.  I did make some changes to the recipe though,  mainly around baking time.  I don’t know why they cook their pie so long, the pie would be cracker crispy if baked for as long as they specify. Still, it would be good to go to the site, there are some good layering photos posted.

The only two ingredients needed for this pie are cheese and flour tortillas.  Everything else is up to you, what you like, and what you have on hand! (see the ingredient suggestion list).  Do you see the paradigm shift potential here?  It’s kind of like learning to make an omelet, or a sandwich, and realizing there are no limits to what you can do, every omelet could be different, every sandwich could be different, just every Quesadilla Pie can be different.

Yes. every time I make Quesadilla pie, it’s different, and every time I make it, it’s good. Sometimes it has three layers, other times five layers. Some times it’s all veggie-most of the time actually, and sometimes it’s a carnivore’s delight. The pie I have pictured here has a layer of spinach and cheese, a layer of fresh tomatoes (juiced, seeded, and chopped) and cheese, a layer of fresh spinach (no need to precook) and cheese, a layer of sauteed onions and zucchini and cheese, and a layer of corn and cheese. That’s five layers, and six tortillas.

Quesadilla Pie

  • 4 or 5 or 6 plate sized flour tortillas (9-10 inches diameter), depending on how many layers you want your pie to have!
  • A bit of butter (not optional)
  • Approx. 1/2 pound grated cheese-one kind, or a mixture based on what you have on hand, (Monterey Jack, Pepper Jack, and Mozzarella are really good.  I usually blend a variety of cheeses-whatever I have in the refrigerator, and always add some Mozzarella (I like it’s “stringy” qualities!).  A bit of cheddar is OK when mixed in with other cheeses, but I find a lot cheddar results in an oily, soggy dish.  A pre-packaged, pre-shredded “Mexican Blend”  could be used, too.)
  • Choice of filling ingredients: (Each layer should have cheese plus one, maybe two, filling    ingredients. Don’t make each layer the same!)
  • fresh  spinach leaves; tomatoes, juiced, seeded and chopped (otherwise they make the tortilla soggy); sliced olives; sautéed/cooked zucchini; any leftover cooked veggie, diced (I’ve added broccoli, asparagus, sweet potato…); chopped and sautéed/cooked onions (yellow or red onions); chopped green onions; cooked mushrooms (if not sautéed first, they make the tortilla soggy); leftover cooked and cubed or shredded chicken, beef/steak, pork, sausage, bacon; cooked or canned green chiles; canned or cooked beans (black beans, pinto beans, pinquitos); fresh or frozen corn
  • Cumin and/or chili powder for extra heat, optional
  1. Preheat oven to 350°F.
  2. Butter the bottom and sides of a pie plate or quiche dish, (pie plate or quiche dish should be approximately the same size as your tortillas). Do not skip the butter.
  3. Place one tortilla on the bottom of the pie dish. Sprinkle some shredded cheese over the tortilla. Use a generous portion of cheese. Add your chosen filling ingredient to this layer. If you want, sprinkle some cumin or chili powder on top for a spicier pie (probably  not necessary if you are using Pepper Jack and/or chilies).
  4. Repeat: tortilla, generous sprinkling of cheese, a chosen filling ingredient, and a sprinkle of optional cumin or chili powder. Make three or four layers, all stacked on top of each other.
  5. Butter the top of the final tortilla and place on top of your “pie”, buttered side up.
  6. Cover the dish with aluminum foil.
  7. Place in preheated 350 degree oven for 20 minutes.
  8. Remove foil and increase the heat to 375°F. Cook for another 5-10 minutes, or until the top tortilla is lightly browned and cheese is bubbly.
  9. Remove from oven. Let cool for 10 minutes before serving.
  10. Cut into slices.  This pie is finger food (once it cools off a bit!).  It’s actually a bit difficult to eat with just a fork.
  11. Serves 2, 3, or 4 persons–depending on appetites and possible side dishes. We just eat, as-is, for lunch.
  12. Serve with salsa, sour cream, and/or avocado, if desired.

Thanks for stopping by my kitchen today.  I hope  you and this recipe for Quesadilla Pie enjoy many happy years together!


Print Friendly, PDF & Email
04 Oct 2011 Chicken Pot Pie

It rained here yesterday!  Happy, happy October, my very favorite month of the whole year.  I was so excited with the cooler weather and the rain that  I put on slippers and a sweatshirt to celebrate.   Then I decided to teach my son how to make Chicken Pot Pie.  He has his own apartment now, and needs to know how to make things like this.  I went shopping for ingredients, started to prep them…and no man-child.  He ended up staying late at work, and I had to make the pie by myself.  He was home when it came out of the oven though (how does he doe that?!).  He walked in, kissed me and said, “I love it when you make stuff like this.” he then proceeded to eat half the pie.  Then he called his friend to say there was Chicken Pot Pie at his house, and to come over and have some!  I’d say the pie was a hit.

This is my son.  He’s a good sport about learning how to cook and wearing an apron his mom made for him!

This is a pretty simple Chicken Pot Pie.  Absolute comfort food!  No spices other than salt and pepper, so the true taste  of sauteed chicken and fresh veggies shine through…and are then snuggled up in a smooth gravy and encased in pastry.  Yummmm!

The hardest part of this pie comes after removing it from the oven.  You have to wait!  You have to wait for the gravy to set up a bit, or it will run all over your pastry.  If you can’t wait, it’s  not really a bad thing!  The loose first slice will still taste delicious and by the time you are ready for your second slice, the filling will have set a bit.

Believe me, after making your own Chicken Pot Pie, you will never buy one from the frozen foods  section again.  You might never order one from a restaurant either…

Chicken Pot Pie

  • 2 tablespoons olive oil
  • 2 tablespoons butter
  • 1 cup chopped onion
  • 1 cup diced carrots
  • 1 cup diced celery
  • 1 lb. boneless, skinless chicken (breast or thighs, or a combination)
  • salt and pepper to taste
  • 1/3 cup flour
  • 1 can condensed chicken broth (or 1 1/2 cups homemade chicken broth)
  • 1/2 cup half-and-half or milk
  • 1/2 cup fresh or frozen corn kernels
  • 1/2 cup petite frozen peas
  • 2 9″ Pillsbury pie crusts (1 box) OR 1 homemade double crust pastry
  • 1 egg, beaten with 1 tablespoon water, optional
  1. Preheat oven to 350 degrees.
  2. Melt the butter along with the olive oil (you can use all oil, if you want) in a large skillet over medium heat.
  3. When the butter has melted and the oil is hot, add the chopped onion and saute over medium heat for a few minutes.
  4. Stir in the diced carrot and celery and saute for approx. 5 more minutes, still over medium heat, stirring occasionally.
  5. While the veggies are sauteing, dice the chicken and sprinkle with salt and pepper.
  6. Stir the diced and seasoned chicken into the veggie mixture and saute for three more minutes, still stirring occasionally.
  7. Sprinkle the flour over the chicken and veggie mixture, stir constantly over medium heat for 3 minutes (the flour might try to stick to the bottom of the pan, try to release it by stirring vigorously. If necessary add another tablespoon or so of butter or oil. Do not burn the flour!).
  8. While the chicken/veggie/flour mixture  is sauteing, combine the chicken broth and half-and-half or milk and microwave for three minutes.  When the microwave beeps, remove the pan from the heat and remove the liquid from the microwave.
  9. Now you are going to make the gravy.  Turn the heat off the pan.  Stir in 1/2 cup of the hot broth-milk mixture.  Stir until mixture is smooth.  Add another 1/2 cup of broth-milk mixture. Stir until smooth.  Repeat two more times using 1/2 cup broth-milk mixture each time.
  10. Return chicken-veggie-gravy mixture to heat.  Stir in frozen (of fresh) corn and peas. Simmer for gently over medium heat to defrost the frozen veggies.
  11. Turn off heat and let filling sit while you unroll the pasty and place one sheet in the bottom of a pie pan.
  12. Pour the filling over the pastry in the bottom of the pie pan, and cover with the second roll of pasty.  Cut 3-5 vent holes in top of top pastry (with scissors or a knife).  Crimp the edges of the pastry so the filling is fully encased.
  13. If you want a nice, shiny crust, brush pastry lightly with egg wash (egg beaten with 1 tablespoon water).  This is optional (but nice if you want to show off!) You won’t need all of the egg wash. (Scramble the leftover egg for the baby, or the dog!)
  14. Bake in preheated 350 degree oven for 40 to 45 minutes.
  15. Remove pie from oven and let sit…for as long as you can.  The longer the pie sits, the thicker the gravy will get.  Letting the pie sit for 30 minutes to an hour, is about right. (Don’t worry, the filling will remain hot.)
  16. Serve, and enjoy.

Thanks for stopping by my kitchen today.  Hope you enjoyed the visit.  See you again, soon, I hope!


Print Friendly, PDF & Email
23 Jul 2011 Beef Skewers

Meat on a stick! Is there anything better?  When I was pregnant with my first child, my cravings were iced tea, tomato soup, and “tasty chunks of beef”!  Twenty-six year later, I still crave tasty chunks of beef!

This is a very easy recipe, resulting is some mighty fine, Asian accented, “tasty chunks of beef”.  Chill the meat for 30 minutes, marinate for 30 minutes, grill and eat.  For a special treat serve with corn-on-the-cob, grilled veggies or a salad and some Bloomin’ Onion Bread!

When I was a single full time working mother of three children I was a master of freezer food.  This was one of my favorites.  Homebaked Chicken Nuggets were another.  I would buy two flank steaks and some skewers.  I’d unroll the flank steaks and then freeze for 30 minutes to make it easier to slice. At the same time I would soak the skewers in cold water.  Then I’d probably sit down with my feet up, an iced coffee and a good book while the the meat chilled and the skewers soaked, LOL!  A sense of humor is a wonderful thing!  More than likely during that thirty minutes I’d finish putting the groceries away, wipe up a spill, ask a telemarketer to put me on the no-call list, solve a kid dispute, feed the dog, move the laundry over, eat lunch and load the dishwasher …  ANYWAY, after thirty minutes I’d slice the beef and thread it onto the skewers.  Then I would layer the skewers into a shoe box sided plastic container.  I’d put wax paper between the layers, and freeze the whole box.  One box would last two or three months and provide plenty of yummy and quick week night main dishes…easily expandable to however many people were home.  Just take out 3-5 skewers per person.  Mix up the marinade.  Marinate the desired number of skewers for 30 minutes, then grill or broil!

Oh, and I often omit the sesame seeds, as I don’t care for them 🙂

Beef Skewers

  • 1 flank steak, approx 1.5 lbs, (unrolled) and slightly frozen (for about 30 min or so)
  • 30 bamboo skewers (soaked in water for 30 minutes)

Marinade

  • ¼ cup soy sauce
  • ¼ cup sugar
  • 2 Tablespoons Sake (an opened bottle will keep 1 year in refrigerator)
  • 2 cloves garlic, smashed
  • 1 ½ teaspoons grated ginger (keep any leftover fresh ginger in baggie in freezer, when ready to use no need to defrost, just peel and grate!)
  • 2 tablespoons toasted sesame seeds (toast in dry frying pan until fragrant)
  • 3 green onions sliced

  1. Slice flank steak, across the grain, into thin strips.  Thread meat slices onto skewers, accordion style. It’s easy!  Child’s play!  (NOTE: Meat on sticks can be frozen at this point. When ready to use, just remove from freezer.  Let defrost for as long as it takes to make marinade.  Then continue with recipe.)
  2. Combine soy sauce, sugar, and sake; stir well to dissolve sugar.  Add in garlic, ginger, sesame seeds, and green onions.
  3. Pour over meat on sticks.  Marinate 30 minutes.
  4. Remove skewers from marinade.
  5. Grill over hot fire or broil for 2-3 minutes on each side.  Good hot, room temperature, and cold! I’ve served these as appetizers and as a main dish.

    Thanks for stopping by my kitchen today!  I hope I have given you an idea for this weekend’s BBQ and for busy school night meals, too!

    Print Friendly, PDF & Email