Tag-Archive for ◊ espresso ◊

18 Sep 2019 Cafe Mocha Pinwheels

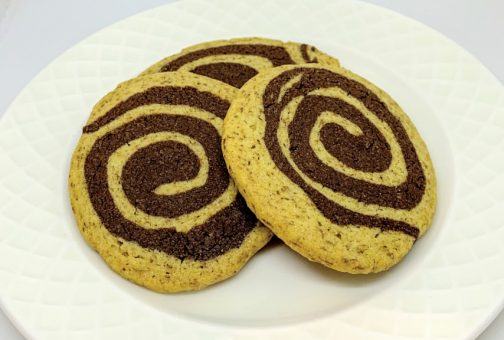
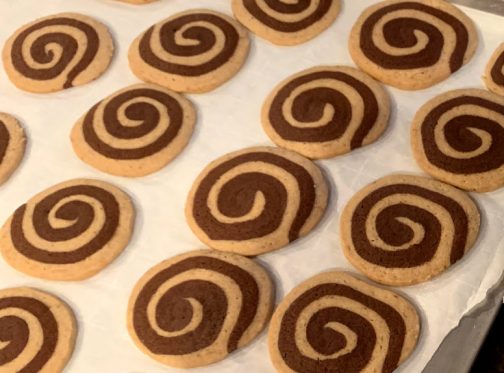
I love cookies! These are fun, a bit different, striking, and feature grown-up flavors of mocha and espresso. I found the original recipe in the Taste of Home publication, ‘Fall Baking 2019’. After my first try, following the recipe perfectly, I changed the recipe a bit. I added more flour to one portion of dough (after the dough is divided) to make both doughs even (why didn’t TOH do the same?). Also, as the mocha flavor was strong in the original recipe and the espresso was loosing out, which I found to be unacceptable, I upped the espresso! The resulting cookie is crisp, pretty, and full flavored.

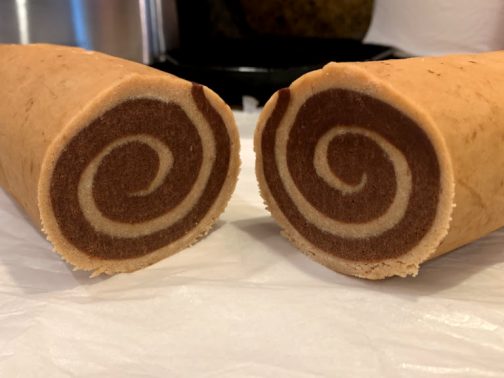
Making the pinwheels is the tricky part, so let me help with that a bit. One, don’t stress. Two, on a large piece of parchment paper, roll the first dough out to a rectangle of only the approximate size. Don’t be a slave to the ruler, it doesn’t matter that much! Three, using another piece of parchment paper, roll the second dough into approx the same size as the first rectangle of dough. Four, put one dough on top of the other dough and remove the top piece of parchment paper. Five, now trim and patch and press to fit! If you have extra dark dough, put it where there’s some extra pale dough, and vice-a-versa. Keep working at it until all the dough is used and more-or-less on top of one another. Five, gently roll over the two doughs with a rolling pin to make the doughs stick together and to remove any lumps or air pockets. Six, roll up tightly and slice as per the directions below. You’ll have beautiful pinwheel cookies!
Café Mocha Pinwheels

  • 1 cup butter, softened
  • 2 cups sugar
  • 2 large eggs, room temperature
  • 2 teaspoons vanilla extract
  • 3 cups all-purpose flour (375 grams)
  • 2 teaspoons baking powder
  • 1 tablespoon instant espresso powder
  • 1/2 cup cocoa powder (Hershey’s is fine) (50 grams)
  • Additional 50 grams flour (about 1/3 cup)
  • Additional 1 tablespoon instant espresso powder
  1. In a large bowl, cream butter and sugar until light and fluffy.
  2. Beat in eggs and vanilla.
  3. In another bowl, whisk flour, baking powder and espresso powder to combine. Gradually beat flour mixture into creamed mixture.
  4. Divide dough in half. Beat cocoa into half of dough. Beat additional flour and additional espresso powder into other half of the dough.
  5. Divide each color into 2 portions.
  6. Refrigerate until firm enough to roll out, about 1 hour.
  7. Roll each portion into a 9×7-in. rectangle, approx. (Roll on parchment paper to make the whole job a lot easier.)
  8. Place a chocolate rectangle on top of the coffee rectangle. Fussy cut and finagle to shape dough into rectangles of matching size and shape.
  9. Roll up tightly jelly-roll style, starting with a long side, and using parchment paper to help with the rolling. Mold the dough into a smooth roll. Securely wrap dough in plastic wrap; repeat with remaining dough. Freeze 1 hour or until firm.
  10. Preheat oven to 350°. Unwrap and cut dough crosswise into 1/4-in. slices. Place 2″ apart on ungreased baking sheets. Bake 10-12 minutes or until edges are light brown. Cool on pans 2 minutes. Remove to wire racks to cool. 
  11. Makes 4 dozen large cookies

Freeze option: Place wrapped logs in an airtight container; return to freezer. To use, unwrap frozen logs and cut into slices. If necessary, let dough stand 15 minutes at room temperature before cutting. Bake as directed.

From Taste of Home, ‘Fall Baking, 2019’ (but has been posted elsewhere on the internet since 2016).

02 Mar 2014 Black Forest Torte (Black Forest Cake)

BookThief-torte

Once a year I host a book club meeting at my house.  My night was last night.  The book was “The Book Thief” so the theme was German food.  Thanks to input from the Internet, I decided to make a “Black Forest Torte” for dessert.  I found a recipe posted on Food.com by a “real German lady”, and decided to make it, with no advance practice session (I know, living on the edge!).

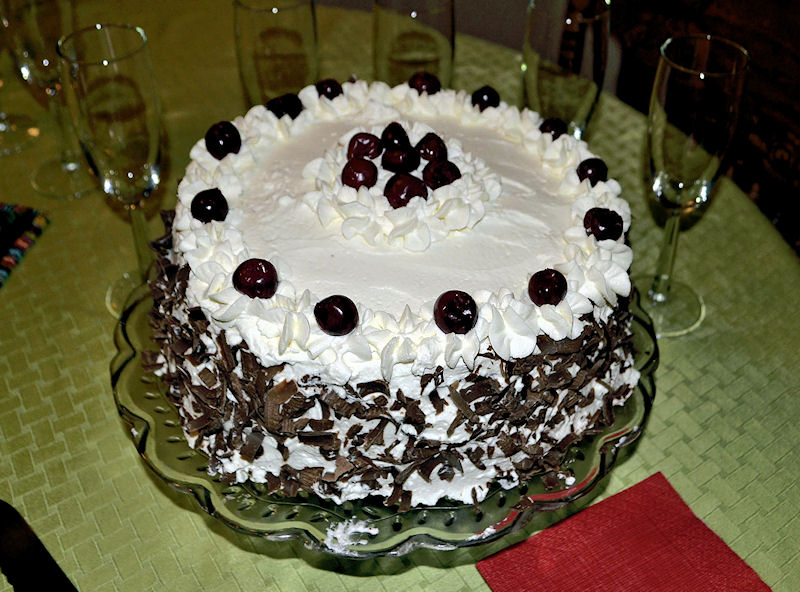
The cake was a delicious show-stopper.  Just look at that picture! I haven’t made too many show-stopper cakes before so I was quite thrilled with the way this one turned out.  PHEW! And I’d like to extend a big, grateful ‘danke’ to the “real German lady” 🙂

I made a few changes to the recipe, of course:  I used pitted sour cherries from a jar, rather than fresh cherries (they’re not in season right now), and I used butter, rather than shortening, in the cake batter. I also made two 9.5 inch cake layers instead of the three 9-inch layers specified in the original recipe (I really dislike 3 layer cakes).  I modified the mixing method for the cake. I used espresso powder, rather than cold brewed espresso, in the filling and adjusted the amount of Kirsch in the filling as well. I upped the whipped cream frosting by 50%.

Now, if you make this cake, you’ll need to start three days in advance and, please, DO make this cake!

  • Day 1: Drain the cherries and soak in Kirsh.
  • Day 2: Make the chocolate layer cakes, soak the cakes in the Kirsch drained from the (now boozy) cherries.  Make the filling and assemble the layers one on top of the other.  Refrigerate overnight.
  • Day 3: Make the chocolate curls and the whipped cream frosting. An hour or two before serving, decorate the cake with the whipped cream, reserved cherries, and chocolate curls. Serve!
  • Day 4: The leftovers are yummy! I called four friends over for tea, and they all accepted, enjoyed the cake, and took slices home for their husbands!  (So far, I have cut sixteen slices from this cake, and there is one slice left in the refrigerator for my 23 year old twins to fight over.

 Black Forest Torte

Cake

  • 1 2/3 cups all-purpose flour (8 oz)
  • 2/3 cup cocoa powder (I had Hershey’s on hand, so that’s what I used)
  • 1 1/2 teaspoons baking soda
  • 1 teaspoon salt
  • 1/2 cup shortening
  • 1 1/2 cups sugar
  • 2 eggs
  • 1 teaspoon vanilla
  • 1 1/2 cups buttermilk

Mocha Buttercream Filling

  • 1/2 cup kirsch
  • 1/2 cup butter
  • 3 cups powdered sugar
  • 1/8 teaspoon salt
  •  1 1/2 teaspoons instant  espresso powder
  • 2 jars of pitted sour cherries, drained (I got mine at Trader Joes-1 1/2 lbs each, most supermarkets have  1 lb. cans of cherries in the canned fruit section) OR 1 1/2 lbs fresh black cherries, pitted

Whipped Cream Frosting

  • 3 cups heavy whipping cream
  • 1 teaspoon vanilla
  • 2-3 tablespoons  kirsch
  • 2 tablespoons dry milk powder (optional, but helps with stability of whipped cream icing)
  • 1/3 cup powdered sugar

Chocolate Garnish

  • One large, 3.5-4 oz. dark chocolate bar, grated or curled

DIRECTIONS

  1.  Drain the cherries then soak them in 1/2 cup Kirsch overnight. Discard the cherry juice UNLESS you want to make a non-alcoholic cake.  If you want a non-alcoholic cake (like, if children will be eating it) use the cherry juice  from the cherries instead of the Kirsch and proceed as outlined below.
  2. Preheat the oven to 350°F
  3. Drain the cherries from the Kirsh.  RESERVE the liquid!  Most of the liquid will be poured over the hot cakes. Reserve 2 tablespoons of the liquid for the filling.
  4. Line the bottom of two 9 inch round cake pans with parchment. Spray the sides with “Pam for Baking”, or grease with a bit of butter or oil.
  5. Sift the dry cake ingredients together and set aside.
  6. With an electric mixer beat the shortening to soften, then add the sugar.  Beat for six minutes or until the shortening-sugar mixture is light and fluffy.
  7. Add the eggs, one at a time and mix well.  Stir in the vanilla.
  8. Add one-third of the dry ingredients to the sugar mixture and beat to combine. Add half of the buttermilk. Beat to combine. Add another one-third of the dry ingredients and beat to combine.  Add remaining buttermilk.  Beat to combine.  Finally, add the last of the dry ingredients and beat well. alternately with the buttermilk and mix well.
  9. Pour batter into the prepared cake pans.
  10. Bake in preheated 350 oven for approx. 25 minutes or until a cake springs back when touched.
  11. Remove the cakes from the oven.  Leave the cakes in the pans and immediately and slowly, pour some of the reserved Kirsch-cherry juice mixture over both cakes. Let the Kirsch soak in, then repeat until all but 2 tablespoons of the Kirsch-cherry liquid has been used. (The remaining 2 tablespoons liquid will be used in the filling)
  12. Let the cakes cool in their pans.
  13. Make the filling. With an electric mixer  beat the butter until light and creamy. Add the powdered sugar, salt, espresso powder, and 2 tablespoons Kirsch-Cherry juice and beat well for 3 or 4 minutes. If the filling is too thick add some extra Kirsch, cherry juice, or cream (add only an extra 1/2 tsp. at a time). The filling should be spreadable, but firm.
  14. Place the base layer on cake plate.  Spread filling over top, then cover with drained cherries (save some good, firm, pretty cherries to go on top of the cake as decoration). I took the time to place each cherry in concentric layers, which I think helped with the stability of the cake. Add the second cake on top of the filling and cherries on the first layer.  Push down a bit to secure a firm fit between the layers.
  15. Cover the cake  and let sit in refrigerator overnight for the flavors to meld.
  16. A few hours before serving place the whipping cream, powdered sugar, Kirsch, vanilla, and optional dry milk powder in the bowl of an electric mixer. Whip the cream until it forms stiff peaks.
  17. Spread the whipped cream frosting over all of the cake. Decorate the sides first, then the top.  If you want to be fancy, put some of the whipping cream in a Ziploc or a piping bag and pipe rosettes or swirls around top and bottom of cake.
  18. Pat the reserved cherries dry, and then place in a pretty design on top of the cake.
  19. Grate the chocolate bar or use a vegetable peeler to make chocolate curls. Gently, and decoratively  press handfuls of the grated chocolate onto the sides of the cake.
  20. Store cake in refrigerator until an hour or so before serving.  Serve and enjoy.  (You should get about 16 generous slices from this cake.)

Thanks for stopping by my kitchen today, and I hope there is a Special Occasion coming up soon so you can make this cake.  It’s a keeper!

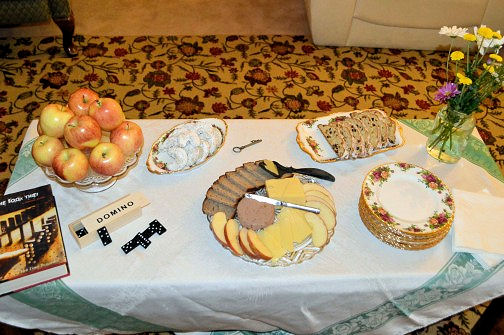
Just in case you are wondering, and in case you are reading this because you’ll also be hosting a book club meeting based upon “The Book Thief”, I also made Kipferls. Kipferls, which are significant in the book, were left by the window for people to take home (just like in the book).  I’ll posted that recipe, too, since they were soooooo good (but soooooo expensive to make, more about that later). My book club does snacks and dessert. For snacks I had a bowl of apples, German bread with cheese and liverwurst, and soft pretzels with a beer-mustard-cheese dip (no picture of the pretzels and dip) and Stollen! To drink, we had champagne, of course.  Those of you who read the book know why.

BookThief-snacks

06 Oct 2013 Espresso Rice Krispie Treats

espresso RKT bright1

As most of you know, I can’t be left in a room with a Rice Krispie Treat, or as my #1 grandson calls them, “Rice Christmas Treats”. Unfortunately, now he can’t be left alone in a room with a Rice Krispie Treat either, but it’s a problem that seems to run in the family.  His mother,  aunt and uncle can’t be left in a room with a RKT either (probably bad parenting).  We’re a Rice Krispie Treat crazed family which is odd, considering we don’t eat cereal (well, Abby eats cereal, but it’s a secret!).  I hate all boxed cereal.  Yes, I know that is a strong word, but I do.  I don’t think I have had a bowl of cereal in 40 years or more.  Yucky stuff, but stir in some processed marshmallows and a bit of butter and everything is magically transformed!

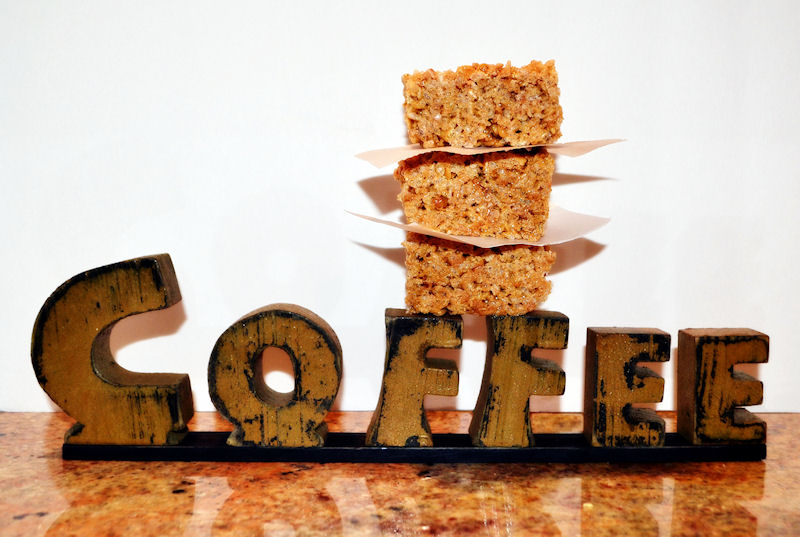
So! Now, I’ve finally found a GOOD recipe for an Espresso Rice Krispie Treats! I’ve tried some others over the years, including one epic fail using butterscotch pudding, but this one is a winner.  Where did I find it?  In the October 2013 edition of Cooking Light!  Are you shocked?  Me, too! This issue has NINE recipes for Rice Krispie Treats!  I am not inclined to make any of the other recipes, one of which is…, wait for it…, drum roll…, Maple Bacon!! Really? Really!?!  A  Maple Bacon Rice Krispie Treat?  (In Cooking Light?!) Ummm, no. But, if you do make them, you have GOT to let me know how they turned out, OK?  Are they supposed to be a breakfast food?!

Here, on In the Kitchen with Polly, I have four more recipes for Rice Krispie Treats: Salted Brown Butter Rice Krispie Treats (the all time favorite, the classic recipe made even better); Coconut Rice Krispie Treats and Chocolate-Chocolate Cherry Rice Krispie treats (which are both deeeeelicious–I don’t know which one I like better!) and Milky Way Rice Krispie Treats (which have a great taste but come in 4th place because they suffer a teeny-tiny bit in texture and are a bit, and just a bit, dense/hard… Not as ooey-gooey as the other four recipes).

This recipe calls for “toffee bits” which are Heath Bar Bits. Normally, I don’t like Heath Bar Bits because they taste a bit old and stale, but in this recipe they  complement and enhance the espresso powder perfectly (truth be told, I  made these the first time because I had half a bag of Heath Bar Bits in the refrigerator and didn’t know what to do with them).  Since then though, I’ve made these Espresso Rice Krispie Treats several times, always to rave reviews, except by #1 grandson, age: not-yet-five, who doesn’t like the coffee flavor (YET).  SCORE! More for ME! But it does mean that I have to make two batches of RKTs when I make these… 🙂

Espresso Rice Krispie Treats

  • 2-3 tablespoons butter
  • 10 oz. miniature marshmallows (check your package, you might have a 16 oz package of marshmallows and in that case, make 1 ½ times this recipe, which fits nicely in a 9″ x 13″ pan)
  • 1 tablespoon espresso powder (can be found in most grocery stores now, next to the instant coffee, gourmet stores carry it too, but at double the price)
  • 1 cup toffee bits (Heath Bar bits, the ones without the chocolate)
  • 6 cups crispy rice cereal (Rice Krispies, or one of the generic brands–which I usually use because they are so much cheaper and they work out fine)
  1. Melt the butter in a saucepan or large skillet over medium high heat.
  2. Stir in the espresso power.  Stir to blend.
  3. Lower the heat. Stir in the marshmallows. Continue cooking and stirring until the marshmallows are melted and the espresso powder has been evenly dispersed. Turn off the heat.
  4. Stir in the 6 cups of Rice Krispies and the toffee bits.  This is the only (slightly) difficult and messy part of the recipe.  Keep stirring until marshmallow mixture has been evenly distributed through the cereal.
  5. Transfer the mixture to an 11″ x 7″ pan (if you don’t have one, don’t worry, use the nearest size pan you have…or use a 9″ x 13″ pan.  In the larger pan, the squares will just be a bit thinner)
  6. Press the mixture evenly into the pan, you have to press down slightly to get the right consistency in your finished Treats.  The mixture will be sticky, and a bit hot, so use the wrapper from the butter to press the mixture down, or butter your fingertips and press down, some people wet their fingertips to do this, but I am always afraid I’ll make the top layer soggy.
  7. Let Rice Krispie Treats set and cool on counter before slicing and serving. Cut into any size or shape bars that you prefer.

That’s it!  Now you have a truly grown-up flavored Rice Krispie Treat!

Thanks for stopping by my kitchen today!

23 Feb 2013 Cold Brewed Iced Coffee (for the Yummiest Iced Lattes)
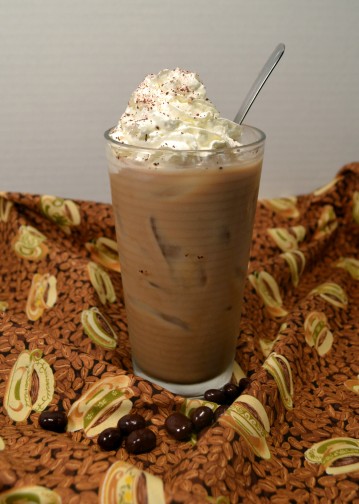
Iced Coffee with Whip

I like coffee.  I loooooove coffee.  Not that hot, black and bitter brewed coffee, but that expensive stuff brewed by the tablespoonful and mixed with steamed and foamed milk.  I have lived with an espresso machine since my ex-husband moved out.  It was a good switch. I am on my fourth one now (fourth espresso machine, not fourth ex-husband!).  Three had to be  retired (again, the three espresso machines not ex-husbands) and one  was fired for making terrible, horrible, no good, very bad lattes.  In addition to hot lattes, from spring through fall I really, really enjoy an Iced Latte in the afternoon, and, for Iced Lattes, with this recipe  no espresso machine is  required! Is there dancing in the aisles?

To make the Cold Brewed Iced Latte base, just get 12 oz of good quality coarse ground coffee beans, 7 cups of water, and a bowl that can be covered.  Are Toffee Nut Iced Coffee’s your little bit of heaven?  Not a problem. Vanilla Iced Coffee’s?  Easy peasy…

My friends and I are loading up my Minnie Winnie (small RV) and heading off to Palm Springs for the Camel & Ostrich Races and the Blessing of the Dates.  (Nooooo, I don’t know why we thought that would be a good idea!!! And no, I am not making this up, both are real events, held yearly, in Palm Springs and, from what I understand, in Arizona, too).  It’s become a tradition for us to load Iced Coffee Base (decaf)  into the Minnie Winnie when we head out.  Iced Lattes every afternoon while touring the US, what a nice way to live!  Don’t be jealous…raise your hand! You can come on the next trip!

Cold Brewed Iced Coffee Concentrate

  • 7 cups water (you could go gourmet and use bottled water…)
  • 12 oz. favorite rich coffee (coarse  or drip grind, decaf or regular)
  1. Pour the entire 12 oz of coffee into a bowl that can be covered (with a lid…or a plate)
  2. Pour the water over the coffee. Stir to make sure all grounds are saturated with water. Cover the bowl.
  3. Let the coffee and water sit, covered and undisturbed, for 24 hours.
  4. Now comes the messy part.  Strain the coffee.  I put a coffee filter in a mesh strainer, balance it on top of a pitcher, and pour cups of the mixture through the filter. The Iced Coffee base collects in the pitcher and  I throw the used coffee grinds away as I go.  You might need to use two coffee filters.  The decanting takes awhile, but it’s definitely worthwhile–messy but easy.
  5. Once all the coffee concentrate has been filtered, put a lid on the pitcher, and store it in the refrigerator for up to three weeks. (Handy Tip: write dates on the container with an erasable marker.  For example:  Made 2/13/13. Good until 3/6/13.  When the container is empty, wash the dates off!  I mark all my plastic containers with erasable markers now.  It’s so handy.)

Iced Latte

  • ¼ cup* of Cold Brewed Iced Coffee Concentrate (above)
  • ¾ cup of milk (If you want, you could experiment with the milk.  I use 1 or 2%, but I have heard of others using coconut milk, almond milk, chocolate milk, and of course soy milk. Some even like evaporated milk with a splash of sweetened condensed milk).
  • 4 or 5 ice cubes
  • Optional: sugar (white or raw), Splenda, Torano Syrup (Vanilla and Toffee Nut are favorites), Bailey’s Irish Creme, Kahlua, 1-3 Tablespoons chocolate syrup, Sprinkles (Trader Joe’s has a “Sugar, Chocolate, Coffee Bean Grinder” that’s fun), a chocolate covered espresso bean or mini chocolate chips…
  • whipped cream and a straw (I think these are musts, but some people are a bit more serious and go without!)
  1. Pour the concentrate into the glass.
  2. Add the milk and stir.
  3. Stir in any optional ingredients (sweetener or syrups)  Stir well.
  4. Plop  in some ice cubes. Stir again.
  5. Top with whipped cream, and sprinkles if you’d like (sprinkles, grated chocolate, a dusting of cocoa powder or cinnamon, or even a squirt of chocolate or caramel syrup), and, of course, a straw.

* ¼ cup of concentrate plus ¾ cup of milk seems to please most of my friends (A LOT!), but I do have one friend who doubles the coffee.  She has ½ cup concentrate and ¾ cup of milk. She’s German.  She likes strong coffee.

Thanks for stopping by my kitchen today!  You have in your hands one my favorite recipes. I hope you’ll be enjoying warm weather and iced lattes very soon!

P.S  If you’d like to get an email notifying you of the next recipe I post, please enter your email address in the box to the left. Don’t worry!  I won’t abuse your email address (I don’t know how to, for starters…) or use it for anything other than an occasional, short email notification of a new posted recipe.