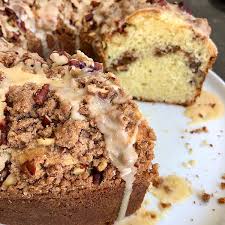
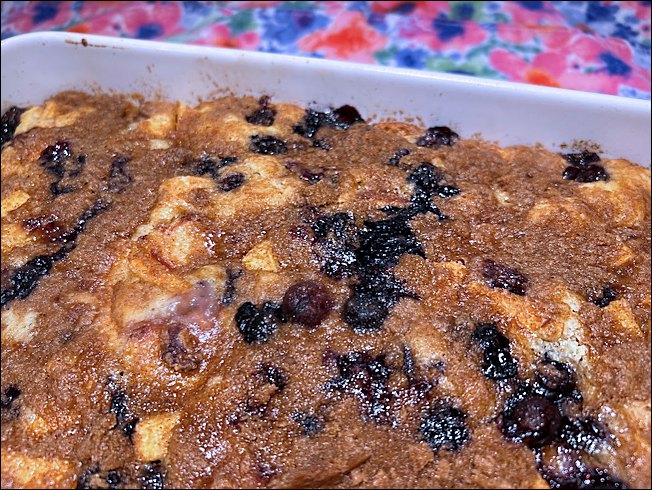
Tag-Archive for ◊ nuts ◊

29 Mar 2014 Caramel and Chocolate Covered Graham Crackers

Graham-crackers-2

It’s been a terrible, horrible, no good, very bad few days around here. We are all fine, but there was a family brouhaha that just didn’t sit right. We were all out of sorts, and, truth be told,  a bit afraid of what the future will bring, too.  So what to do? Make the all time favorite family comfort food, of course!

This recipe is rustic and quik, and it’s done in 20 minutes.  So it’s great just to start on this and put some of that pent up adrenaline to good use. But then there’s the cooling off period. Once made, these bars have to  sit in the refrigerator to harden up a bit. Again, another good thing.  A cooling off period is needed after a big family brouhaha.  Then comes the peace and contentment, sitting down with a good cup of coffee, some rustic chocolate covered graham crackers and reflecting on what went right and what went wrong, and figuring out how to right the wrongs and ultimately, bringing peace back to the family.

In August of 2005 my friends Sharon and Margie, from Lake Arrowhead Retreats, gave me a recipe for Saltine Toffee Cookies which they had found on AllRecipes.com.  Truth be told, the recipe didn’t sound very good.  Saltine crackers, brown sugar, butter, and melted chocolate?  Just say no.  But they insisted I try it.  They insisted the recipe was good.  I trusted them, they make some great food, so I tried it. It WAS good. VERY good.  Then I came to find out this recipe is sort of an Internet sensation and I might have been the last person on the planet to know about it!

Years pass, and one fine weekend, I took a chocolate making class.  The instructor of the class talked about how her mother used to make a ganache and pour it over crumbled up graham crackers as a bedtime snack for her and her siblings (I know, I know, what a Mom! I never did that for MY kids…).  Then the gears started churning.  Chocolate covered graham crackers are one of my favorite things in the whole wide world, but I had never made them.  The chocolate covered graham crackers from Starbucks are the best, but they are a bit too rich with a bit too much chocolate. OH!  The light bulb popped!  Could I make chocolate covered graham crackers for my kids, too?  I could one-up that other Mom, as well!  I could make chocolate covered graham crackers and with caramel!  Never mind that she was using a fancy ganache and I was just melting giant chocolate bars, LOL! What if I use the Saltine Toffee Cookie recipe but substitute graham crackers for the saltine crackers.  What if???

So I did it.  Many times.  My son says these are the best things I make. The last tin I made, hidden in the refrigerator behind the lettuce, lasted only three days.

Turns out, I am not the first person to think of this!  Lots of people on the Internet have used graham crackers instead of saltines with this recipe. Again, why am I one of the last people on the planet to know about this?! 🙂 Anyway, here’s my recipe.  You can find lots of versions all over, but this is the one that works for me.  Keep these Caramel Chocolate Covered Graham Crackers refrigerated, when they are not being eaten…  If these cookies sit out too long at room temperature the graham cracker starts to soften and loose it’s crunch 🙁 My 2005 copy of this recipe (with saltines rather than graham crackers) specifies that the recipe makes 35 servings. ROFLMAO!!! That’s so funny 🙂

Caramel and Chocolate Covered Graham Crackers

  • approx. 2/3 a box of graham crackers (two wax covered packages out of a box of 3 packages)
  • 1 cup butter
  • 1 cup dark brown sugar
  • 1 large sized (4 or 5 oz) chocolate bar, chopped (I like a Symphony Bar or a Cadbury Bar, if you like dark chocolate, the Hershey’s Special Dark Bar is good)
  • ¾ cup chopped nuts (if you like nuts.  I have never added nuts) OR, if it’s December, crushed candy canes! (I loooove this option!)
  1. Preheat oven to 400 degrees.
  2. Line a rimmed cookie sheet with graham crackers.  Place the graham crackers as close together as possible. You will need most of 2 waxed covered packages. Set tray aside.
  3. In a medium saucepan, combine butter and sugar and stir constantly, over medium heat, until sugar is melted.
  4. Raise heat slightly, to bring mixture to a boil.  Boil vigorously for 3 minutes, without stirring–shaking the pan occasionally is OK (the original directions said to “stir constantly” but I have found this to make a grainy caramel layer).
  5. Immediately pour caramel over graham crackers.  Use an offset spatula to quickly spread the caramel evenly over the crackers.
  6. Place tray in hot oven and bake for 5 minutes.
  7. Remove tray from oven and sprinkled chopped chocolate evenly over top.  Let chocolate just sit on top of caramel for 5 minutes.
  8. Spread the now melted chocolate evenly over the caramel.  Sprinkle with nuts (if using).
  9. Let tray sit until chocolate has hardened.  This make take a few hours.  To speed things up, put the tray in the refrigerator for about 15-20 minutes.
  10. When chocolate is set, break bars into uneven pieces. Sneak a piece or two.  Serve or cover and hide in refrigerator until needed.

Thanks for stopping by my kitchen today!  If there is a brouhaha in your family, I hope it’s over quickly and sweetly!

08 Mar 2014 Kipferls (Vanilla Hazelnut Butter Cookies)

kipferl2

I had never, ever heard of Kipferls before.  Then, in two weeks they came into my life twice!  First, my friend Priscilla made some in the Culinary School Pastry Arts program she is enrolled in. I didn’t try one because I don’t like nuts.  I dislike nuts so much that the name of the cookie didn’t even register.  Then I read “The Book Thief” and Kipferls are important in one chapter.  Since I was hosting book club this month and since the author had contributed his mother’s recipe for Kipferls to “The Book Club Cookbook” that my friend Kayte  gave me for my birthday last year, I decided to make the cookie. I had to do a Google image search to see what they looked like! Then came the hunt for Hazelnut Flour.  It’s out there. I found it at Sprouts.  I was shocked by the price.  I told the cashier that there must have been a mistake.  She said she doubted it.  I asked her to call for a manager for a price check.  YEP.  She was right.  There was no mistake.  It’s $16.95 for a 14 oz. packet of Hazelnut Flour (aka Hazelnut Meal). After creating such a fuss, and with my book club in less than seven hours, I bought the dangblasted expensive and pitifully small bag of Hazelnut Flour. BTW, you don’t have to buy this flour to make these cookies.

How to avoid using expensive Hazelnut Flour:

1. Make your own.  Preheat oven to 350°F. Place 6 ounces (1 1/4 cups) of shelled hazelnuts on a baking sheet in a single layer. Bake 8–10 minutes, stirring occasionally until the hazelnuts are fragrant and brown. Remove the nuts from the  oven and let cool slightly. While still warm, though, fold the nuts inside a clean kitchen towel and rub vigorously to remove their skins. Place skinned nuts in a food processor fitted with the stainless-steel blade, and process until they are finely ground.

2. Substitute Almond Flour or Almond Meal for the Hazelnut Flour.  Almond Meal is about one-third the price of Hazelnut flour.  My German friend Karin said she always makes her Kipferls with Almond Meal, but her German relatives grind their own nuts.

To continue with my saga…Upon returning home with my $16.95 package of Hazelnut Flour, I got out the recipe and got started.  No! Two vanilla beans?  TWO?  For 36 cookies?  It is now clear to me that I am making World’s Most Expensive Cookie and I am thinking these better be good.  (They were, thank goodness. So good I might have to make them again, and again, and again…)

This recipe is based upon Markus Zusak’s recipe for Kipferls as published in The Book Club Cookbook.  I made some changes to the method and to the ingredients.  Mr. Zusak’s mother mixed her dough by hand, I tried it for a bit, then resorted to my electric mixer.  I split the use of the vanilla beans, putting one in the cookie and one in the powdered sugar, Mr. Zusak put both in the powdered sugar. I had to quadruple the amount of powdered sugar to cover all the cookies, and I covered the cookies with the powdered sugar while the cookies were still warm* so get a crackly, almost melted sugar coating on the cookies. (*Let the cookies cool a little, to firm up a bit.  If you toss hot cookies in powdered sugar, the cookie will break.)

Kipferls

Crisp German Vanilla Hazelnut Butter Cookies

For the cookies

  • 1 ¾ cups all-purpose flour
  • 1 ¼ cups Hazelnut Flour or Hazelnut Meal or alternative (see above)
  • 2/3 cup granulated sugar
  • 14 tablespoons (1 ¾ sticks) butter, at room temperature
  • 1 whole vanilla bean, split in half, and insides scraped off with a knife.  Discard the outside of the vanilla bean

For the vanilla sugar

  • 1 1/3 cup powdered sugar
  • 1 whole vanilla bean, cut crosswise into 1-inch pieces (different preparation than above)
  1. Make the vanilla sugar first.  Place the powdered sugar with the chopped up vanilla bean in the bowl of a food processor fitted with a metal blade.  Process until the vanilla bean has been incorporated into the powdered sugar, several 10 second bursts.  Place a fine meshed sifter over a small bowl and sift the powdered sugar to remove the unblended pieces of vanilla bean.  Pour vanilla sugar into a large Ziploc bag. Set aside.
  2. Preheat oven to 350°F. Spray two baking sheets lightly with cooking spray or line with parchment paper.
  3. Combine all purpose flour, hazelnut flour/meal, and granulated sugar in a large bowl. Cut butter into 1/2-inch pieces and add to flour mixture. Scrape the inside out of the split vanilla bean and add to bowl.  With an electric mixer, mix dough for 3-4 minutes or until a soft dough is formed.
  4. Pinch off small pieces of dough (1 T; 1/2 oz; 15 grams) and mold gently between your palms to form 3-inch ropes, thicker in the middle and tapered at the ends.   This took a bit of doing to master.  I rolled the dough to the length of my three middle fingers.  I rolled the dough a bit more firmly with my ring and index finger so the ends of the dough would be thinner. Fashion each piece of rolled dough into a crescent shape and place onto the prepared trays, see picture above.
  5. Bake in preheated 350º oven for 15-20 minutes or just until the cookies are beginning to turn brown.  Mr. Kusak says that once the Kipferls are brown, they are over cooked.
  6. Remove cookies from oven.  Cool just slightly and then toss into the Ziploc bag with the vanilla sugar–tossing the cookies while they are still hot creates a slightly melted-on, and truly special coating.  Toss  cookies in vanilla sugar.
  7. Remove cookie to a cooling tray and repeat with remaining cookies and vanilla sugar.  If you have vanilla sugar left over, you can re-coat the cookies.
  8. Let cool completely before eating. The cookies will crisp up as they cool.

 Yield: About 3 ½ dozen cookies

Kipferls1

I hope you enjoy the World’s Most Expensive Cookie!  They ARE good and worth the cost and the effort. Thanks for stopping by my kitchen today!

PS…I am making another batch of these cookies to take to a Tahoe retreat this weekend.  One bag of that dangblasted expensive Hazelnut Flour does make three batches of these cookies…AND, Costco sells vanilla beans now.  Note my friend Sally’s point, put the vanilla beans in the powdered sugar as soon as you get them.  Once you are ready to make the cookies, remove the beans and use as outlined above.  The benefit is that some of the essence of the vanilla beans will have soaked into the sugar…yummmmm.

07 Dec 2012 Peanut Brittle

Three years ago, maybe four, I made some peanut brittle for some end-of-the-year gifts for my children’s teachers and coaches.  No problem.  Two months ago I made some peanut brittle as samples for a craft fair.  No problem.  Two days before the craft fair I made two batches of peanut brittle.  LOTS of problems. Both batches were big flops.   Crisis!  I needed some peanut brittle to sell, I needed it fast, and I needed it to be fabulous.

Thank goodness for the Internet!  I spent a few hours reading everything I could about making peanut brittle.  I took notes.  I highlighted.  I found sites that swore microwaved peanut brittle was the way to go.  I was all for it, but as (my) luck would have it, my microwave died the same day as the peanut brittle flopped.  (Where is my guardian angel!?)   I abandoned my old recipe, and went with a recipe that seemed to have the best chance of success (and that I could cook the “old fashioned” way, on the top of the stove), a twenty year old recipe from Bon Apetite, found on Epicurious.com.

I got out my heaviest pans. I hooked up my candy thermometer.   I also hooked up my instant read thermometer.   I put on my lucky apron.  I banished the grandchildren from the kitchen. I put on Christmas music. I was going to be double extra careful.  This was do or die day. I had to get two batches of really good peanut brittle into the cute boxes with the cute bows and the cute tags ASAP.

It worked.  PHEW.  I am glad to share with you the winning recipe, with all the hints and tips.  Good Luck!  As long as you don’t make this on an especially wet/humid day–and follow these direction and all my hints and tips–you should be OK.  But please note, this is important, the times are approximate.  I have a very powerful gas range, and I am an aggressive cook, so the times noted are the ones that worked for me.  If  you have an electric stove and/or are a cautious cook, your times might be twice as long.  Trust your candy thermometer (and your back up thermometer)  and pay attention to color.

One batch of this will make about 3 ½ lbs of peanut brittle.  That’s a lot of peanut brittle. I made two batches and was able to put 7 lbs of peanut brittle up for sale, to benefit my favorite organization, Dining For Women, YAY!

Totally Nuts Peanut Brittle

  • 3 cups sugar
  • 2 cups water
  • 1 ½ teaspoons salt
  • ¾ cup light corn syrup
  • ¾ cup dark corn syrup
  • 3-4 cups salted cocktail peanuts (whole or coarsely chopped–I left mine whole)
  • 2 tablespoons butter
  • 1 tablespoon baking soda
  • 1 teaspoon vanilla
  1. Stir the sugar, water, light and dark corn syrup, and salt together in a large saucepan over medium heat until sugar dissolves.  (TIPS:  Use a really large, heavy pan (mixture will foam up, a lot, in the last step).  I used a five quart stock pot.  The dark corn syrup is for color.  You can use all light corn syrup if you want. The sugar isn’t be dissolved until you can see the bottom of the pan.)
  2. Take your spoon out of the mixture and leave it out for this entire step.  Clip your candy thermometer to the edge of the pan.  Be sure the tip of the thermometer is not touching the bottom of the pan. Increase the heat to high, and BOIL the mixture, without stirring, until the candy thermometer registers 280 degrees F, about 40 minutes. (TIPS:  The mixture will stay at 220 degrees for about 30-40 minutes, don’t worry about it, your thermometer is not broken.  The temperature will go up a bit faster after passing the 220 degree F. mark.  To reassure yourself, use a second thermometer, if you have one.)
  3. Preheat your oven to 225 degrees.  Put two (or three) large rimmed cookie trays into the oven to warm.  Just before your mixture reaches the 295 degree mark (next step) take the pans out of the oven and lightly grease with a bit of butter.
  4. Pour the nuts and the butter into the boiling mixture (this will cause a temperature drop).  Use your spoon now, and keep your eye on the thermometer/s.  Stir the mixture constantly until it reaches 295 degrees F., about 15 minutes.  (TIPS:  I prefer to use 3 cups of nuts, because I like more brittle than nuts, 4 cups of nuts makes a very nutty brittle.  Watch the color, you want that deep rich amber color.  One or two degrees over 295 will be fine–if you work quickly in the next step, but don’t go much higher than that.  The temperature will move fast now, and you could easily burn a batch! On the other hand, under no circumstances should you stop cooking before reaching 295 degrees–or you’ll have “Peanut Bendy and Sticky” instead of “Peanut Brittle”.)
  5. Yell for help. A child should not answer this call.
  6. Remove the pan from heat.  Stir in baking soda and vanilla and stir briskly.  Mixture will foam up.  Keep stirring. (TIPS: This is why you used a large pan. If you didn’t use a large pan your mixture might bubble out of the pan and onto the counter.  This is not a good thing. Under no circumstances should you touch the hot, Hot HOT mixture.)
  7. Being very careful and using your best hot mitts to protect your hands and arms, immediately pour mixture onto the warm and greased cookie trays.  If anyone answered your call for help have them spread the peanut brittle as thinly as possible across the trays. (TIPS: Do not get burned.  Do not burn your helper.  Banish all pets and children from the area. Do not touch the pan. Do not touch the peanut brittle.)
  8. Put the pans of peanut brittle in the warm oven for 2-3 minutes. This should help the peanut brittle spread evenly over the bottom of the pans.
  9. Remove pans from oven and let sit until cold and hard.
  10. Break brittle into pieces and store in airtight containers at room temperature for a month or more.
  11. Pat yourself on your back for a job well done.
That’s IT!  I hope this recipe helps you make the most delicious Peanut Brittle ever!
Thanks for stopping by my kitchen today!

04 Jun 2011 Frozen Bananas

Such an easy recipe, and one you’ll probably use all summer long, assuming the weather gets better.  June 4th here in San Jose, and it rained all day!  Unbelievable, but we ate frozen bananas for dessert anyway!  They were a hit.  I only wish we had waited 5 minutes for the bananas to soften a bit before we tore into them.  You can see the frost on the bananas in these pictures!  On hot days you won’t have to wait so long…

I’ve been making frozen bananas for a decade or so, and have decided that Hershey’s Special Dark is the best chocolate to compliment the taste of the banana (odd, since I am usually a milk chocolate devotee). There are a variety of toppings the chocolate covered banana can be rolled in.  The most popular, in my experience, are toasted coconut, chopped peanuts, and rainbow jimmies.  Other options include leaving them plain (for the boring people in your crowd!) chopped peanut butter chips, mini M&M’s, cookie crumbs, granola, and any kids cereal.  IMHO, bananas+cereal+bit of chocolate= a special summer breakfast.  I think your kids might nominate you for mom/pop-of-the-year, if you agreed with me!  Just think; frozen bananas as a special treat for a summer birthday (or for a summer half birthday for winter birthday kids–as all my kids were), or for the first day of summer vacation, or to celebrate the summer solstice…

Frozen Bananas

Quantities are approximate, as size of bananas varies widely.  If you end up with extra bananas, and not enough chocolate, just keep the extra bananas in the freezer until you are ready to make smoothies or banana bread.

  • 3-4 perfect bananas (not over-ripe and not green, no bruises or black spots)
  • 6 or 8 Popsicle sticks (if you don’t have Popsicle sticks craft sticks, lollipop sticks, chopsticks, or even the tops of plastic Popsicle molds can be used)
  • 2  4.25 oz. bars Hershey’s Special Dark chocolate (don’t substitute chocolate chips…if you do, you’ll have to add a few tablespoons of Crisco to help them melt…, and I think that’s yucky)
  • assorted toppings (rainbow jimmies, chopped peanuts or other nuts, mini M&M’s, chopped peanut butter chips, toasted coconut, granola, cereal…)
  1. Peel the bananas and remove any banana strings.  Inspect the bananas carefully and cut off any bruises or soft parts.  Cut the good bananas in half, and insert a stick into the flat, cut end, of each banana.  Place skewered bananas on a pan/plate/tray that will fit into your freezer and open freeze for an hour or so (or even overnight).
  2. Set out chosen toppings in shallow bowls or on pieces of wax paper or foil.
  3. Break chocolate into squares, place into good quality microwave safe bowl, and melt chocolate in microwave on 50% power for about 2 or 3 minutes.
  4. While chocolate is melting remove frozen bananas from freezer.
  5. Dip frozen banana into warm melted chocolate and, with a knife,  QUICKLY spread chocolate all over the banana.  Before chocolate hardens–work quickly–dip and roll banana in chosen topping.  Repeat with remaining bananas.
  6. Refreeze chocolate covered bananas for about 30 minutes or so.
  7. Remove bananas from freezer, place in a covered container or Ziploc bag, and return to freezer until ready to eat.  Frozen bananas keep well, or at least for a few weeks (I haven’t had any in the freezer for longer than 2 weeks…)

Thank for stopping by my kitchen today.  See you tomorrow!!